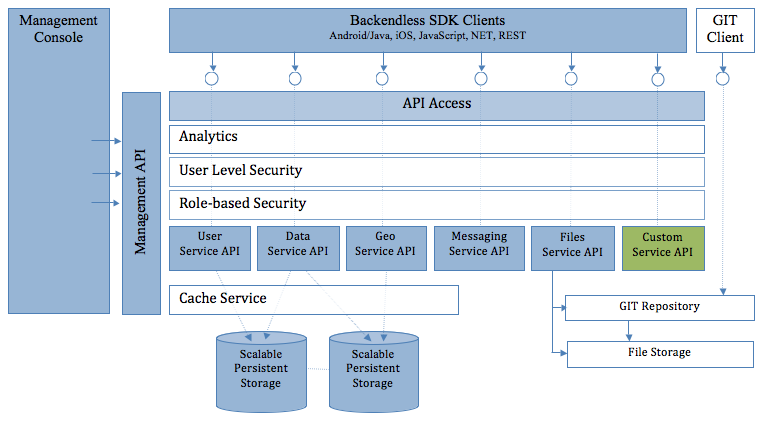
Social Settings
Backendless provides support for logging in users with Facebook or Twitter credentials. Once logged in, Backendless creates a registered user in its internal user storage and links the Backendless user account with his external social account (see the "socialAccount" column in the Users table on the Data screen). To enable social login, a Backendless backend must be configured with API keys.
Login with Twitter Setup
This configuration is available on the Manage > App Settings screen of the Backendless Console:
To obtain your Twitter Consumer key and secret:
- In a browser, navigate to https://developer.twitter.com/en/apps and sign in with your Twitter account.
- Click "Create New App":
- Enter application name and description.
-
For the Website field use the following value:
https://api.backendless.com
-
For the Callback URLs field use the values shown below, where
YOUR-APP-ID
andREST-API-KEY
are the values assigned to your Backendless app.
https://api.backendless.com/YOUR-APP-ID/REST-API-KEY/users/social/oauth/twitter/request_url https://api.backendless.com/YOUR-APP-ID/REST-API-KEY/users/social/twitter/authorize
-
Once the application is created, click the Keys and tokens tab and copy Twitter API key and secret values to the corresponding fields in Backendless console. You can find these fields when you login to your app in Backendless Console, click the Manage icon and scroll down to the Social Settings section. The fields are Twitter Consumer key and Twitter Consumer secret fields:
- This completes the configuration setup. The Backendless backend is now ready to handle Twitter authentication. The steps below demonstrate how Login with Twitter can be tested:
- Run the following command in a terminal window (if you do not have access to the
curl
command, a similar request can be created using any REST plugin for Google Chrome). The request performs the Twitter login operation. Once the login is successful, user's account will also be created in the Backendless internal storage. This is the same request which Backendless SDK sends when using theloginWithTwitter
method. Notice the "fieldsMapping
" parameter - it specified how Twitter user properties will be mapped to Backendless user properties. In this example, Twitter's "userId
" property will be presented as "twitterUserIdInBackendless
" in the Backendless system. Similarly, Twitter's "screenName
" will be saved as "'twitterUserIdInBackendless".
Also, make sure to replaceYOUR_APP_ID
andREST_API_KEY
with the specific values for your Backendless backend.curl -H Content-Type:application/json -X POST -d'{"fieldsMapping":{"userId":"twitterUserIdInBackendless", "screenName":"twitterScreenNameInBackendless"}, "redirect":true}' -v http://api.backendless.com/YOUR_APP_ID/REST_API_KEY/users/social/oauth/twitter/request_url
- Once you run the command, look for the Location header in the response.
- Copy the value of the header and paste it into a web browser and authorize the app. This is the same thing that happens when you use Backendless SDK. The implementation opens a page which requests the user to authorize access:
Login with Facebook Setup
This configuration is available on the Manage > App Settings screen of the Backendless Console:
To obtain your Facebook App ID/API Key and App Secret:
- Open https://developers.facebook.com/
- Select an application or create one using the "My Apps" dropdown in the upper right corner.
- Make sure the application is public and available to all users as indicated by the green dot next to the application name:
- Locate the App ID and App Secret in the Settings section and copy the values into the corresponding fields in the Backendless Console (Manage > App Settings > Social Settings).
- IMPORTANT: For the Backendless' "Easy Facebook Login" option make sure to make the following changes:
- Click Settings on your Facebook application page.
- Enter
api.backendless.com
into the App Domains field. - Make sure the Contact Email field contains a valid email address.
- If the Website platform is not added, click + Add Platform and select Website.
- Enter
https://api.backendless.com
as the Site URL.
After you make the changes described above, the Settings section should look as shown below: - Click Save Changes.
- Click the Advanced tab on the Settings section.
- Scroll down to the Client OAth Settings block and enter
https://api.backendless.com
into the Valid OAth redirect URIs field - Scroll to the bottom of the page and click Save Changes.