Importing Data to Backendless
Importing data into a Backendless backend can be done either with the Backendless console or using the Management REST API. The import feature can process the following types of data:
- Application Settings - includes application configuration, which includes email configuration, mobile and social settings, development team setup, external hosts and git config. Must be a valid JSON file.
- Data Tables - includes schema definition, column types (optional), data objects and relations between the objects. Must be a
.csvfile. - Compressed ZIP Files - the ZIP file must contain at least one
.csvdata table which will be imported into Backendless. - Firebase Users - import data of your Firebase users into the Backendless. Use the
.csvdata table format for import.
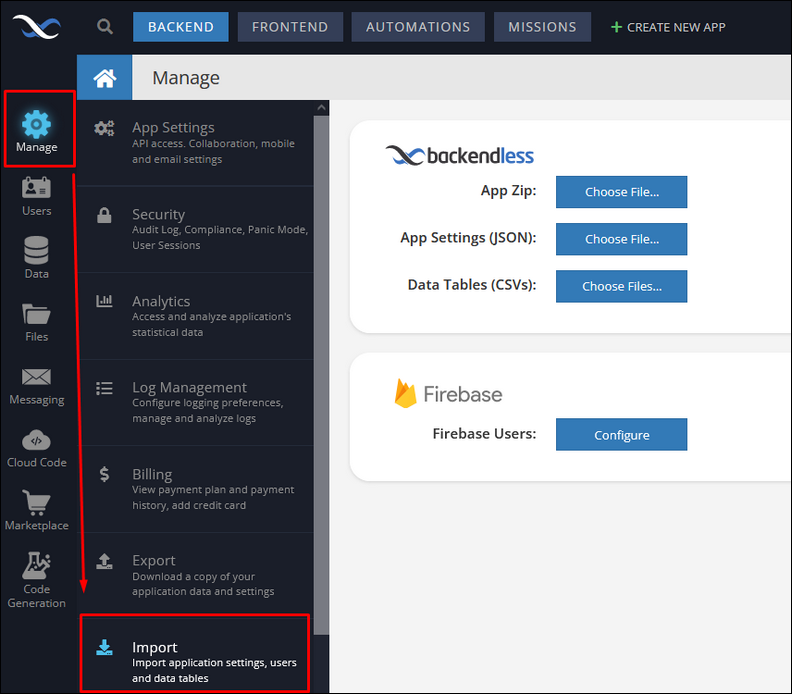
The import feature is available in Backendless console under Manage > Import:
Importing ZIP Files
The App Zip section expects compressed ZIP files (.zip file extension) containing .csv data tables that get imported into Backendless.
Importing Application Settings
The App Settings section accepts a file in the JSON format. The best way to become familiar with the file format is to run Export for an application and see the structure of the settings.json file.
Importing into Data Service
This section accepts one or more files in the JSON or the CSV formats. Each file corresponds to a single table. If the table does not exist, it will be created with the same name as the name of the file. A file may either contain only schema definition (columns and their types) or both schema definition and the objects. Consider a file called Product.csv with the following data:
| price |
productName |
|---|---|
| 599 |
iPhone |
| 899 |
Surface Pro |
| 399 |
XBOX One |
| 1200 |
MacBook |
price,productName
599,iPhone
899,Surface Pro
399,XBOX One
1200,MacBook
To import the data into the application click the add file button next to Data Service and locate the file. Notice that the first line in the file contains the names of the columns and there is no additional information about the column types. As a result, when you click the Import button, Backendless console shows the following screen for each CSV file:
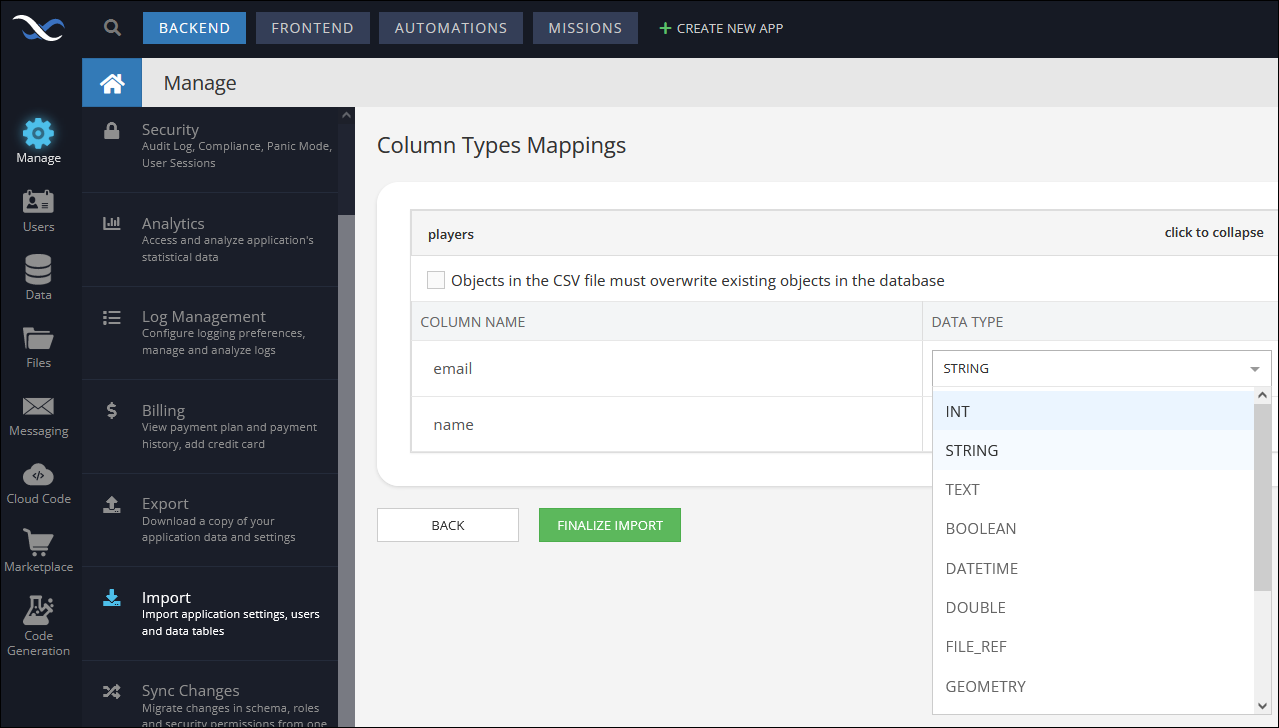
The user interface lets you select a data type for each column. If more than one CSV file is imported, a similar form is displayed for each file. Once the types have been selected, click the Finalize Import button. Backendless processes data import as an independent, asynchronous task. Depending on the size of the imported data, it may take some time for the import to complete. Once it is finished, Backendless sends an email with the import status/log to the email address associated with the application.
For the file shown above, the imported data in Backendless will appear in the Data section of the console:
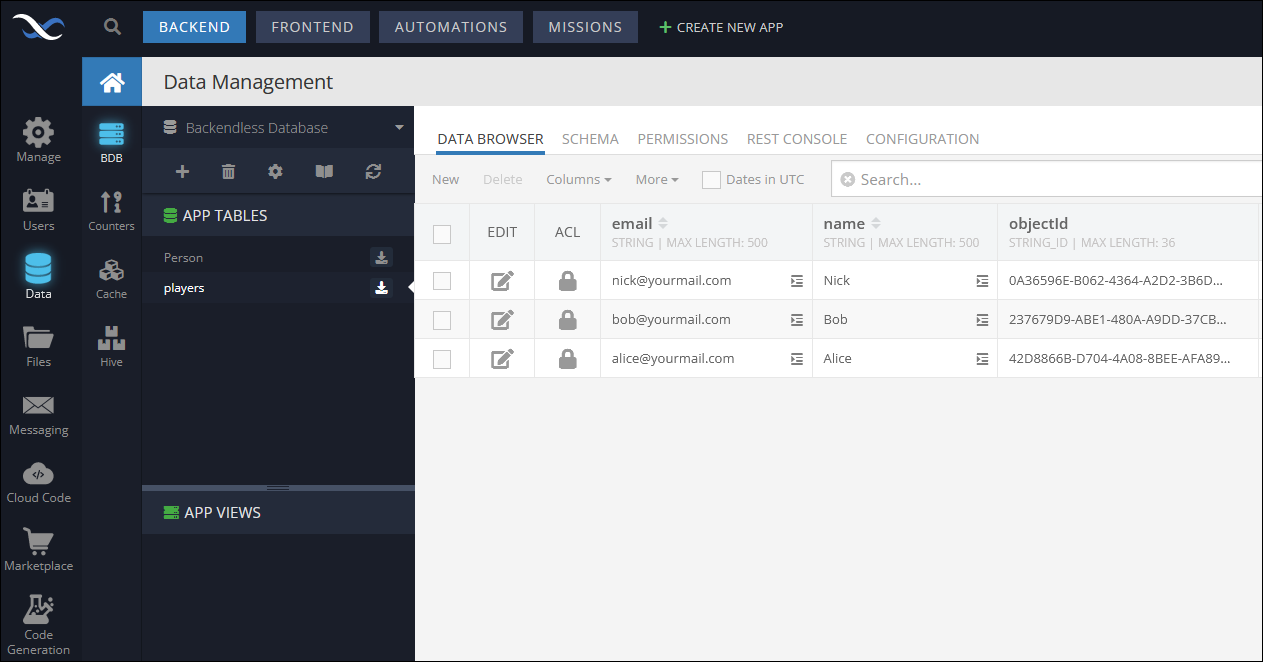
Notice that Backendless added the objectId column with unique values assigned to each record and also added the created and updated columns. It is also possible for your objects/records to use custom IDs. The column name must be called objectId and it must contain unique values. For example:
| price |
productName |
objectId |
|---|---|---|
| 599 |
iPhone |
1 |
| 899 |
Surface Pro |
2 |
| 399 |
XBOX One |
3 |
| 1200 |
MacBook |
4 |
price,productName,objectId
599,iPhone,1
899,Surface Pro,2
399,XBOX One,3
1200,MacBook,4
Importing Firebase Users
The Firebase Users section exepcts a .csv data table exported from the Google Firebase. For more information about exporting user data from the Firebase and hash configurations, refer to the official documentation.
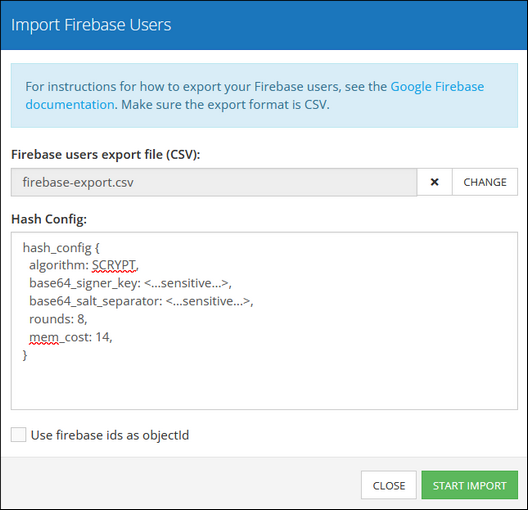
When clicking the Configure button, the corresponding menu will prompt you to select the destination folder where the .csv file is stored in your computer, You must also paste the hash configuration into the Hash Config field to process password hashes of the imported users:
Data Types
Backendless supports a special format for the header row with column names and data types. The format for defining the data type for a column in the header row is:
columnName(type)
where type can be any of the values presented in the table below.
Note that data types with an asterisk symbol (*) in their name require a different declaration approach in the header row. For more details, refer to the Declaration Convention in the description below.
Not Null (NN)- Specifies that a column must contain a value and cannot be left empty.
For example, the following header row declares columns and pre-assigns data types to them:
"objectId(STRING_ID)", "name(STRING)", "price(INT)", "desc(TEXT)","date(DATETIME)","discounted(BOOLEAN)", "my_choice({"type":"STRING","dynamicProps":{"localData":{"type":"MULTIPLE_CHOICE"}}})"
When the types are specified, Backendless still shows the second step of the data import - the screen where the developer can adjust the data types for the columns.
ObjectId Value As Number
When working with data tables, the values stored in the objectId column are usually of the alphanumerical type such as: 0F197BBA-A717-4D28-9D14-25CA82545123. These alphanumerical identifiers are added to every new object in the table and cannot be changed to another format.
However, when importing a new file containing a data table, the objectId column can have unique identifiers of the number type such as: 885715632. This scenario works only when a new data table is imported from a file, hence the file must contain unique identifiers(objectId values) of the number type. For example, below is a sample data table called Players containing objectId values as numbers:

Suppose you need to import the data table presented above. Upon successful import, your data will look as following:
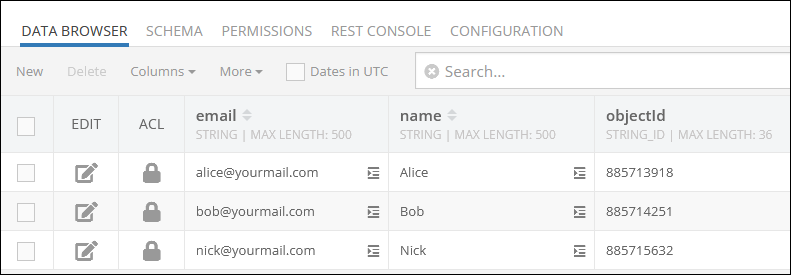
As you can see, the objectId column contains unique identifiers but of the different format. The imported data in the objectId column is stored in the Backendless as values of the STRING_ID data type.
Relations
Backendless can import related objects and reconstruct relations between them. The system uses a special naming convention for the columns representing relations. There are two types of relations supported by the system: one-to-one and one-to-many.
One-to-one Relations
For one-to-one relations. the column must be defined in the "parent" file - the file containing objects/records which reference other related entities. For instance, suppose there are two files in the import - Order and Customer. The "order" records contain a column referencing a "customer" record. In this case, Order.csv would contain a column which references related objects from Customer.csv. The value of a reference must be the objectId value of the related record.
The format of the column name defining a relation is significant. It includes column name, name of the file containing related entities and a special marker designating the column as a relation. The general format of the column name is:
columnName__Filename__bcklsFK__ONE_TO_ONE
Using the same example of Order and Customer, the files would look as shown below:
Order.csv:
| objectId |
name |
customer__Customer__bcklsFK__ONE_TO_ONE |
|---|---|---|
| 1 |
Office Supplies |
1 |
| 2 |
Catering |
2 |
objectId,name,customer__Customer__bcklsFK__ONE_TO_ONE
1,Office Supplies,1
2,Catering,2
Customer.csv:
| objectId |
name |
|---|---|
| 1 |
AcmeFoo Corp |
| 2 |
AcmeBar Corp |
objectId,name
1,AcmeFoo Corp
2,AcmeBar Corp
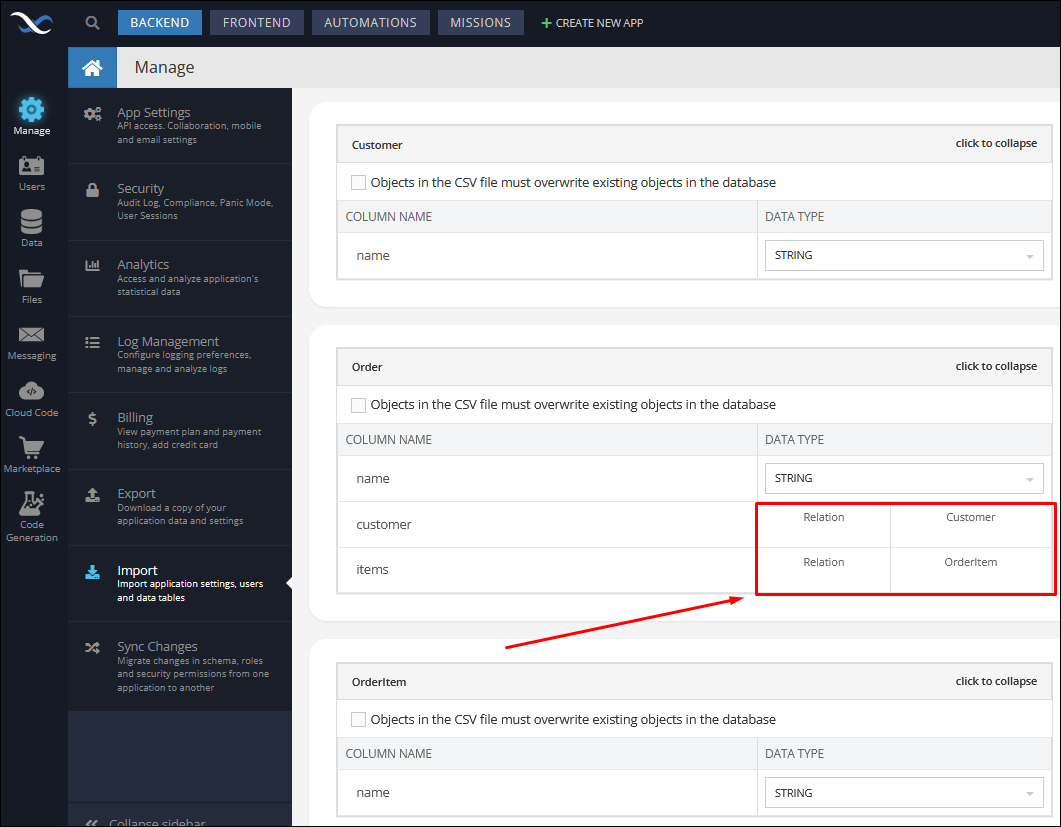
When importing files with related records, Backendless recognizes relations and displays them accordingly on the second step of the data import - the screen where the column types can be set or adjusted. Notice how the relation displays for the sample data shown above:
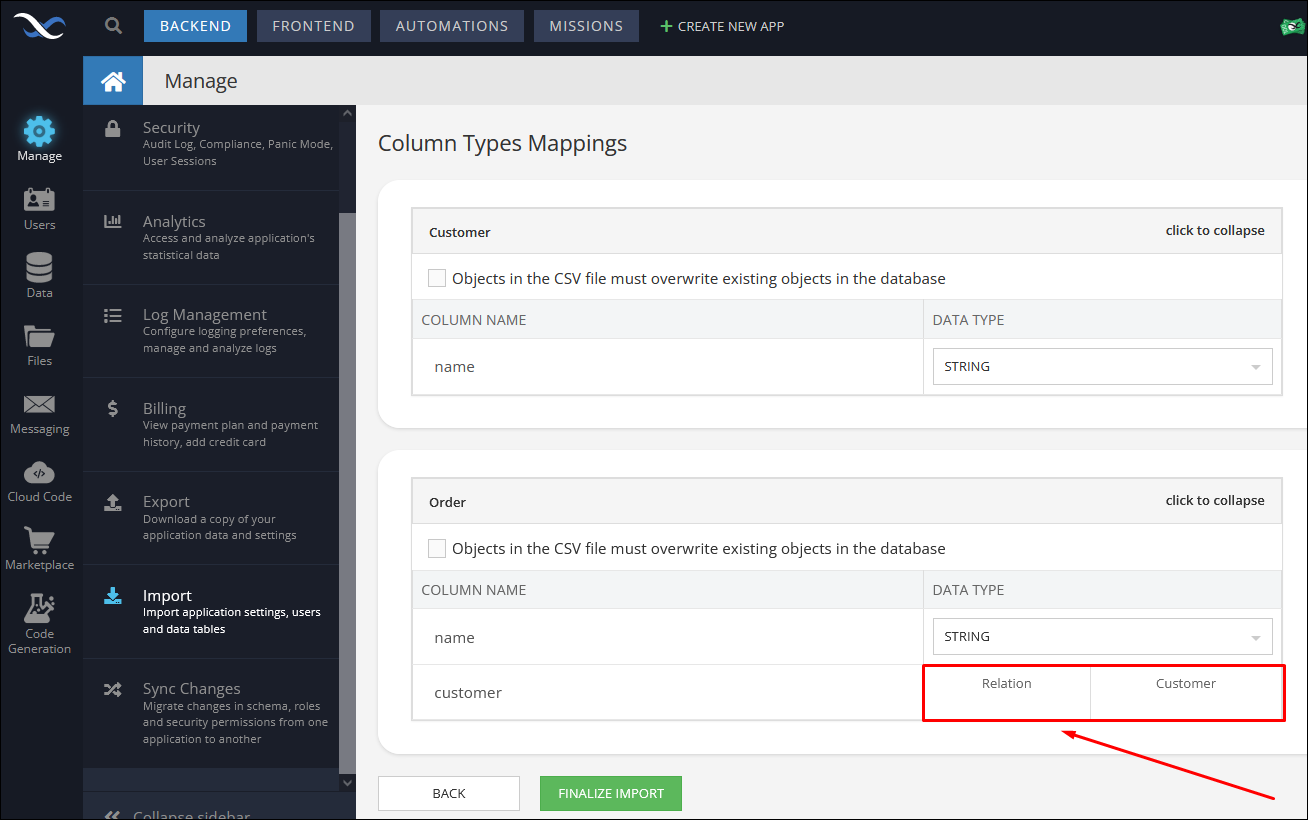
Once the import is complete, the Data browser automatically displays all relations as links:

One-to-many Relations
One-to-many relations differ from one-to-one in a way that the relationship column is defined at the child level. For example, consider a scenario where an Order object contains a collection of OrderItem objects. In this case, the relation column must be defined in the OrderItem.csv file. Each OrderItem record contains a value of objectId of the Order record it belongs to.
The format of the column name defining a one-to-many relation consists of column name (in the parent object), name of the file containing parent entities and a special marker designating the column as a relation. The general format of the column name is:
columnName__Filename__bcklsFK__ONE_TO_MANY
Extending the example of Order and Customer shown above with the OrderItem.csv file:
Order.csv:
| objectId |
name |
customer__Customer__bcklsFK__ONE_TO_ONE |
|---|---|---|
| 1 |
Office Supplies |
1 |
| 2 |
Catering |
2 |
Customer.csv:
| objectId |
name |
|---|---|
| 1 |
AcmeFoo Corp |
| 2 |
AcmeBar Corp |
OrderItem.csv:
| objectId |
name |
items__Order__bcklsFK__ONE_TO_MANY |
|---|---|---|
| 1 |
Pen |
1 |
| 2 |
Pencil |
1 |
| 3 |
Sandwich |
2 |
| 4 |
Juice |
2 |
objectId,name,items__Order__bcklsFK__ONE_TO_MANY
1,Pen,1
2,Pencil,1
3,Sandwich,2
4,Juice,2
When importing the files, notice how Backendless recognizes and confirms the relations in the second step of data import:
