Using Camera
Introduction
In this chapter, we're going to dive into how you can integrate camera functionality into your application. This feature is incredibly useful when your app requires users to capture images - be it for profile pictures, uploading documents, or just sharing moments.
Integrating the camera involves a simple yet important process that ensures a seamless user experience. Here’s what you need to know:
- Requesting Permission: First things first, your app needs to ask for the user's permission to access the camera. This is a critical step for respecting user privacy and adhering to platform guidelines. This step can be accomplished with a simple Codeless block.
- Opening the Camera App: Once permission is granted, the next step is to launch the camera. This can be done in a way that's most suitable for your app's needs.
When a user takes a picture, there are several options for what happens next. The image can be displayed within the app for a quick preview, or it could be sent to a server for storage and further processing. The beauty of UI Builder is that you have full control over these options.
Now, let's talk about the user experience when activating the camera. When you integrate a button in your app to open the camera, you can provide the following options:
- Camera or Gallery Choice: Users can choose whether to snap a new picture using the camera or pick an existing one from their gallery. This flexibility is great for enhancing user convenience.
- Back Camera Default: The camera app can be set to automatically start with the back camera. This is the standard setting for general photography.
- Front Camera (Selfie Mode) Default: Alternatively, the camera can start in the front-facing 'selfie' mode. This is particularly useful for apps centered around user profiles or social interactions.
Throughout this chapter, we'll guide you step-by-step on how to implement these features, ensuring your app provides a smooth and user-friendly camera experience. Let’s get started!
Requesting Camera Permissions
To ensure your app functions smoothly and respects user privacy, it's crucial to request permission to use the camera. UI Builder makes this process straightforward with its Codeless programming interface. Let's explore how to implement this.
Using the Codeless Block
To initiate the camera permission request, you will use a specific Codeless block designed for this purpose. The logic below requests a permission to use the device's camera and checks if the permission is granted:

Here’s how to find and use the block:
- Locate the "Get Camera Permission" Block: This block is located in the Native section of the Codeless toolbar.
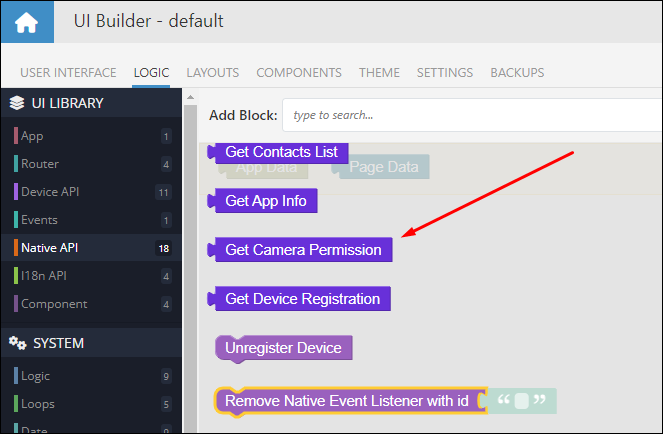
- Running the Block: When you run this block for the first time, it triggers a permission request pop-up on the user's device. This pop-up is a standard system dialog that asks the user to allow your app to access the camera. You can use the block multiple times in your app. The system will remember user's decision for every run of the app. If the user denied the permission, the popup will not be displayed in the subsequent runs.
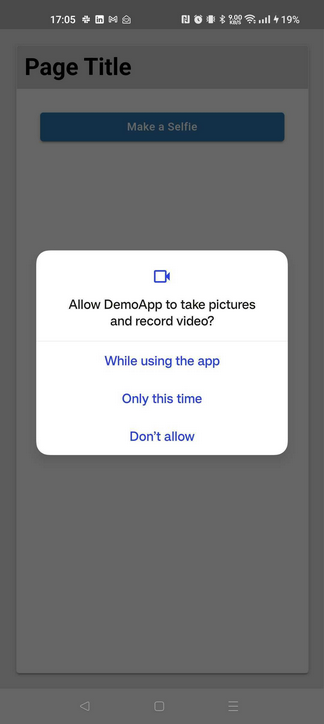
Note: The appearance and intent of this pop-up will be somewhat similar across different platforms, such as Android and iOS, with some variations to fit the native design of each operating system. - Checking Permission Status: An important feature of this block is its ability to check the status of the permission. When used, it returns a String value indicating what permission is associated with using the camera on the device:
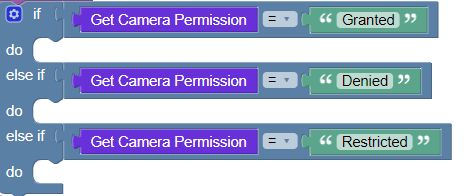
Available permission status values are:
Denied: The user has explicitly refused access to the camera. This decision isn't final and the application can request permission again.
Granted: Access to the camera has been authorized by the user, allowing full functionality of the camera features within the app.
Restricted (iOS only): This status indicates that access to the camera is blocked by the operating system, often due to overarching restrictions like parental controls. The user is unable to alter this status for the app.
Limited (iOS 14+ only): The user has granted the app limited access to the camera. This typically entails certain restrictions on the app's camera usage, aligning with user preferences or system-imposed limitations.
Permanently Denied (Android only): The user has permanently denied camera access for the app, and the permission request dialog will not be displayed in future requests. Users can only revise this decision through the app settings.
Understanding the Permission Process
When your app requests camera access, it's not just about turning on the camera. It's about building trust with your users. Here’s why this process is key:
- User Consent: By asking for permission, your app respects user privacy and choice, which is essential in today's digital environment.
- Platform Compliance: This step is also crucial for complying with the guidelines of various app stores and operating systems.
- Functionality Assurance: Ensuring you have the necessary permissions before trying to access the camera avoids potential errors and enhances user experience.
Opening the Camera App
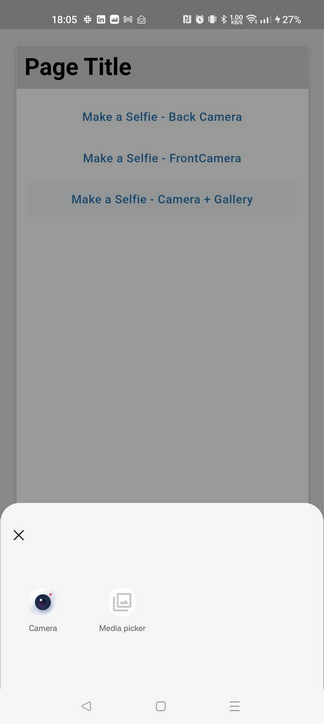
This may come as a surprise, but to access the Camera App you need to use the File Uploader Button component. By default, the component provides a way to select files from the device's gallery and, if the permission to access camera is granted by the user, use it to snap a picture. The camera/gallery selection interface on Android has the following appearance:
This behavior may not always be desired as the user has to click through the "Camera" icon to get the camera. Instead, you may want to initiate the Camera directly after clicking an action button/link/etc to open the camera. To facilitate this, you need to add a customization described below.
Starting Back Camera by Default
Suppose the File Uploader button is assigned the backCam ID:

To configure the component to default to the back camera when the button is clicked, make sure to select Environment in the Capture drop-down: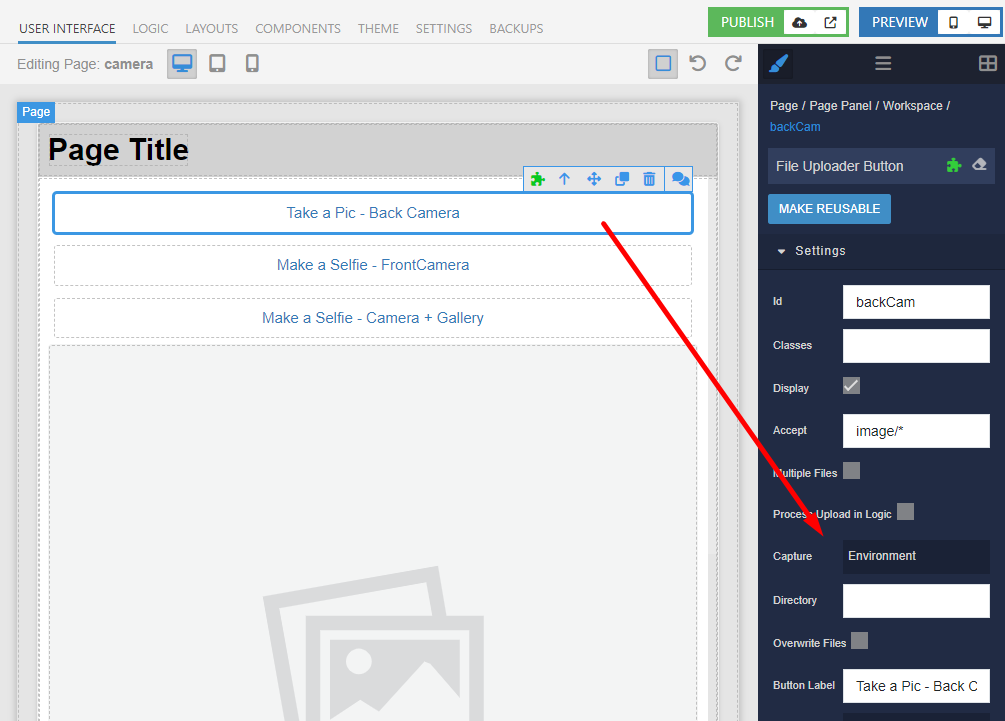
With this customization, clicking the File Uploader button will automatically open the camera app and default to the back camera.
Starting Front Camera by Default
To customize a file uploader to open the front camera by default, use the same configuration property (Capture) and select the User option.