Client-side Setup
Pure Java and Android clients can consume the Backendless services using the Backendless SDK for Android/Java. The SDK can be added to your project per the instructions below:
Gradle Setup
If your project uses Gradle, you can add the following configuration to your build.gradle file:
dependencies {
    implementation group: 'com.backendless', name: 'backendless', version: '5.0.+'

    // required for real-time database and real-time messaging
    implementation ('io.socket:socket.io-client:1.0.0') {
      // excluding org.json which is provided by Android
      exclude group: 'org.json', module: 'json'
    }
}
Important
It is not recommended to use the '+' sign in the dependency version number. Make sure to check the current version of the Backendless library (check only 5.x or later) in Maven Central .
SDK from Maven
The backendless client library for Android and Java is available through the Maven repository. Since the version of Backendless deployed to maven changes frequently, make sure to lookup the latest version number from Maven Central. To add a dependency for the Backendless library, add the following to pom.xml:
<dependency>
  <groupId>com.backendless</groupId>
  <artifactId>backendless</artifactId>
  <version>VERSION FROM MAVEN</version>
</dependency>

<!-- required for real-time database and real-time messaging -->
<dependency>
    <groupId>io.socket</groupId>
    <artifactId>socket.io-client</artifactId>
    <version>1.0.0</version>
</dependency>
Android Manifest
Since Backendless APIs communicate with a server, it is necessary to add the android.permission.INTERNET permission to the manifest file. Add the line below to the <manifest> element:
<uses-permission android:name="android.permission.INTERNET" />
Application initialization
If your Android/Java application uses Backendless SDK, the client application must initialize the SDK with one of the approaches shown below.
-
Using your Backendless subdomain name: Every Backendless application receives a subdomain under the
backendless.appdomain. The subdomain is in the format ofxxxx.backendless.app. The subdomain is used to identify your backend when the client app uses Backendless APIs and also to run client-side applications created with UI Builder. To see the subdomain name assigned to your application navigate to the main dashboard of your application, you will see the Backendless subdomain field. Use the copy icon on the right side of the field to copy the value: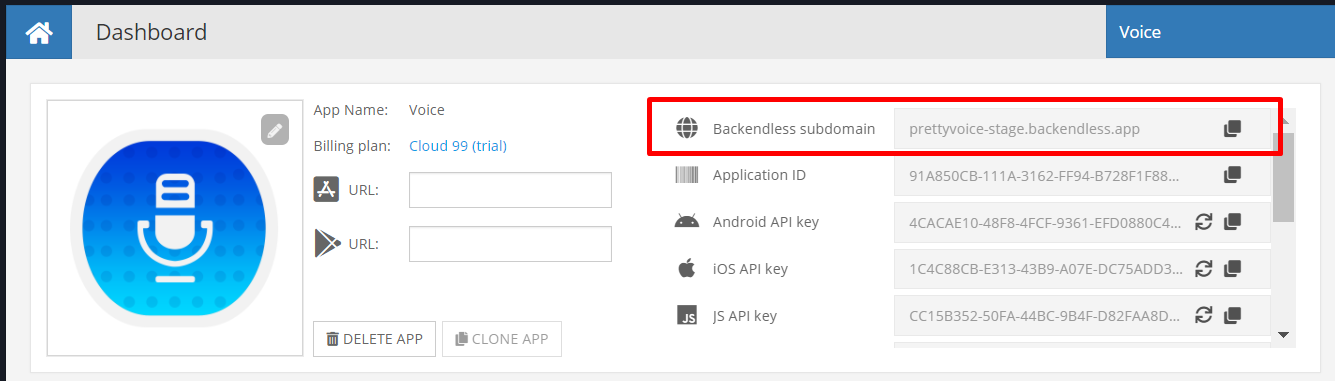
The code to initialize your Android/Java application with your subdomain name is:
// Android apps: // the context argument is is an instance of android.content.Context. // For instance, it may be your Android application main activity. Backendless.initApp( Object context, "https://your-subdomain-name.backendless.app" ); // Java apps: Backendless.initApp( "https://your-subdomain-name.backendless.app" ); -
Your own domain name. You can assign a custom domain to your application using the Manage > App Settings > Custom Domain section of Backendless Console. When a custom domain is assigned, your Android/Java application should be initialized with the following code:
// Android apps:
// the context argument is is an instance of android.content.Context.
// For instance, it may be your Android application main activity.
Backendless.initApp( Object contect, "http://your-custom-domain" );

// Java apps:
Backendless.initApp( "http://your-custom-domain" );
To enable SSL for your custom domain, make sure your application is on the Scale plan. Configure a custom domain in Backendless Console, we will gladly generate an SSL certificate for your domain. - Backendless native endpoint. Every Backendless cluster (hosting zone) has a native endpoint. Your application's backend is running in one of the clusters below. It is important to make sure to use the endpoint that correspond to the cluster. The North American endpoint is automatically embedded in the SDK, it is not necessary to set it in the code, however, the EU endpoint must be explicitly specified. Use the code below based on the cluster your app is in:
North American cluster:
// Android apps:
// the context argument is is an instance of android.content.Context.
// For instance, it may be your Android application main activity.
Backendless.initApp( Object context, "application-Id", "API-key" );

// Java apps:
Backendless.initApp( "application-Id", "API-key" );
South American cluster:
Backendless.setUrl( "https://api.sa.backendless.com" );

// Android apps:
// the context argument is is an instance of android.content.Context.
// For instance, it may be your Android application main activity.
Backendless.initApp( Object context, "application-Id", "API-key" );

// Java apps:
Backendless.initApp( "application-Id", "API-key" );
European Union cluster:
Backendless.setUrl( "https://eu-api.backendless.com" );

// Android apps:
// the context argument is is an instance of android.content.Context.
// For instance, it may be your Android application main activity.
Backendless.initApp( Object context, "application-Id", "API-key" );

// Java apps:
Backendless.initApp( "application-Id", "API-key" );
The values for"application-Id"and"API-key"must be obtained from Backendless Console. They are available on the main dashboard as well as the Manage > App Settings screen.
Proguard Configuration
If your Android application uses Proguard, it is necessary to add the following configuration parameters to proguard.cfg:
-dontwarn com.backendless.**
-dontwarn weborb.**
-keep class weborb.** {*;}
If you run your application with minifyEnabled (obfuscation is turned on), it is necessary to add the following statement to proguard.cfg:
-keep class com.backendless.** {*;}
Apps with Google Maps and Geolocation
Android applications using Google Maps, for instance, the Geo service sample app generated by Backendless code generator, require additional configuration in order for Google maps to be displayed. The process of configuring an app to support Google maps consists of the following tasks:
-
Display the debug certificate fingerprint
- Locate your debug keystore file. The file name is
debug.keystore, and is created the first time you build your project. By default, it is stored in the same directory as your Android Virtual Device (AVD) files:- OS X and Linux:
~/.android/ - Windows Vista and Windows 7:
C:\Users\your_user_name\.android\
- OS X and Linux:
- If you are using Eclipse with ADT, and you are not sure where your debug keystore is located, you can select ** Windows > ** Prefs > ** Android > Build** to check the full path, which you can then paste into a file explorer to locate the directory containing the keystore.
- List the SHA-1 fingerprint.
- For Linux or OS X, open a terminal window and enter the following:
keytool -list -v -keystore ~/.android/debug.keystore -alias androiddebugkey -storepass android -keypass android - For Windows Vista and Windows 7, run:
keytool -list -v -keystore "%USERPROFILE%\.android\debug.keystore" -alias androiddebugkey -storepass android -keypass android
- For Linux or OS X, open a terminal window and enter the following:
- You should see output similar to this:
Alias name: androiddebugkey Creation date: Jan 01, 2013 Entry type: PrivateKeyEntry Certificate chain length: 1 Certificate[1]: Owner: CN=Android Debug, O=Android, C=US Issuer: CN=Android Debug, O=Android, C=US Serial number: 4aa9b300 Valid from: Mon Jan 01 08:04:04 UTC 2013 until: Mon Jan 01 18:04:04 PST 2033 Certificate fingerprints: MD5: AE:9F:95:D0:A6:86:89:BC:A8:70:BA:34:FF:6A:AC:F9 SHA1: BB:0D:AC:74:D3:21:E1:43:07:71:9B:62:90:AF:A1:66:6E:44:5D:75 Signature algorithm name: SHA1withRSA Version: 3 - The line that begins SHA1 contains the certificate's SHA-1 fingerprint. The fingerprint is the sequence of 20 two-digit hexadecimal numbers separated by colons.
- Locate your debug keystore file. The file name is
-
Create an API project in the Google APIs Console
- In a browser, navigate to the Google APIs Console .
- If you haven't used the Google APIs Console before, you're prompted to create a project that you use to track your usage of the Google Maps Android API. Click ** Create Project ; the Console creates a new project called ** API Project . On the next page, this name appears in the upper left hand corner. To rename or otherwise manage the project, click on its name.
- If you're already using the Google APIs Console, you will immediately see a list of your existing projects and the available services. It's still a good idea to use a new project for Google Maps Android API, so select the project name in the upper left hand corner and then click ** Create** .
- You should see a list of APIs and services in the main window. If you don't, select ** Services** from the left navigation bar.
- In the list of services displayed in the center of the page, scroll down until you see ** Google Maps Android API v2** . To the right of the entry, click the switch indicator so that it is on.
- This displays the Google Maps Android API Terms of Service . If you agree to the terms of service, click the checkbox below the terms of service, then click ** Accept** . This returns you to the list of APIs and services.
- In a browser, navigate to the Google APIs Console .
-
Obtain a Google Maps API key
If your application is registered with the Google Maps Android API v2 service, then you can request an API key. It's possible to register more than one key per project.
- Navigate to your project in the Google APIs Console .
- In the ** Services** page, verify that the "Google Maps Android API v2" is enabled.
- In the left navigation bar, click ** API Access** .
- In the resulting page, click ** Create New Android Key...** .
- In the resulting dialog, enter the SHA-1 fingerprint, then a semicolon, then your application's package name. For example:
BB:0D:AC:74:D3:21:E1:43:67:71:9B:62:91:AF:A1:66:6E:44:5D:75;com.example.android.mapexample - The Google APIs Console responds by displaying Key for Android apps (with certificates) followed by a forty-character API key, for example:
AIzaSyBdVl-cTICSwYKrZ95SuvNw7dbMuDt1KG0
-
Add the API key to your application
Follow the steps below to include the API key in your application's manifest, contained in the file AndroidManifest.xml. From there, the Maps API reads the key value and passes it to the Google Maps server, which then confirms that you have access to Google Maps data.
- In AndroidManifest.xml, add the following element as a child of the
<application>element, by inserting it just before the closing tag</application>:<meta-data android:name="com.google.android.maps.v2.API_KEY" android:value="API_KEY"/> - Substitute your API key for
API_KEYin the value attribute. This element sets the keycom.google.android.maps.v2.API_KEYto the value of your API key, and makes the API key visible to anyMapFragmentin your application. - Save AndroidManifest.xml and re-build your application.
- In AndroidManifest.xml, add the following element as a child of the
Application ID and API Key
Values for the application-id and api-key arguments in the application initialization call must be obtained through the Backendless Console:
- Login to your account and select the application.
- Click the Manage icon from the vertical icon-menu on the left.
- The App Settings section is selected by default. The interface contains values for Application ID and API keys for each supported client-side environment.
- Use the Copy icon to copy the value into the system clipboard.

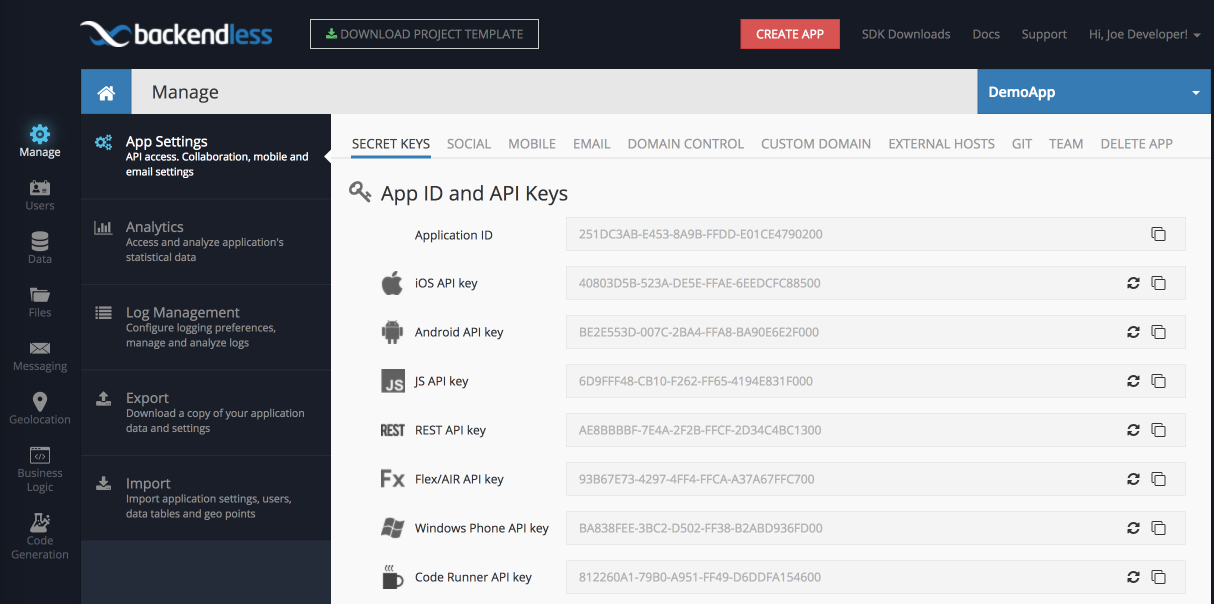
Make sure to use the "Android API Key" for the api-key argument.