How to integrate a Thunkable app with a Backendless backend
From this point on, we will be demonstrating how to integrate Thunkable with Backendless. In this article, we’re going to walk you through the process of integrating several basic backend functions into your Thunkable app (click to jump to each section):
To get started, you will need a Thunkable account as well as a Backendless account (register here for free).
Note: The simplest way to access Backendless’ robust backend features is to build your frontend with Backendless as well. Be sure to check out our no-code UI Builder to see how it stacks up to Thunkable.
User Registration With Backendless
User registration and login enable your app to personalize the user’s experience.
User login opens up the entire set of user management functions in Backendless. These include session management, password management, user roles, and relating user to other data objects.
User registration also opens up user engagement opportunities such as email messaging, push notifications, and in-app messaging.
Let’s get started.
We’ll start by setting up user registration in Thunkable, connected to Backendless.
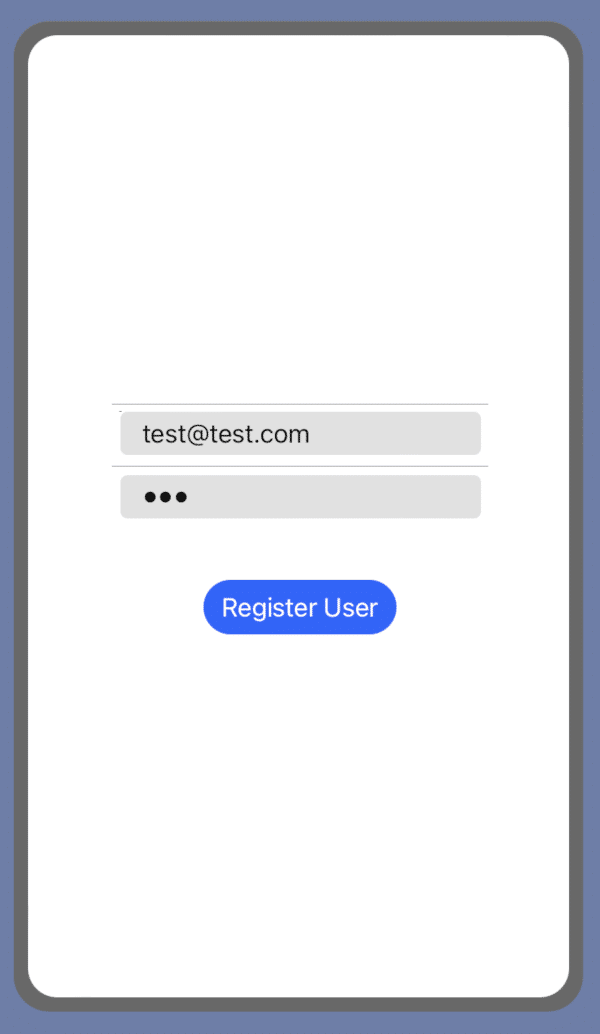
First, let’s create a new page with two Text Input components with identifiers EmailInput (Keyboard type: email address) and PasswordInput (with SecureText Entry option enabled) and a button RegisterUserButton. These components can be found in the Design tab.
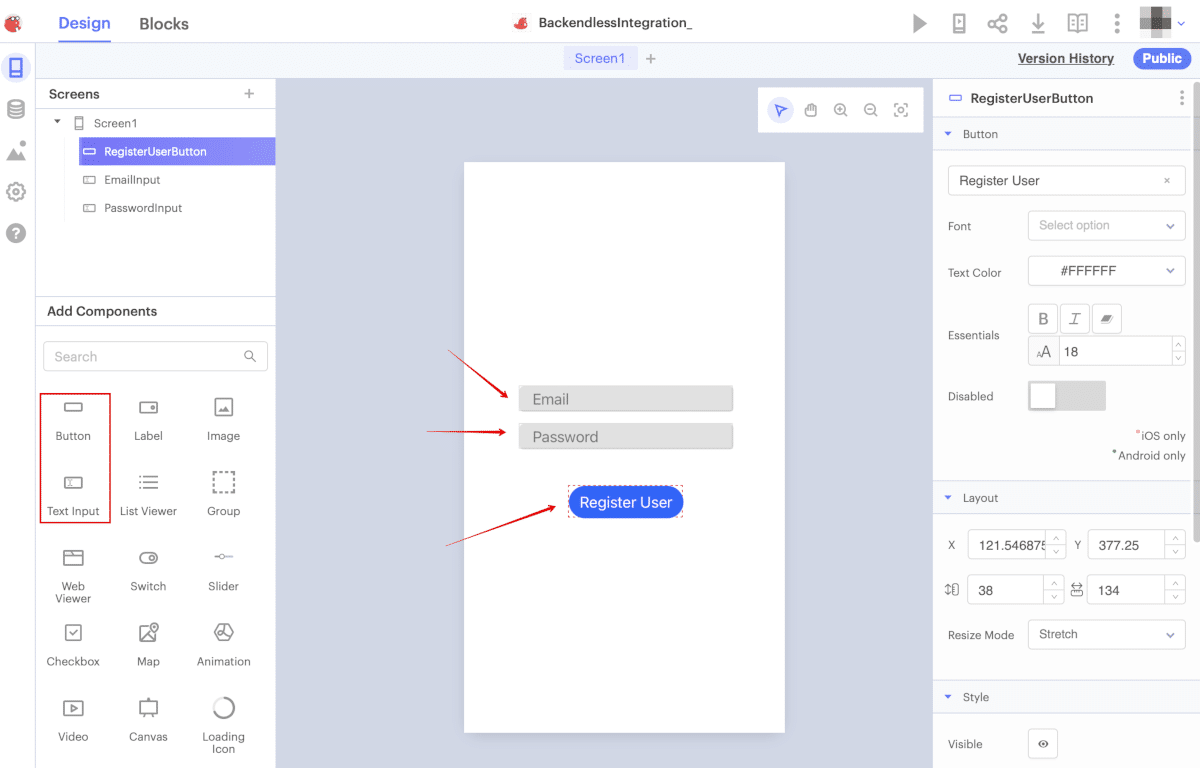
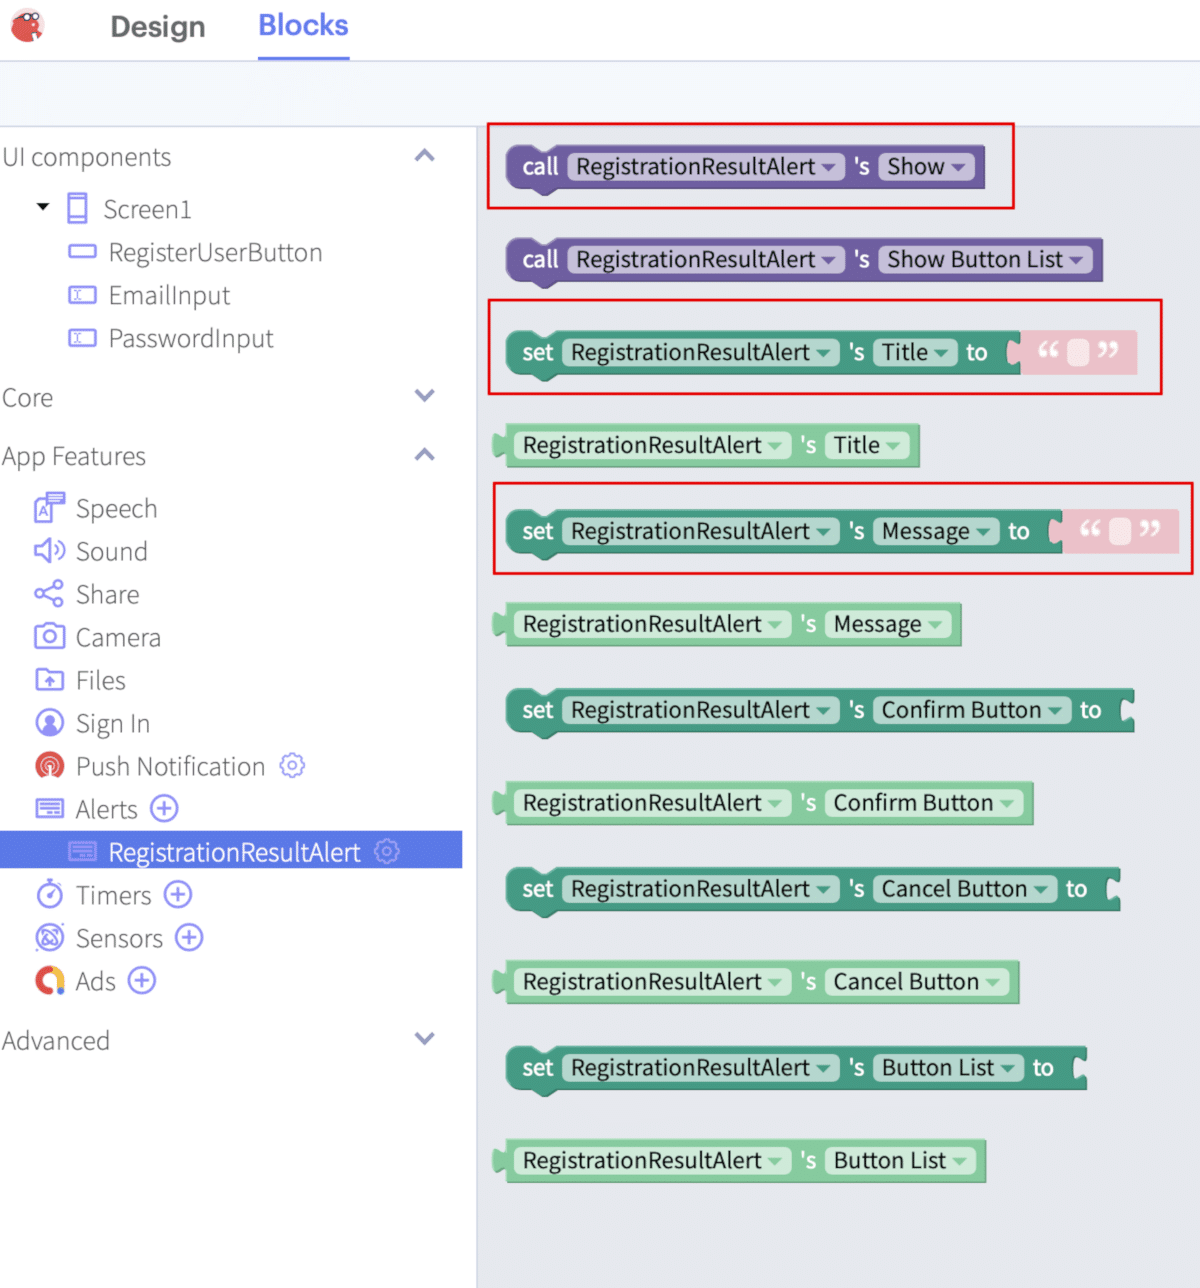
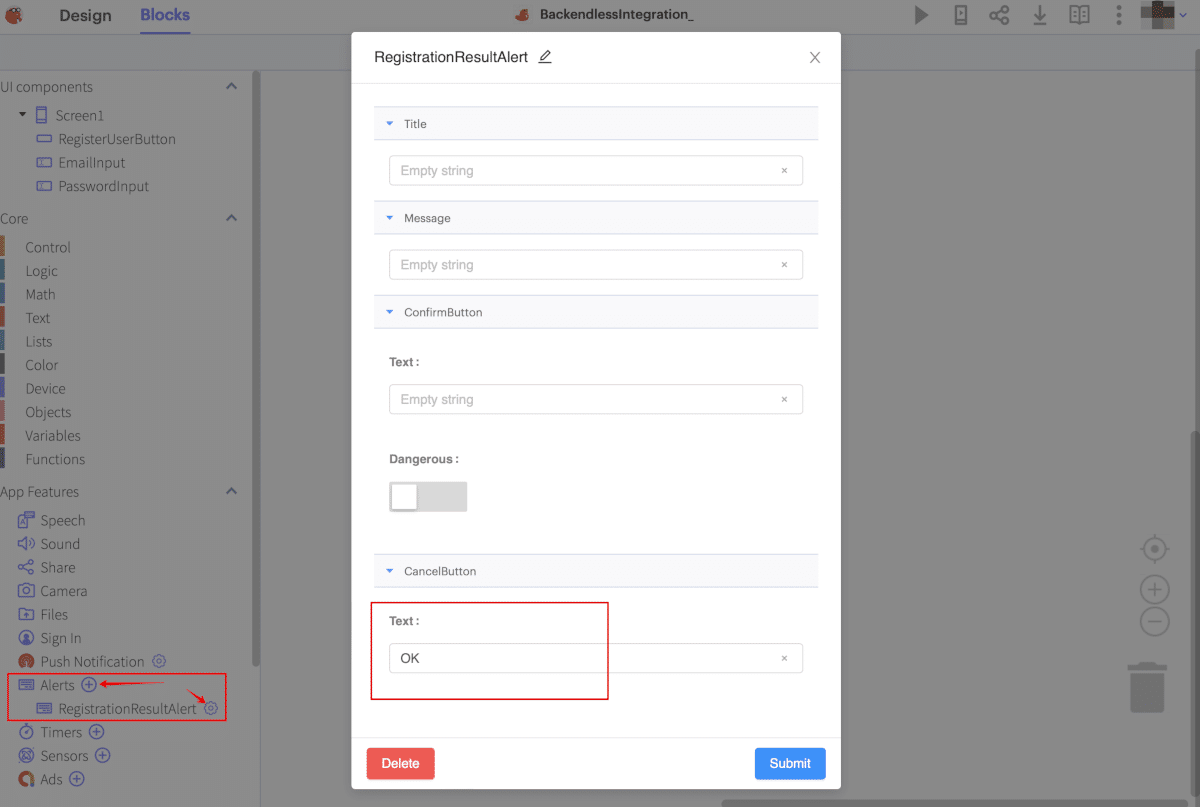
Also add an Alert RegistrationResultAlert from the Blocks tab. In the RegistrationResultAlert settings, clear the values of all fields and leave only one CancelButton to close the message:
Connect Thunkable To Backend Via API
We will also add a Web API (Blocks – Advanced – Web APIs) component for user registration and name it RegisterUserAPI. Configure it with the corresponding URL and headers:
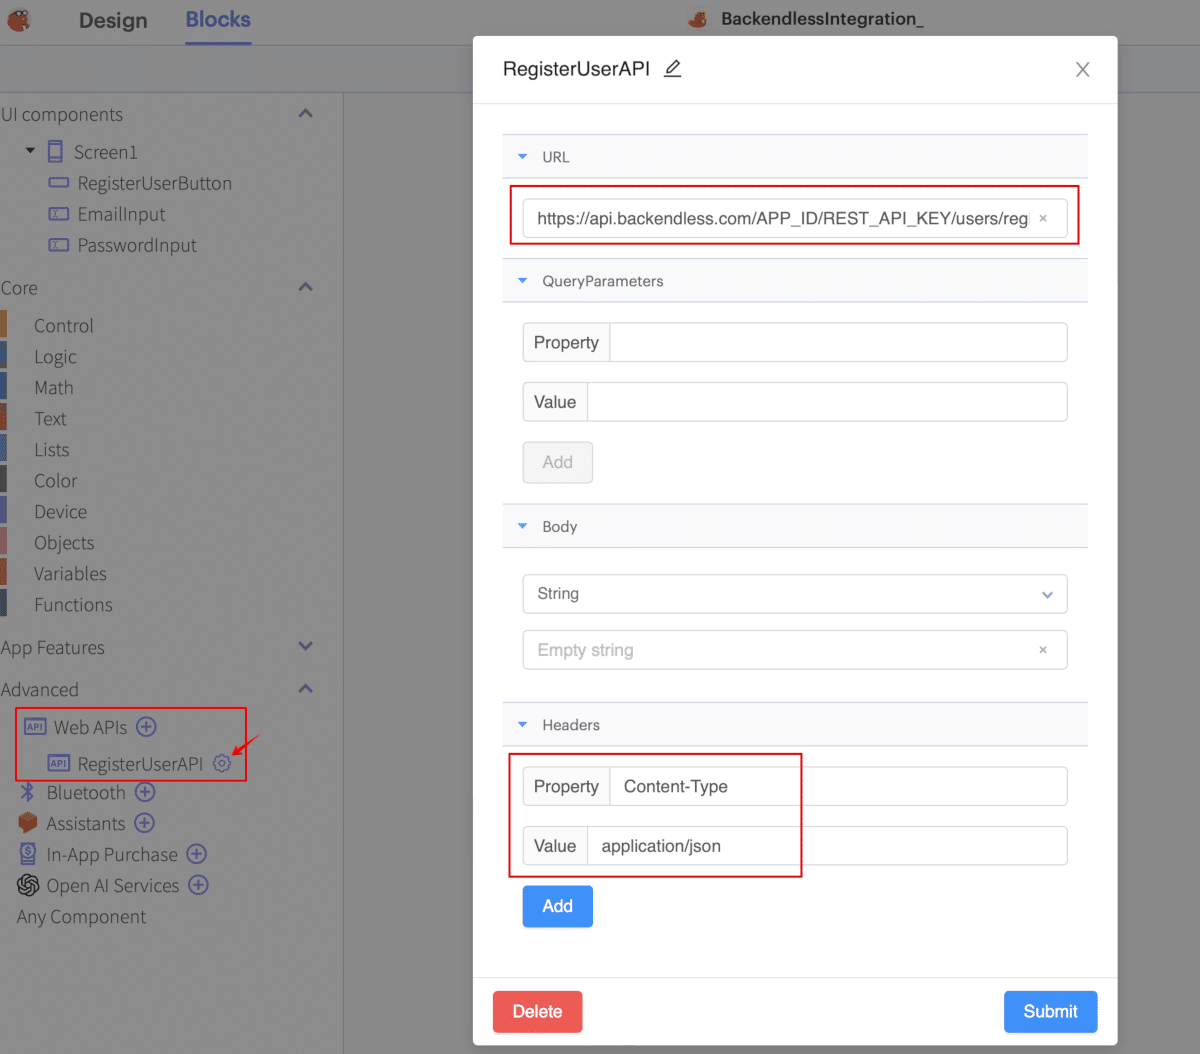
The URL value is https://api.backendless.com/APP_ID/REST_API_KEY/users/register (or https://eu-api.backendless.com/APP_ID/REST_API_KEY/users/register for the EU cluster). Be sure to replace APP_ID and REST_API_KEY with your app’s values, found on your Backendless Backend Dashboard.
Now let’s go to the Blocks tab and add logic for registering a user by clicking on the Register User button.
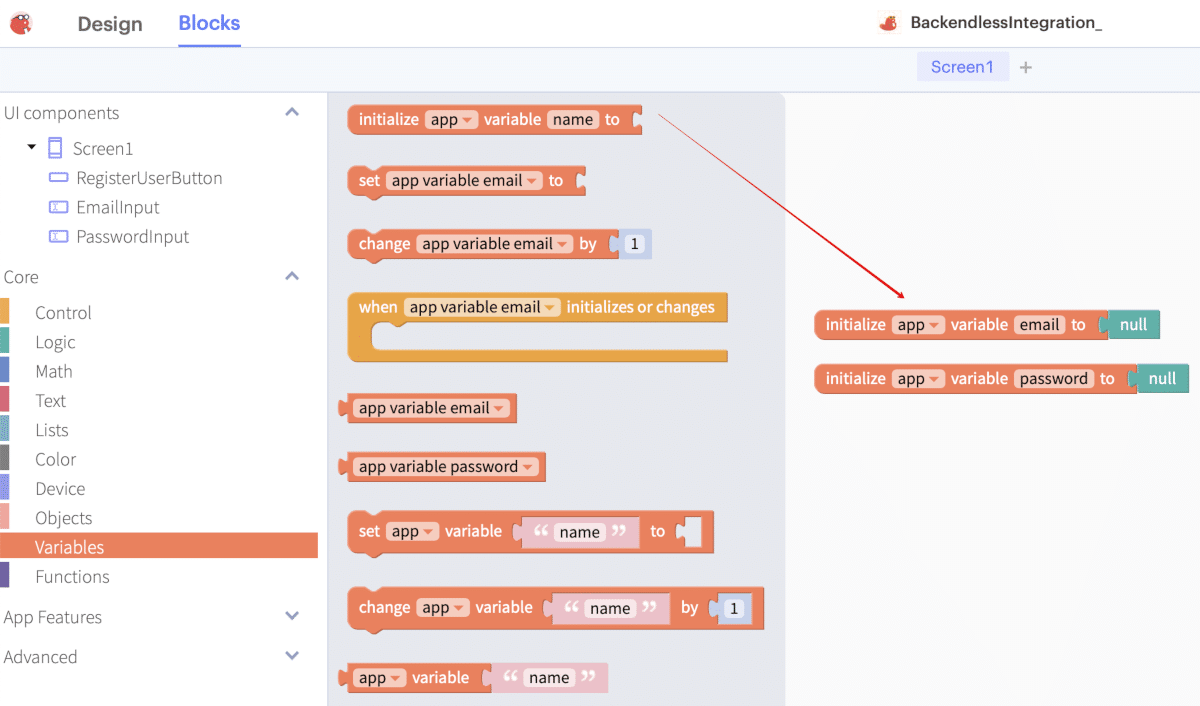
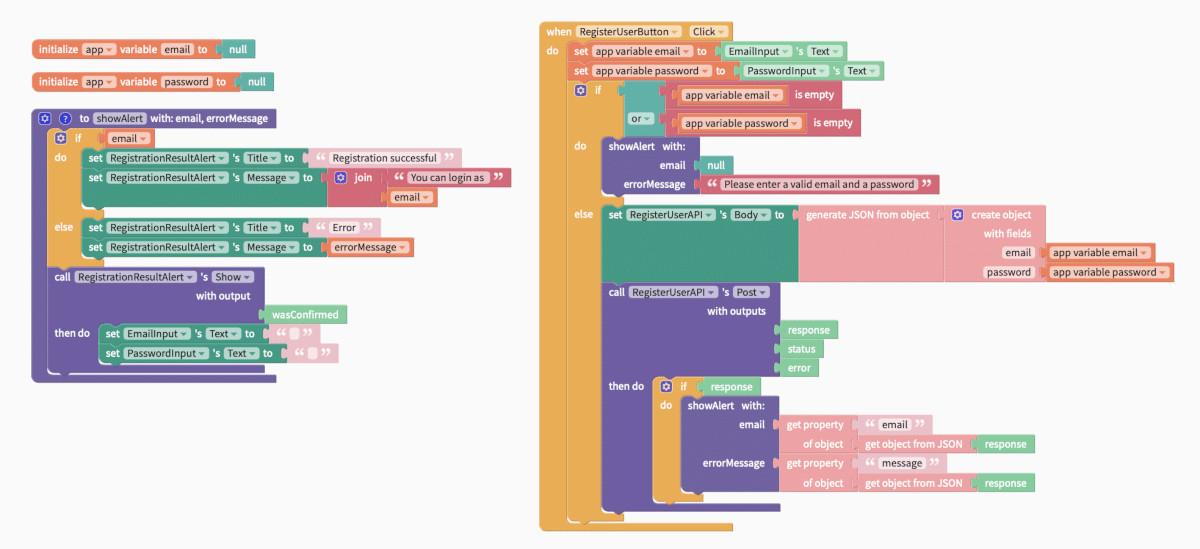
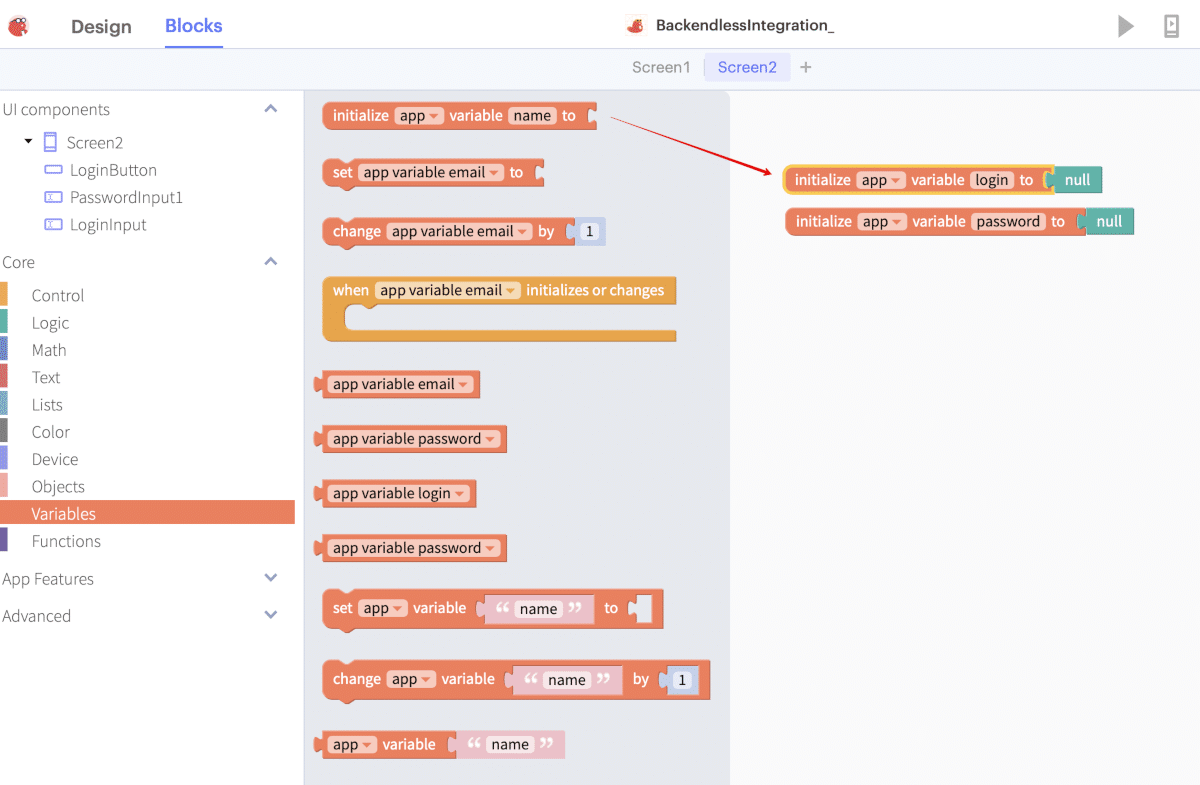
First, let’s add two variables to our application – email and password – and set their values to null. In the future, these values will be taken from the corresponding EmailInput and PasswordInput. To create a variable, in the Blocks tab select Core – Variables – initialize app variable to:
Next, let’s add the showAlert function to display the Alert. This takes email and errorMessage as parameters and, depending on the parameter, displays the desired message. To add a function in the Blocks tab select Core – Functions and then select a block with a function that returns nothing.
The logic of the alert display function is as follows:
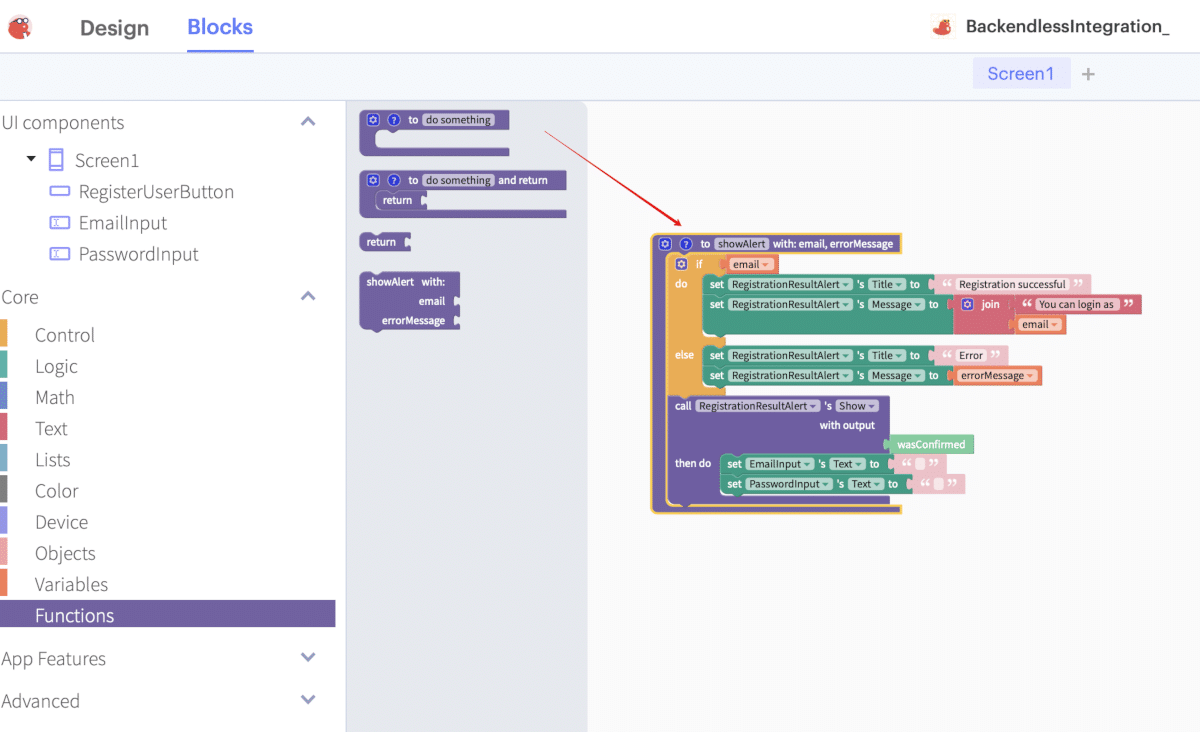
We check if the value was passed to the function email. This option for the alert will be relevant if the user is successfully registered. If the registration is successful, set the success message in the Title and Message alert.
If email = null, then an error has occurred. In this case, set an error message in Title and Message of the alert.
After setting the values in Title and Message, we call the alert display, after which we clear the EmailInput and PasswordInput fields.
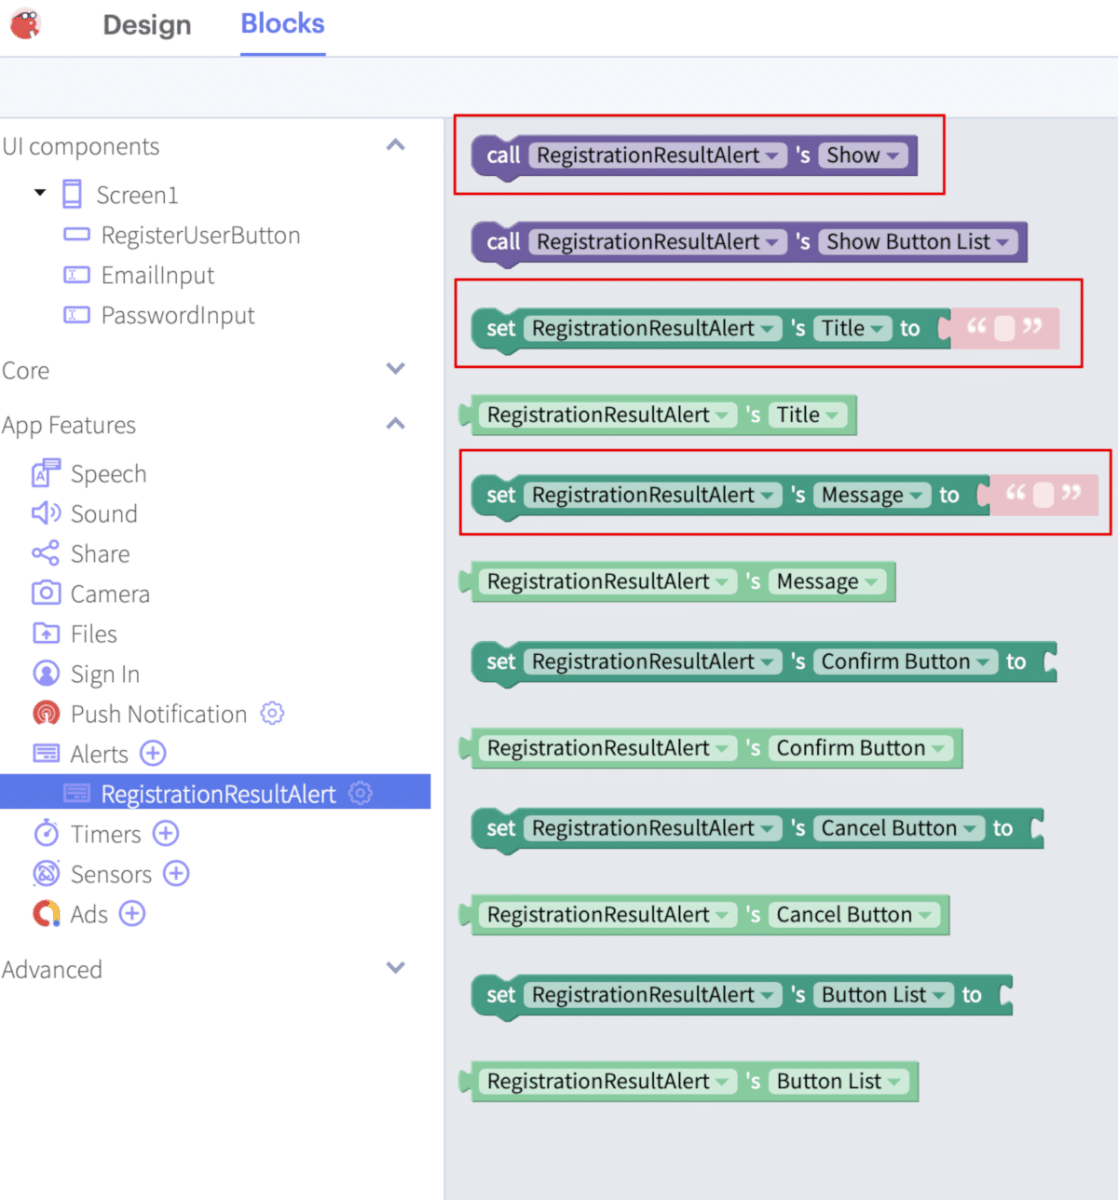
To interact with the Alert, select RegistrationResultAlert in the Blocks – App Features – Alerts:
Now let’s return to the click handler for the registration button. On the left panel, select RegisterUserButton – Click.

Set the email and password variables to the values from the EmailInput and PasswordInput fields. If one of the fields is not filled in, we call the function to display an alert with a request to enter the correct values for email and password.
Note above that we are passing null to the showAlert function’s email argument.
If both values are entered, then you can call the user registration method (docs).
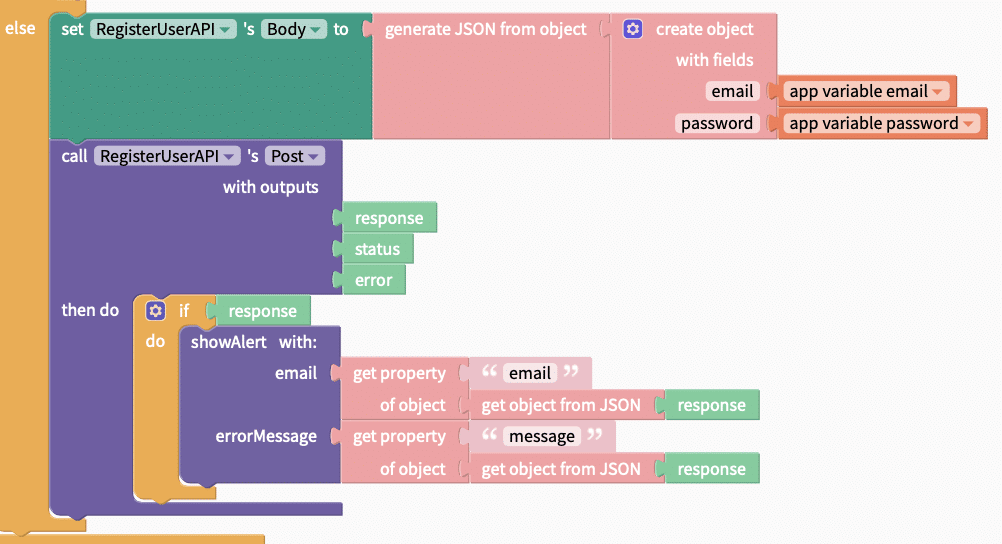
In the Blocks tab, select Advanced – Web APIs – RegisterUserAPI and select the blocks for setting the request body.
Note that the request body is a JSON object with the email and password parameters, the values of which we took from the EmailInput and PasswordInput fields.
After setting up the API, we call RegisterUserAPI Post. If successful, the result will be an object containing the registered user. Otherwise, we receive an error.
Regardless of the result, we form an object from the response and pass the values email (will be null in case of unsuccessful registration) and message (will be null in case of successful registration) to the showAlert function.
Thus, depending on the result, we will receive either a message about successful registration or an error.
The final version of the logic looks like this:
Testing
In the upper right corner, click on the Web Preview button, enter the email and password of a new user and click Register User:
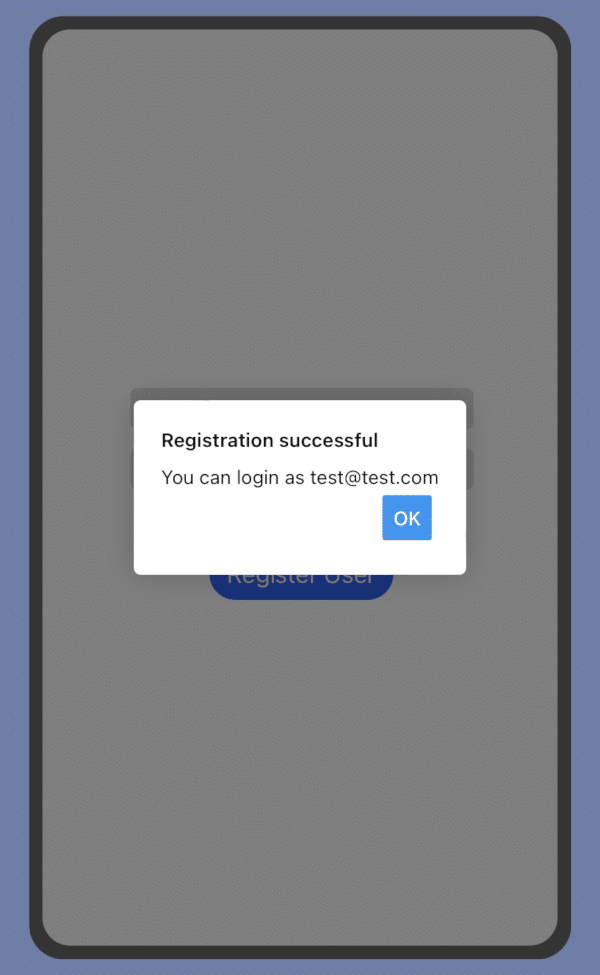
If the registration was successful, we will receive a message about successful registration:
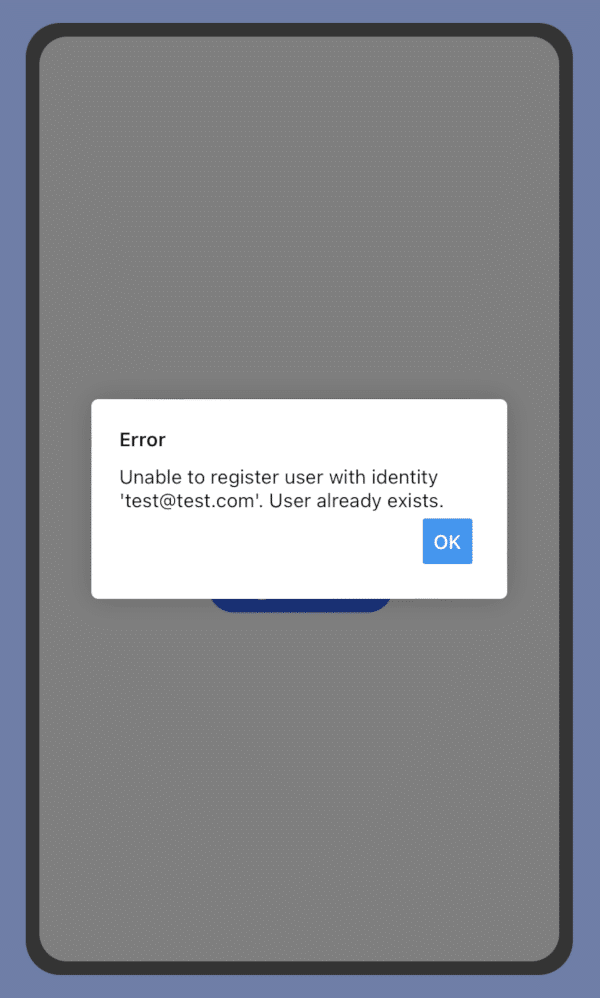
If an error occurred during registration (for example, an attempt was made to register an existing user), we will receive the following notification:
With that, user registration is complete. Now let’s move to logging in the user.
Login With Backendless
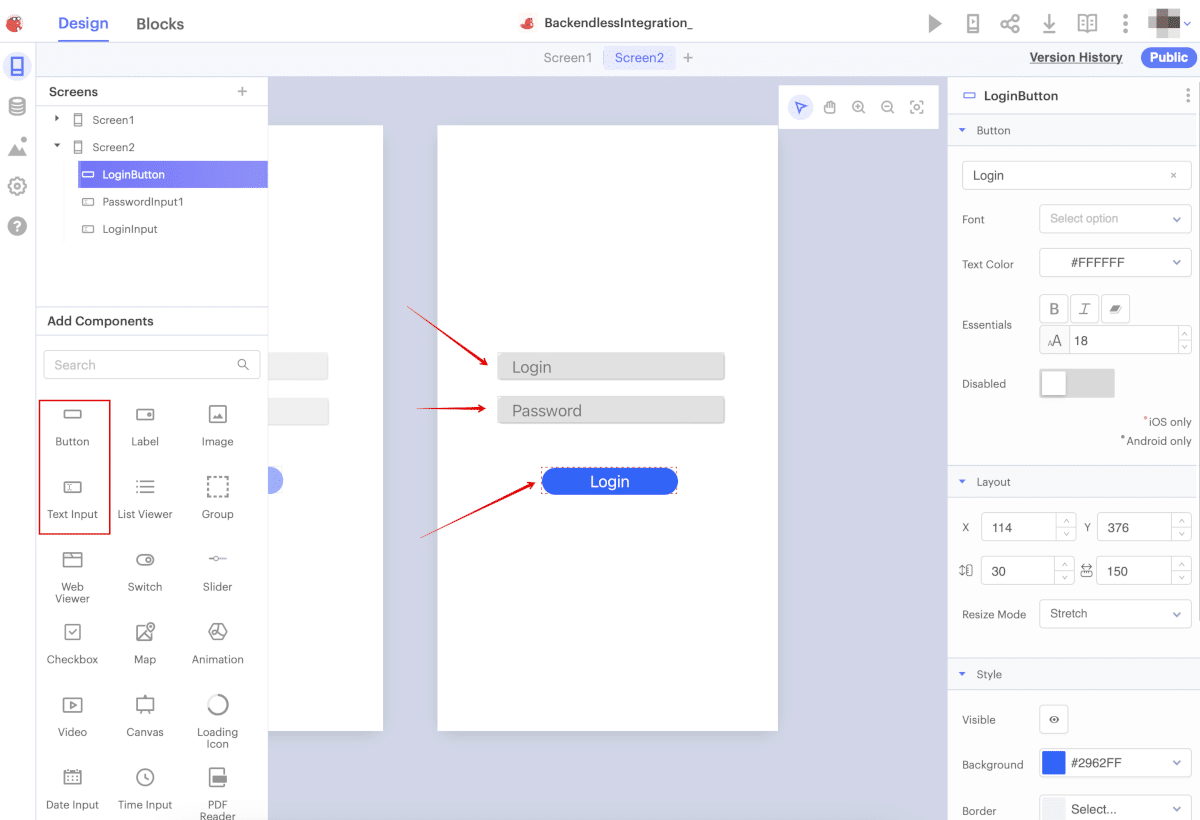
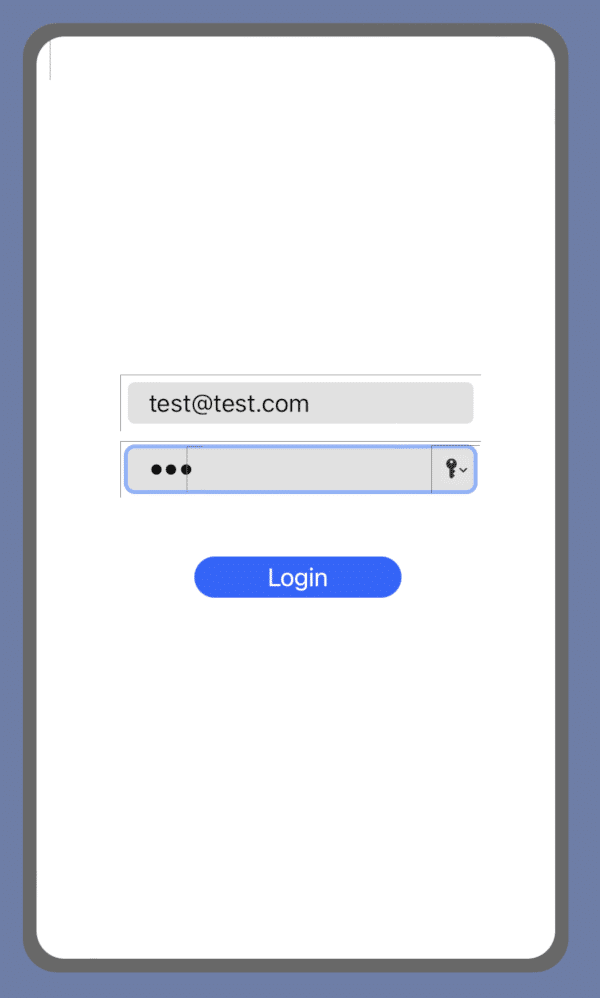
For the Login page, we need two Text Input components with the LoginInput and PasswordInput1 (with SecureText Entry option enabled) identifiers and a LoginButton. These components can be found in the Design tab:
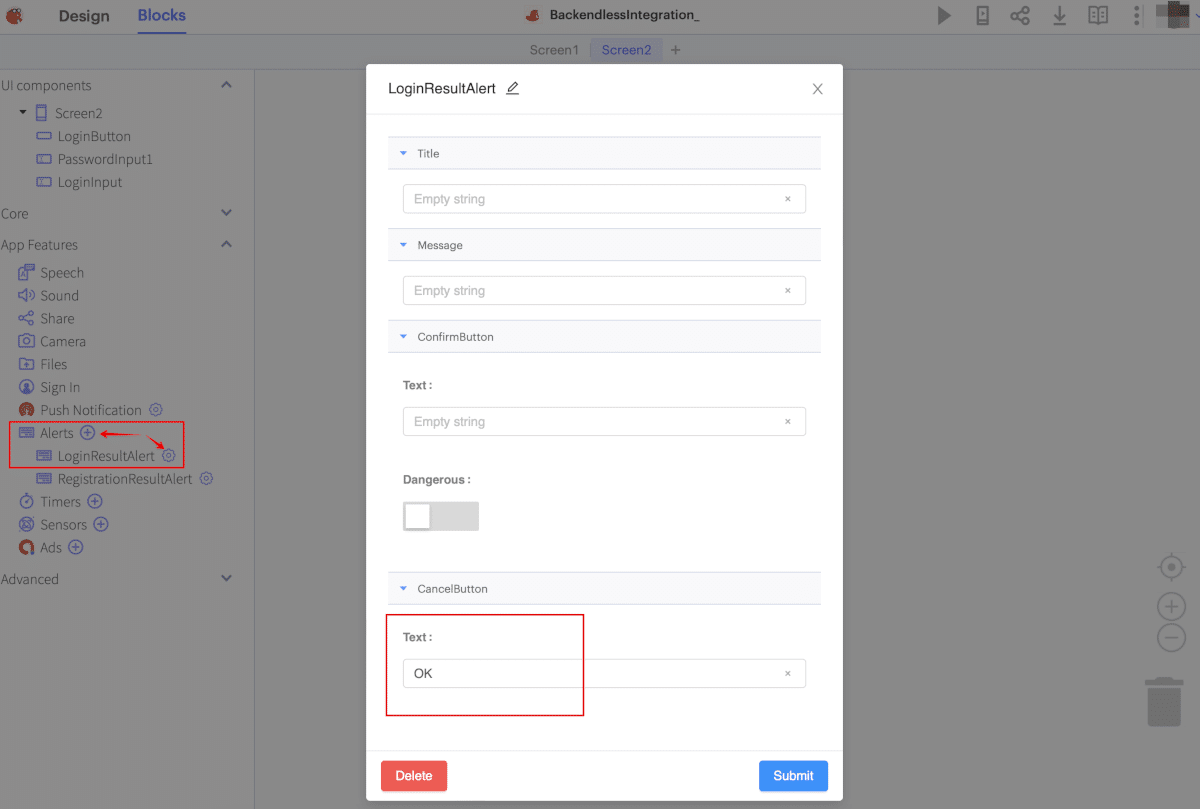
Also add an Alert LoginResultAlert from the Blocks tab. In the LoginResultAlert settings, clear the values of all fields and leave only one CancelButton to close the message:
Connect Thunkable To Backend Via API
We will also add a Web API component from the Blocks tab (Advanced – Web APIs) for the user login and name it LoginAPI. Configure it with the corresponding URL and parameters:
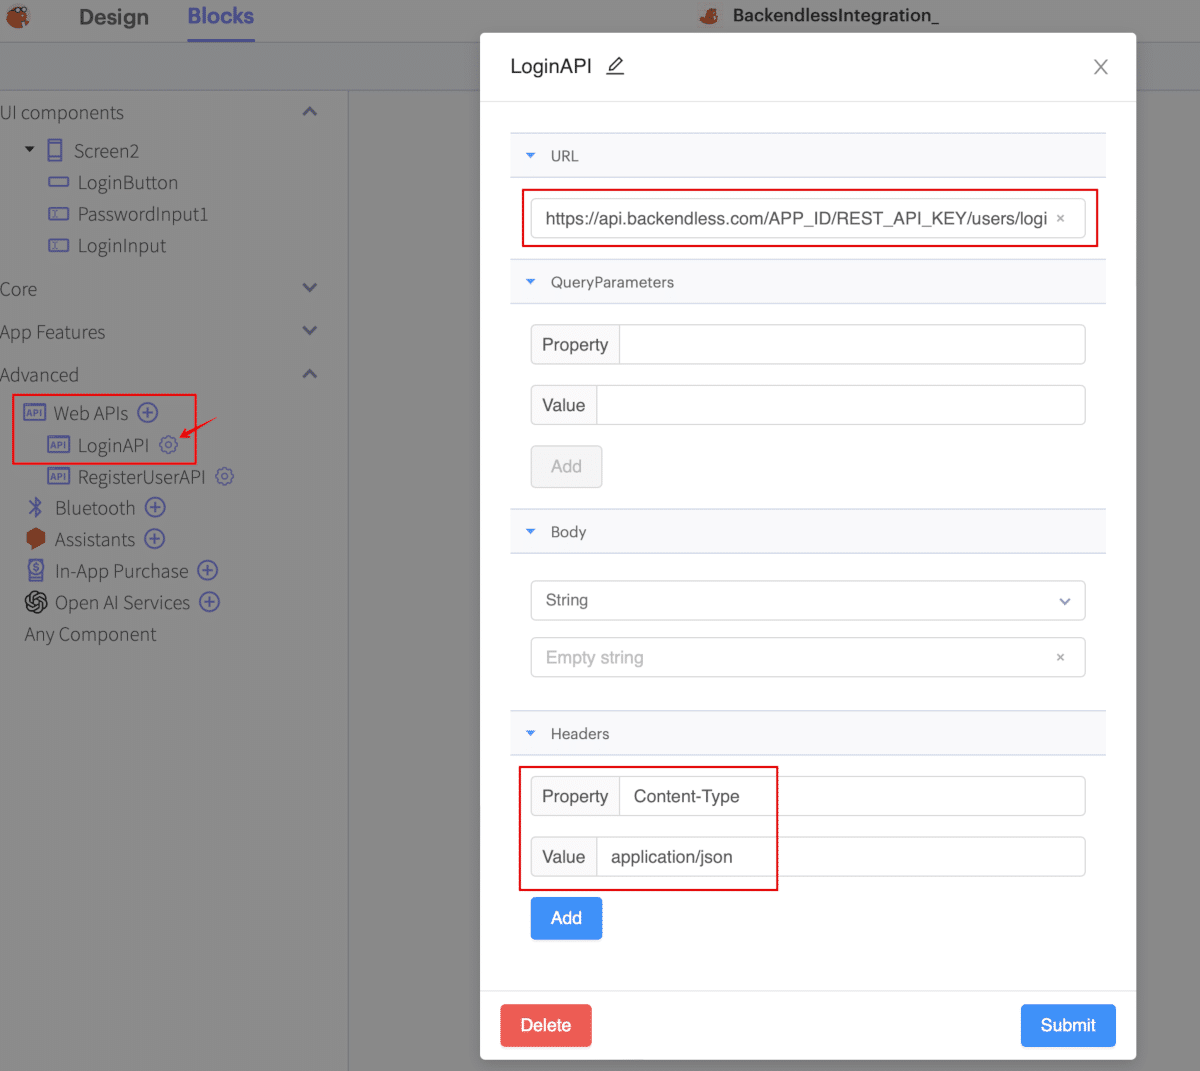
The URL value is https://api.backendless.com/APP_ID/REST_API_KEY/users/login (or EU-https://api.backendless.com/APP_ID/REST_API_KEY/users/login for the EU cluster).
Be sure to replace APP_ID and REST_API_KEY with your app’s values, found on your Backendless Backend Dashboard.
Now let’s go to the Blocks tab and add logic for the user’s login by clicking on the Login button.
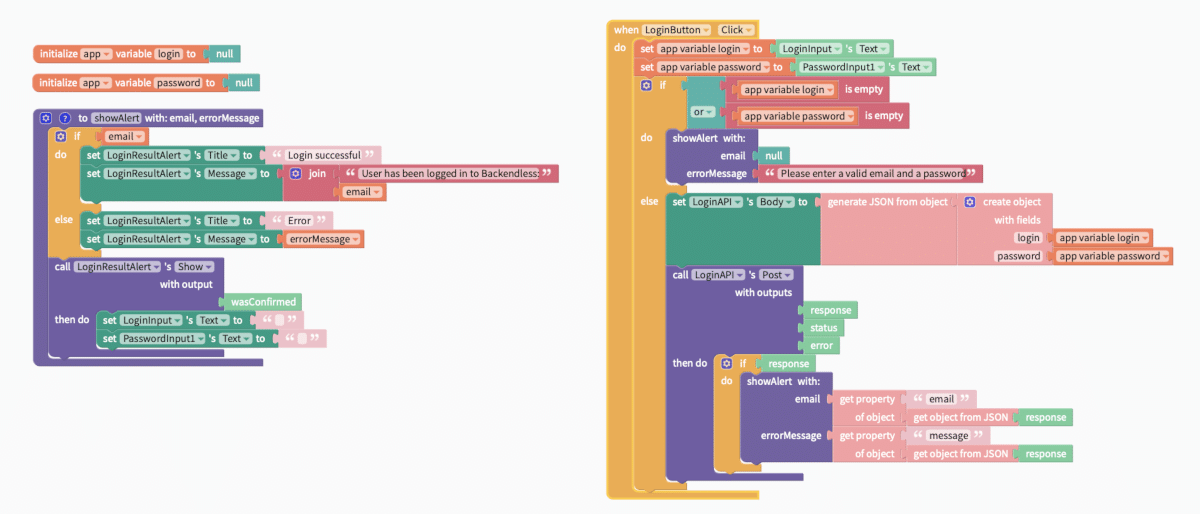
First, let’s add two variables to our application – login and password – and set their values to null. In the future, these values will be taken from the corresponding LoginInput and PasswordInput1:
Let’s add the showAlert function to display our Alert. The Alert takes email and errorMessage as parameters and, depending on the parameter, displays the desired message:
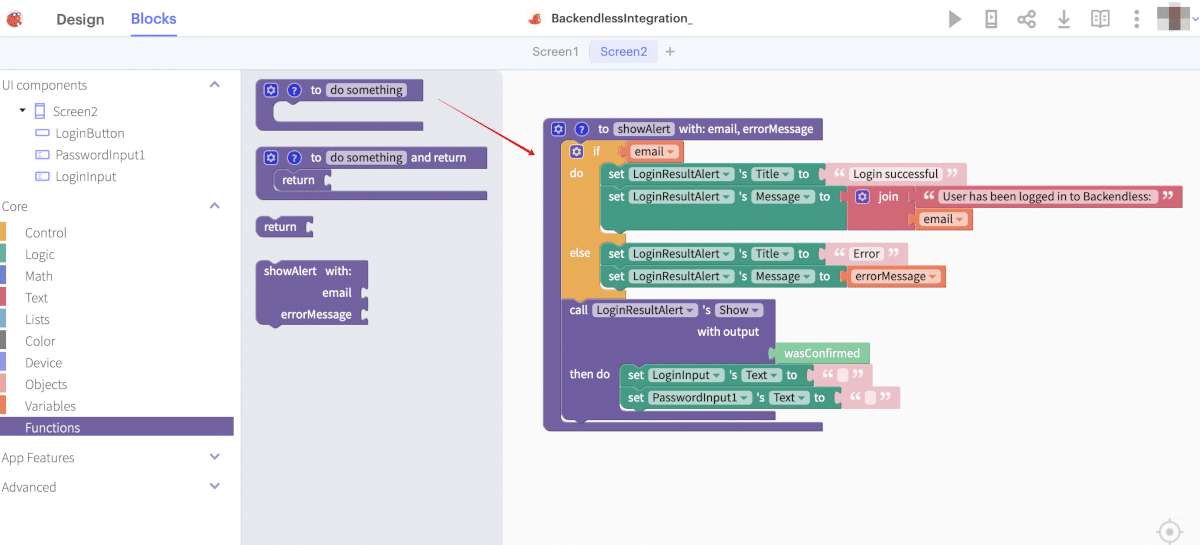
Similar to registration, we check whether the value of email was passed to the function. We’ll use this option for the alert if the login is successful. If the login is successful, set the success message in the Title and Message alert. (You can come back later to change this action to navigate to a home page or take another action appropriate for your app.)
If email = null, then an error has occurred. In this case, set an error message in Title and Message of the alert.
After setting the values in Title and Message, we call the alert display, after which we clear the LoginInput and PasswordInput1 fields.
Now let’s return to the login button click handler:
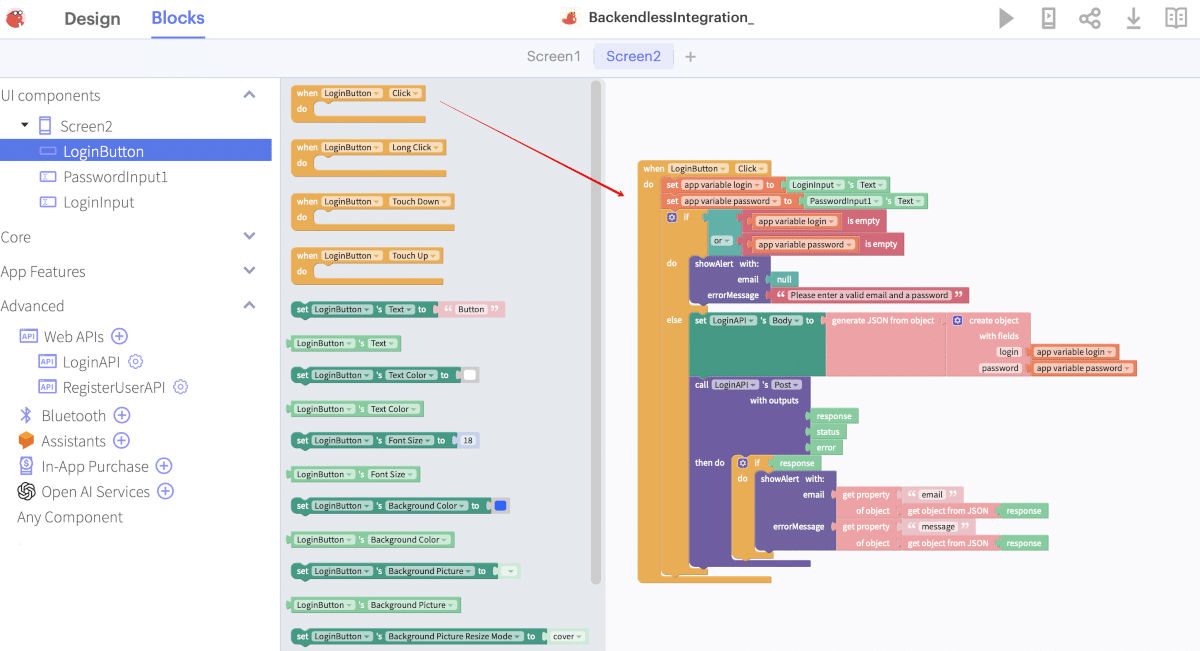
Set the login and password variables to the values from the LoginInput and PasswordInput1 fields. If one of the fields is not filled in, we call the function to display an alert with a request to enter the correct values for email and password.
We pass null to the email argument of the showAlert function.
If both values are entered, then you can call the login method (docs).
For the LoginAPI, in the Blocks – Advanced – Web APIs tab, select blocks for setting the request body.
Note that the request body is a JSON object with login and password parameters, the values of which we took from the LoginInput and PasswordInput1 fields.
After setting up the API, we make a call to LoginAPI Post. If successful, the result will be an object of the logged in user. If the request fails, an error will be returned.
Regardless of the result, we form an object from the response and pass the email (it will be null in case of an unsuccessful login) and message (it will be null in case of a successful login) values to the showAlert function.
Thus, depending on the result, we will receive either a message about a successful login or an error. The final version of the logic looks like this:
Testing
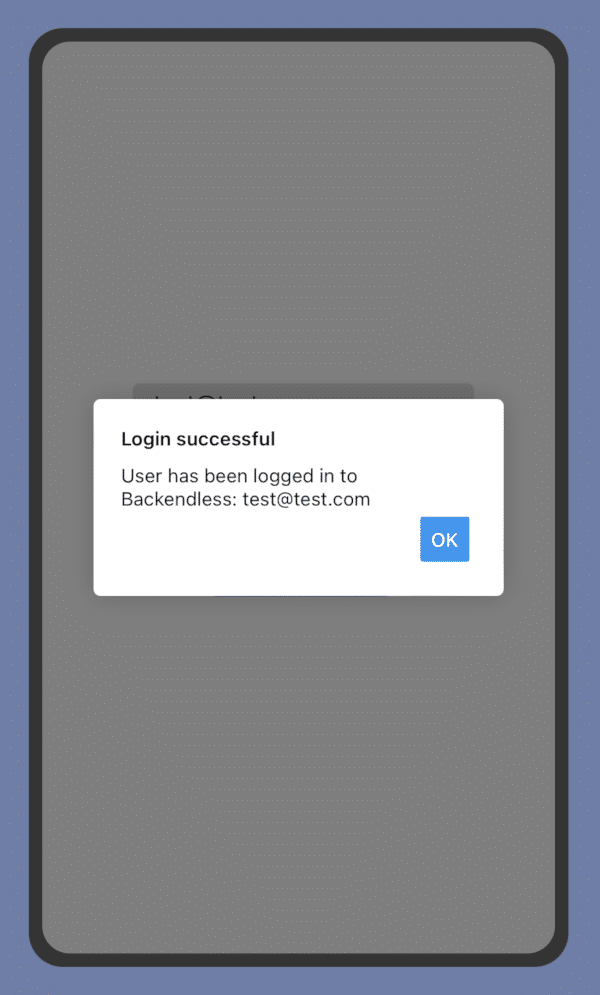
In the upper right corner, click on the Web Preview button, enter the login and password of a new user and click Login:
If the login was successful, we will receive a message about the success of the operation:
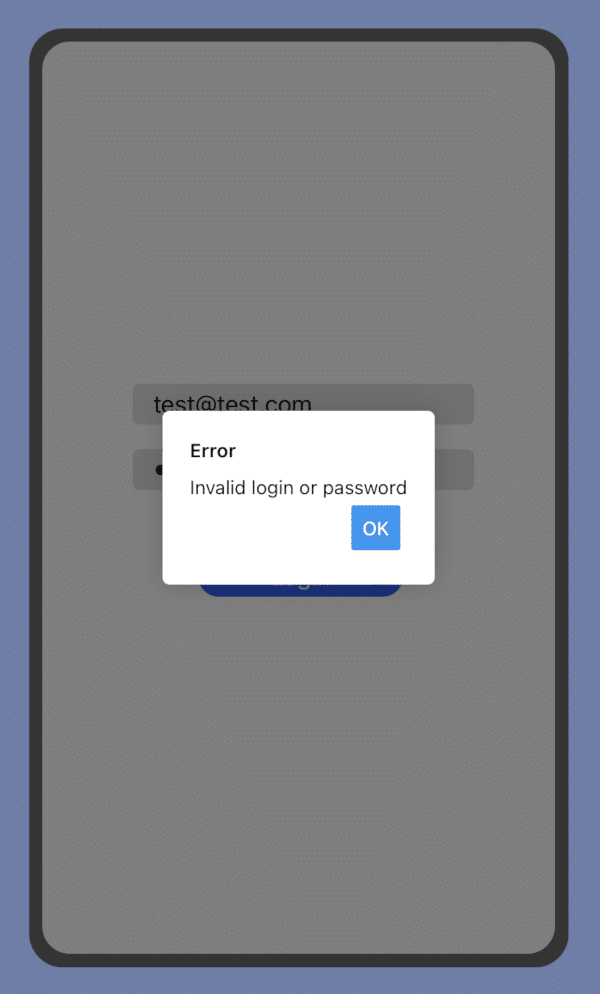
If an error occurred during login (for example, they tried to login with an incorrect password), then we will receive the following notification:
Save Thunkable App Data In Backendless
Backendless Database is what sets Backendless apart from every other no-code platform out there. Your database can store a wide range of data types (including spatial/geo data and JSON objects) and makes it trivially easy to create relations between objects.
Backendless Database uses a SQL-based querying system. (We will touch on that more in the next section.) This approach allows you to easily query your data and display exactly what you want the user to see.
To start working with our data, let’s first take a look at how to save data into our Backendless Database from Thunkable. Let’s build a simple new page to try it out.
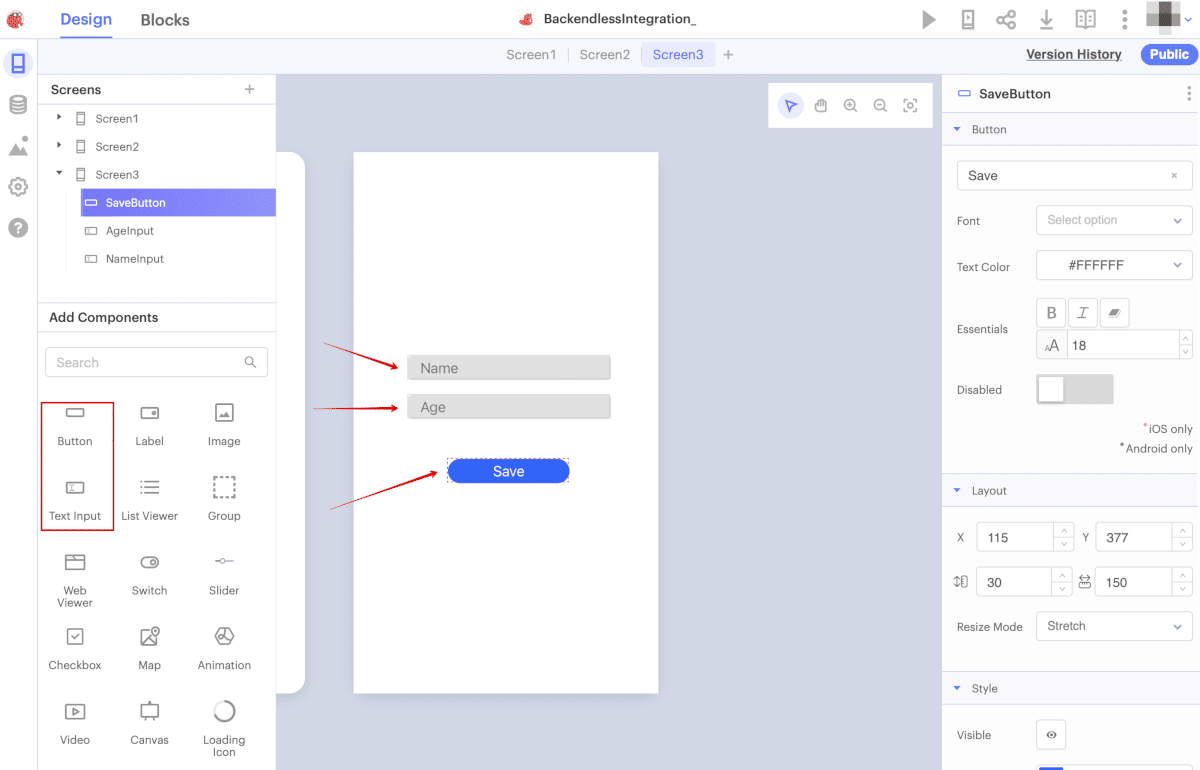
For this example, we need two Input components with identifiers NameInput and AgeInput (keyboard type: numeric) and a button SaveButton:
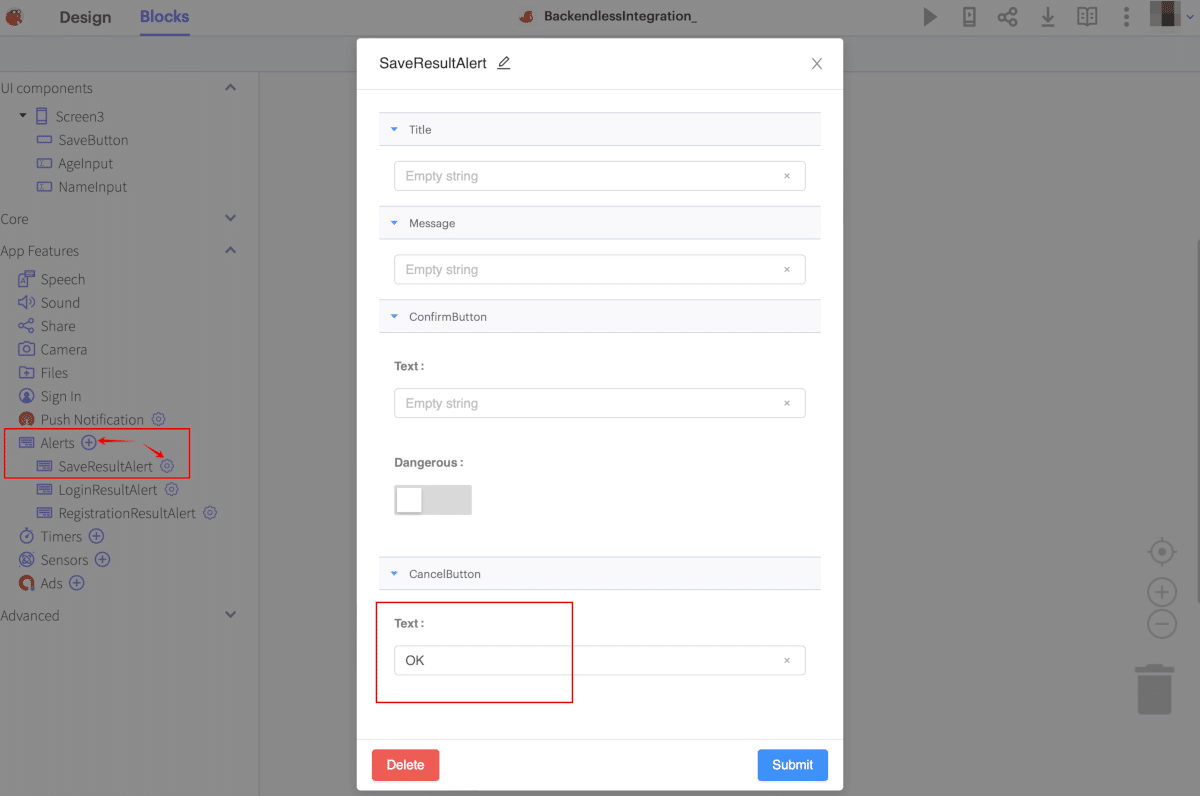
Also add an Alert SaveResultAlert, clear the values of all fields and leave only one CancelButton to close the message:
Connect Thunkable To Backend Via API
Also add a Web API (Blocks – Advanced – Add Components – Web APIs) component to save the object and name it SaveObjectAPI:
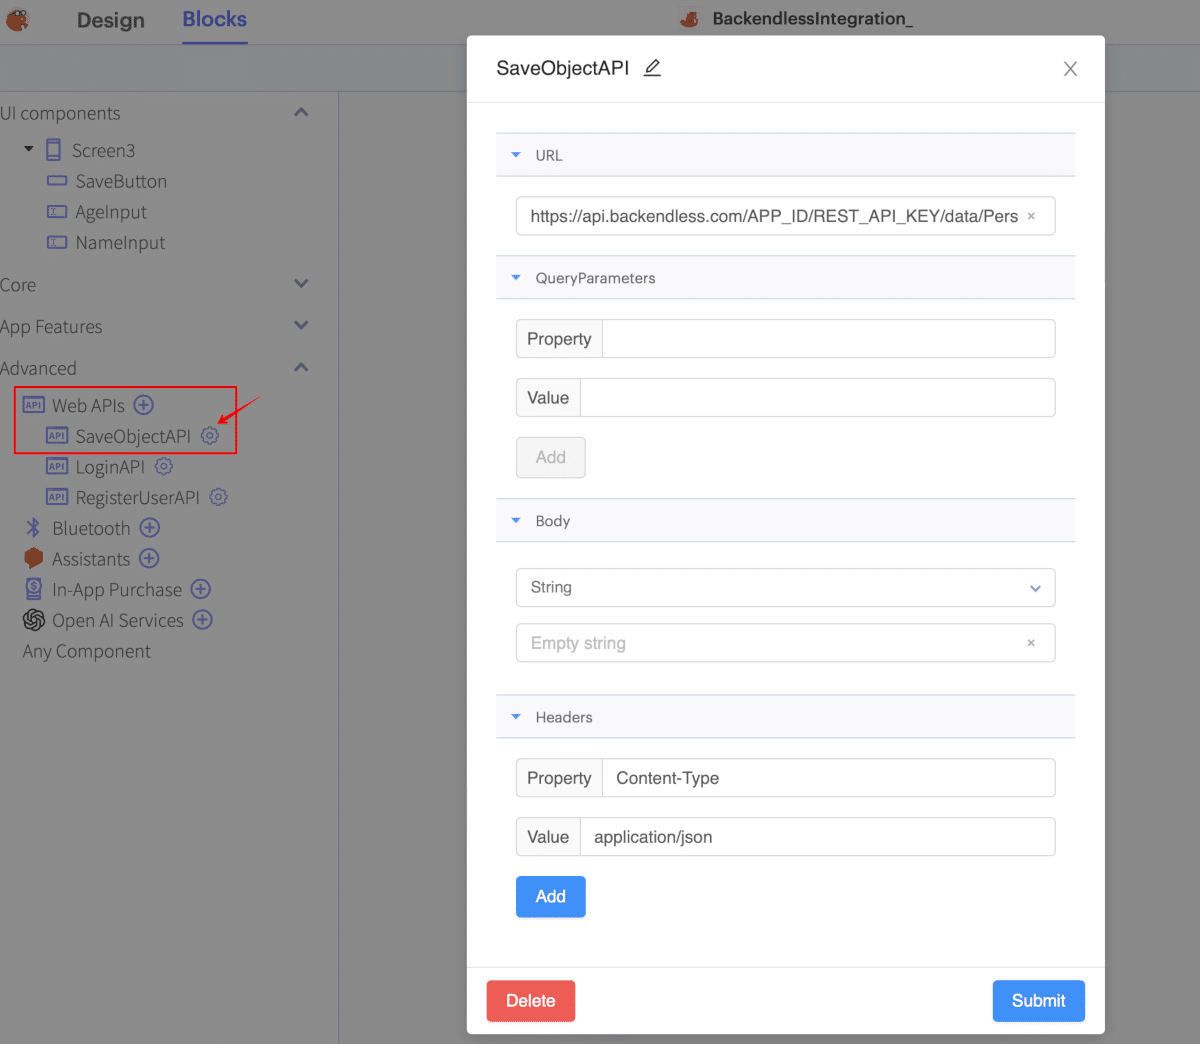
The URL value is https://api.backendless.com/APP_ID/REST_API_KEY/data/Person (or https://eu-api.backendless.com/APP_ID/REST_API_KEY/data/Person for the EU cluster). Be sure to replace APP_ID and REST_API_KEY with your app’s values, found on your Backendless Backend Dashboard.
Next, let’s go to the Blocks tab and add logic to save the object by clicking the Save button. We will save the new object to the Person table.
Let’s add the showAlert function to display the Alert, which takes objectId and errorMessage as parameters and, depending on the parameter, displays the desired message:
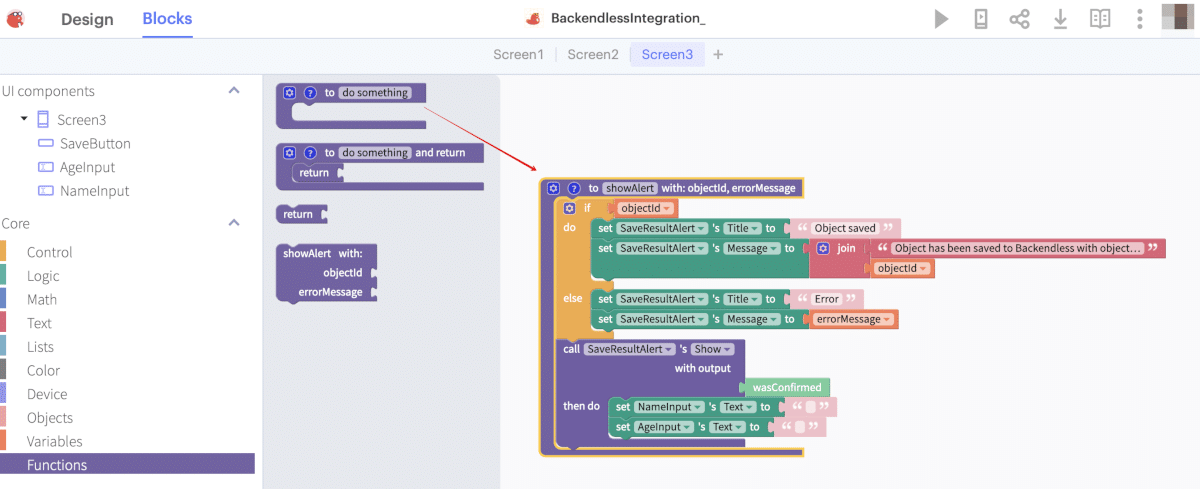
We check if the objectId value was passed to the function. This option for the alert will be relevant if the save is successful. If the saving was successful, set the success message in the Title and Message alert.
If objectId = null, then an error has occurred – in this case, set the alert message to the error message in Title and Message. After setting those values, we call the alert display and then clear the NameInput and AgeInput fields.
Now let’s return to the click handler for save button:
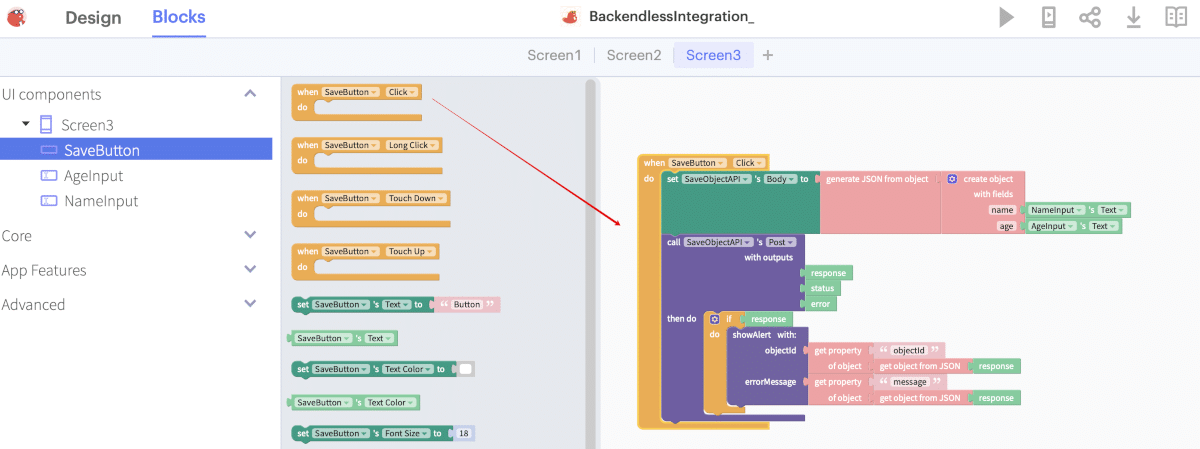
By clicking on the Save button, we call the method for saving the object (docs).
Note that the request body is a JSON object with the name and age parameters, the values of which we took from the NameInput and AgeInput fields.
After setting up the API, we make a call to SaveObjectAPI Post. The result will be a saved object if the query is successful, or an error if it fails.
Regardless of the result, we form an object from the response and pass the values objectId (will be null in case of unsuccessful saving) and message (will be null in case of successful saving) to the showAlert function.
Thus, depending on the result, we will receive either a message about the successful saving of the object, or an error.
Testing
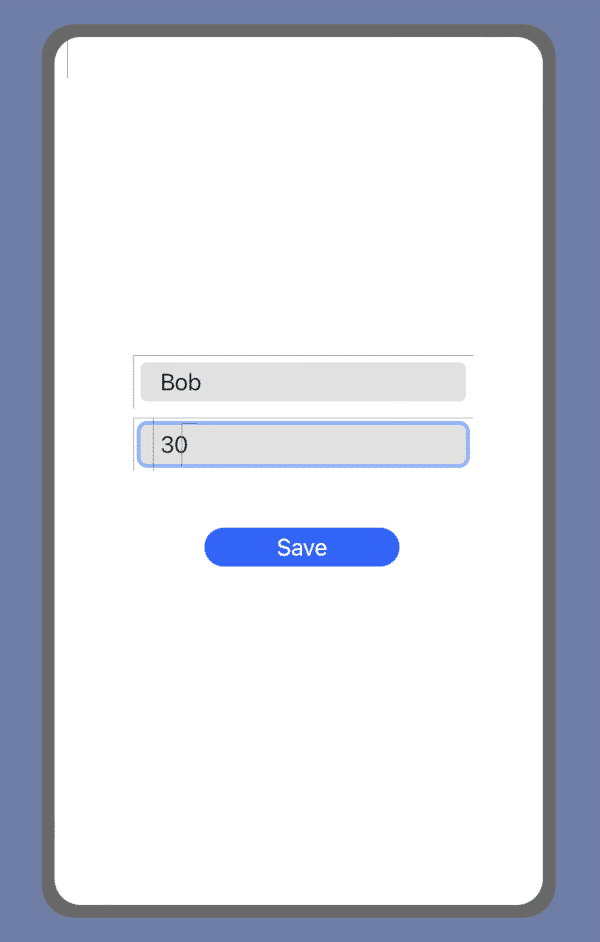
In the upper right corner, click on the Preview button, enter the name and age of the object and click Save:
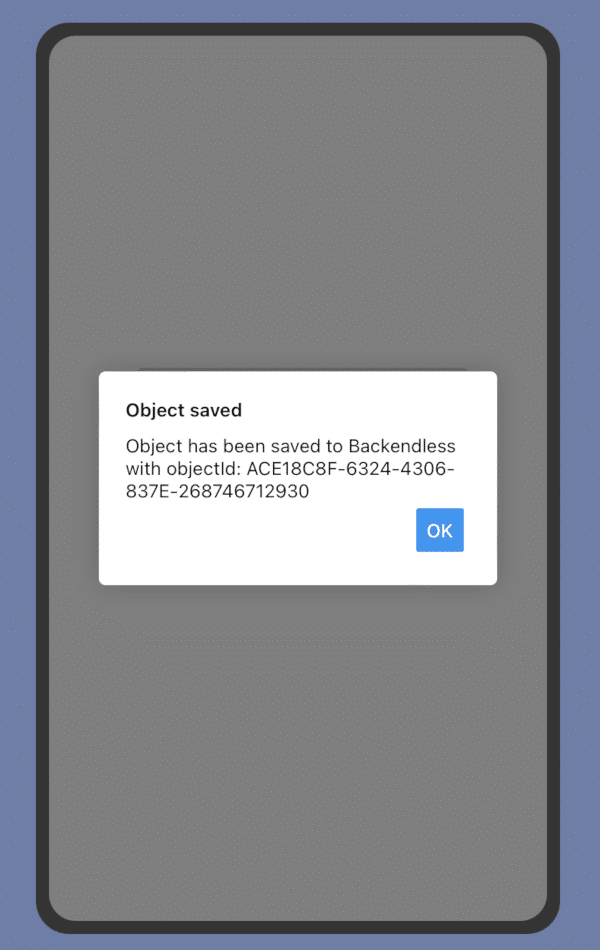
If the saving was successful, we will receive a message about the success of the operation:
Run A Query In Backendless
Finally, let’s walk through how to retrieve data from your database by running a query. We will again create a simple page for demonstration.
We will need one Input component with the WhereClauseInput identifier, the FindButton button and the ResultsList List Viewer to display the search results (I set a light blue background to it):

Connect Thunkable To Backend Via API
We will also add a Web API (as usual Blocks – Advanced – Web APIs) component for selecting objects. Name it FindAPI and change its settings:
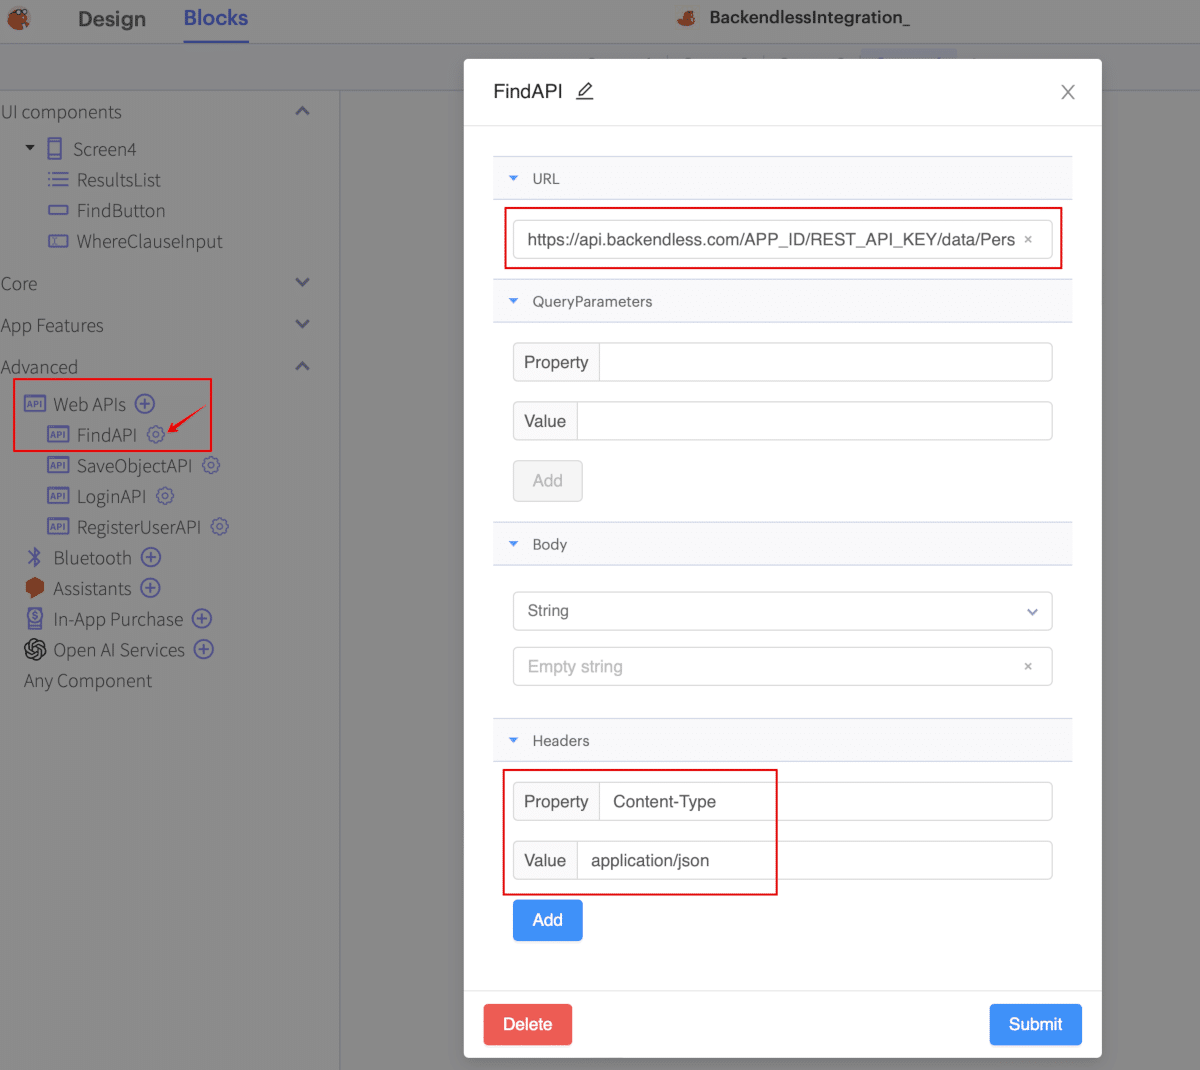
The URL value is https://api.backendless.com/APP_ID/REST_API_KEY/data/Person (or eu-https://api.backendless.com/APP_ID/REST_API_KEY/data/Person for the EU cluster).
Be sure to replace APP_ID and REST_API_KEY with your app’s values, found on your Backendless Backend Dashboard.
Now let’s add logic for selecting by clicking on the Find button. The selection will be made from the Person table in our database.
Let’s create two variables – empty arrays named responseObjects and resultsArray.
responseObjects is an array of objects that we will receive as a result of the fetch requestresultsArray is an array that will be the data source for the ResultsList

Now let’s return to the click handler on the Find button:
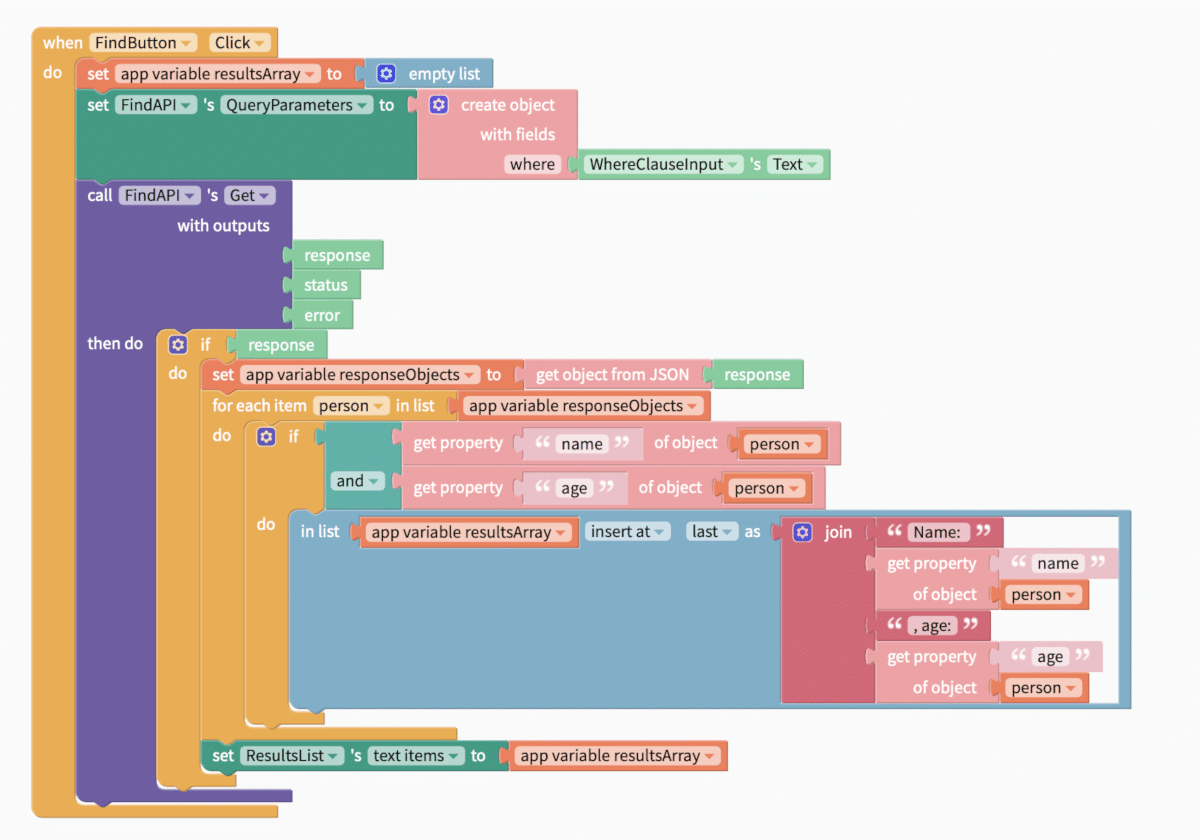
By clicking on the Find button, we clear the resultArray to clear the data of the previous search and call the data retrieval method (docs).
The where value for the conditional selection is taken from the WhereClauseInput field. This parameter is optional, and if not specified, all data will be selected.
After setting up the API, we call FindAPI Get. The result will be an array of objects that we convert from JSON and write to the app variable ResponseObjects.
After we have received the necessary objects, using the for…each loop, we go through this array and form the resultsArray. In the ResultsList, we will display the name and age of the received Person objects, so from each found object (if this object contains the name and age fields) we form the string "Name:" + person.name + ", age:" + person.age.
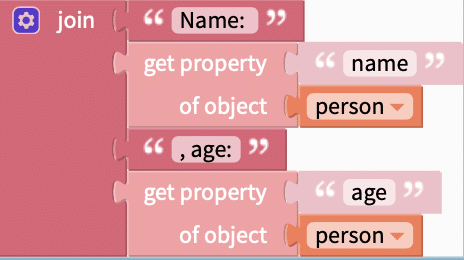
and add it to the resultsArray:
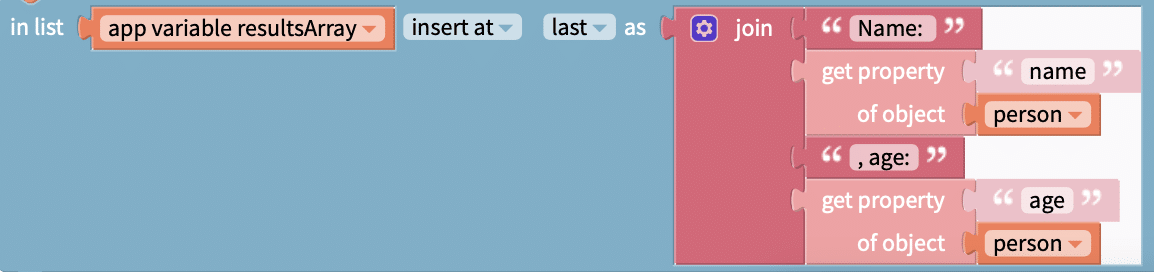
After forming the resultsArray, we pass it to the ResultsList for display:

Testing
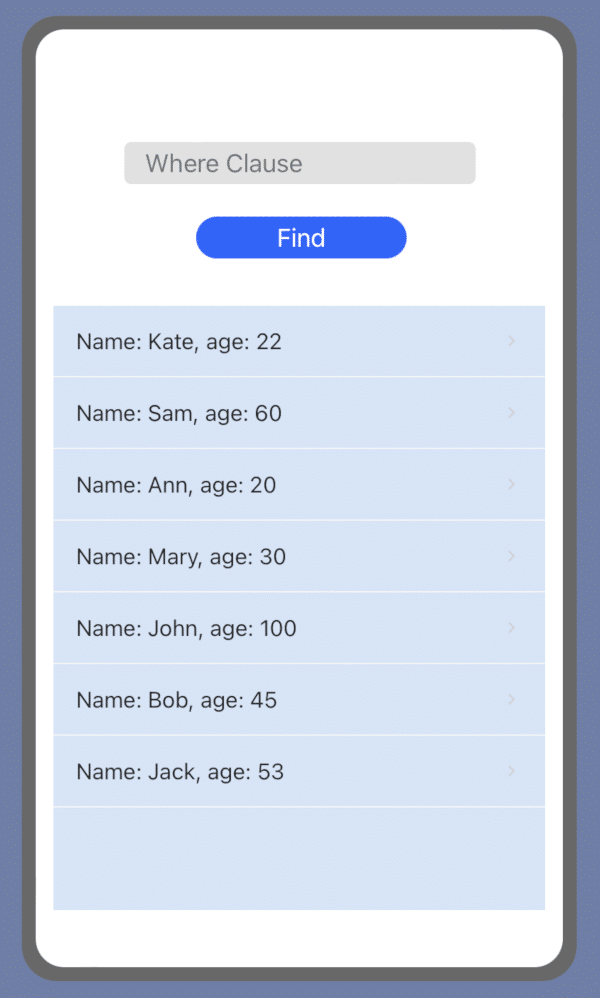
Our logic is ready. In the upper right corner, click on the Web Preview button, optionally enter a where clause, and click Find:
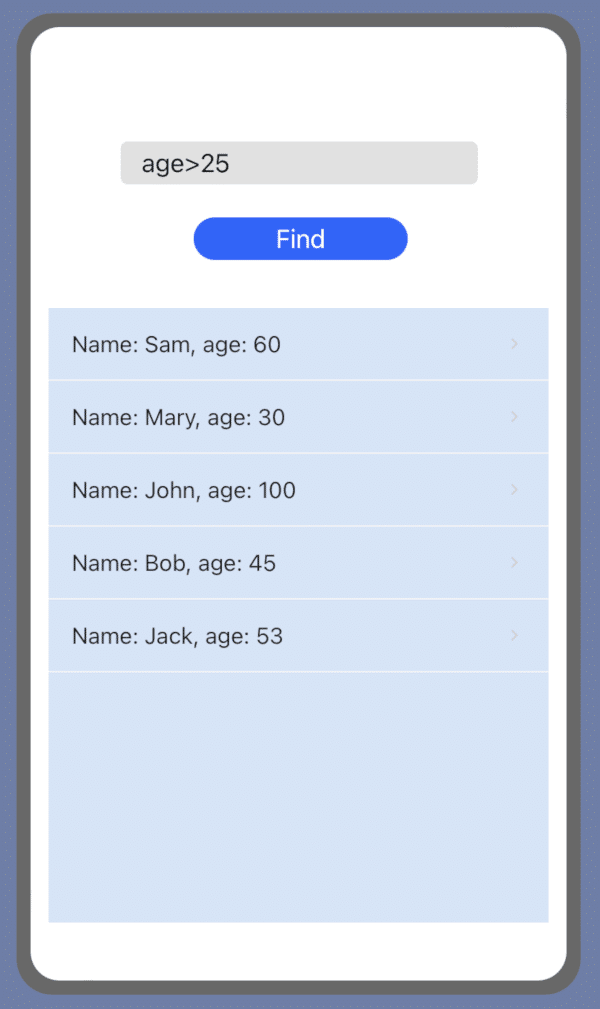
As a result of a query with whereClause = 'age>25', we got a list of Person table objects with age greater than 25. If we execute a Find query without specifying a whereClause, we get a list of all objects:
Closing
You should now have a basic handle on how to interact with a Backendless backend via Thunkable, but this is just the tip of the iceberg. Adding a Backendless backend and database to a Thunkable mobile app gives your app incredible flexibility.
With Thunkable’s easy frontend interface and Backendless’ many pre-built APIs, your possibilities become endless.
In addition to managing users and data, Backendless gives you access to timers, event handlers, and whatever Codeless logic you can think of on the backend.
Your app is virtually limitless.
Thanks for reading and Happy Codeless Coding!
*Backendless Free Plan pricing only. Thunkable pricing may not be free.