Add A Codeless Backend To AppGyver With Backendless
AppGyver describes itself as a “professional no-code platform, enabling you to build apps for all form factors, including mobile, desktop, browser, TV and others”. When you integrate a feature-rich no-code Backendless backend with your AppGyver app, you get a visual relational database, user management, bulletproof security, highly-scalable serverless hosting, and much more.
A successful app requires much more than just an impressive user interface. Most apps will be supported by their backend, including servers, data storage, user management, and in many cases, logic.
The more capable an app’s backend, the more effective the app and the better the user experience.
AppGyver offers fantastic no-code UI development tools and is setup to allow easy connection to external backend resources.
That’s where Backendless comes in.
With a huge assortment of pre-built APIs and the capability to build your own codeless APIs, Backendless easily fills in all the backend gaps in your AppGyver application.
The AppGyver-Backendless Stack
In this article, we’re going to walk you through the process of integrating the several basic Backendless functions into your AppGyver app (click to jump to each section):
The above items merely scratch the surface of the benefits of connecting your AppGyver app to a Backendless backend. You will also gain access to no-code features such as:
- A large pre-built API collection,
- Serverless hosting,
- Codeless logic builder,
- Cloud Code, timers, and event handlers,
- Email and push notification support,
- Team-driven development,
- and much more.
To get started, you will need a AppGyver account as well as a Backendless account (register here for free).
User Registration With Backendless
User registration and login enable your app to personalize the user’s experience.
User login opens up the entire set of user management functions in Backendless. These include session management, password management, user roles, and relating user to other data objects.
User registration also opens up user engagement opportunities such as email messaging, push notifications, and in-app messaging.
Let’s get started.
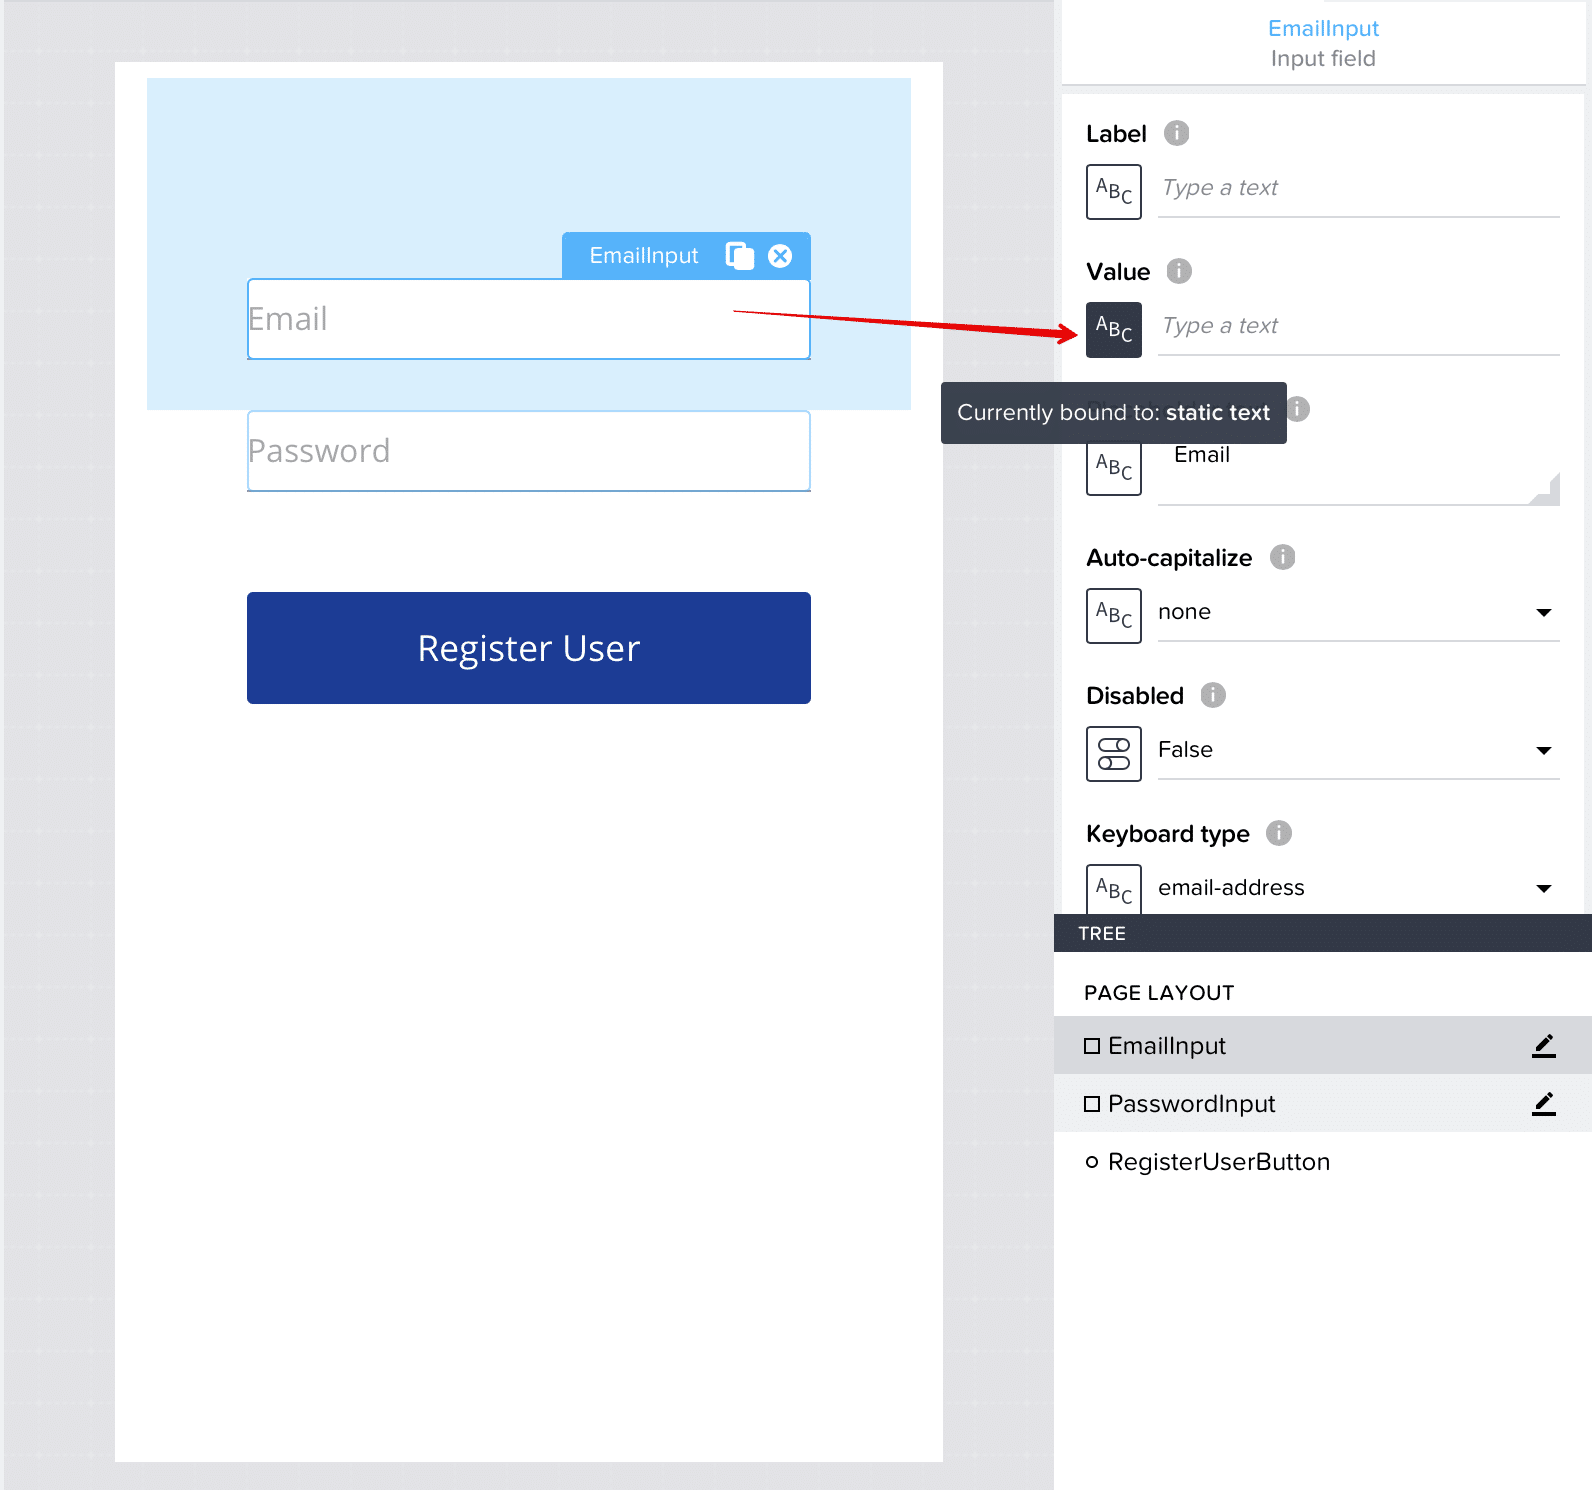
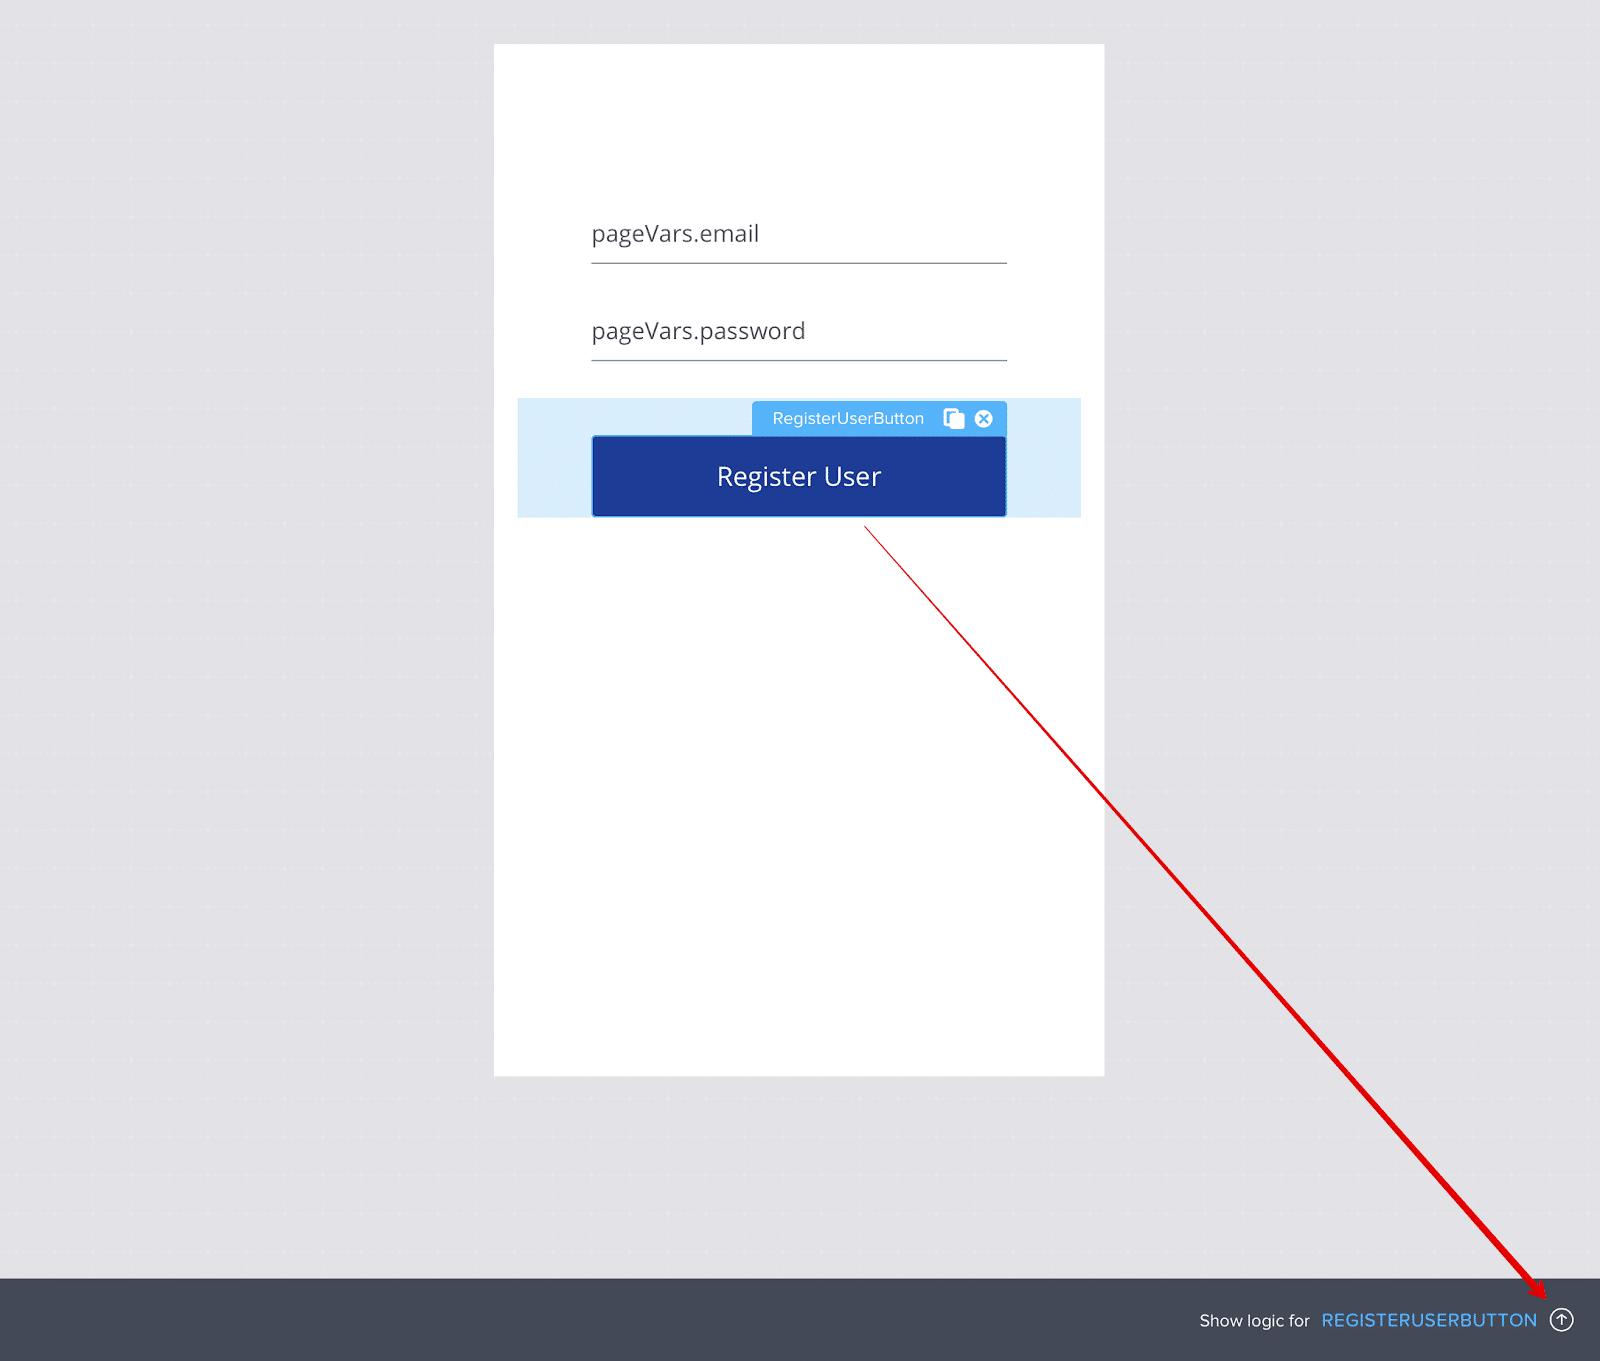
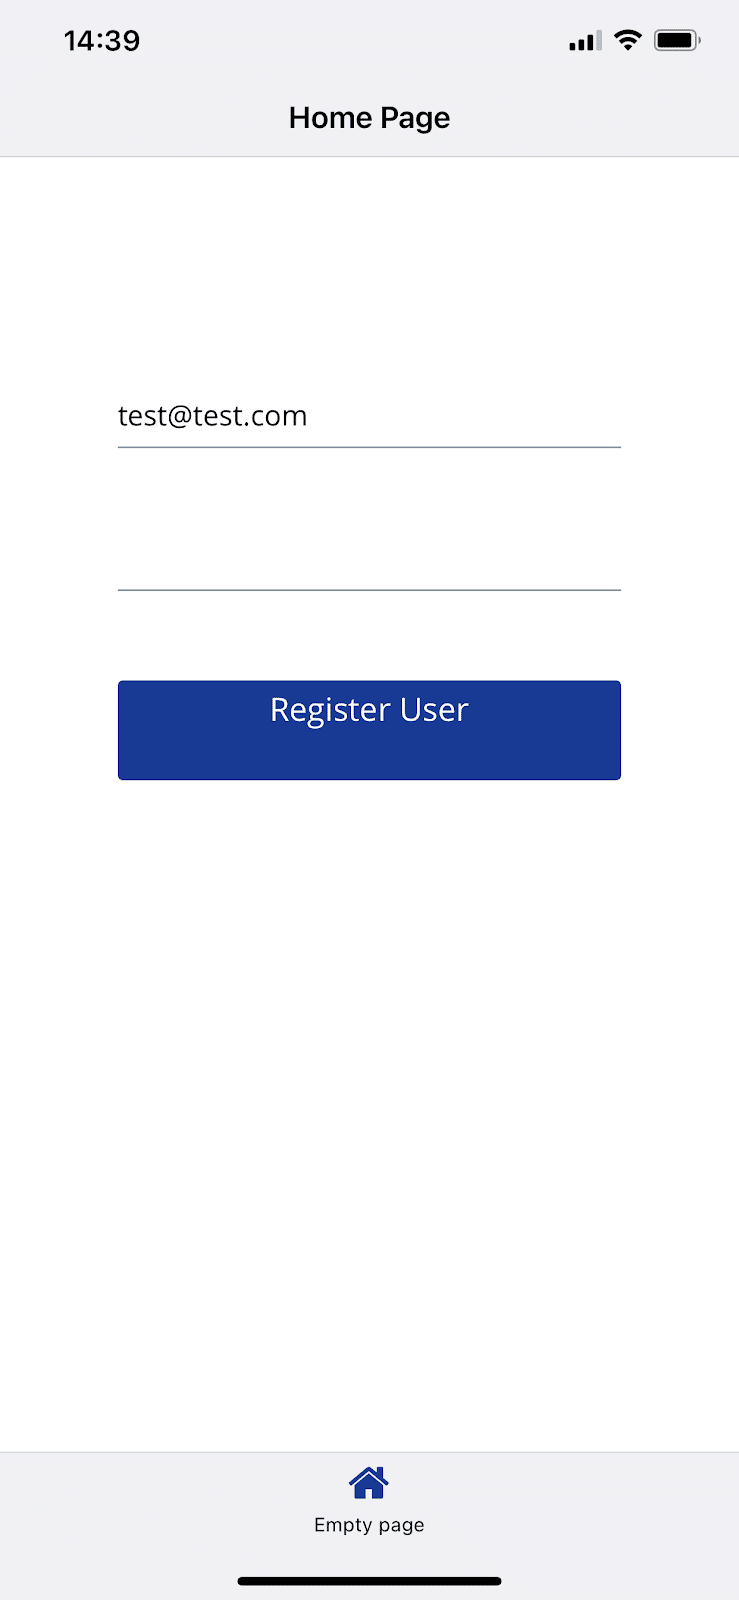
We will start with a page with two Input field components with identifiers EmailInput (Keyboard type: email-address) and PasswordInput (Password input: true) and a button RegisterUserButton:

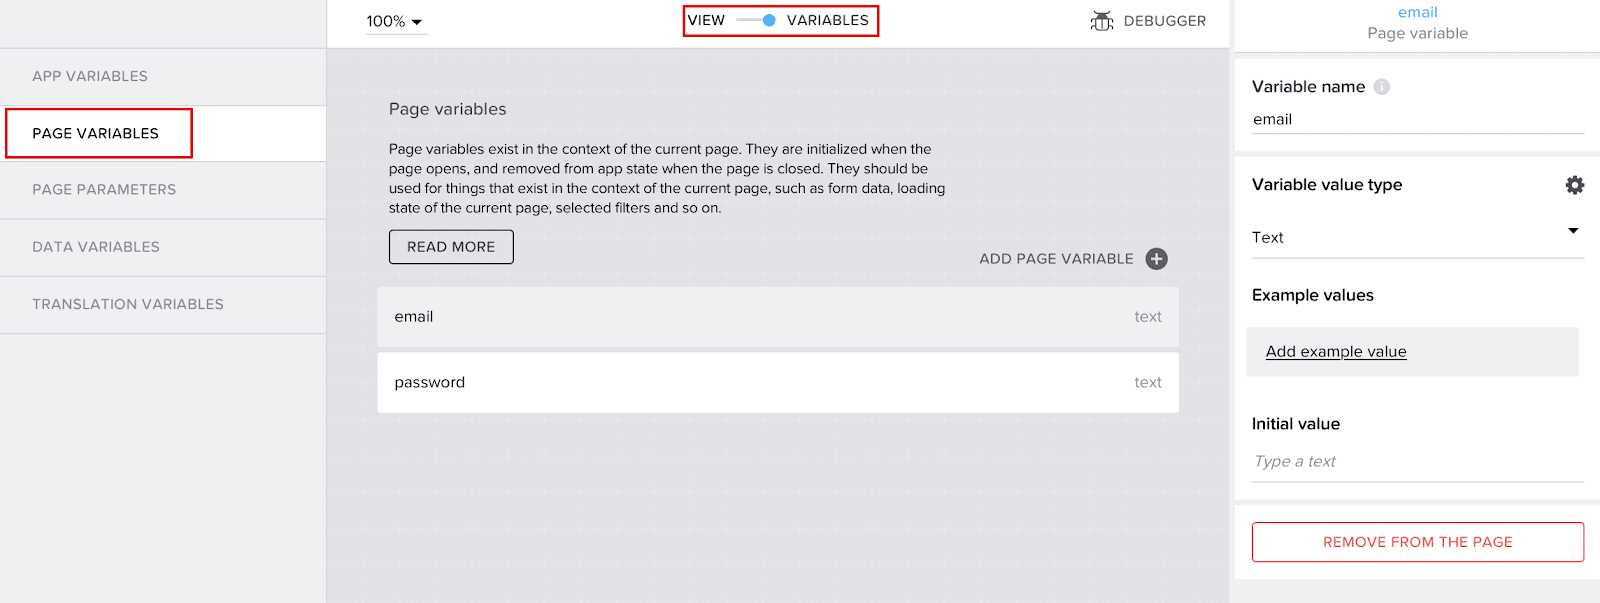
Let’s go to the Variables tab and add two Page Variables – email and password of type text:
Let’s bind these variables to the corresponding EmailInput and PasswordInput fields. To do this, go back to View, select EmailInput and set Value to it:
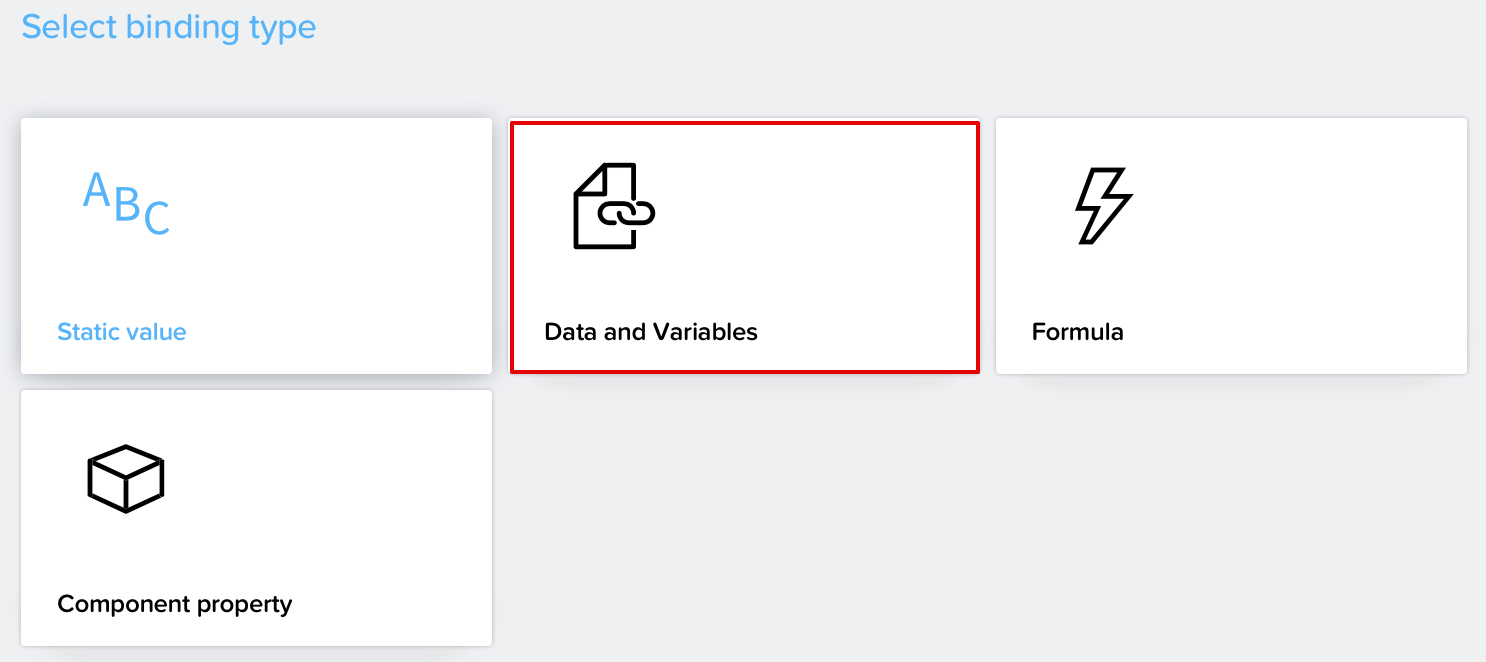
Choose Binding Type -> Data and Variables -> Page Variable -> email:
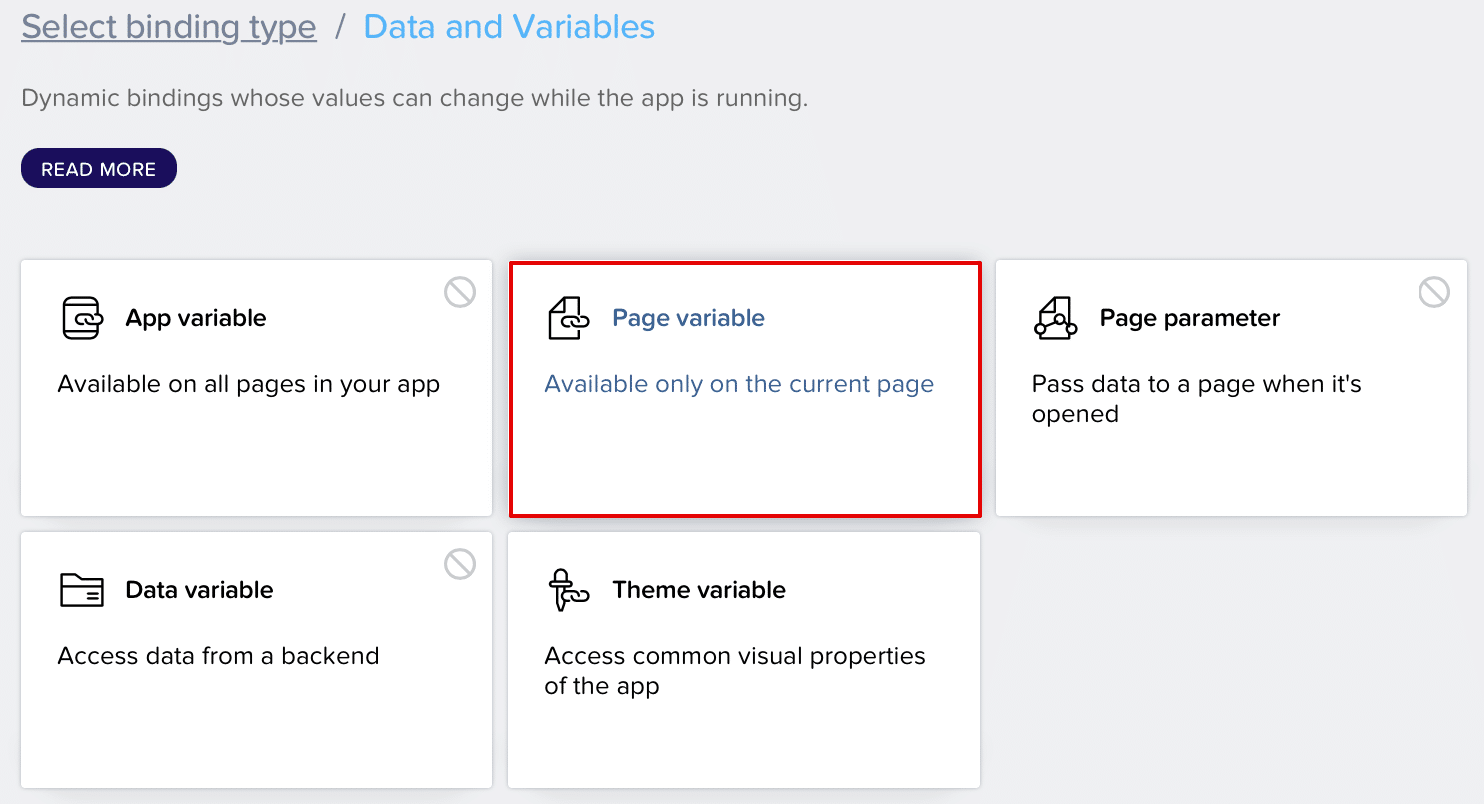

We make a similar binding for PasswordInput with the password variable.
Now let’s add an API for integrating Backendless registration. To do this, go to the Data tab and select Add Data Resource -> REST API direct integration:
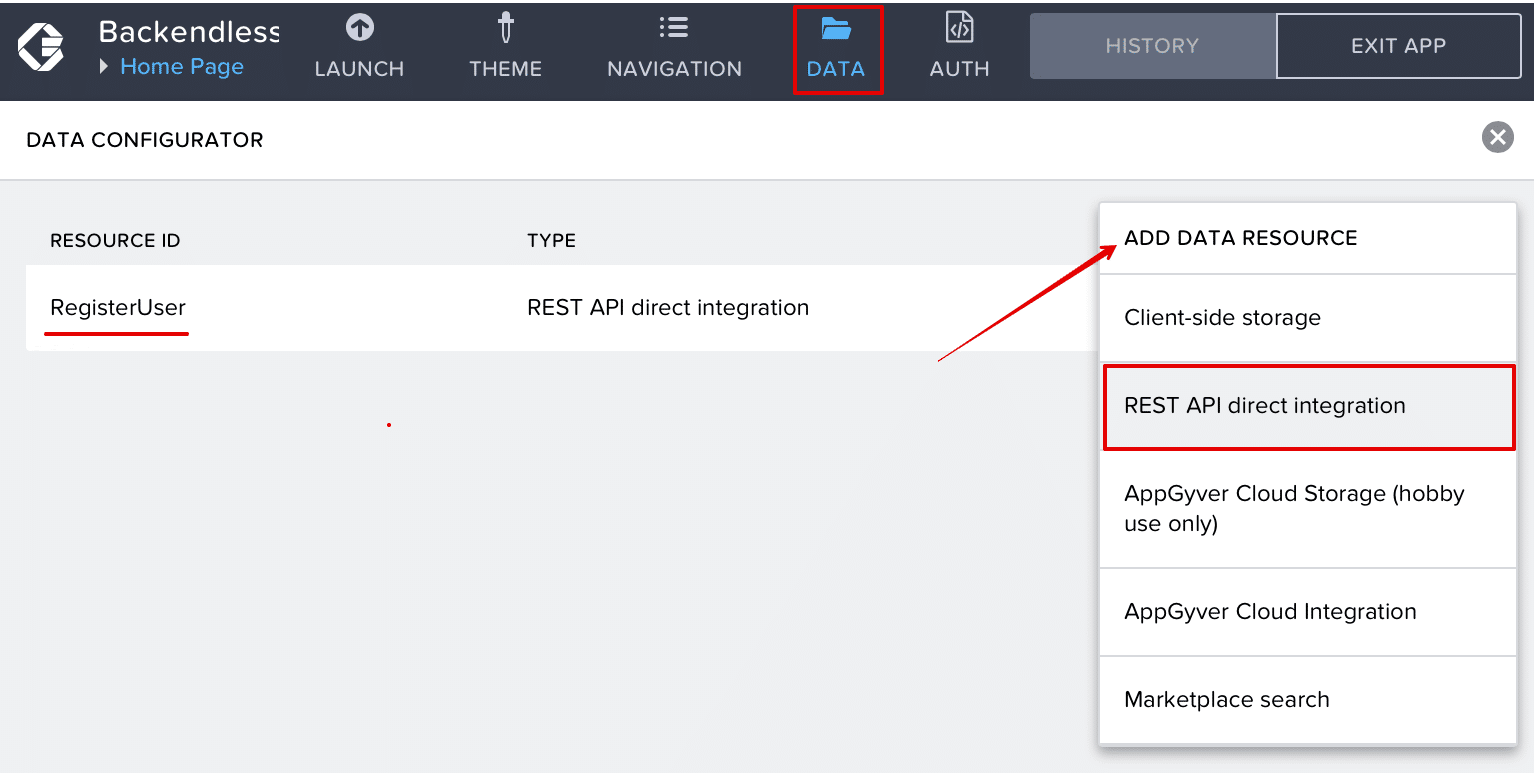
In AppGyver, let’s call the API RegisterUser from the backend and move on to configuring it:
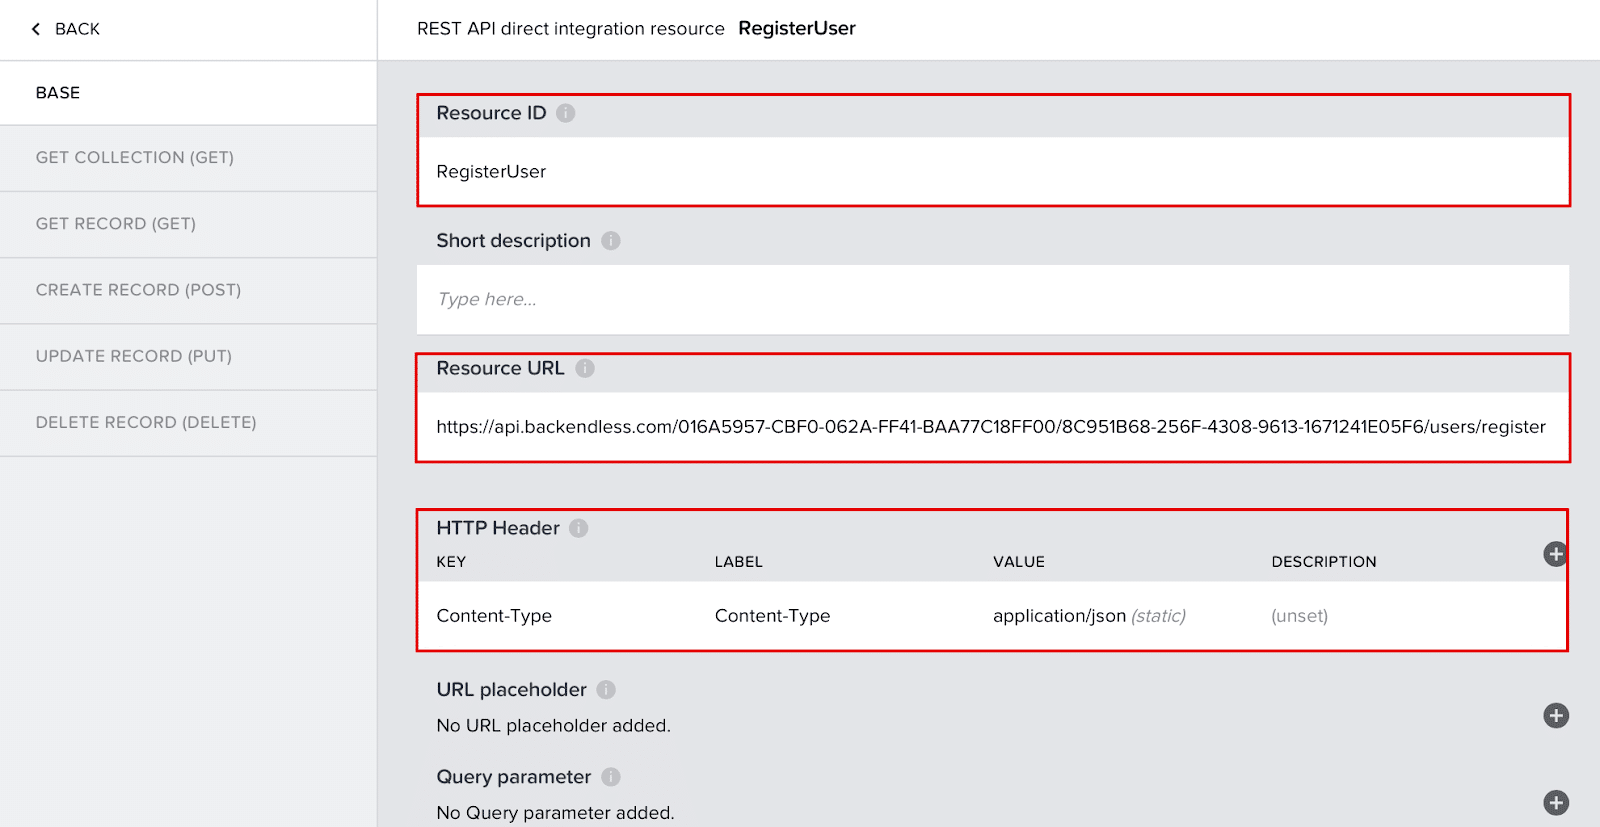
In the BASE tab, configure the Resource URL https://api.backendless.com/APP_ID/REST_API_KEY/users/register (be sure to replace APP_ID and REST_API_KEY with your app’s values, found on your Backendless Backend Dashboard) and add the Content-Type: application/json, then go to the POST tab to complete the configuration.
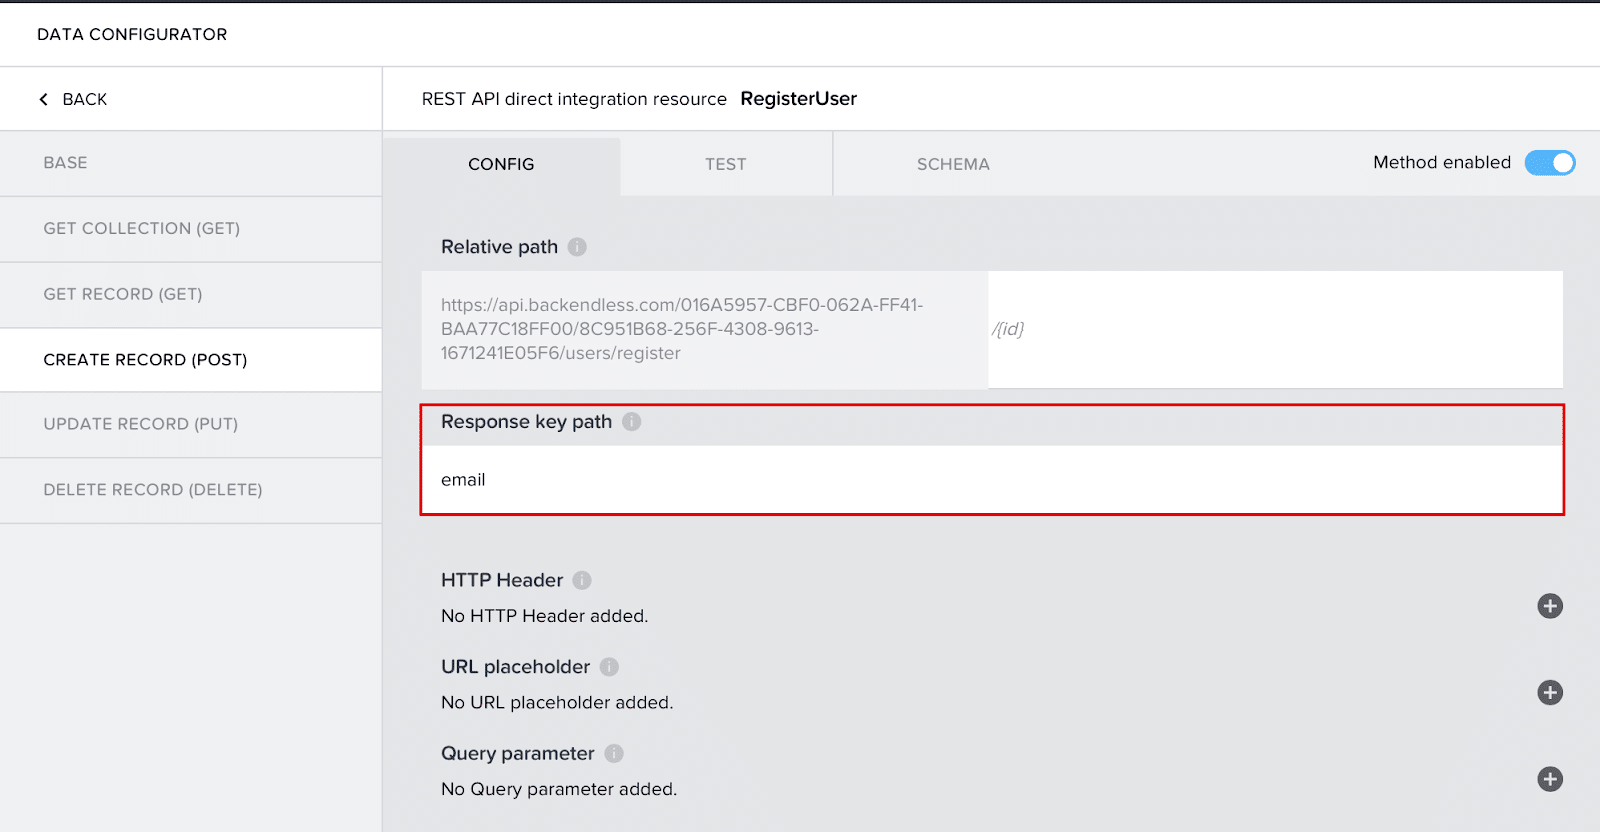
In the CONFIG tab, specify the Response key path: email. This means that out of the entire response (registered user object), we ask you to give us only email – in the future we will use this value to notify about successful registration:
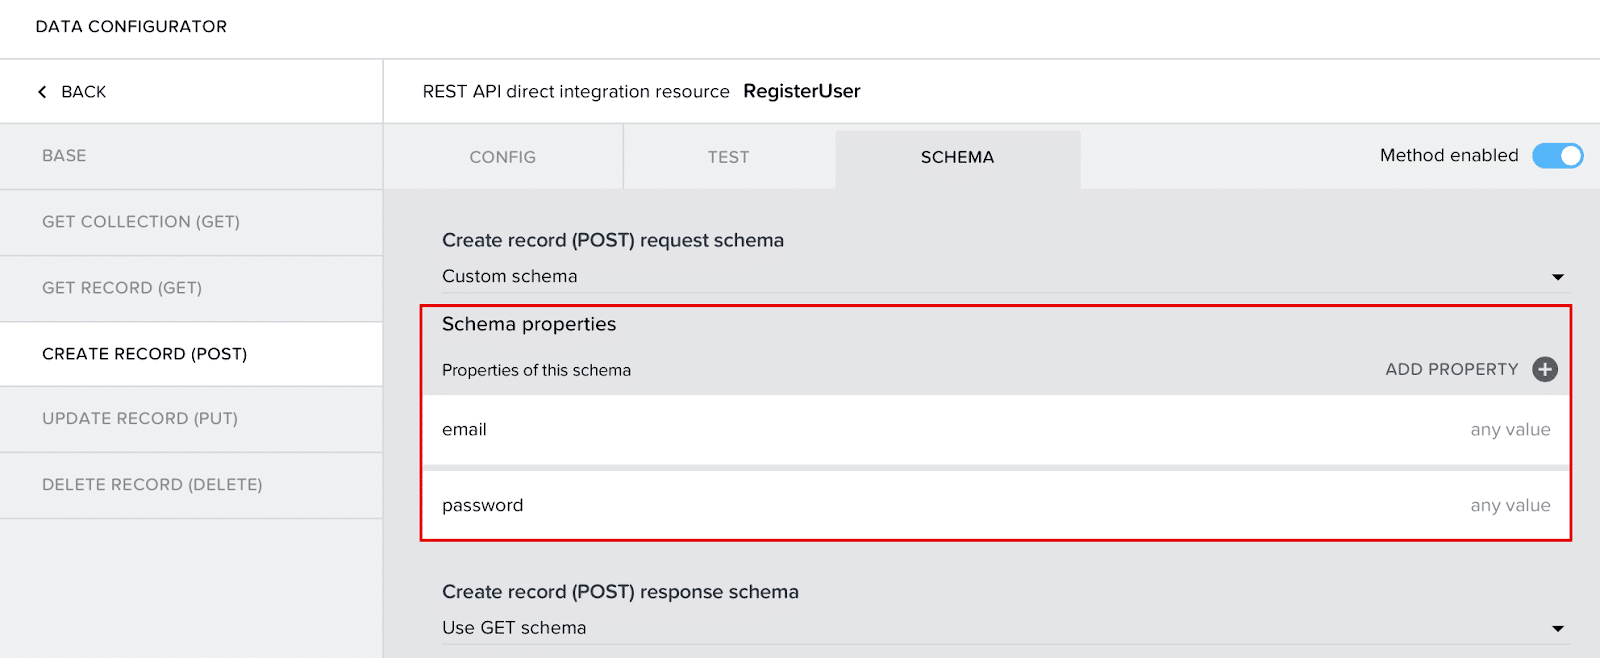
Now let’s go to the SCHEMA tab and add the email and password parameters to the body of the registration request. These parameters are of type any value in order to avoid a casting error, since the values for them will be taken from EmailInput and PasswordInput, whose values are of type text/numeric:
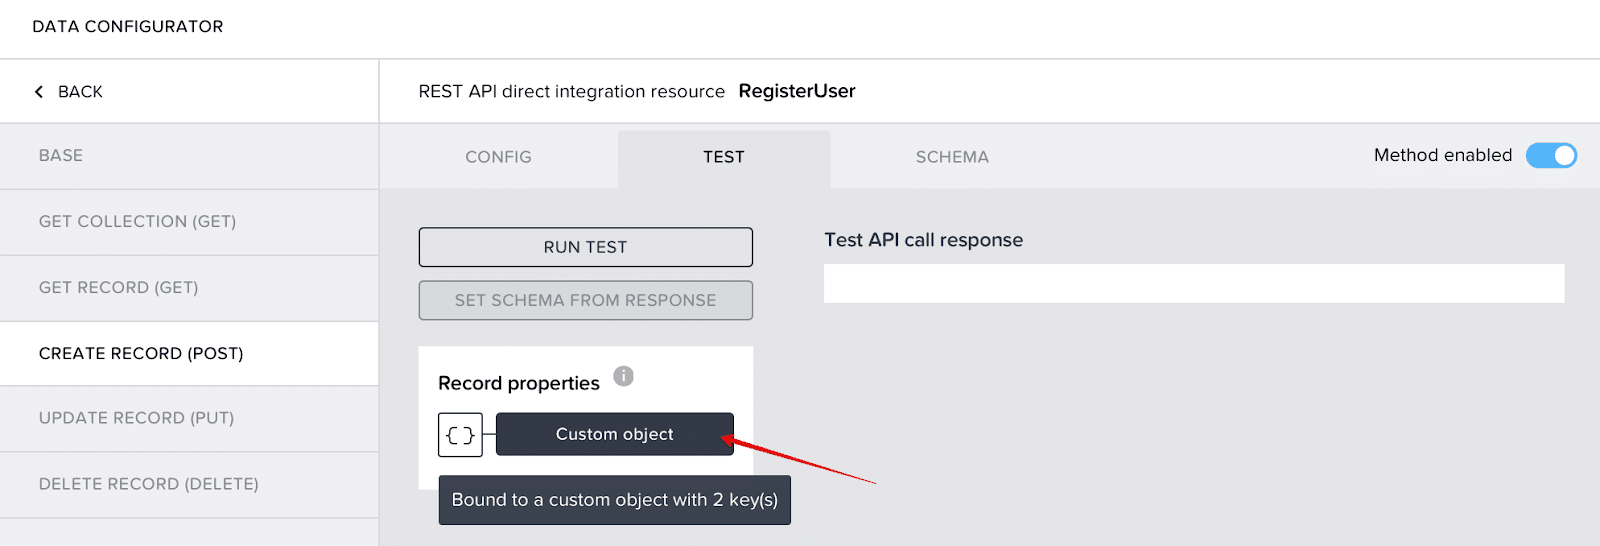
After specifying the parameters, you can go to the TEST tab. For testing, you must specify test values for the email and password parameters. To do this, click on the Custom object button:
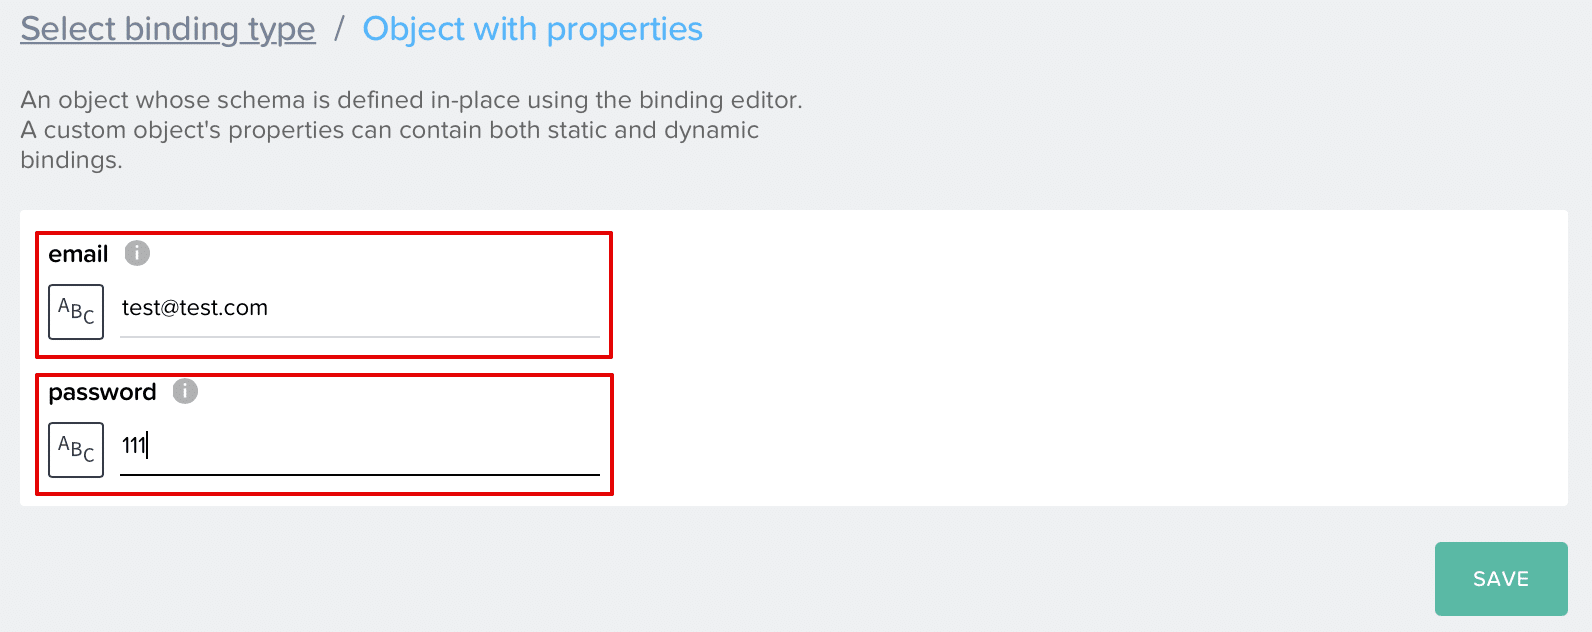
Enter the values and click Save:
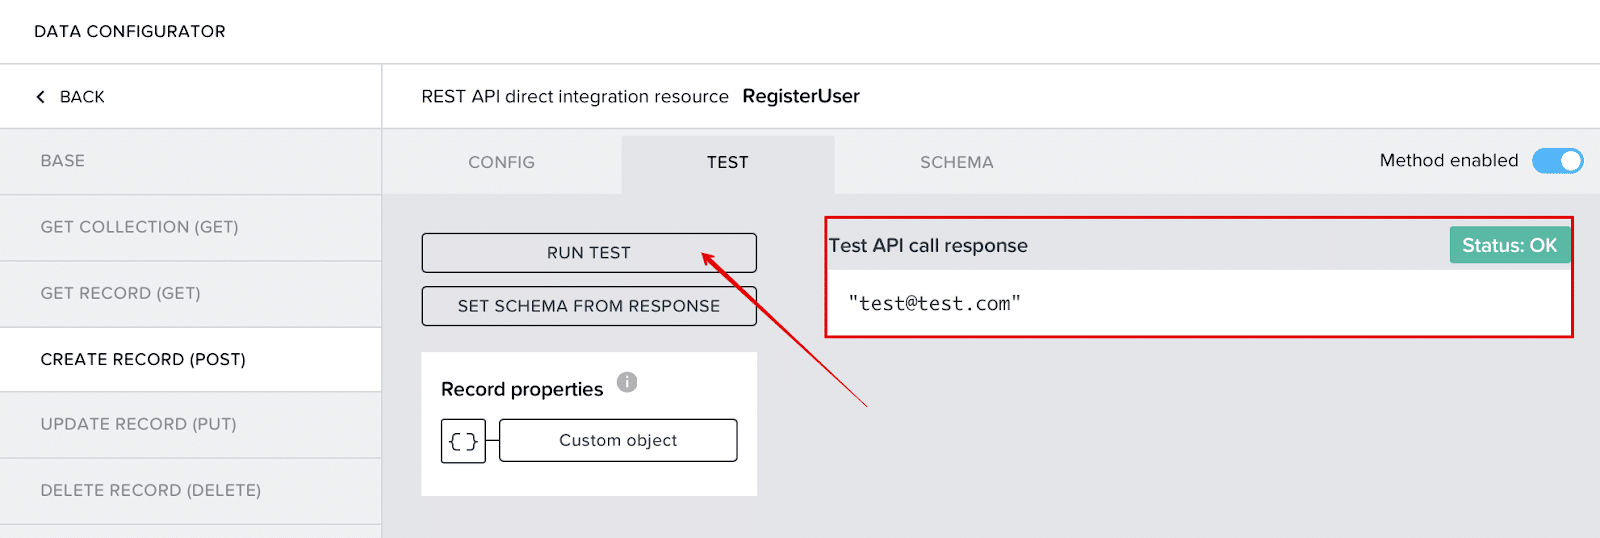
After that, we press RUN TEST and if the request is successful, in the response we will receive the email of the registered user (only email, not the whole object, since we specified email as the Response key path):
Save the changes and return to the View tab with our UI.
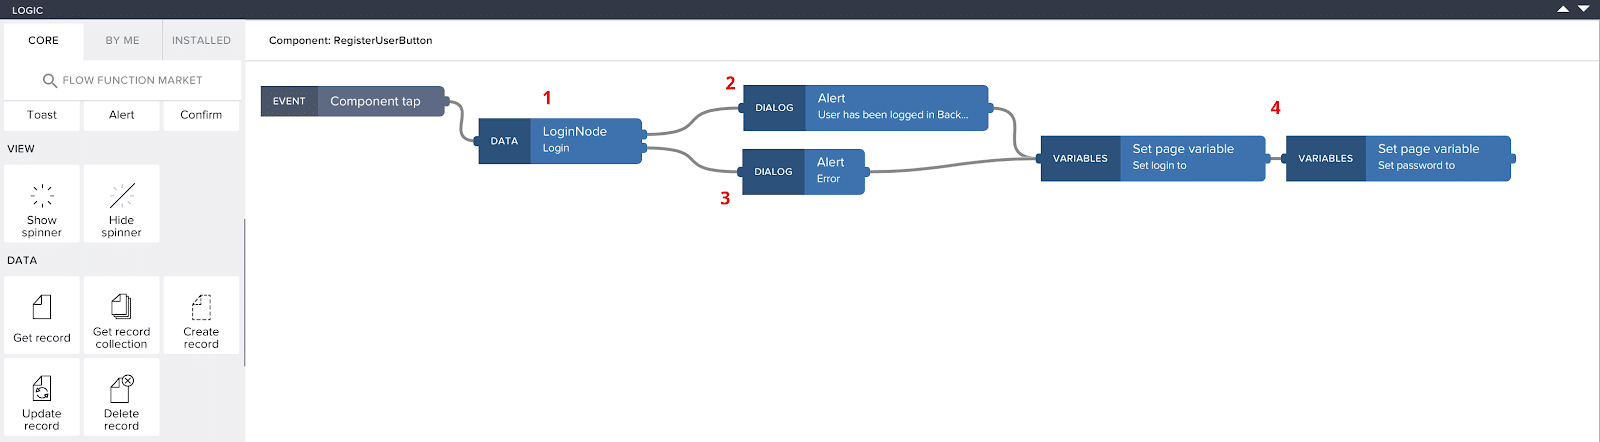
Select the RegisterUserButton and click Show Logic for REGISTERUSERBUTTON:
In the field that opens, drag the blocks to set up the logic as follows (explained further below):
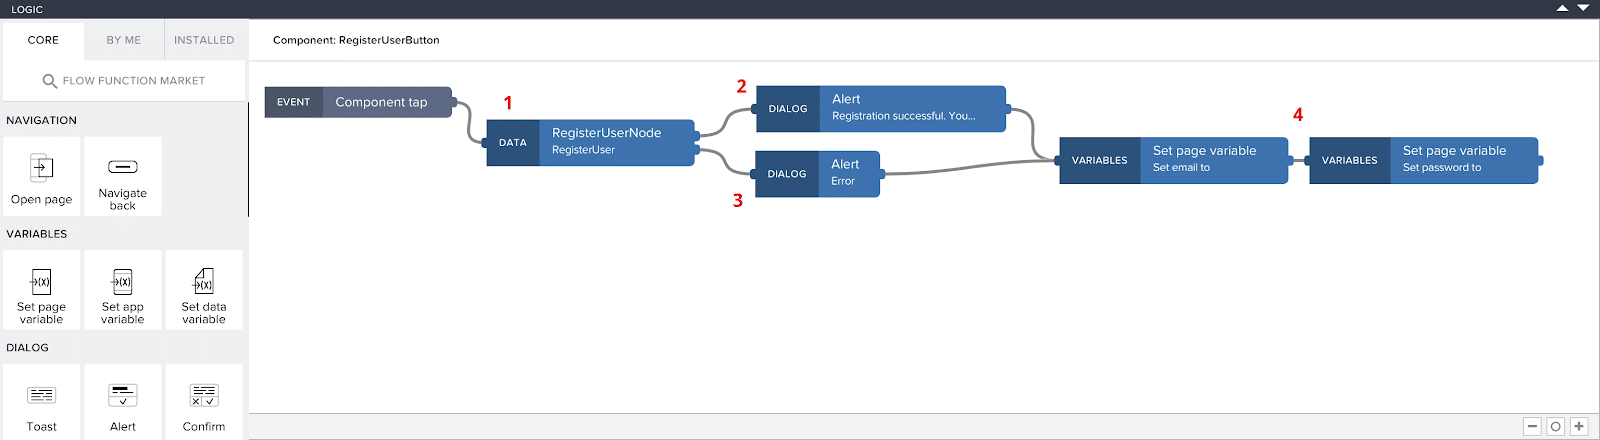
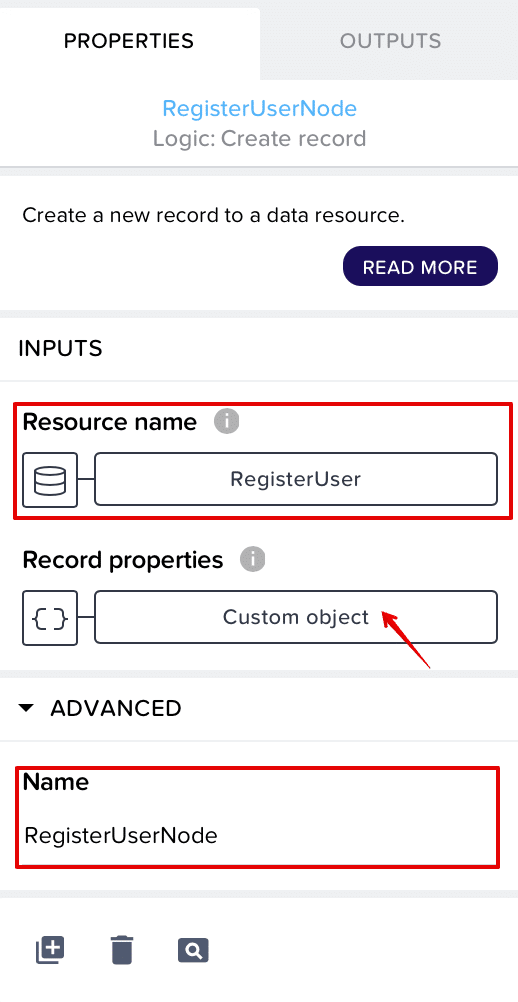
1) On the left tab, find DATA and drag the Create Record component to the Component: RegisterUserButton field:

In the block settings, select Resource name: RegisterUser, specify the name of the node: RegisterUserNode and click the Custom object button in the Record properties section to pass the corresponding values from EmailInput and PasswordInput to the email and password parameters:
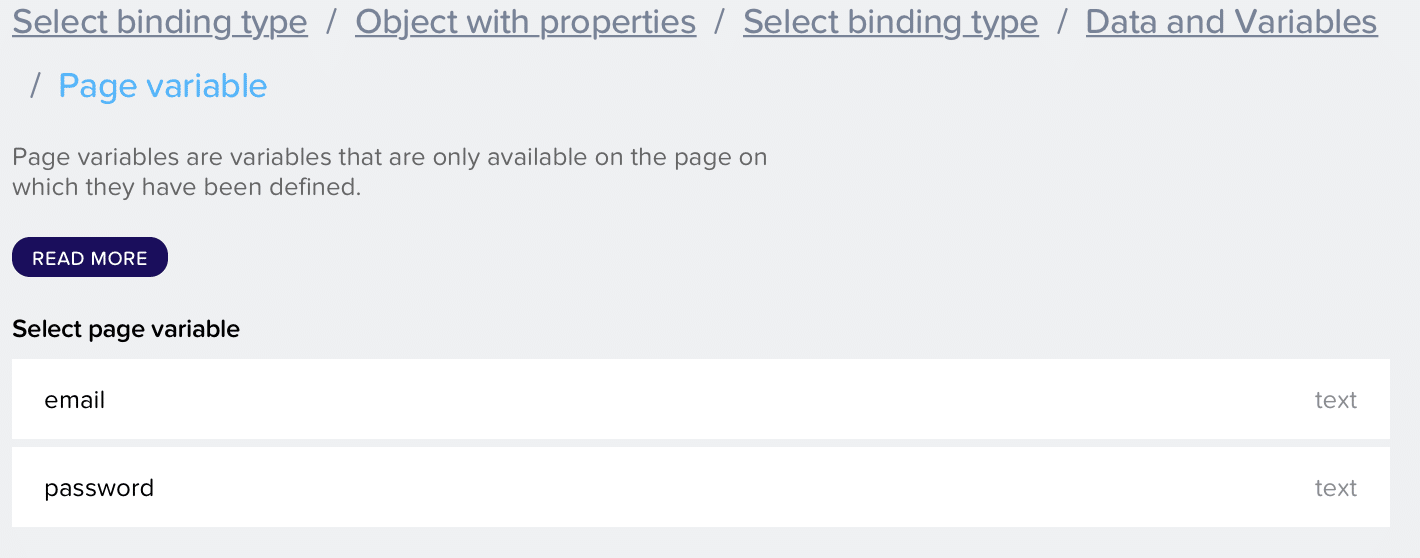
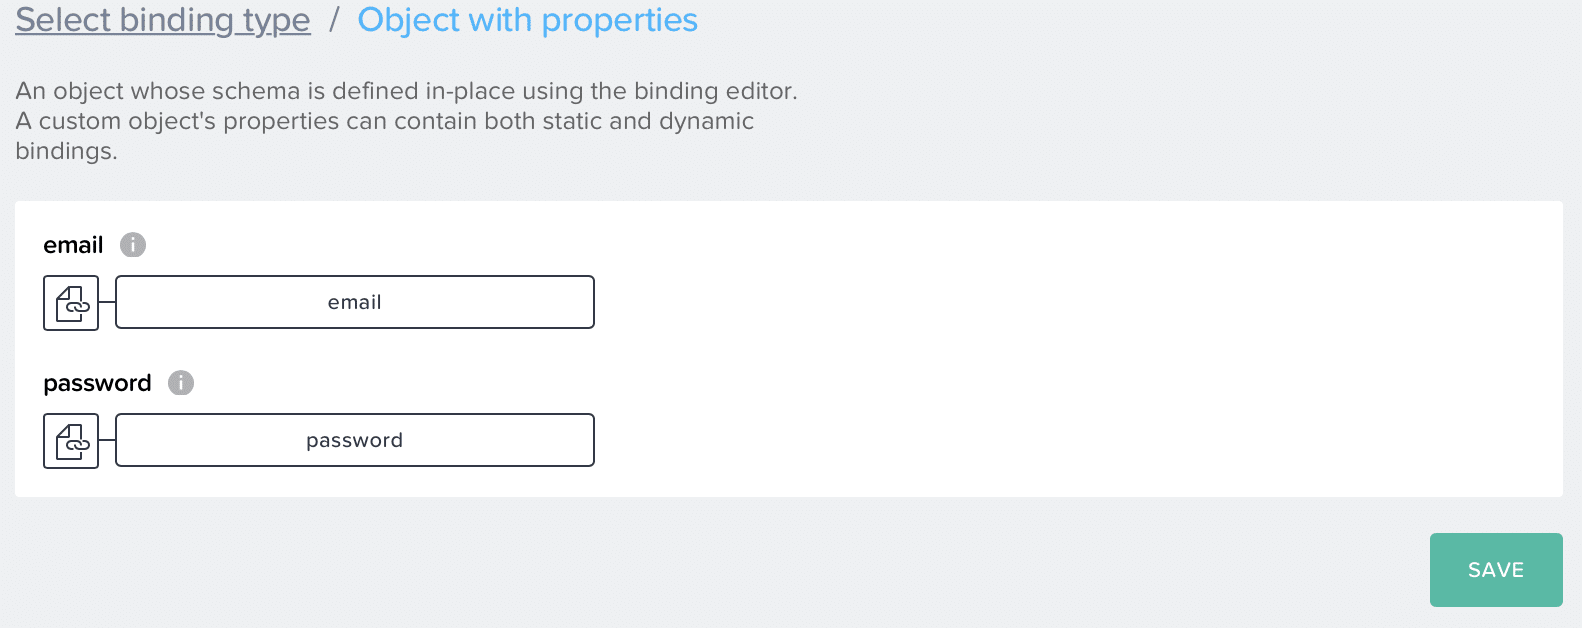
We select Binding type: Object with properties and then set the values of the email and password parameters corresponding to the values of Page variables: email and password:
Thus, setting up an object with parameters to call RegisterUserAPI would look like this:
Click Save and return to View.
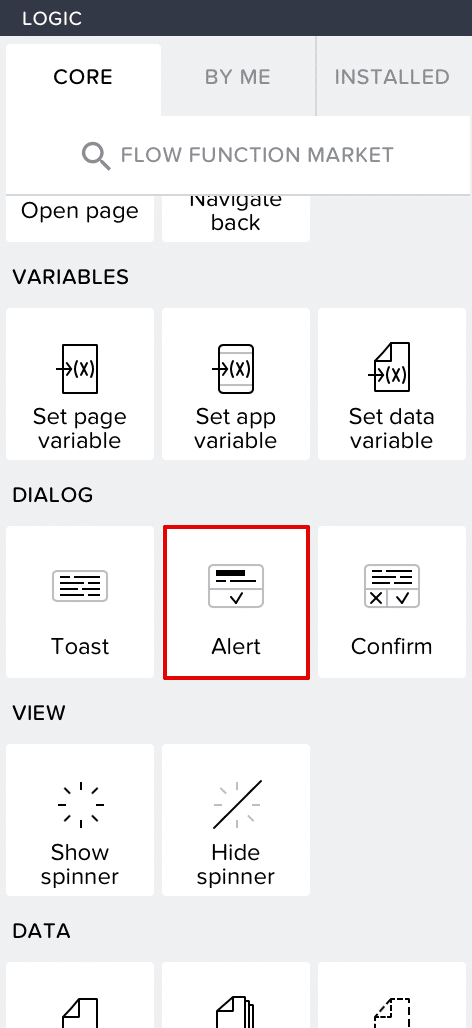
2) The result of the RegisterUser API call can be either an object of the registered user (in our case, only the email of the registered user, since we specified it in the Response key path), or an error. The second item in our logic is responsible for handling a successful response. From the left pane of the Logic section, drag the Alert component:
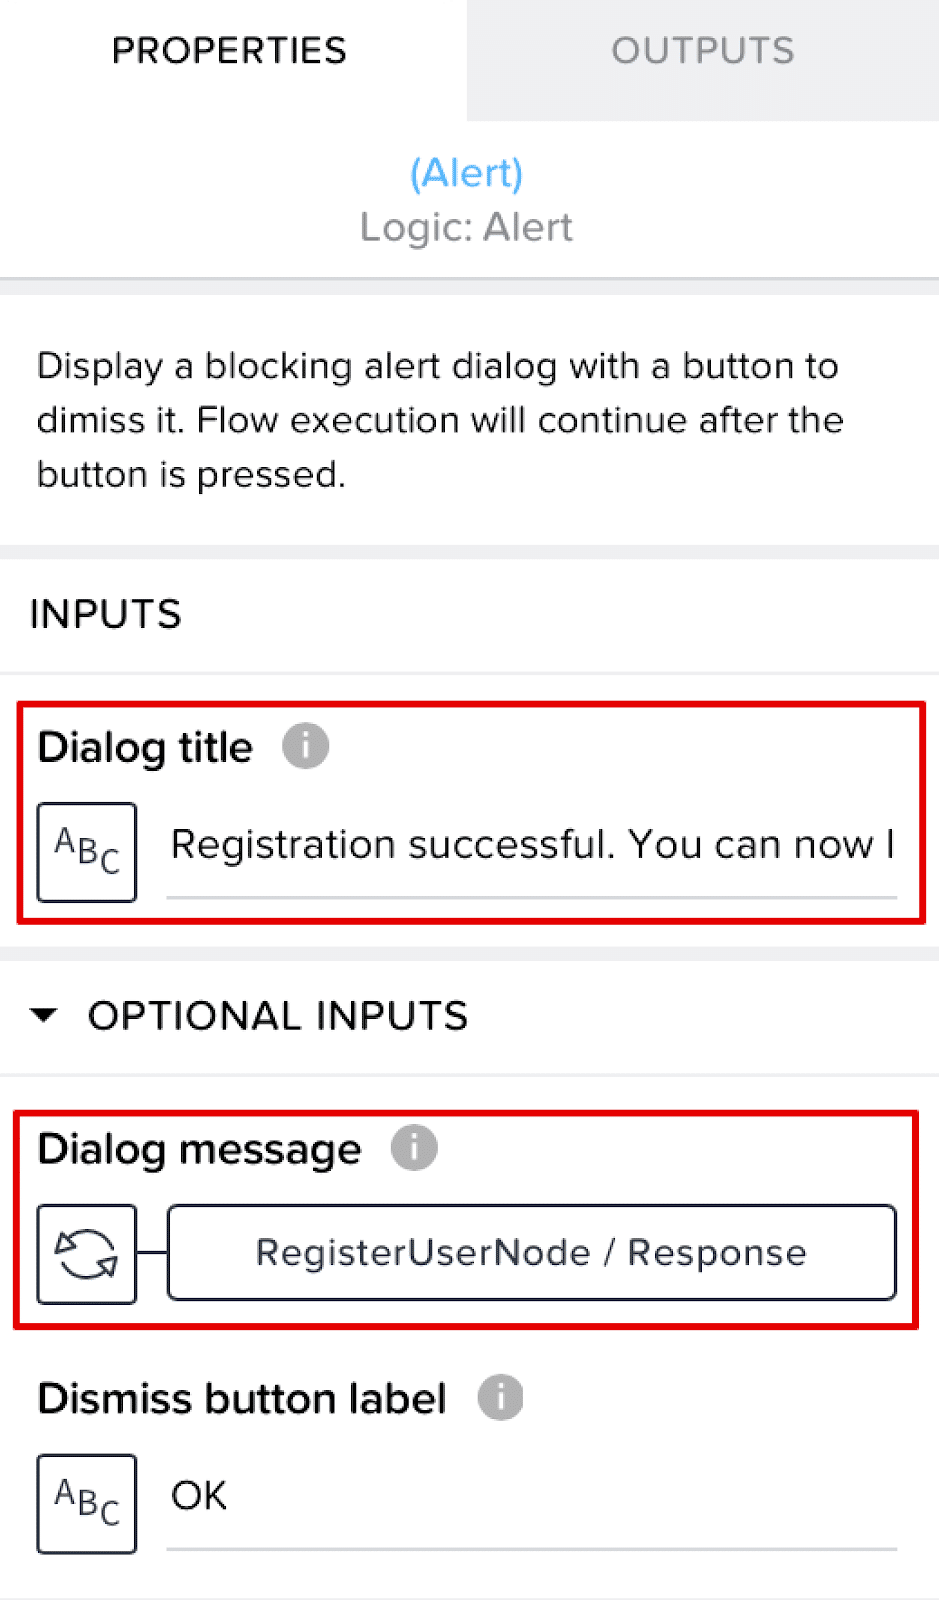
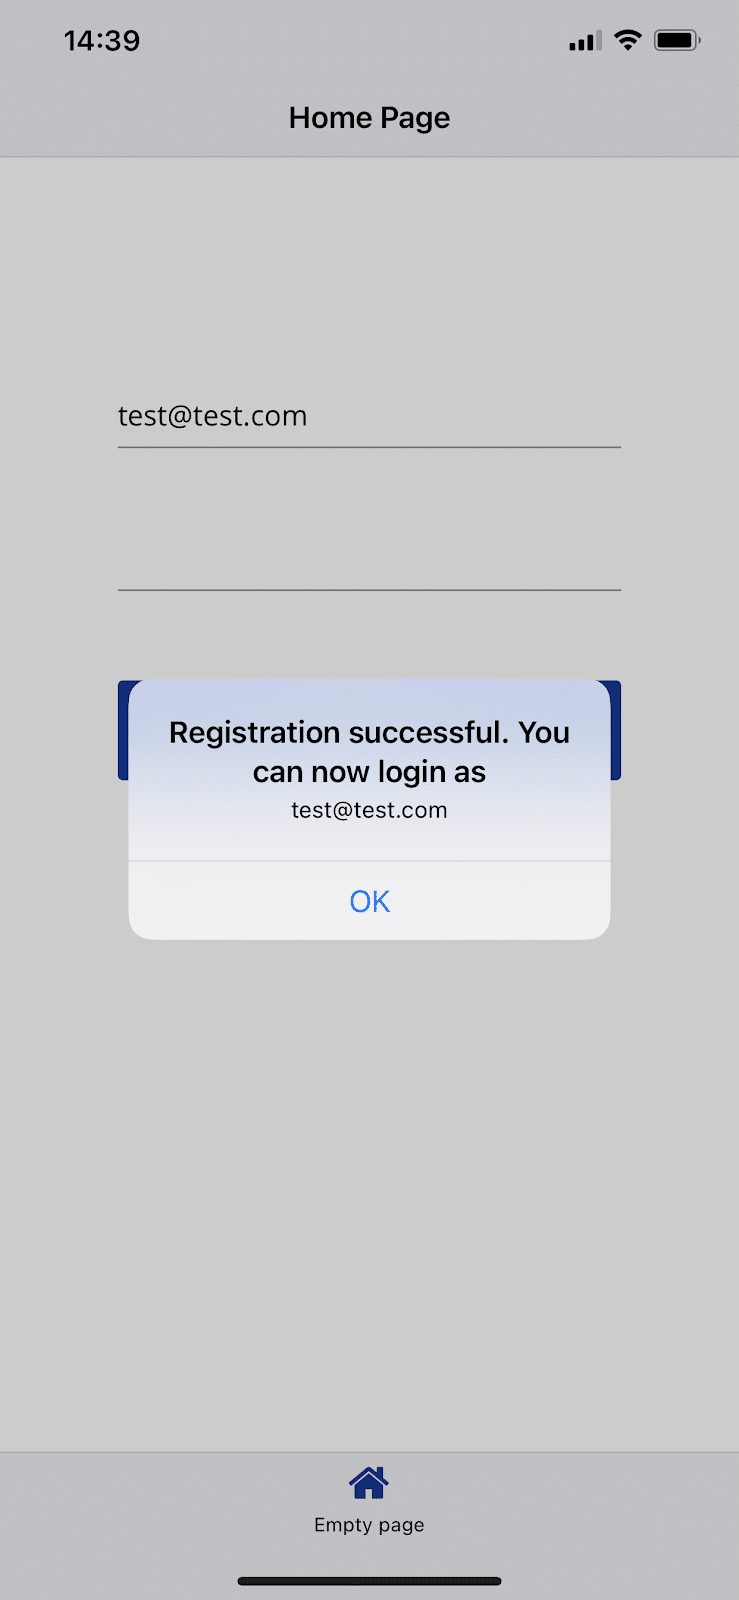
In the Alert settings, in the Dialog title, we write a message about successful registration: “Registration successful. You can now login as“, and in the Dialog message we substitute the result from the RegisterUserNode node – the email of the registered user:
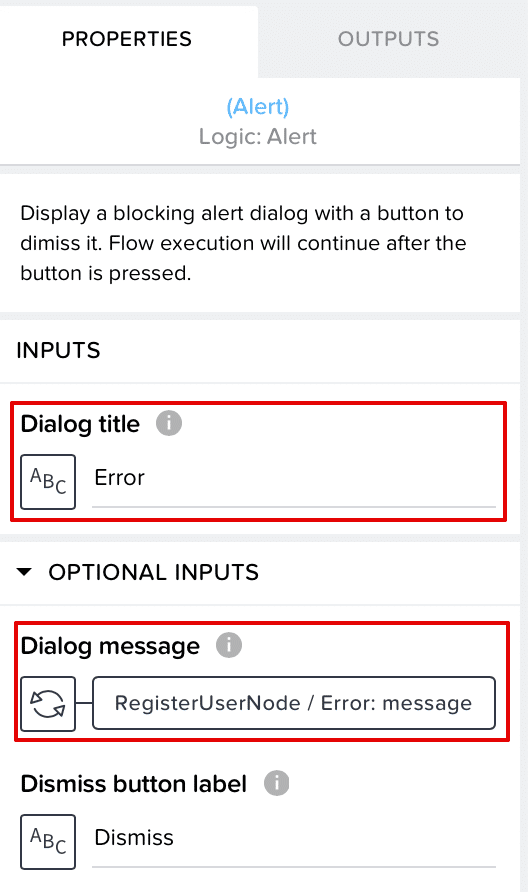
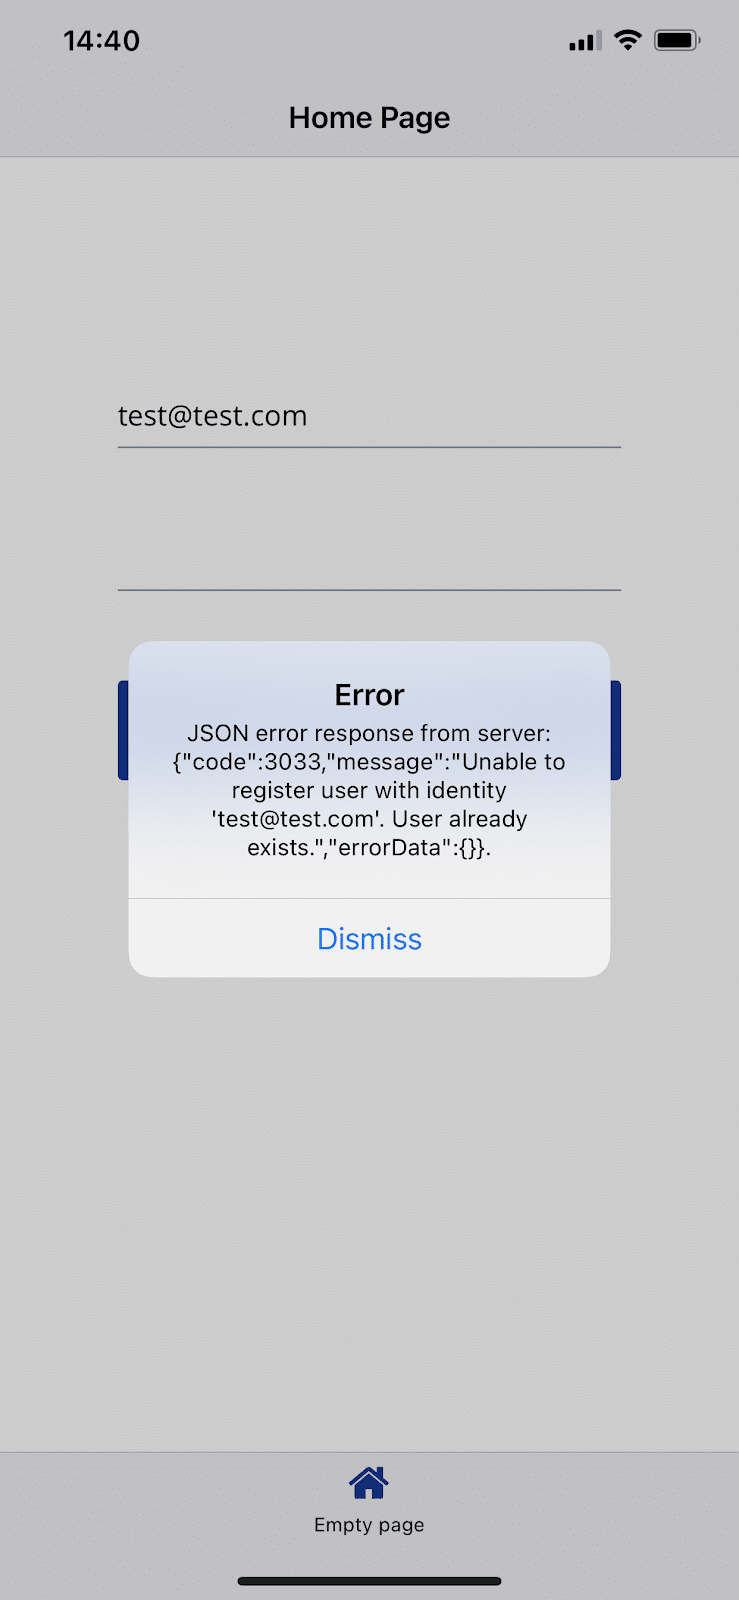
3) In case of an error, similar to the second item, add another Alert and display the error message received in RegisterUserNode as a Dialog message:
4) After displaying an alert about the success of registration or about an error, clear the EmailInput and PasswordInput fields.
From the panel on the left, drag the Set page variable component:
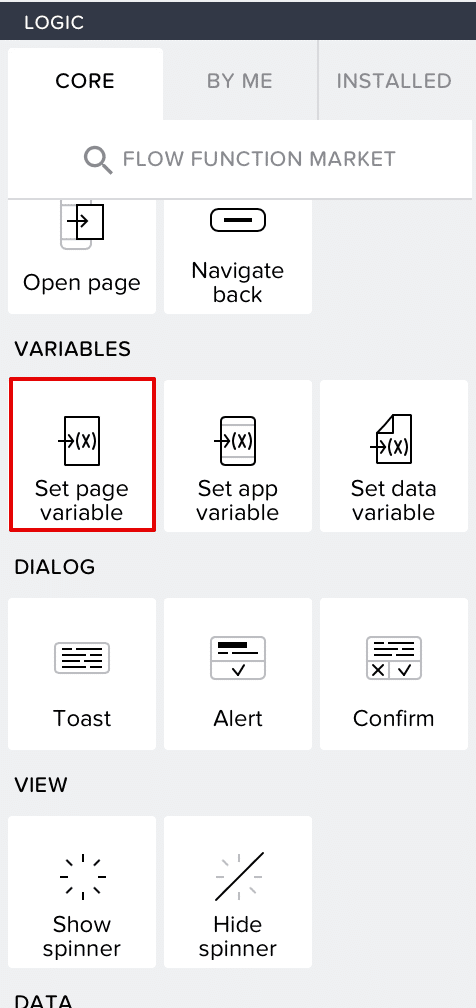
Select the email variable and set it to empty:

We take a similar step for the password variable.
Since these variables are associated with the corresponding fields EmailInput and PasswordInput, and this connection is two-way, then when the value of the variable changes, the value in the corresponding input also changes.
We save the changes, open the AppGyver application on the phone, enter the email and password of the new user in the selected application and click Register User:
If registration was successful, we will receive a message about successful registration:
If an error occurred during registration (for example, they tried to register an existing user), then we will receive the following notification:
With that, user registration is complete. Now let’s move to logging in the user.
Login With Backendless
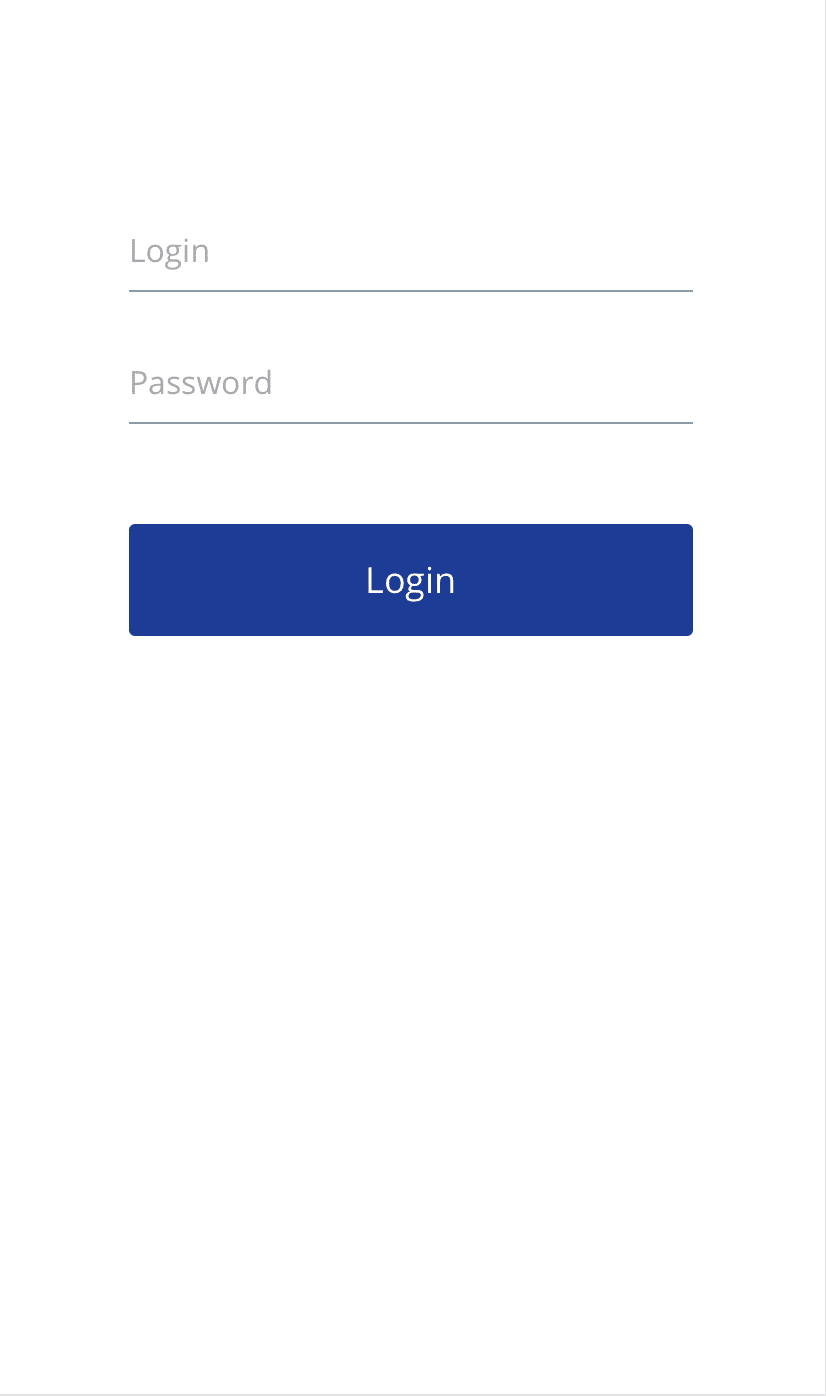
For the Login page, we need two Input field components with identifiers LoginInput and PasswordInput (Password input: true) and a button LoginButton:
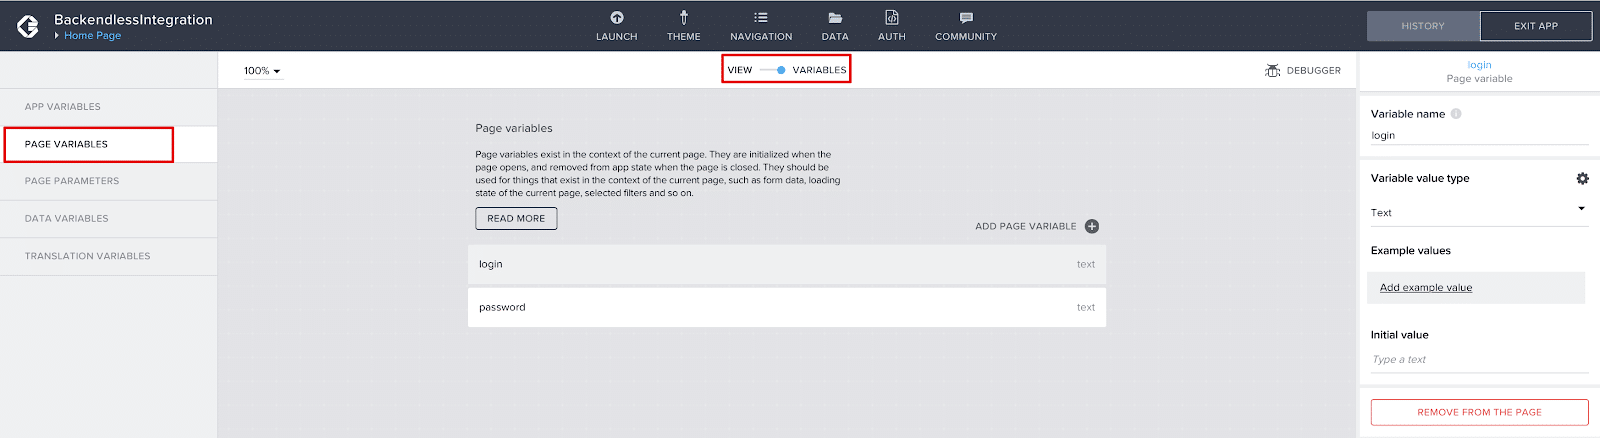
Let’s go to the Variables tab and add two Page Variables – login and password of type text:
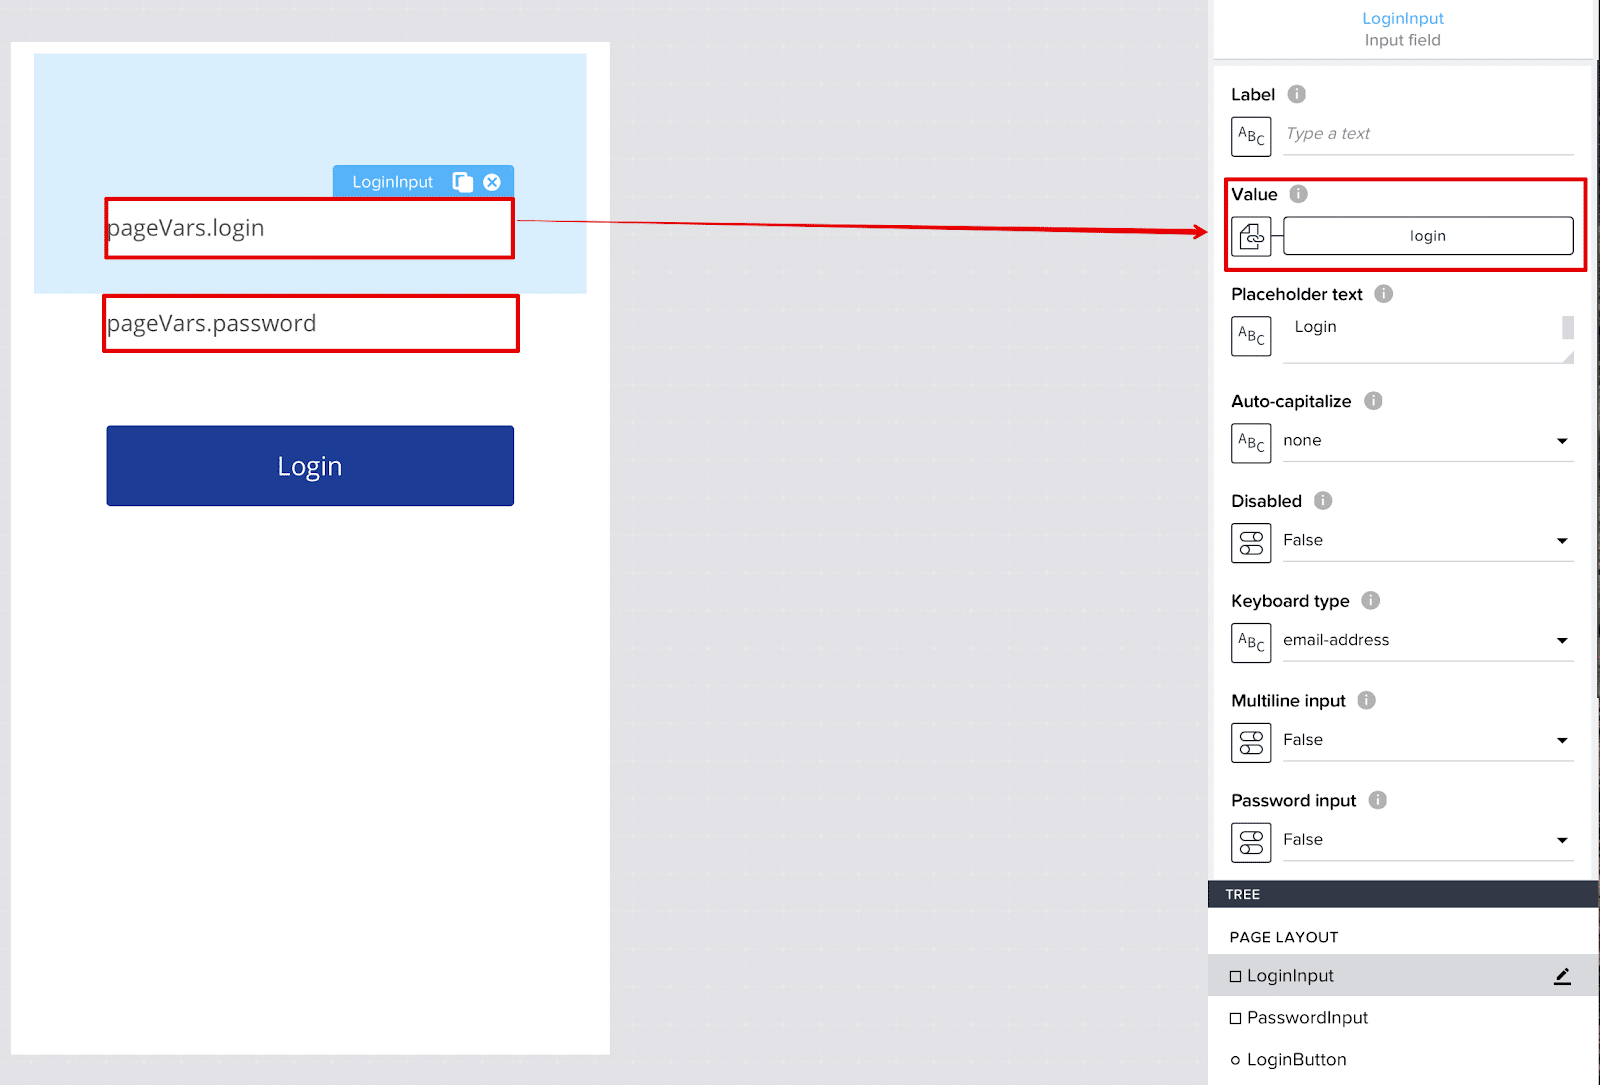
Let’s bind these variables to the corresponding LoginInput and PasswordInput fields. To do this, go back to the View, select LoginInput and set the login variable to its Value, then set the password value in PasswordInput (step-by-step binding is described in the previous section):
Now let’s add an API for integrating Backendless login. Go to the Data tab and select Add Data Resource: REST API direct integration and name it Login:

In the BASE tab in AppGyver, configure the Resource URL https://api.backendless.com/APP_ID/REST_API_KEY/users/login (be sure to replace APP_ID and REST_API_KEY with your app’s values, found on your Backendless Backend Dashboard) and add the Content-Type: application/json header, then go to the POST tab to complete the configuration.
In the CONFIG tab, as during registration, we specify the Response key path: email:

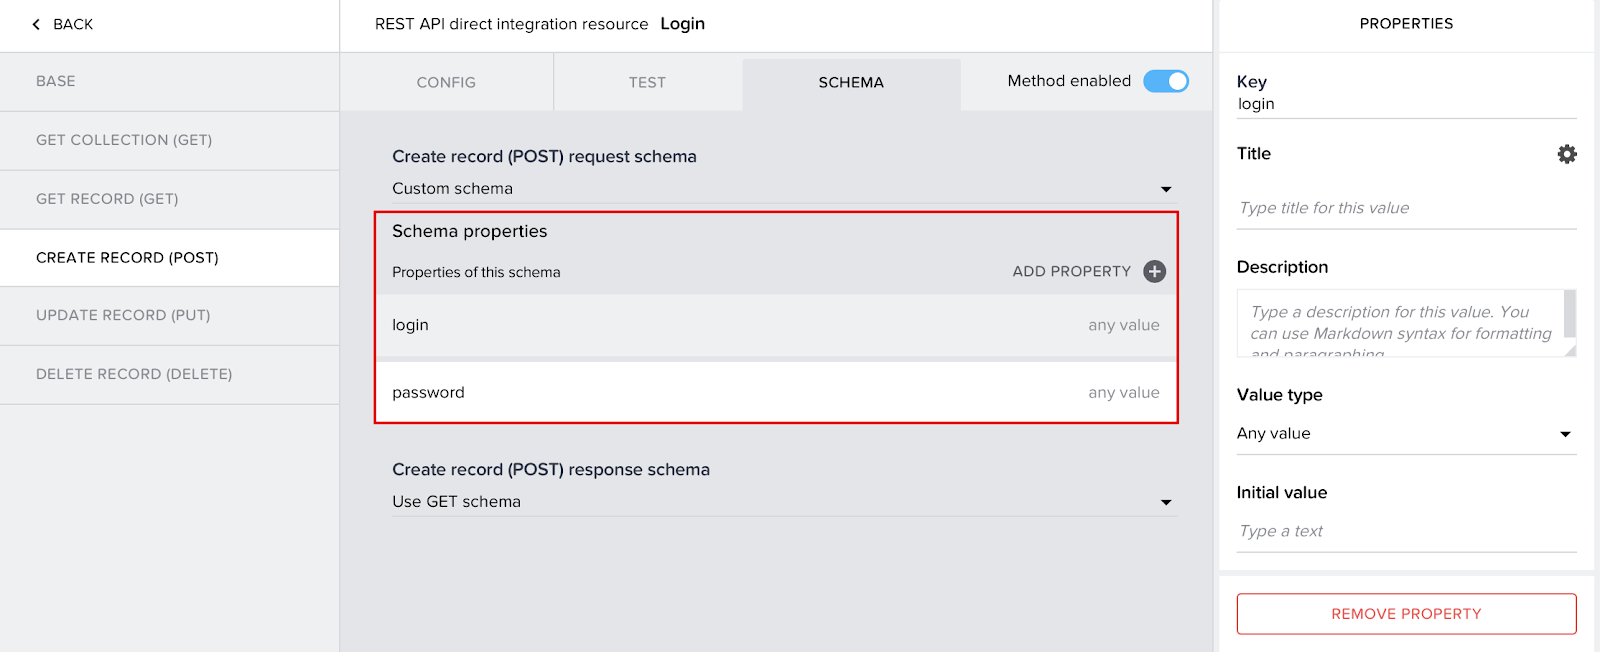
Now let’s go to the SCHEMA tab and add the login and password parameters to the body of the login request. These parameters are of type any value to avoid a casting error:
Now you can go to the TEST tab. For testing, you must specify test values for the login and password parameters. To do this, click on the Custom object button, enter test values and click Save.
Press RUN TEST, and if the request is successful, in the response we will receive the email of the logged in user (only email, not the entire object, since we specified email as the Response key path):

Save the changes and return to the View tab with our UI. Select the Login button, click Show Logic for LOGINBUTTON.
In the field that opens, drag the blocks to set up the logic:
The login scheme is very similar to the user registration scheme. It differs in a few ways:
- In the second step, by calling the Login API instead of the RegisterUser API and by passing the
loginandpasswordparameters to the login method - In the third step, by the message about a successful login, where the message about a successful login in the Alert Dialog title changes to “
User has been logged in Backendless:”
A more detailed description of setting up all steps can be found in the section User Registration With Backendless.
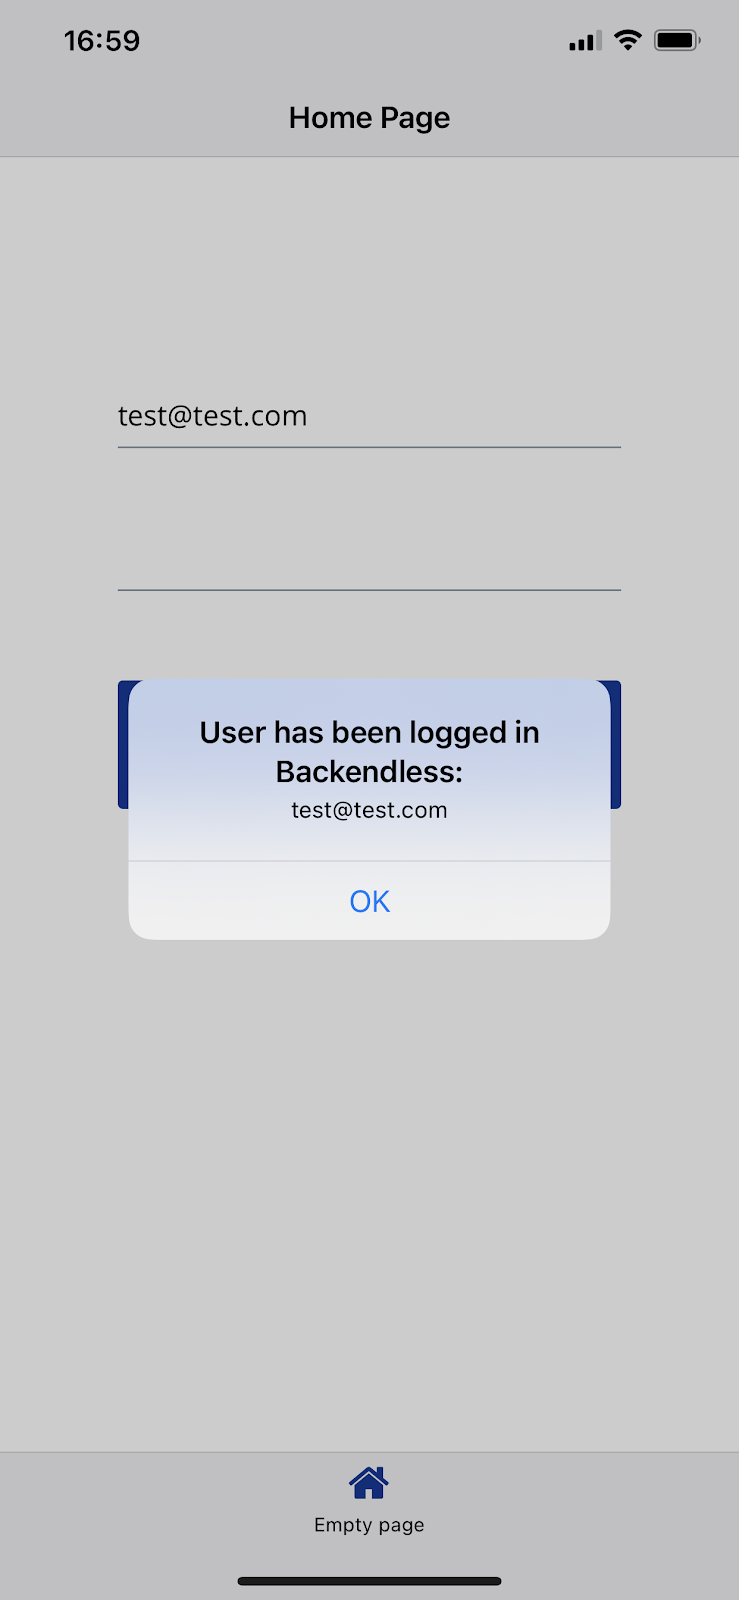
We save the changes, open the AppGyver application on the phone, enter the login and password of the existing user in the selected application and click Login:
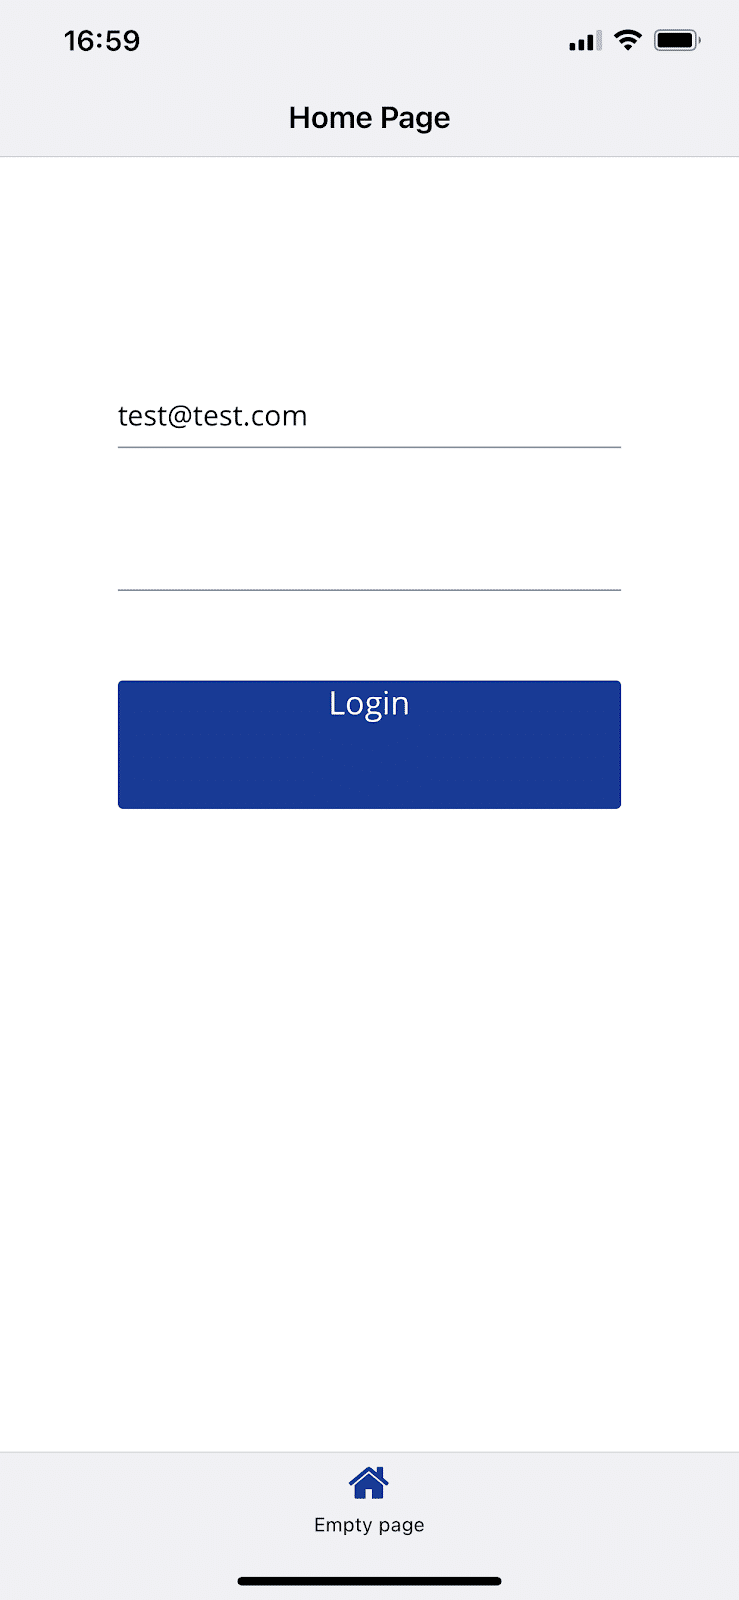
If the login was successful, we will receive a message about the success of the operation:
If an error occurred during login (for example, they tried to login with an incorrect password), then we will receive the following notification:

Save AppGyver Data To The Backend Database
Backendless Database is what sets Backendless apart from every other no-code platform out there. Your database can store a wide range of data types (including spatial/geo data and JSON objects) and makes it trivially easy to create relations between objects.
Backendless Database uses a SQL-based querying system. (We will touch on that more in the next section.) This approach allows you to easily query your data and display exactly what you want the user to see.
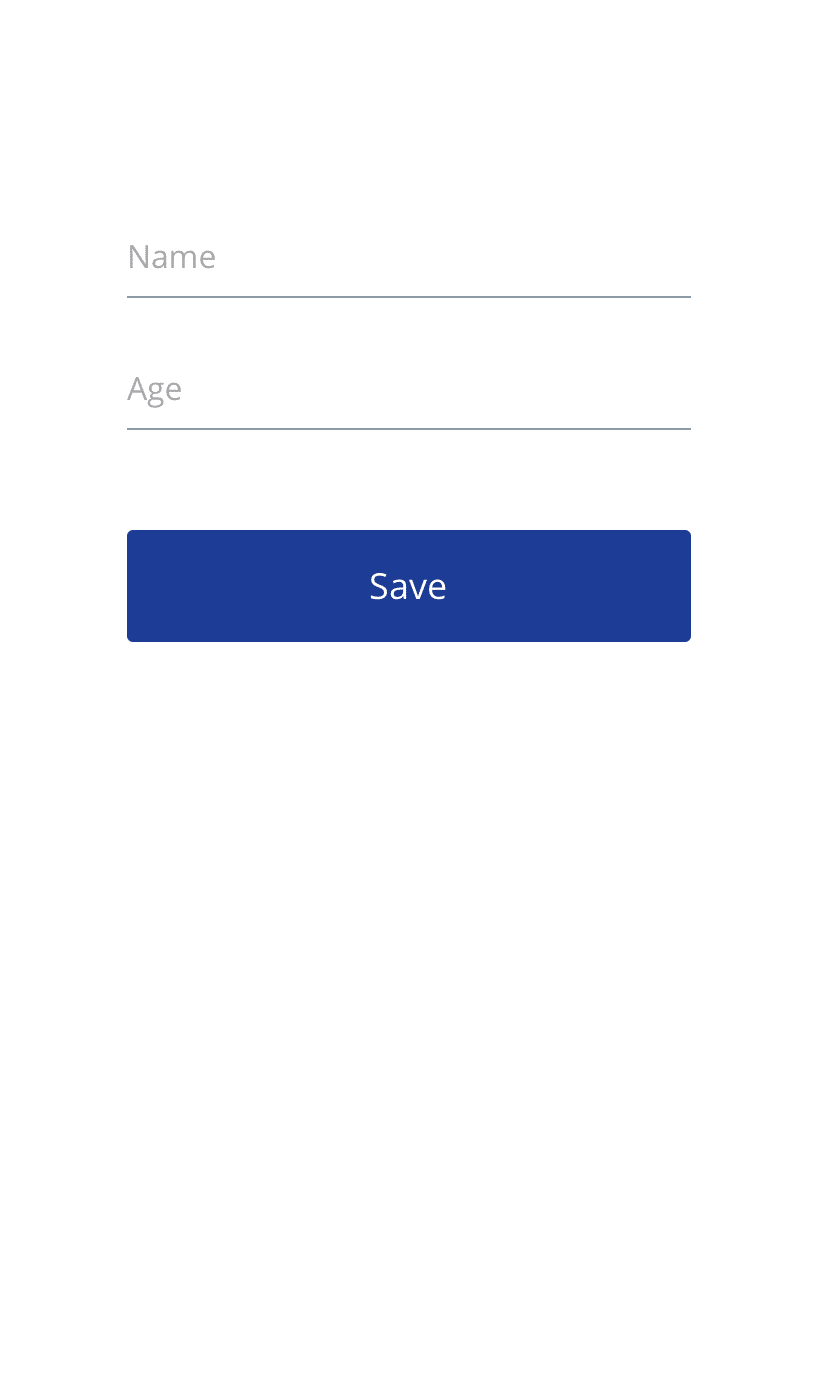
To start working with our data, let’s first take a look at how to save data into our Backendless Database from AppGyver. Let’s build a simple new page to try it out.
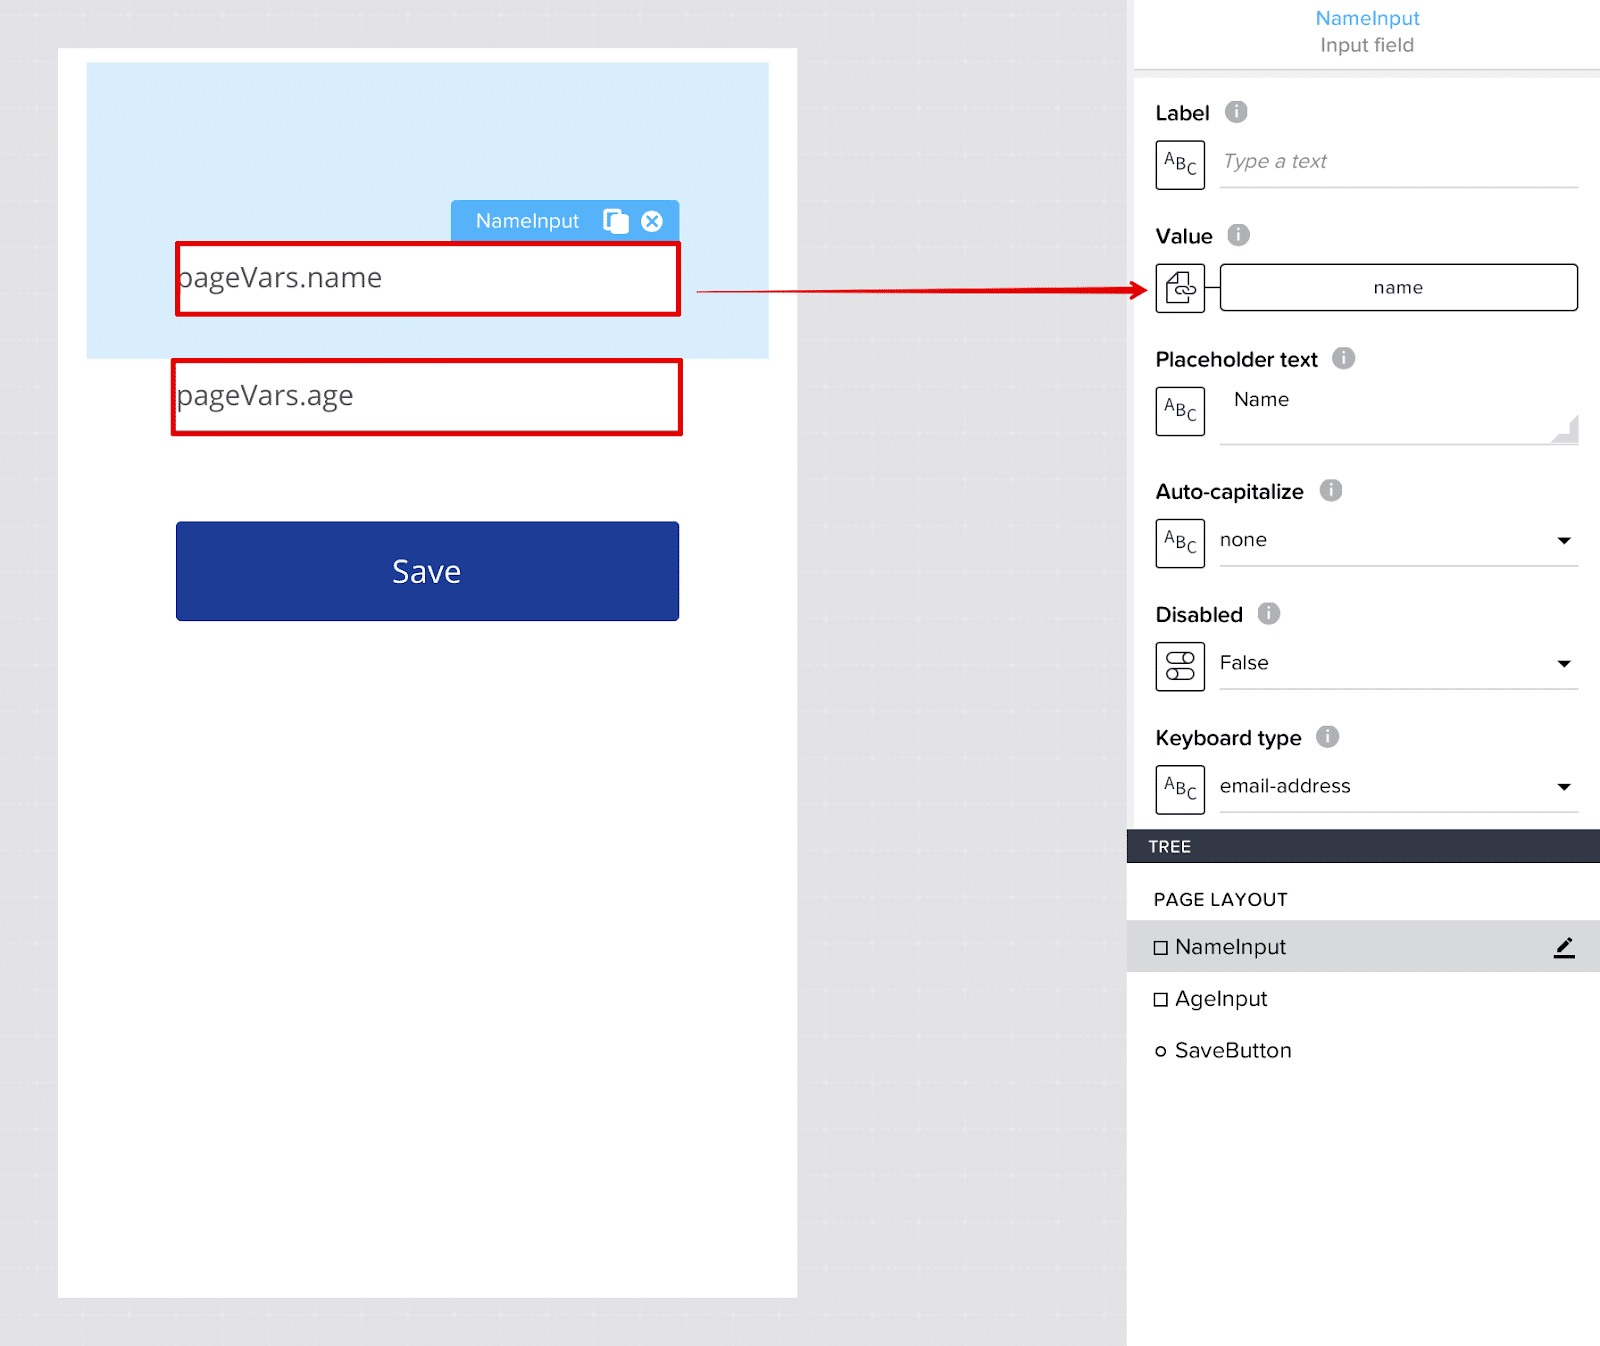
On this page, we need two Input field components with identifiers NameInput and AgeInput (Keyboard type: number-pad) and a button SaveButton:
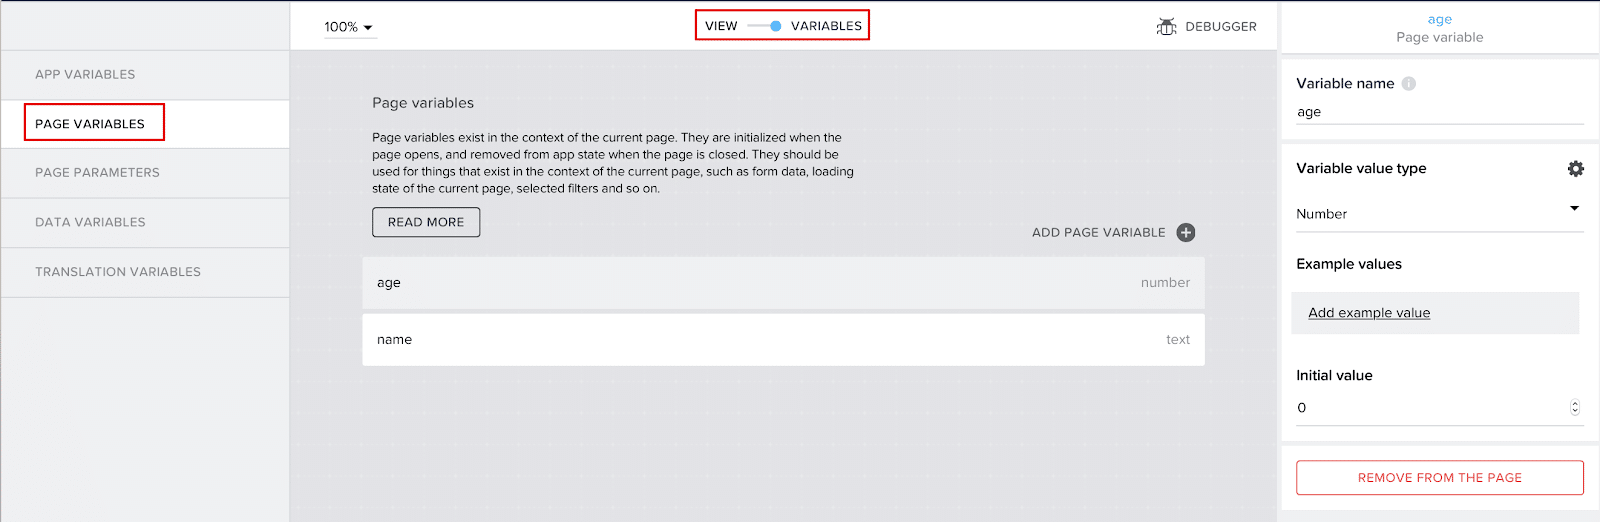
Let’s go to the Variables tab and add two Page Variables – age of type number and name of type text:
Let’s bind these variables to the corresponding NameInput and AgeInput fields. To do this, go back to View, select NameInput and set the variable name to its Value, then set the AgeInput to the value of age (step-by-step binding is described in the section User Registration With Backendless):
Now let’s add an API for integrating object persistence into Backendless. Go to the Data tab and select Add Data Resource: REST API direct integration and name it SaveObject. We will save the objects to the Person table using the Database API:
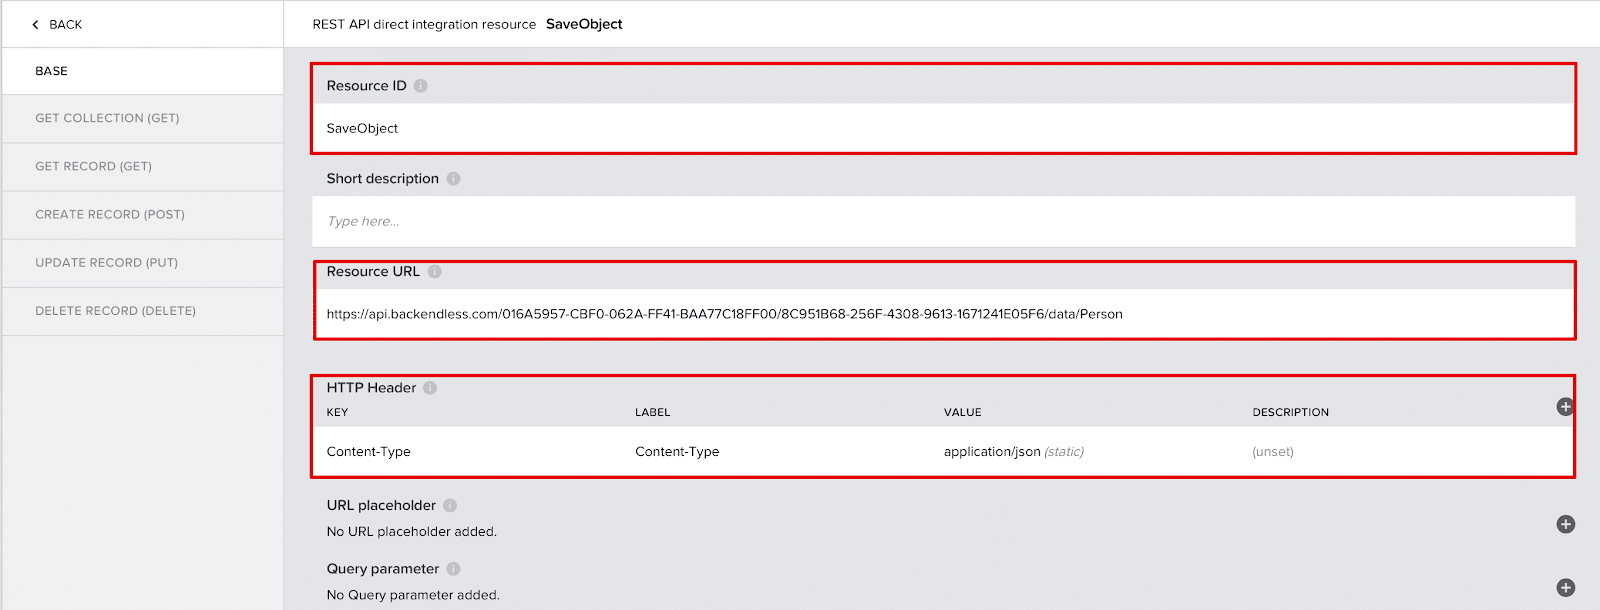
In the BASE tab, configure the Resource URL https://api.backendless.com/APP_ID/REST_API_KEY/data/Person (be sure to replace APP_ID and REST_API_KEY with your app’s values, found on your Backendless Backend Dashboard) and add the Content-Type: application/json header, then go to the POST tab to complete the configuration.
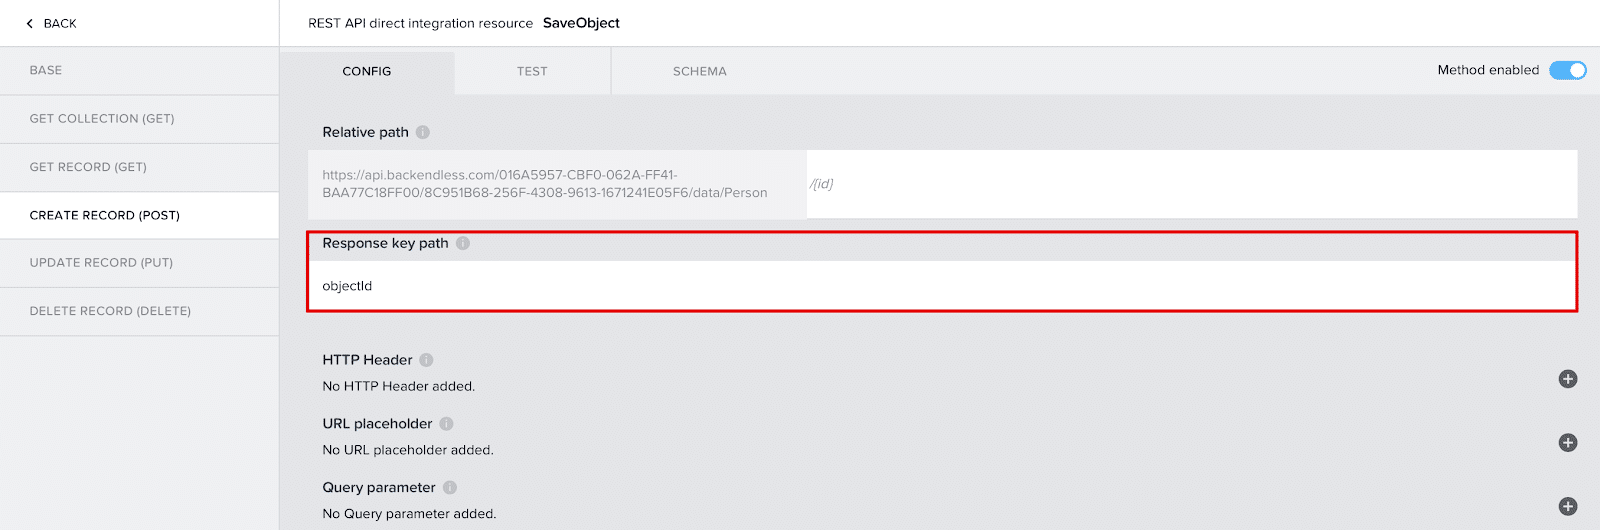
In the CONFIG tab, as during registration, we specify the Response key path: objectId:
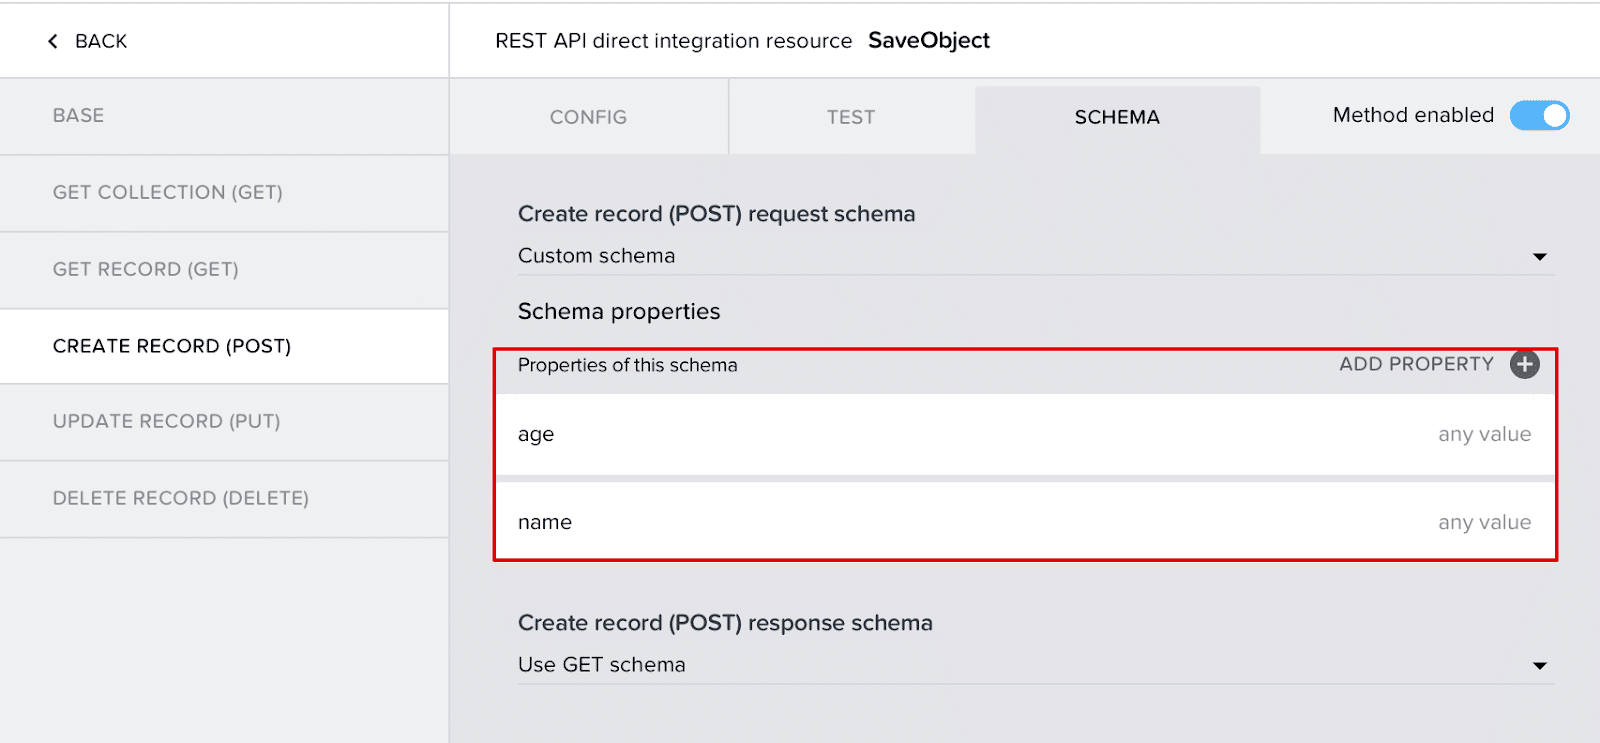
Now let’s go to the SCHEMA tab and add the name and age parameters to the body of the login request. These parameters are of type any value to avoid a casting error:
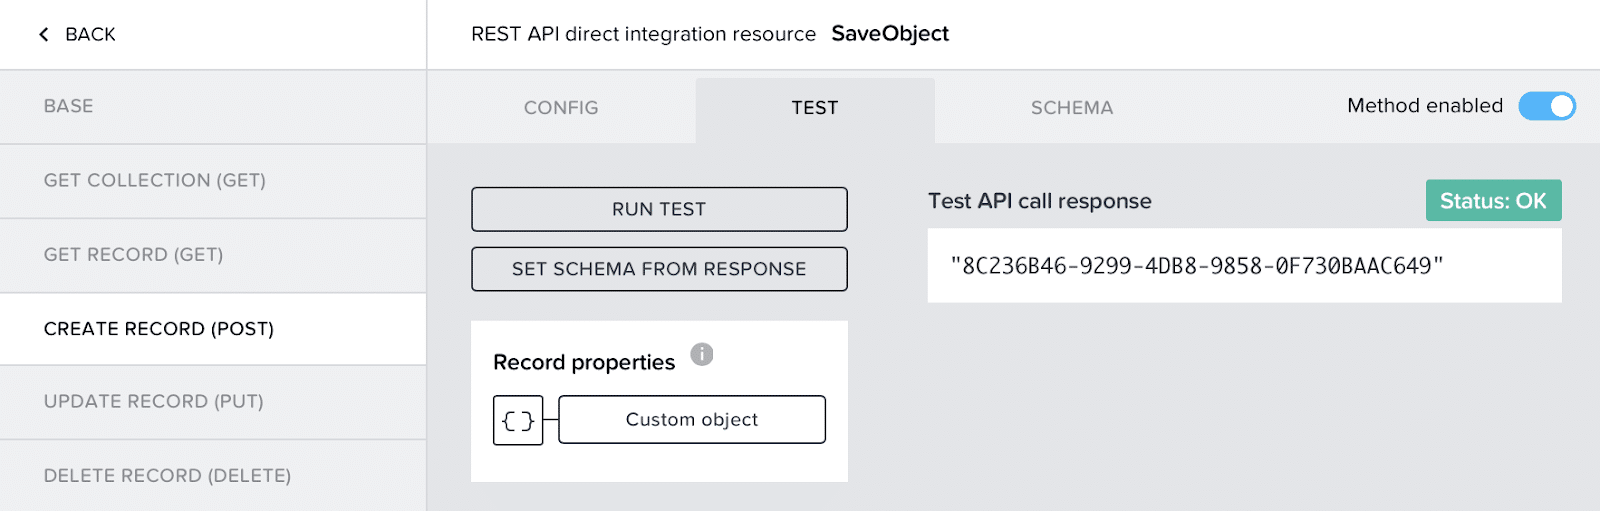
Now you can go to the TEST tab. For testing, you need to specify test values for the name and age parameters. To do this, click on the Custom object button, enter test values and click Save.
We press RUN TEST, and if the request is successful, in the response we will get the objectId of the saved object (only the objectId, not the whole object, since we specified the objectId as the Response key path):
Save the changes and return to the View tab with our UI. Select the Save button, click Show Logic for SAVEBUTTON.
In the field that opens, drag the blocks to set up the logic:

The save scheme is very similar to the scheme we detailed in the previous sections. The following items differ from that scheme:
- In the second step, by calling the SaveObject API instead of the RegisterUser API and passing the
nameandageparameters to the save method. - In the third step, the message about the successful saving of the object will change in the Alert Dialog title to read “
Object has been saved in Backendless with objectId:”.
A more detailed description of setting up all steps can be found in the section User Registration With Backendless.
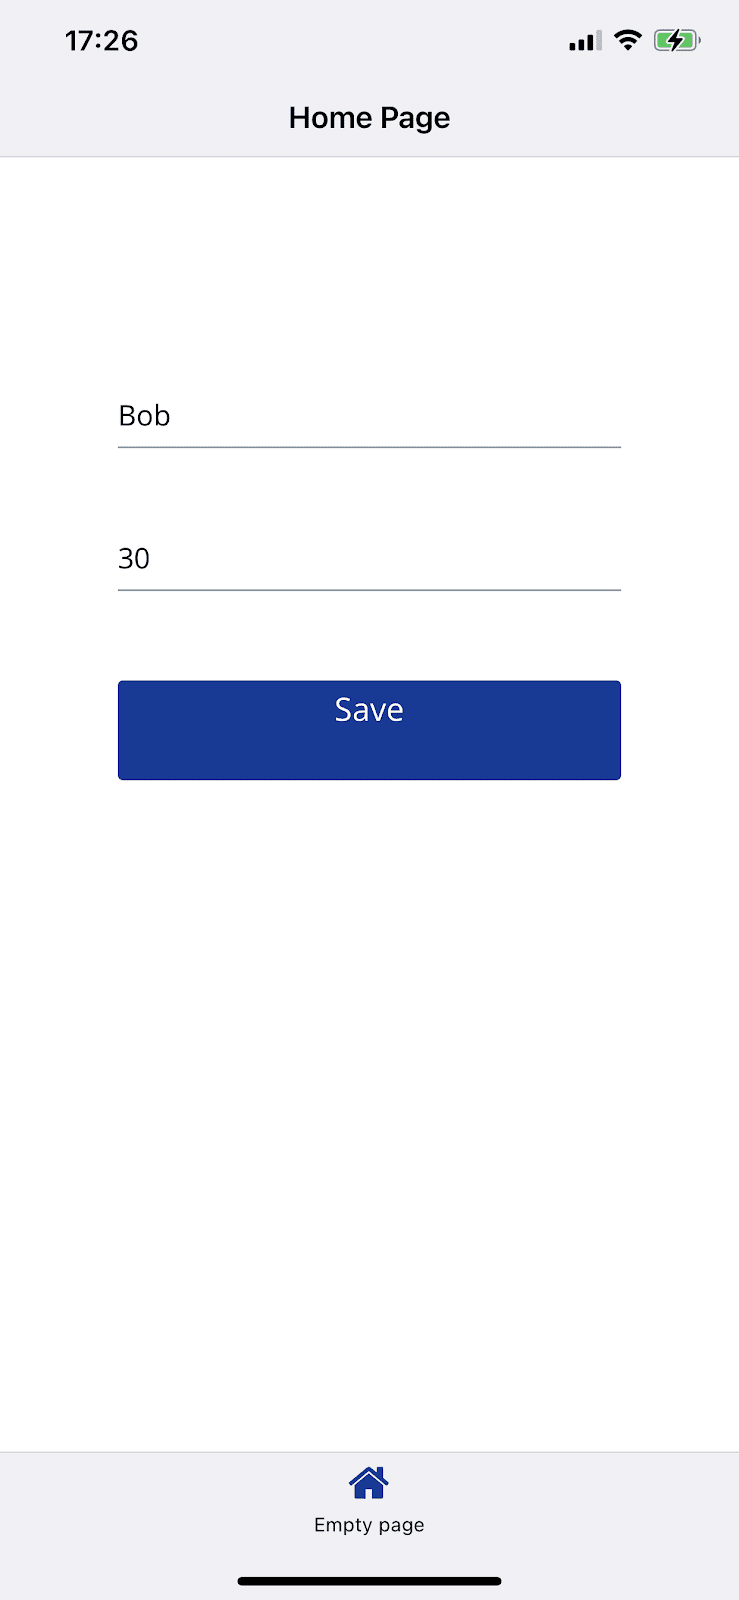
Save the changes, open the AppGyver application on the phone, enter the name and age of the Person object in the selected application and click Save:
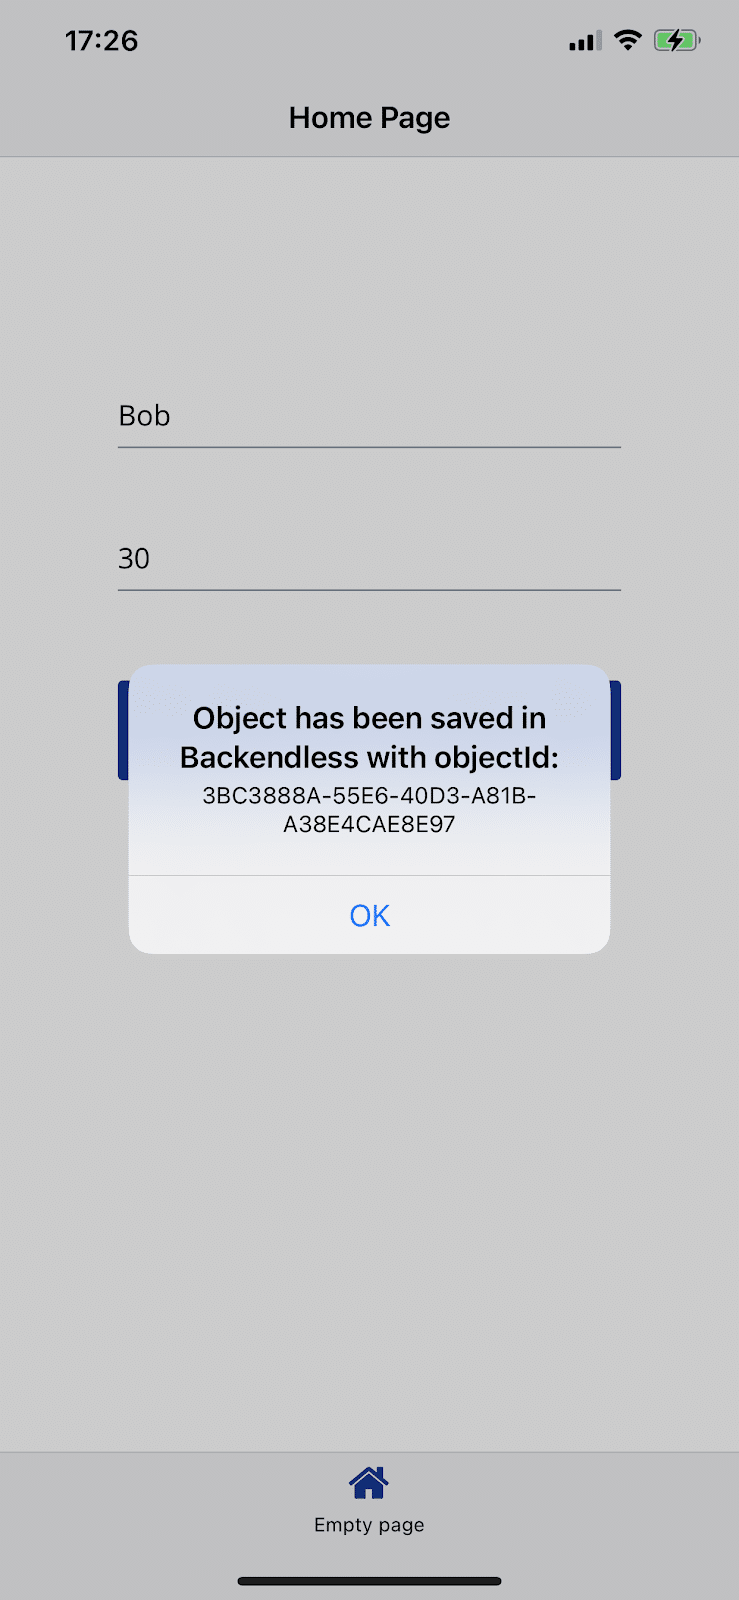
If the save was successful, we will receive a message about the success of the operation:
Run A Query In AppGyver Against Backendless Database
Finally, let’s walk through how to retrieve data from your database by running a query. We will again create a simple page for demonstration.
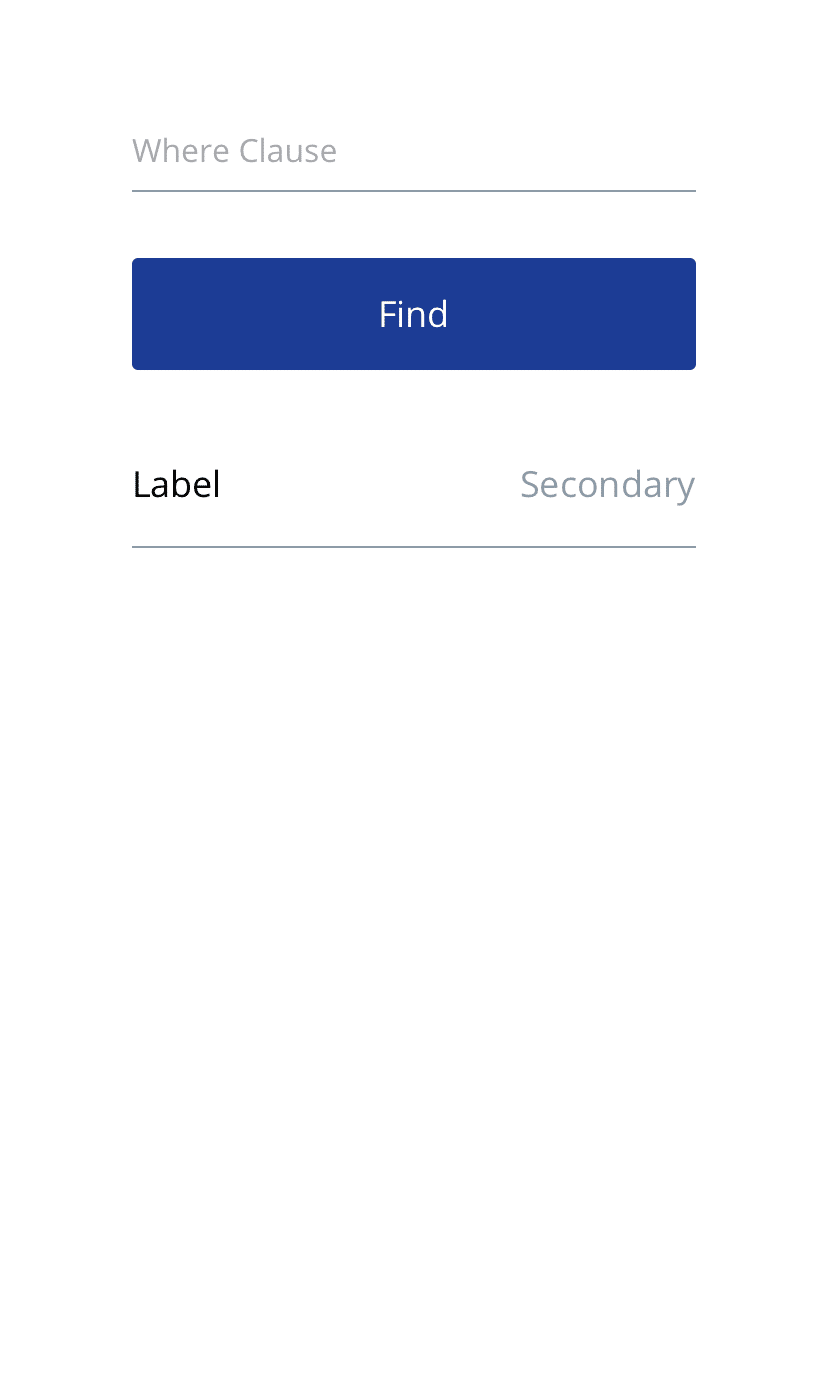
For this example, we need just one Input field component with the WhereClauseInput identifier, a FindButton button and a List item to display search results with the ResultsList identifier:
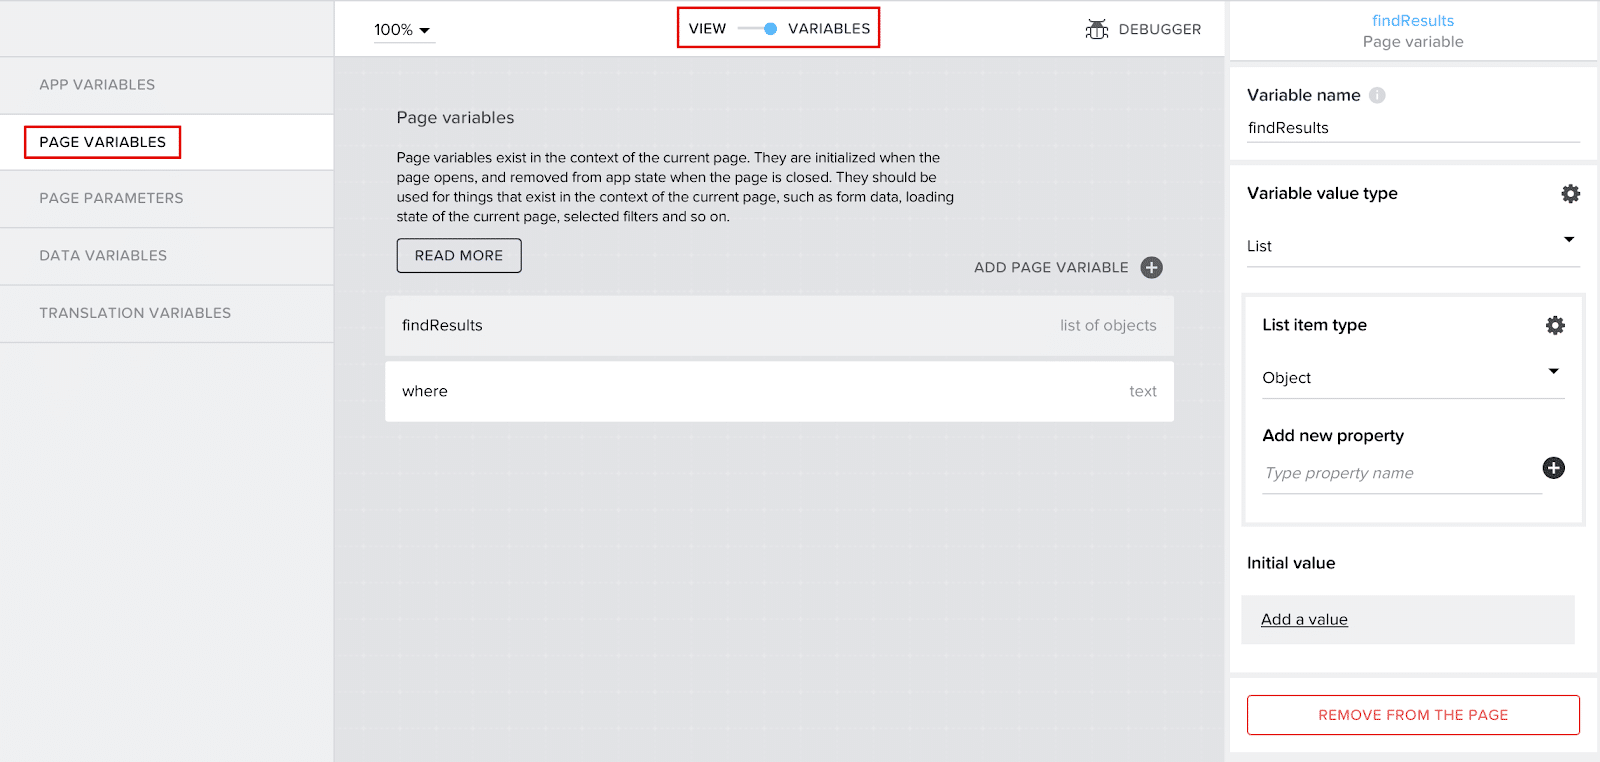
Let’s go to the Variables tab and add two Page Variables – findResults of type list of objects and where of type text:
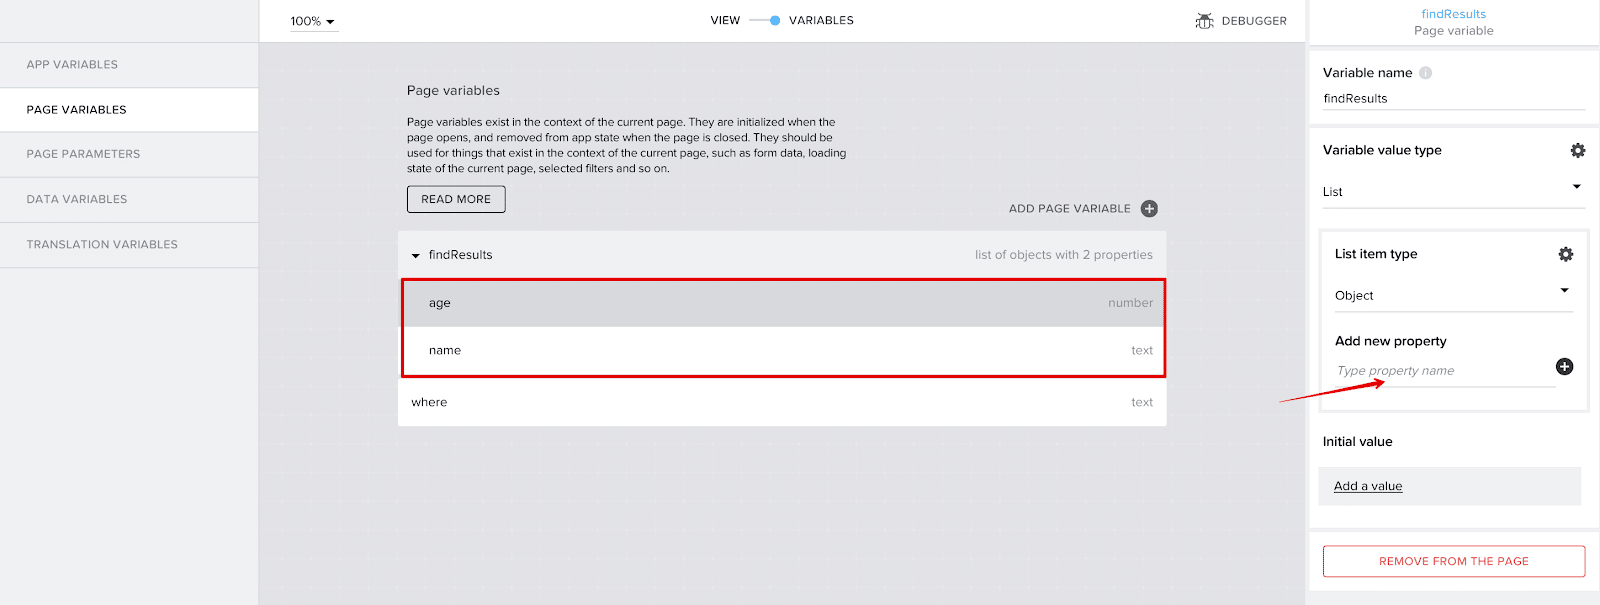
For objects of the findResults list, we will set the parameters that we will display in the ResultsList: name of type text and age of type number:
Let’s bind the where variable to the corresponding WhereClauseInput field. To do this, go back to View, select WhereClauseInput and set the variable name to its Value (step-by-step binding is described in the section User Registration With Backendless):

We also add a binding for the findResults variable to the ResultsList component:
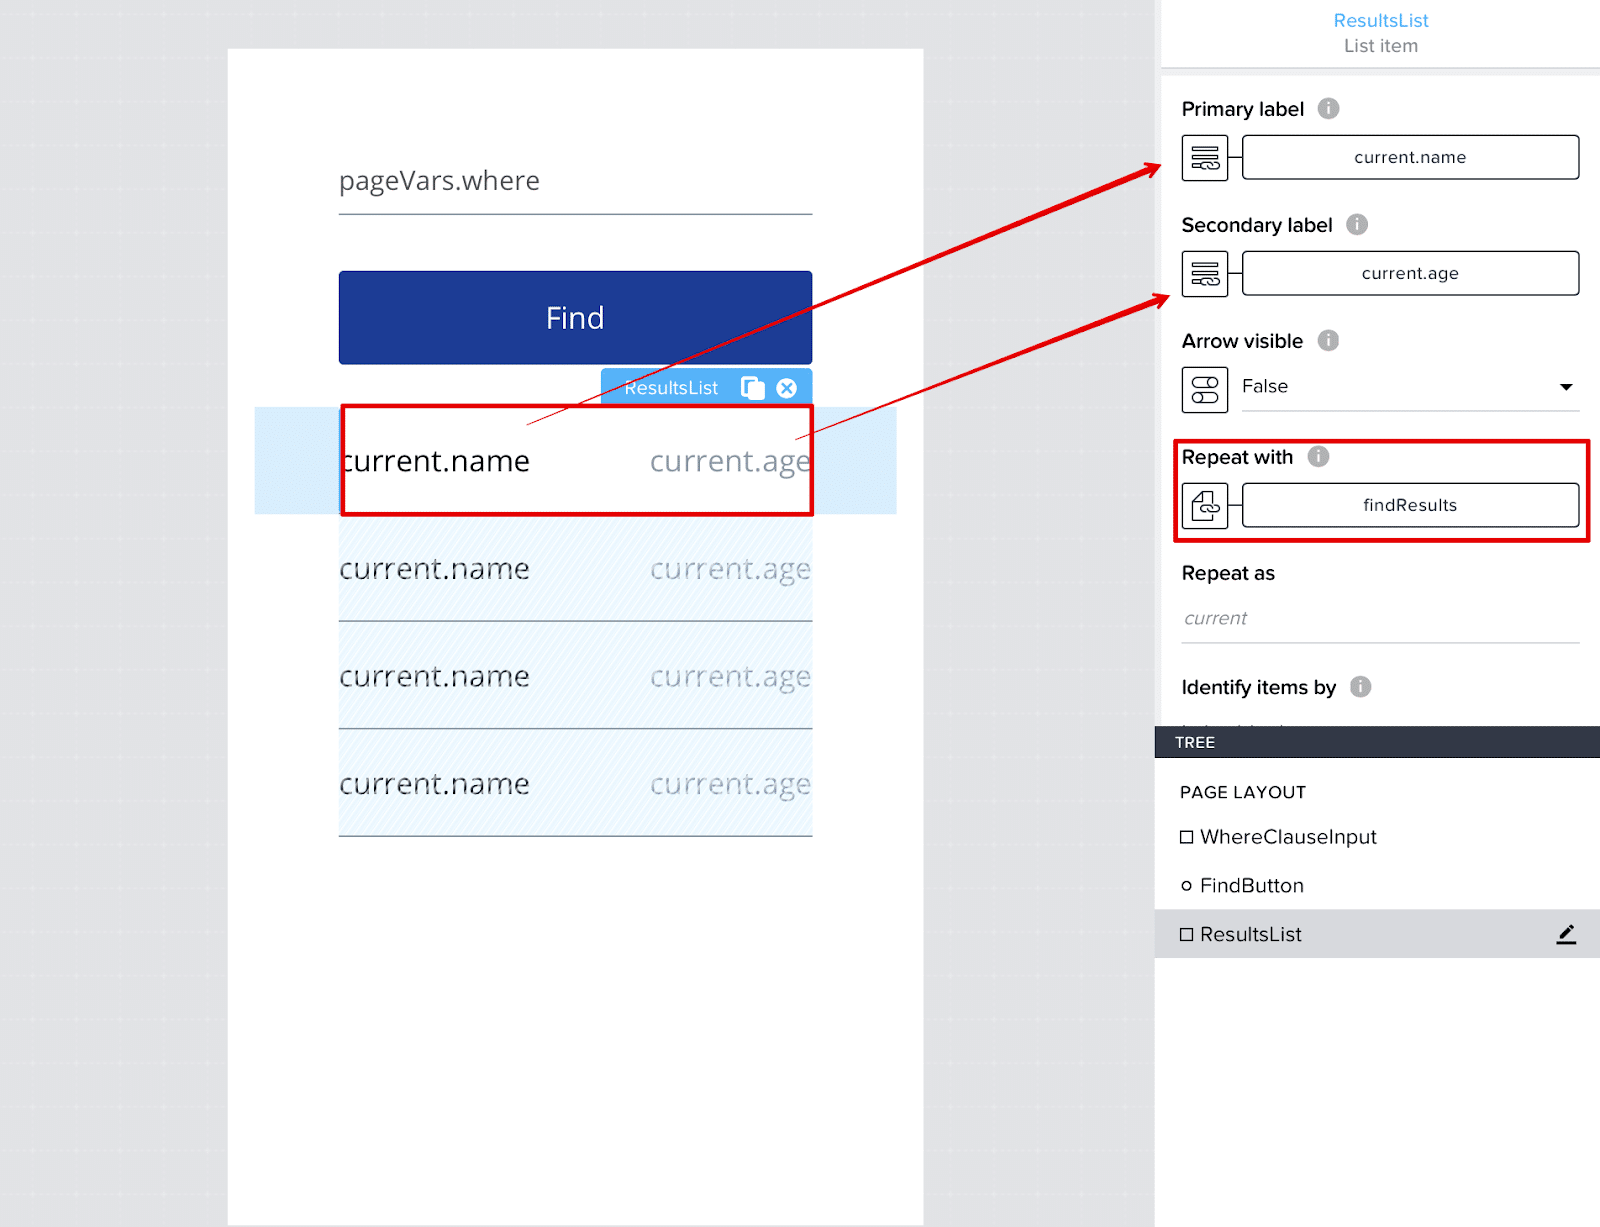
We set the ResultsList to Repeat with: findResults, and the values of the Primary and Secondary fields will correspond to the values of name and age of the current record in the findResults list (we set these parameters for the objects of the findResults list a little earlier). For this binding, we use the Property of data item in repeat:

Now let’s add an API in AppGyver for fetching data objects from the backend using the Data Search API. Go to the Data tab and select Add Data Resource: REST API direct integration and name it Find. We will select objects from the Person table:
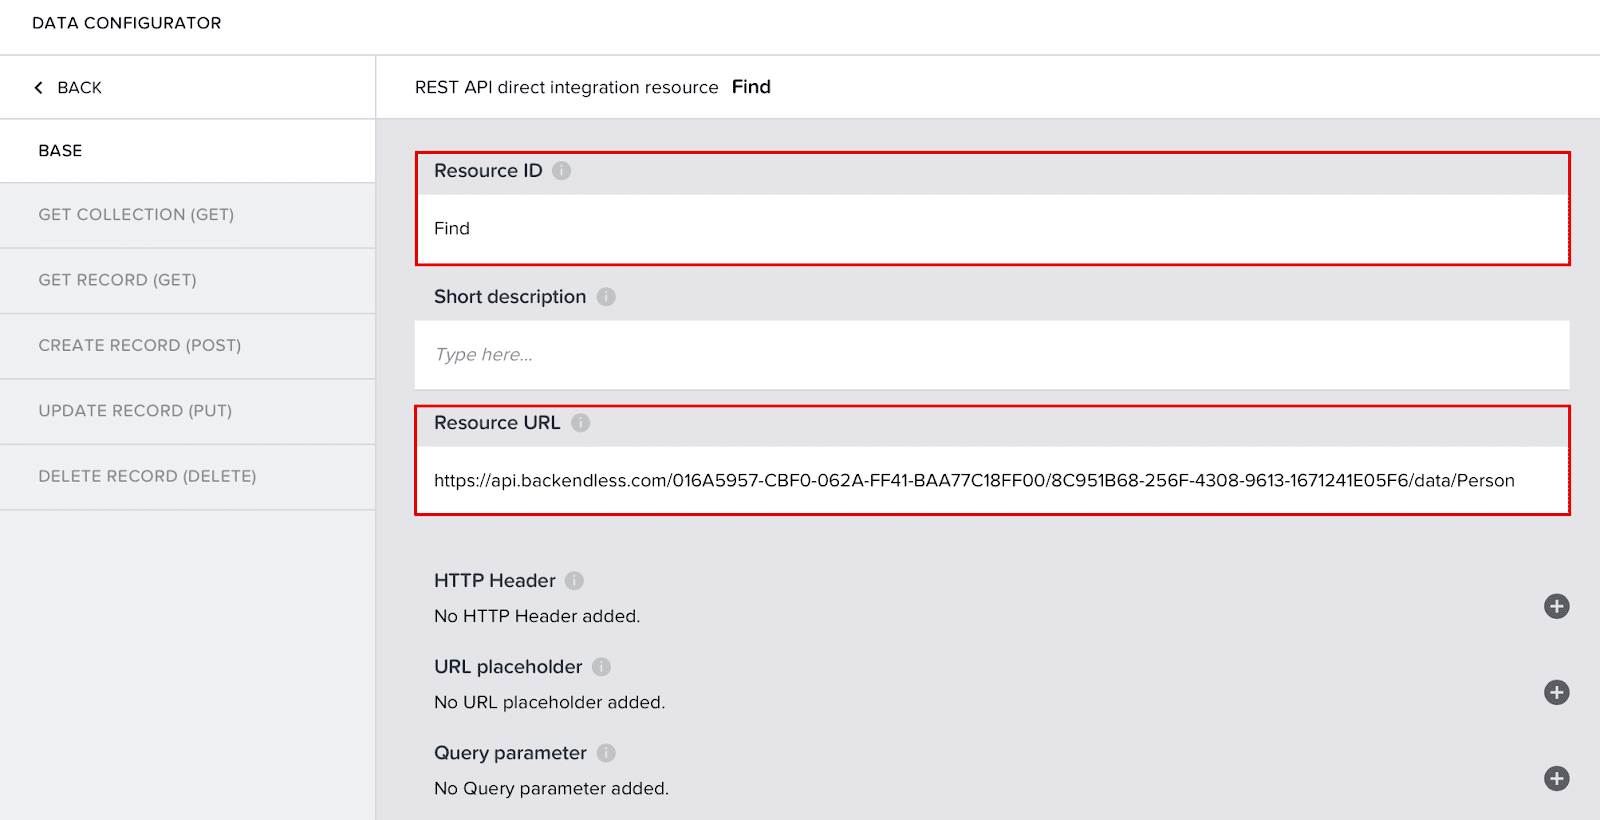
In the BASE tab, configure the Resource URL https://api.backendless.com/APP_ID/REST_API_KEY/data/Person (be sure to replace APP_ID and REST_API_KEY with your app’s values, found on your Backendless Backend Dashboard) then go to the GET COLLECTION tab to complete the configuration.
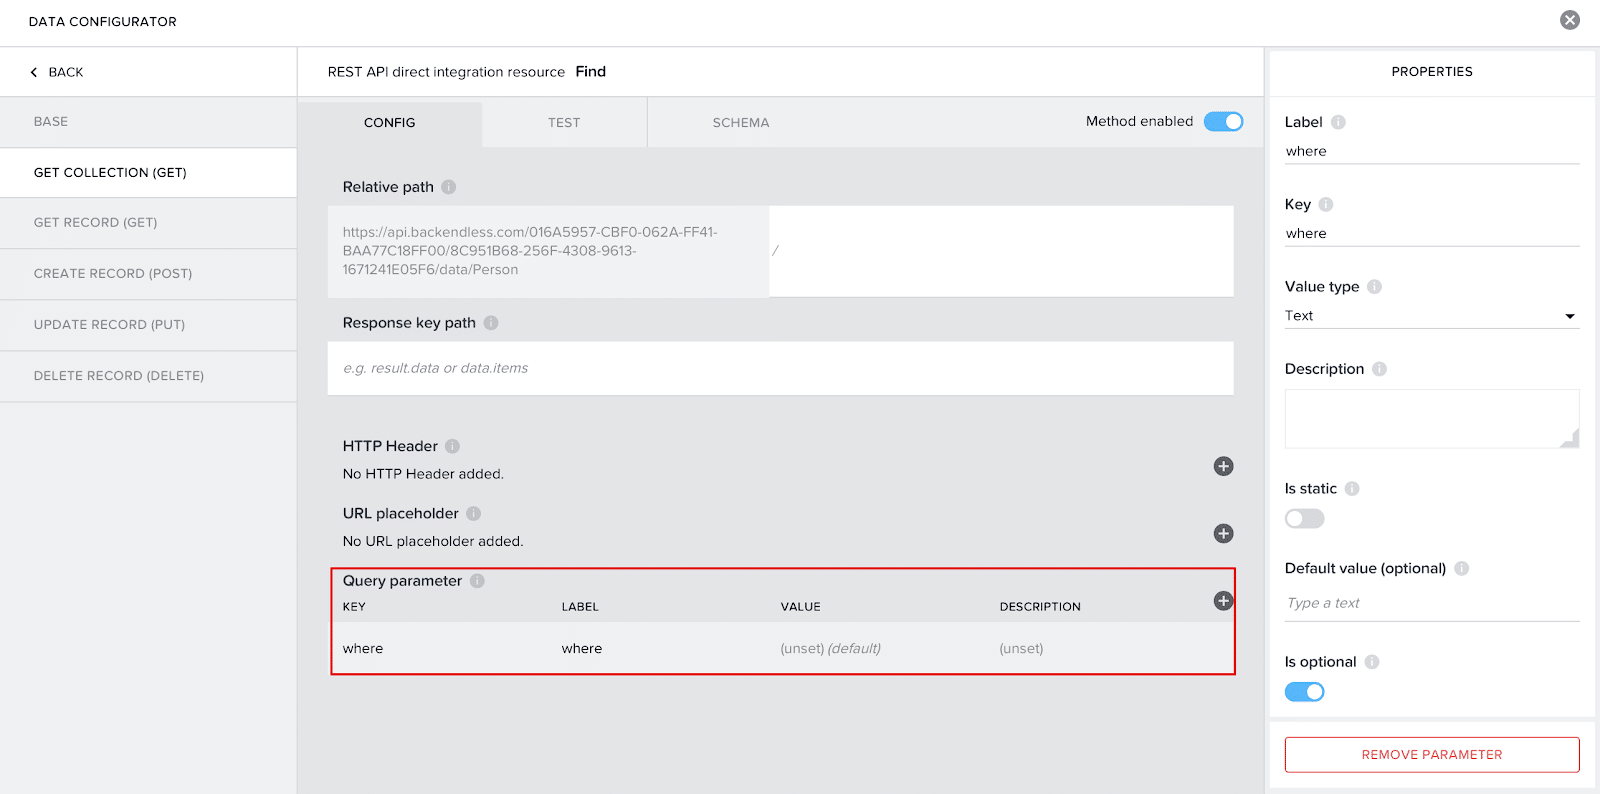
In the CONFIG tab, add the Query parameter: where:
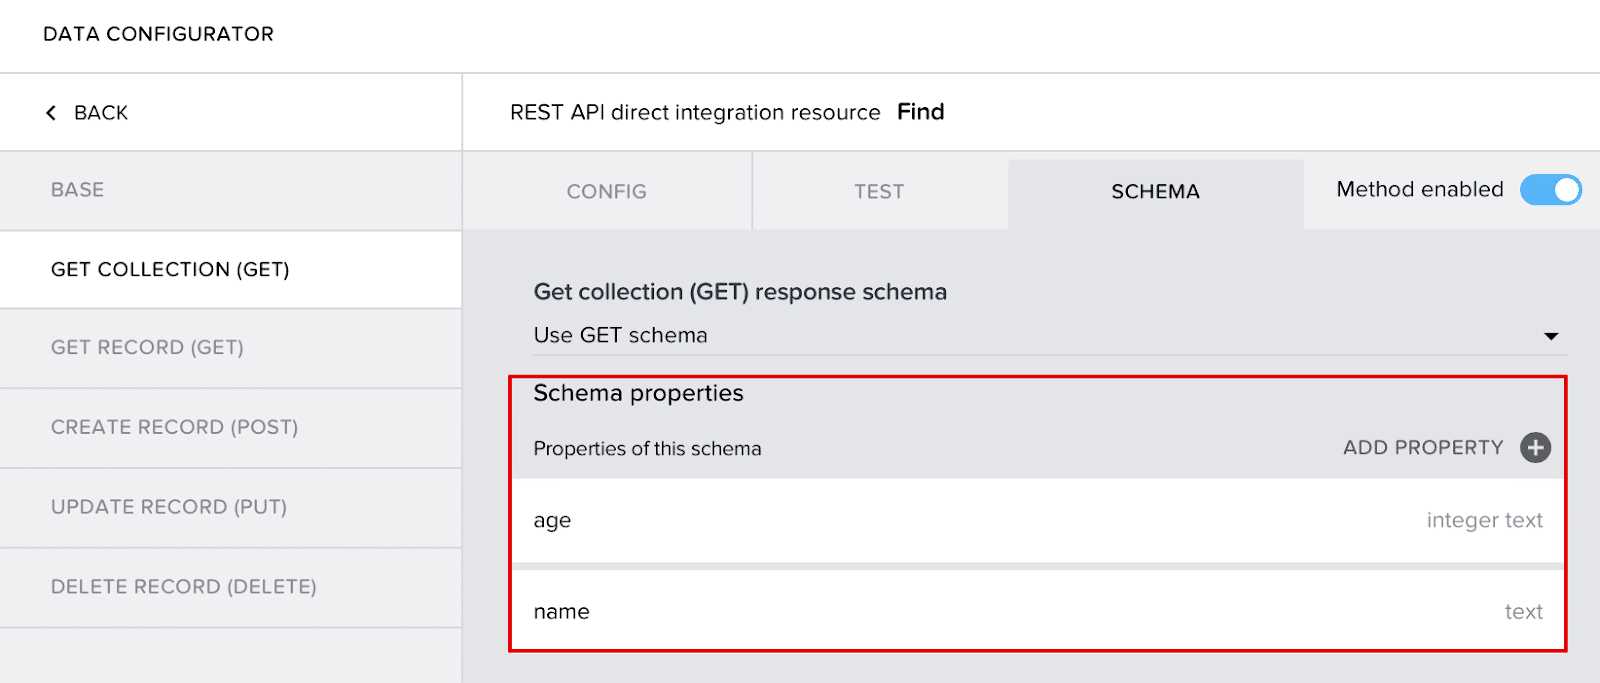
Now let’s go to the SCHEMA tab and add the name and age parameters:
Now you can go to the TEST tab. For testing, you can specify an optional test value for the where parameter.
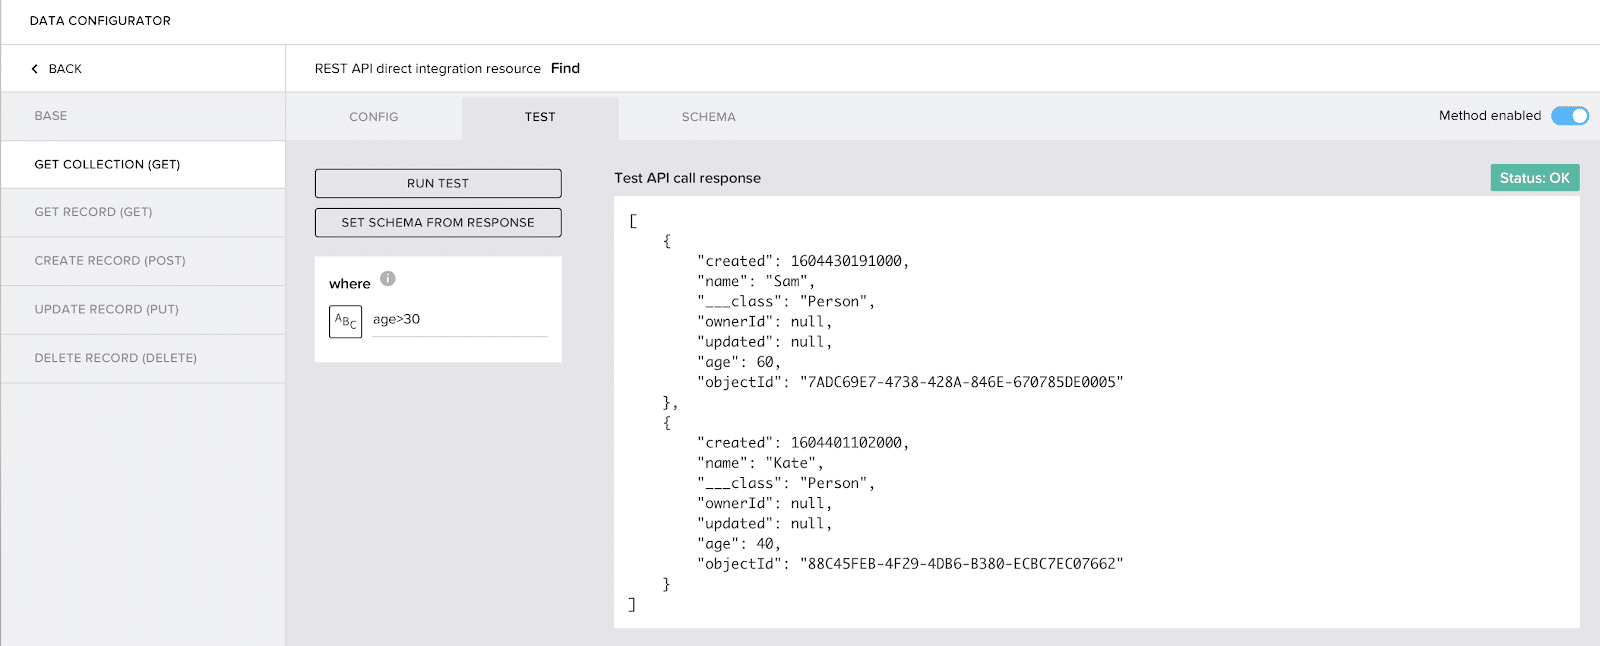
Press RUN TEST, and if the request is successful, in the response we will receive a list of objects that match the search criterion, or a list of all objects, if the condition is not specified:
Save the changes and return to the View tab with our UI. Select the Find button, click Show Logic for FINDBUTTON.
In the field that opens, drag the blocks to set up the logic:

- From the Logic panel on the left, drag the Get record collection component and call the Find API in it. Set the
FindNodename to this node. - If the selection is successful, write the array of objects obtained in step 1 to the
findResultsvariable. Since this variable is bound to theResultsListcomponent, the list will be automatically populated with the resulting entries. - If an error occurs at step 1, the user will receive an Alert with a corresponding notification.
- We clear the value in the
WhereClauseInputfield.
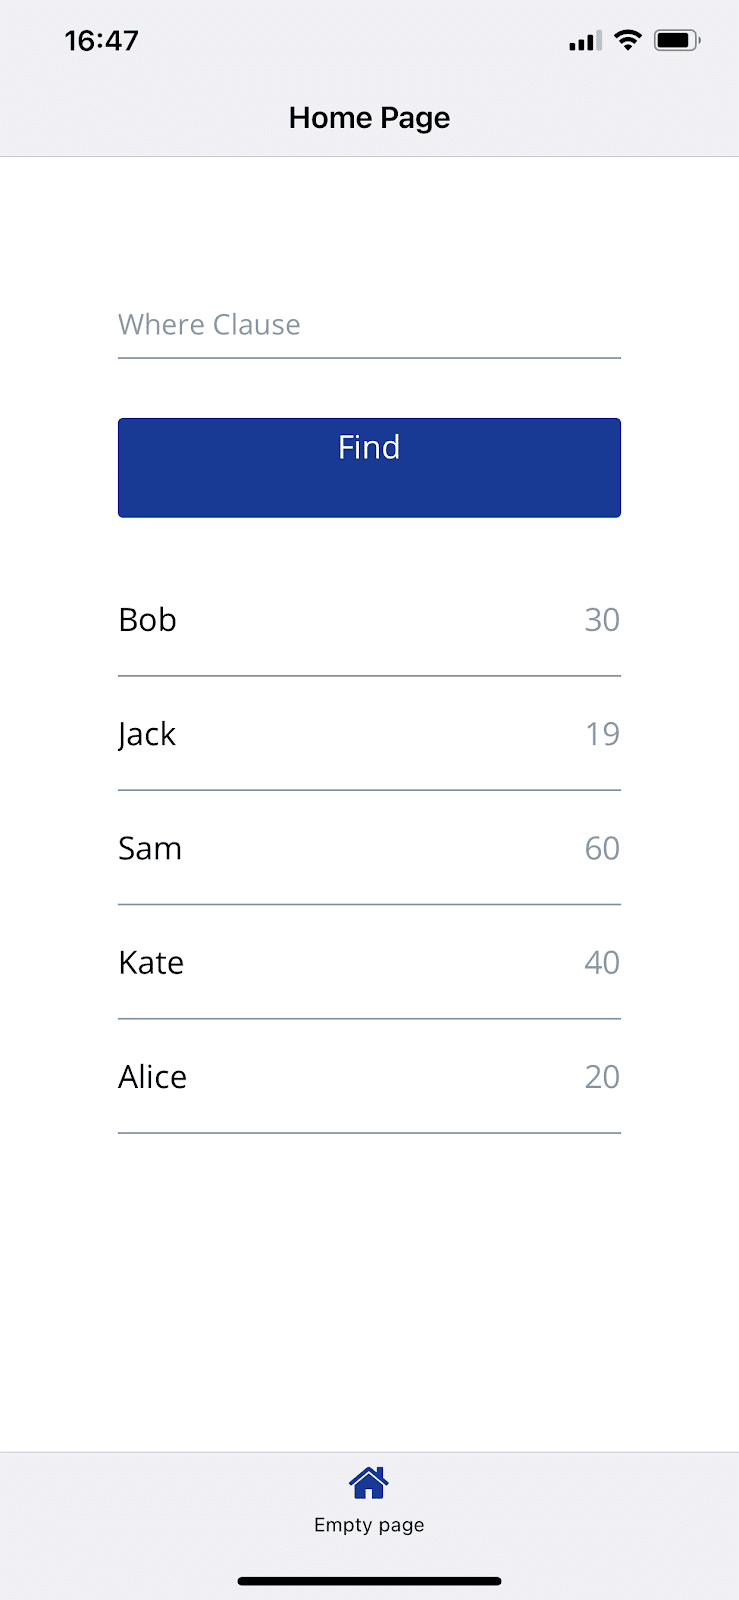
The logic is ready. We save the changes, open the AppGyver application on the phone, in the selected application, if desired, enter the where clause and press Find:

As a result of a query with whereClause = "age> 25", we got a list of Person table objects with age greater than 25. If we execute a Find query without specifying a whereClause, we get a list of all objects:
Closing
You should now have a basic handle on how to interact with a Backendless backend via AppGyver, but this is just the tip of the iceberg. Adding a Backendless backend and database to a AppGyver mobile app gives your app incredible flexibility.
With AppGyver’s enormous library of frontend components and Backendless’ many pre-built APIs, your possibilities become endless.
In addition to managing users and data, Backendless gives you access to timers, event handlers, and whatever Codeless logic you can think of on the backend.
Your app is virtually limitless.
Thanks for reading and Happy Codeless Coding!