How To Integrate Retool With Backendless

Retool is a no-code website builder designed for building internal tools “remarkably fast.” When you integrate a feature-rich no-code Backendless backend with your Retool frontend, you get a visual relational database, user management, bulletproof security, highly-scalable serverless hosting, easy login, and much more.
The inner workings of an application are almost always more important than the user interface. This is particularly true for internal applications, where function trumps form.
The more capable a tool’s backend, the more effective the tool will be for the user. Pairing an effective backend with an impressive frontend creates a powerful tool for your business.
Retool is a no-code frontend builder focused on making beautiful and highly functional user interfaces for internal tools. How do you get your business’s data – spread among various providers and databases – to easily stream into your Retool apps?
That’s where Backendless comes in.
With a huge assortment of pre-built APIs and the capability to build your own codeless APIs, Backendless easily fills in all the backend gaps in your Retool project.
Backendless allows you to easily connect with external APIs and databases as well, streamlining your internal apps to make your workflow simpler.
The Retool-Backendless Stack
In this article, we’re going to walk you through the process of integrating the several basic backend functions into a Retool app (click to jump to each section):
The above items merely scratch the surface of the benefits of connecting your Retool app to a Backendless backend. You will also gain access to no-code features such as:
- A large pre-built API collection,
- Serverless hosting,
- Codeless logic builder,
- Cloud Code, timers, and event handlers,
- Email and push notification support,
- Team-driven development,
- and much more.
To get started, you will need a Retool account (free to start) and a Backendless account (register here for free).
User Registration With Backendless
User registration and login enable your app to personalize the user’s experience and deliver the right data to the right personnel at just the right time.
User login opens up the entire set of user management functions in Backendless. These include session management, password management, user roles, and relating users to other data objects.
User registration also opens up user engagement opportunities such as email messaging, push notifications, and in-app messaging.
Let’s get started.
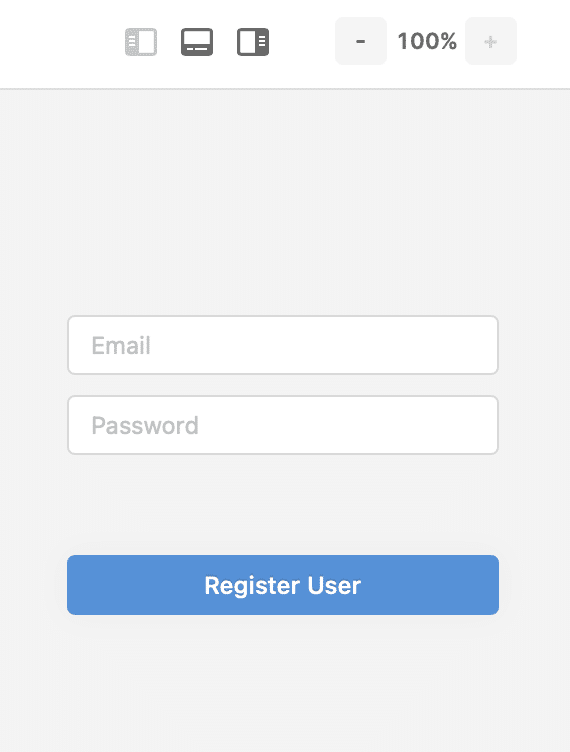
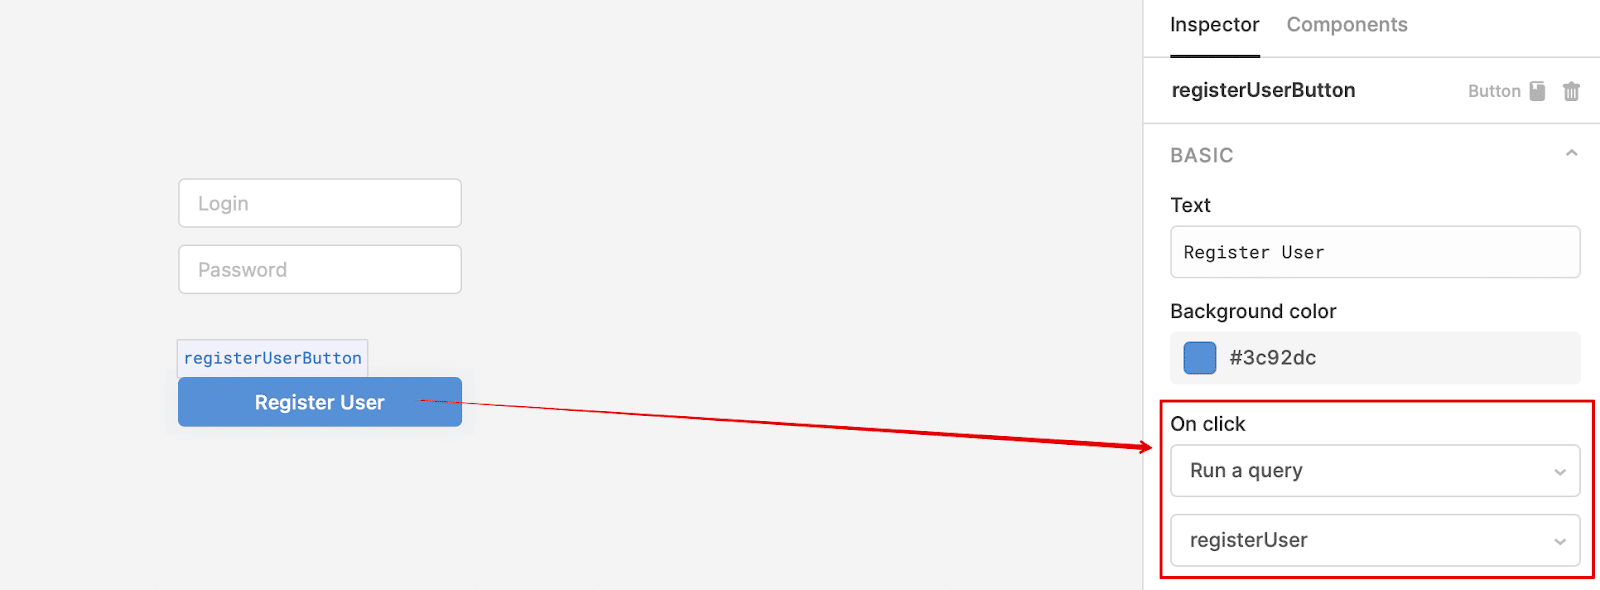
For our first example, we will need two Text Input components with the identifiers emailInput (Input type: email, Placeholder text: Email) and passwordInput (Input type: password, Placeholder text: Password), as well as a button with the registerUserButton identifier:
To register a user, a REST request will be used, which can be configured in the Queries section (read to User Registration docs):
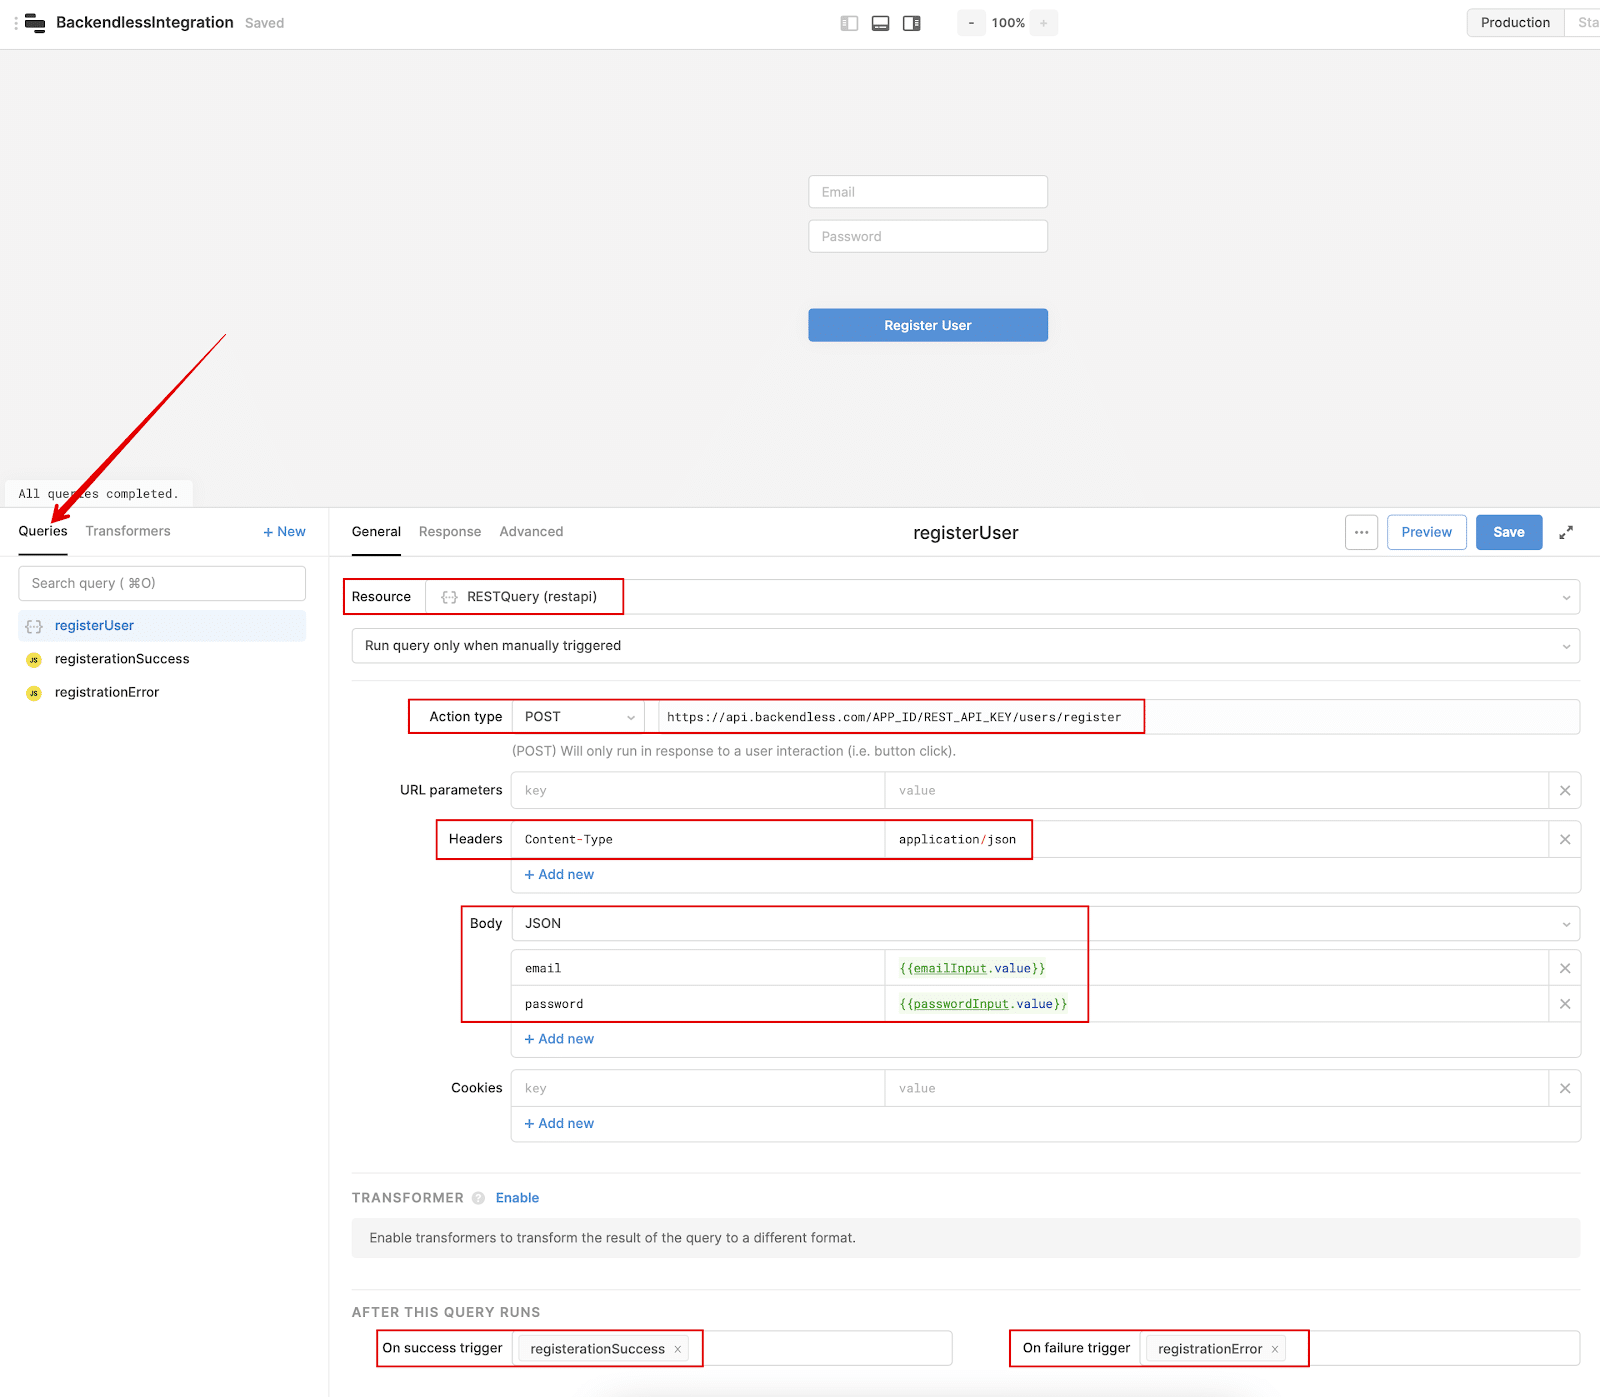
Set up the POST request, specify the url, add the Header Content-Type: application/json, and pass the email and password parameters to the Body, the values of which are taken from the corresponding emailInput and passwordInput fields.
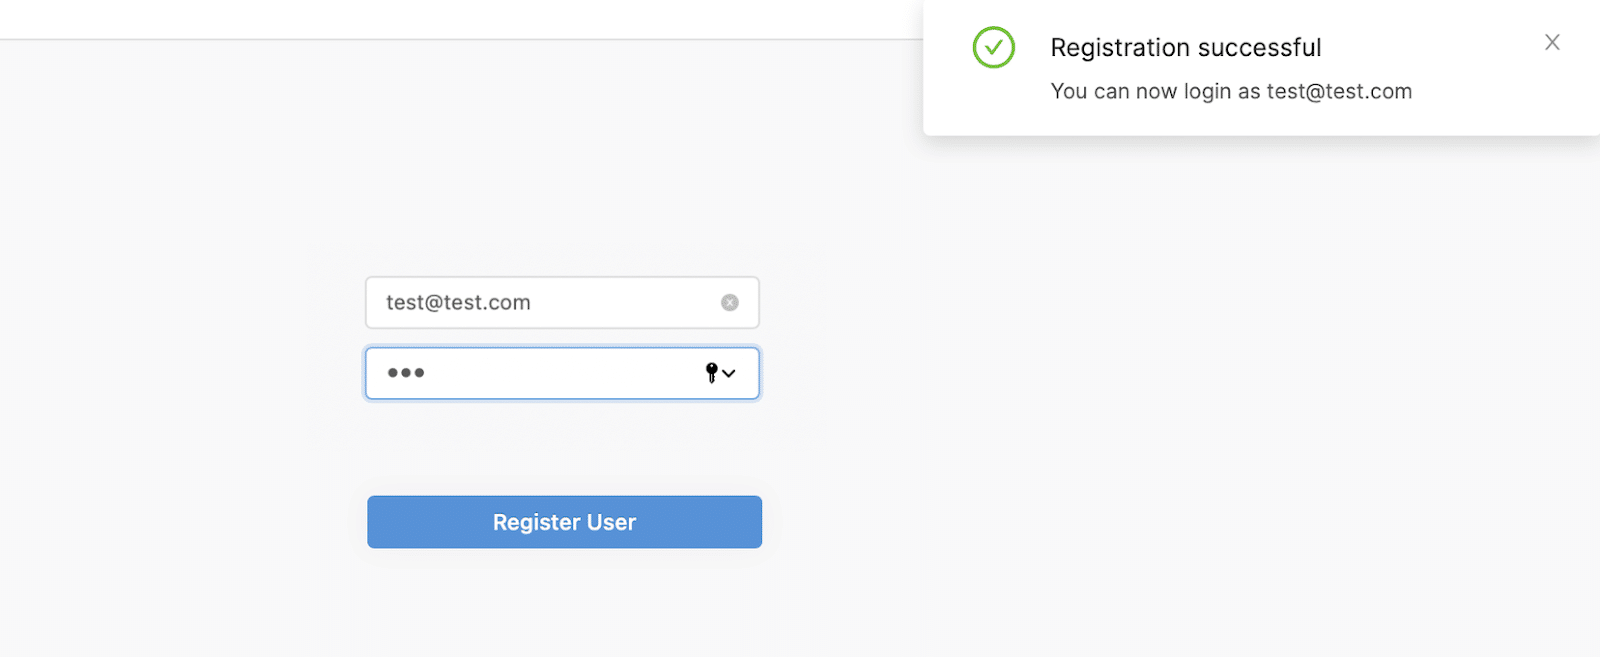
If the request is successful and a new user has been registered, the registrationSuccess trigger will fire (code found below):
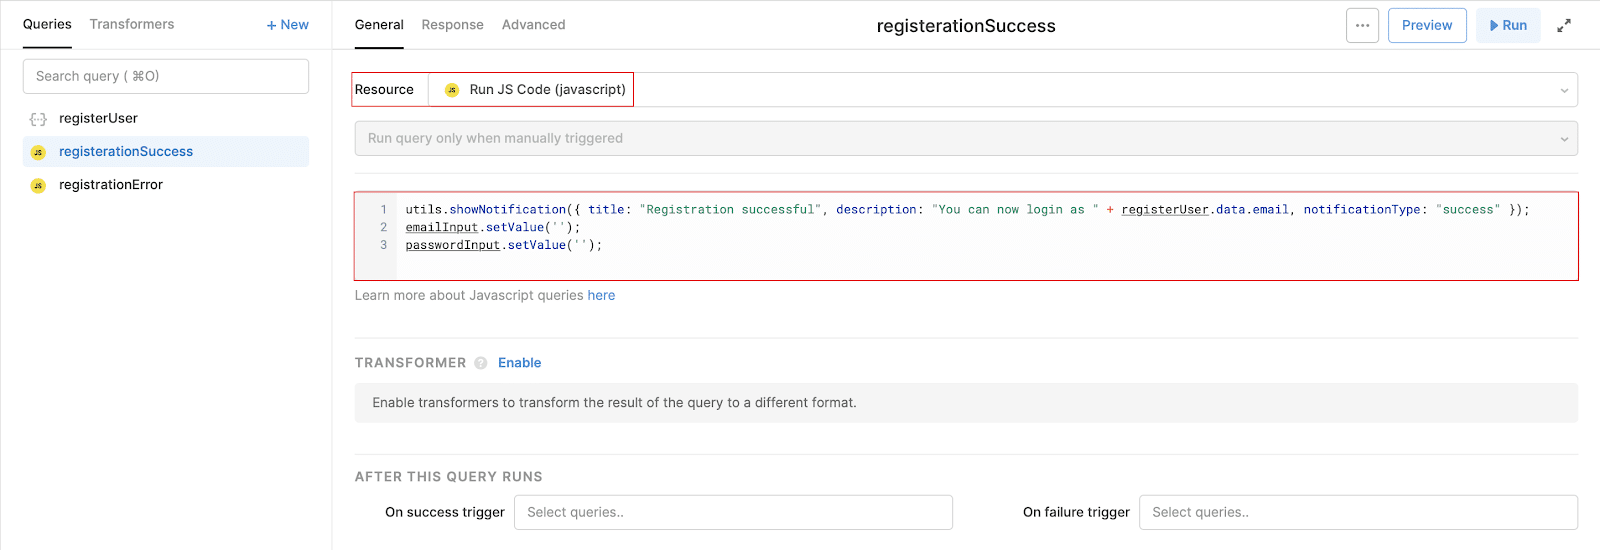
utils.showNotification({ title: "Registration successful", description: "You can now login as " + registerUser.data.email, notificationType: "success" });
emailInput.setValue('');
passwordInput.setValue('');
The user will be shown a message about user registration, and the emailInput and passwordInput fields will be cleared.
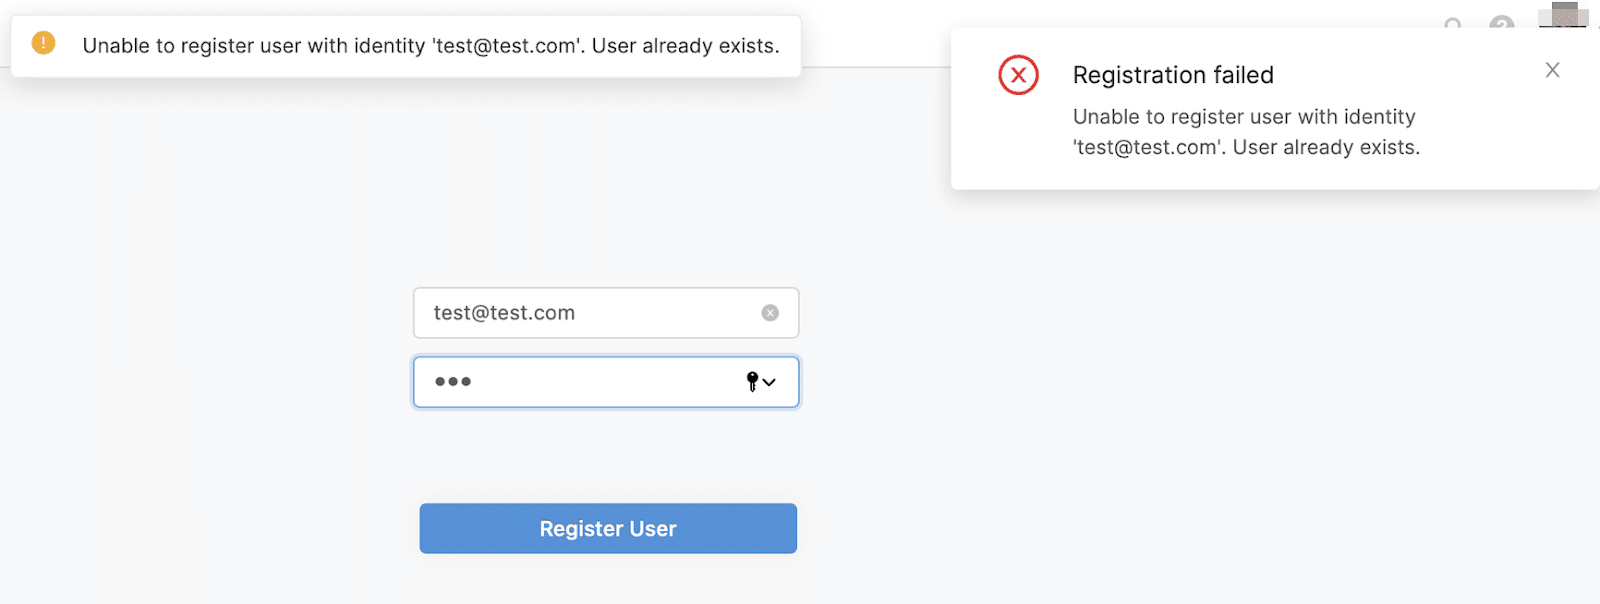
If an error occurs during registration, the registrationError trigger will be fired:
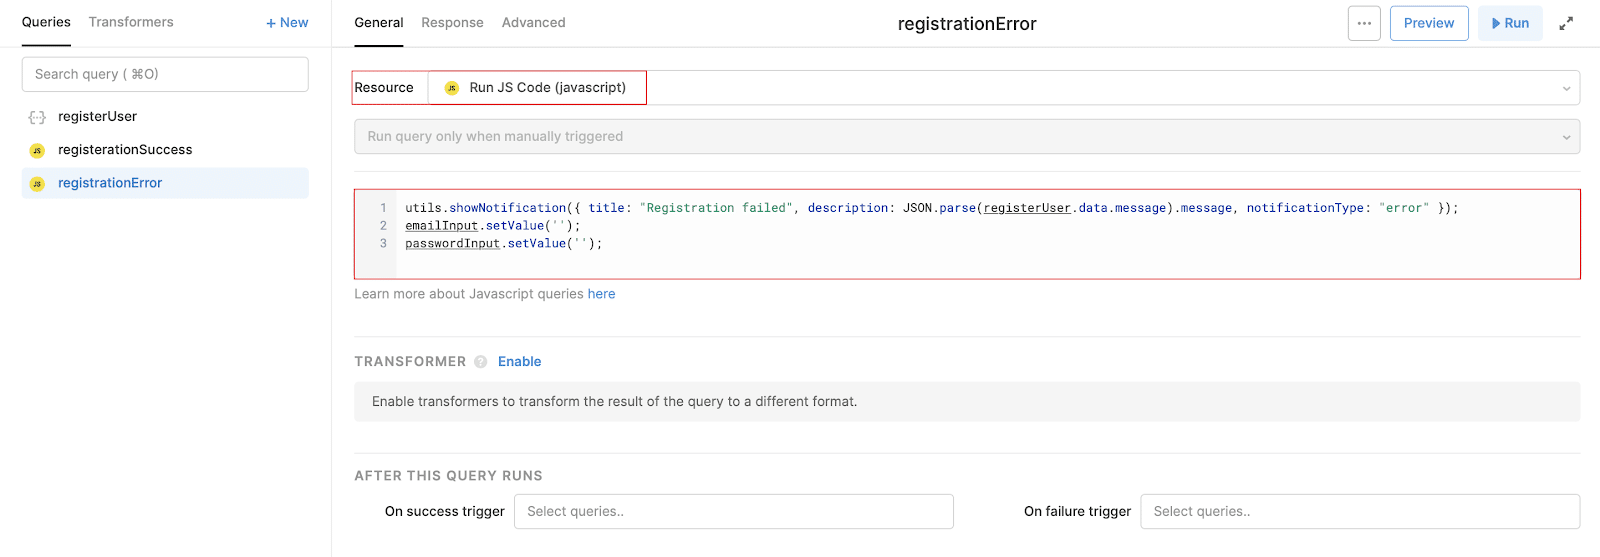
utils.showNotification({ title: "Registration failed", description: JSON.parse(registerUser.data.message).message, notificationType: "error" });
emailInput.setValue('');
passwordInput.setValue('');
The user will be shown an error message and the emailInput and passwordField values will be cleared.
For the Register User button, add an On Click event handler so that when the button is clicked, the registerUser Query is called:
The logic is ready. In the upper right corner of the screen, click the Preview button. On the opened site, enter the email and password of the new user and click Register User. If registration was successful, we will receive a message about successful registration:
If an error occurred during registration (for example, the user tries to register an existing user), then we will receive the following notification:
Retool Login With Backendless
Now that we’ve had the user register, let’s create a Retool login page.
For this example, let’s add two Text Input components with identifiers loginInput (Input type: text, Placeholder text: Login) and passwordInput (Input type: password, Placeholder text: Password), as well as a button with the loginButton identifier:
For the Retool login, a REST request will be used, which can be configured in the Queries section (read the Login docs):
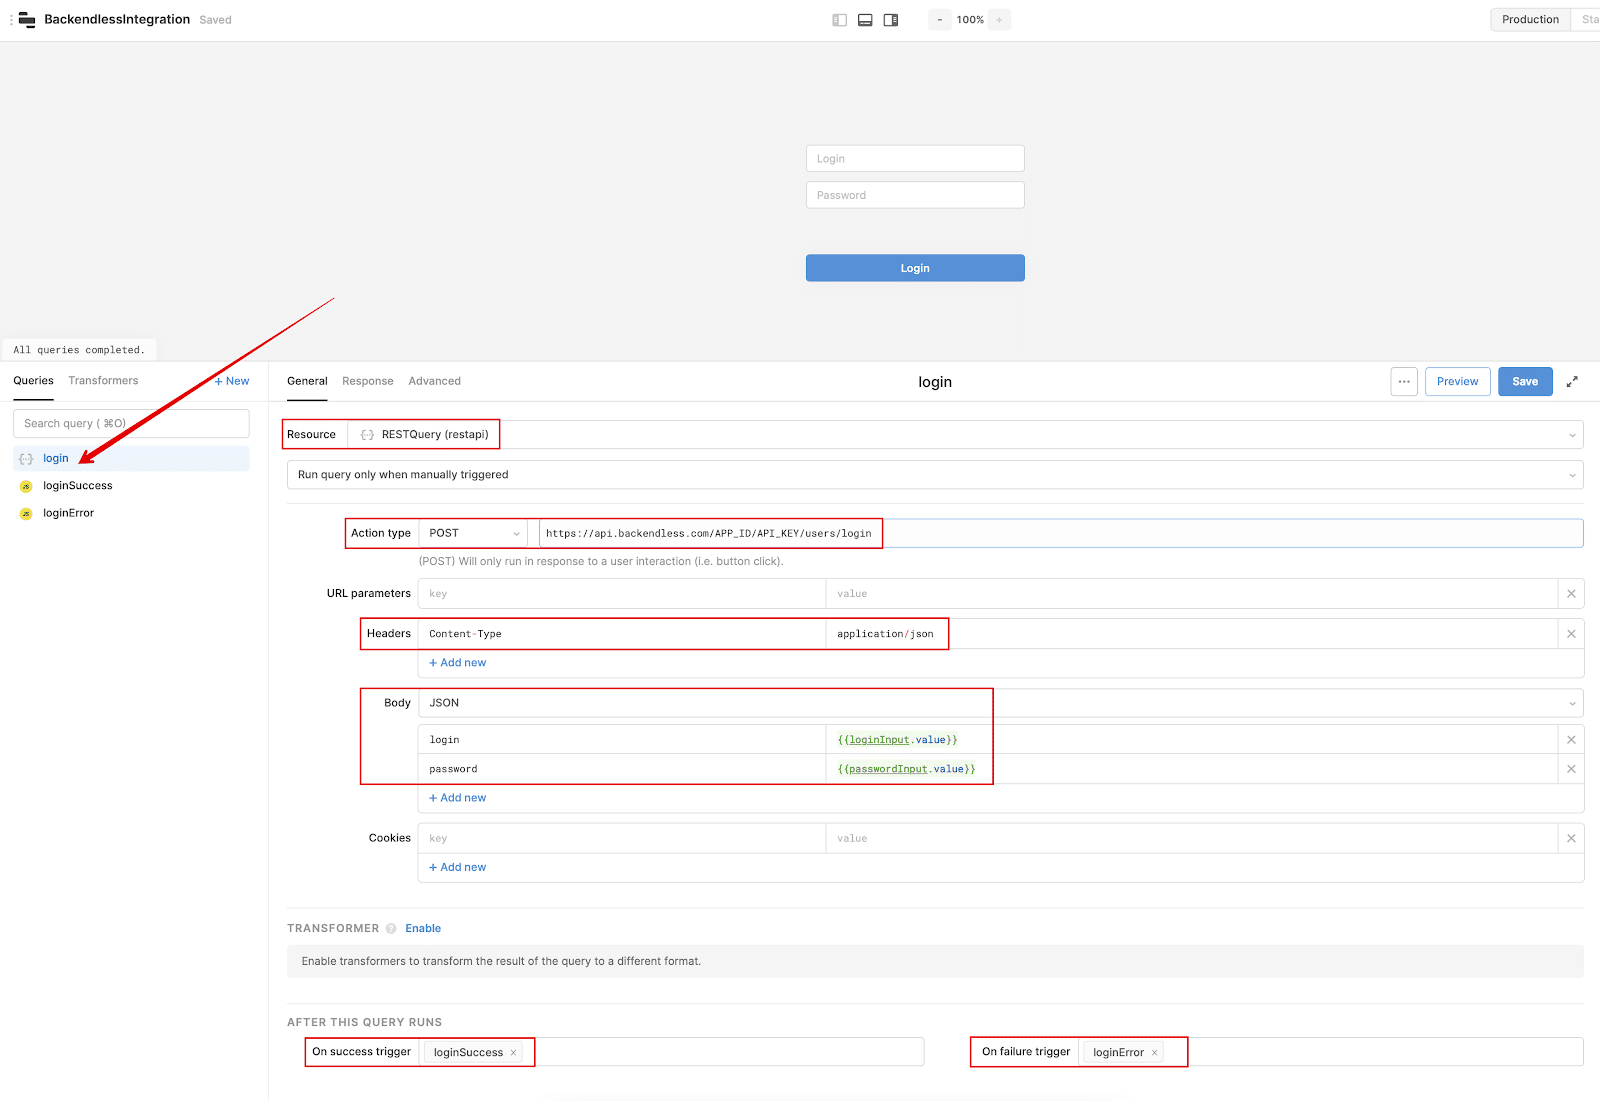
We set up the POST request, specify the url, add the Header Content-Type: application/json, and pass the login and password parameters to the Body, the values of which are taken from the corresponding fields loginInput and passwordInput.
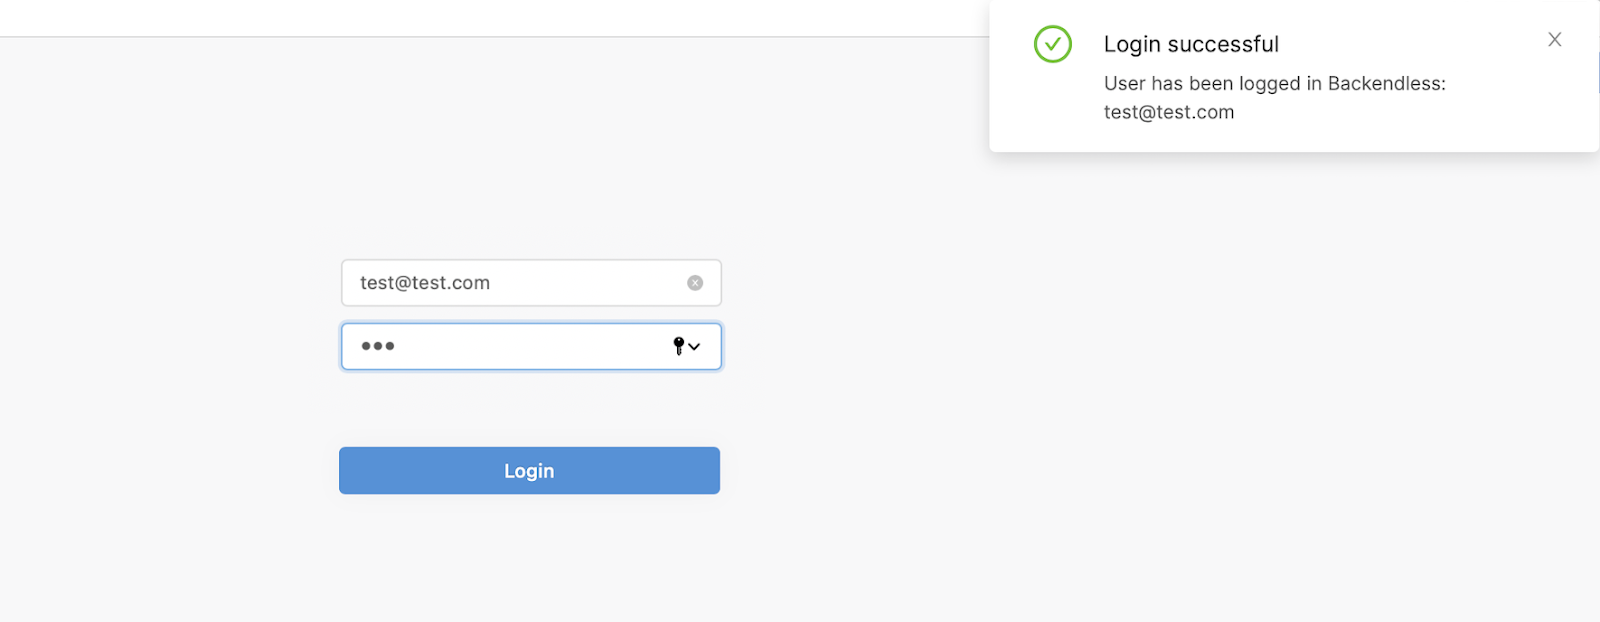
If the request is successful and the user is logged in, the loginSuccess trigger will fire:
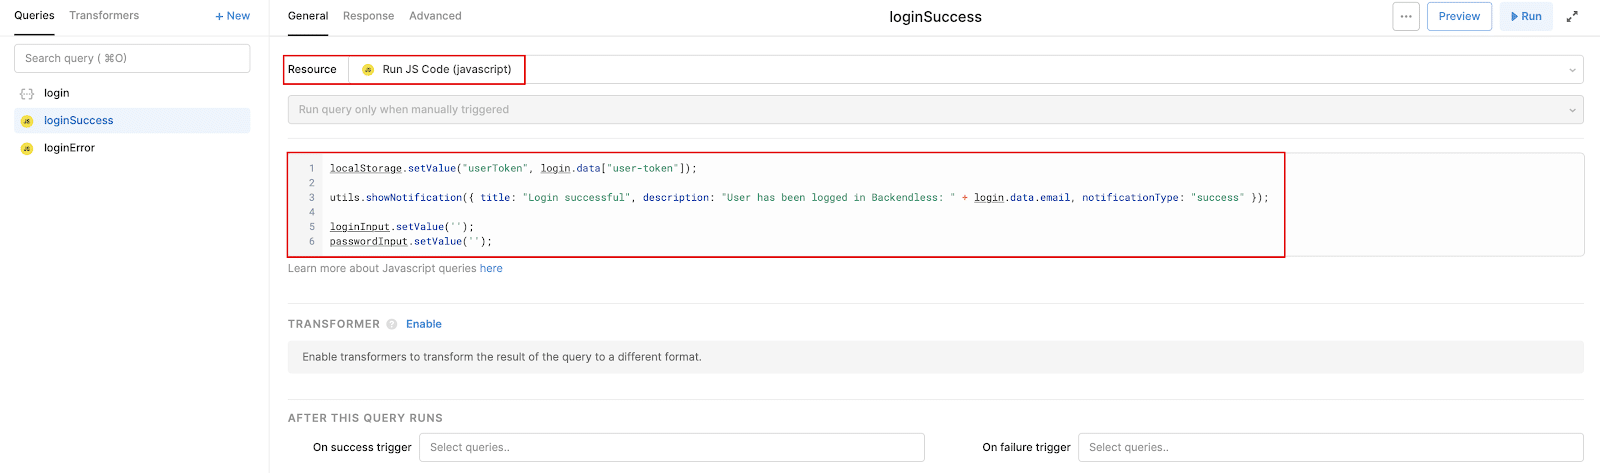
localStorage.setValue("userToken", login.data["user-token"]);

utils.showNotification({ title: "Login successful", description: "User has been logged in Backendless: " + login.data.email, notificationType: "success" });

loginInput.setValue('');
passwordInput.setValue('');
The logged in user’s token will be saved in localStorage, a successful login message will be displayed, and the values of the loginInput and passwordInput fields will be cleared.
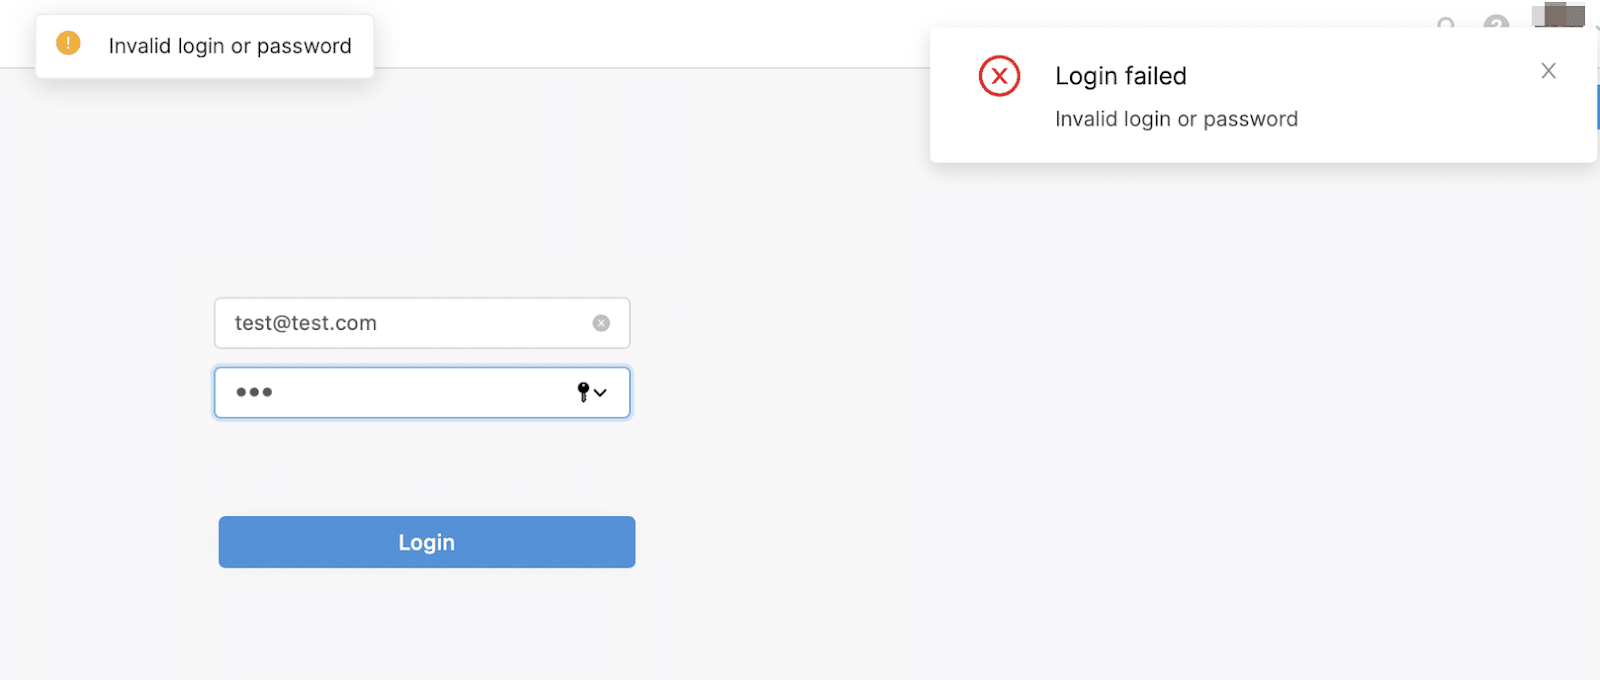
If an error occurs during login, the loginError trigger will fire:
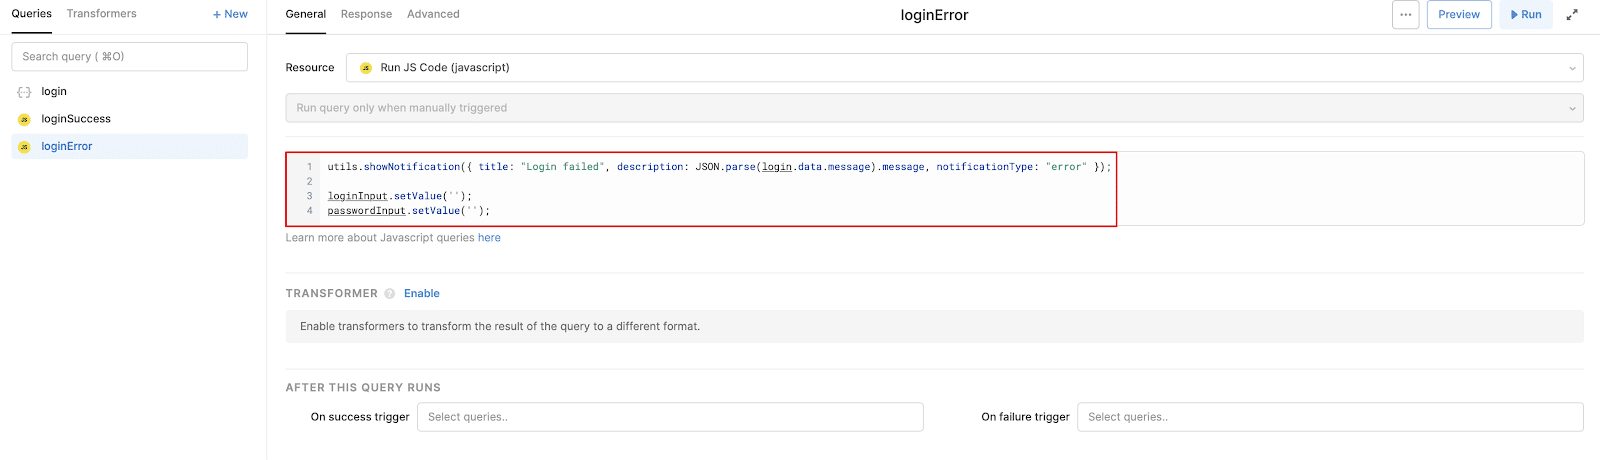
utils.showNotification({ title: "Login failed", description: JSON.parse(login.data.message).message, notificationType: "error" });

loginInput.setValue('');
passwordInput.setValue('');
The user will be shown an error message and the values for the loginInput and passwordInput fields will be cleared.
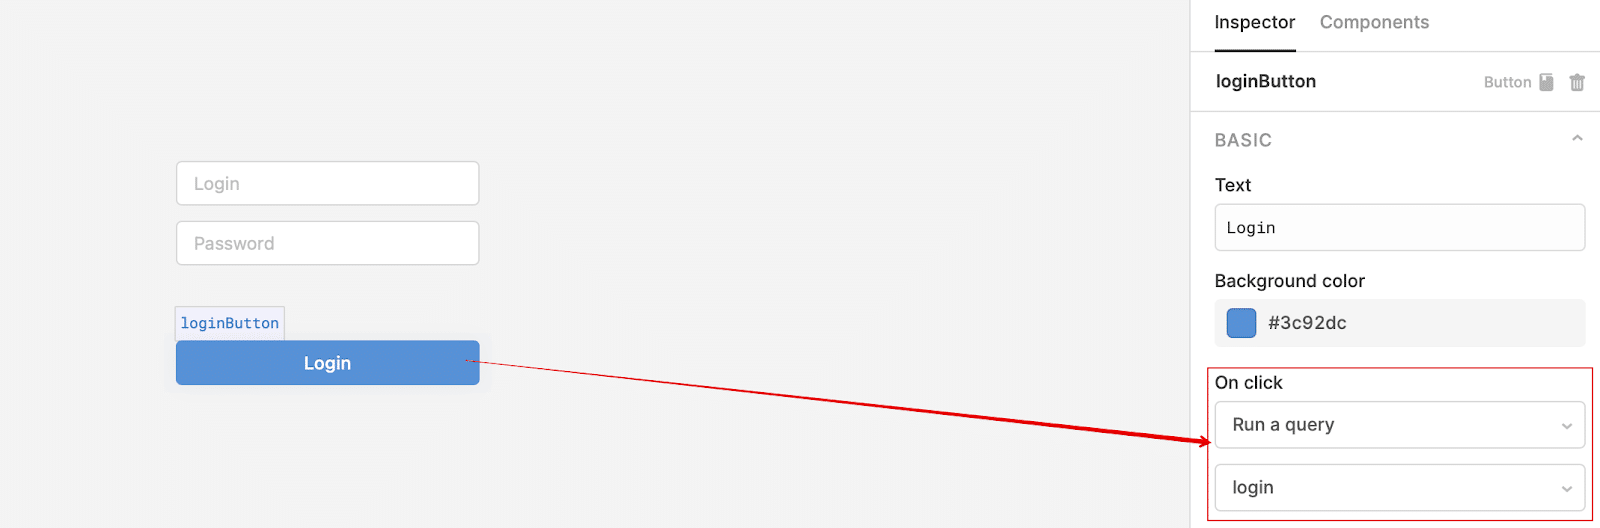
For the Login button, add an On Click event handler so that when the button is clicked, the login Query is called:
The logic is ready. In the upper right corner of the screen, click the Preview button. On the opened site, enter the login and password of an existing user and click Login.
If the login in Retool was successful, we will receive a message about the successful operation:
If an error occurred during login (for example, the user tries to login with an incorrect password), then we will receive the following notification in Retool:
Save Data In Backendless
Backendless Database is what sets Backendless apart from every other no-code platform out there. Your database can store a wide range of data types (including spatial/geo data and JSON objects) and makes it trivially easy to create relations between objects.
Backendless Database uses a SQL-based querying system. (We will touch on that more in the next section.) This approach allows you to easily query your data and display exactly what you want the user to see.
To start working with our data, let’s first take a look at how to save data into our Backendless Database from Retool. Let’s build a simple new page to try it out.
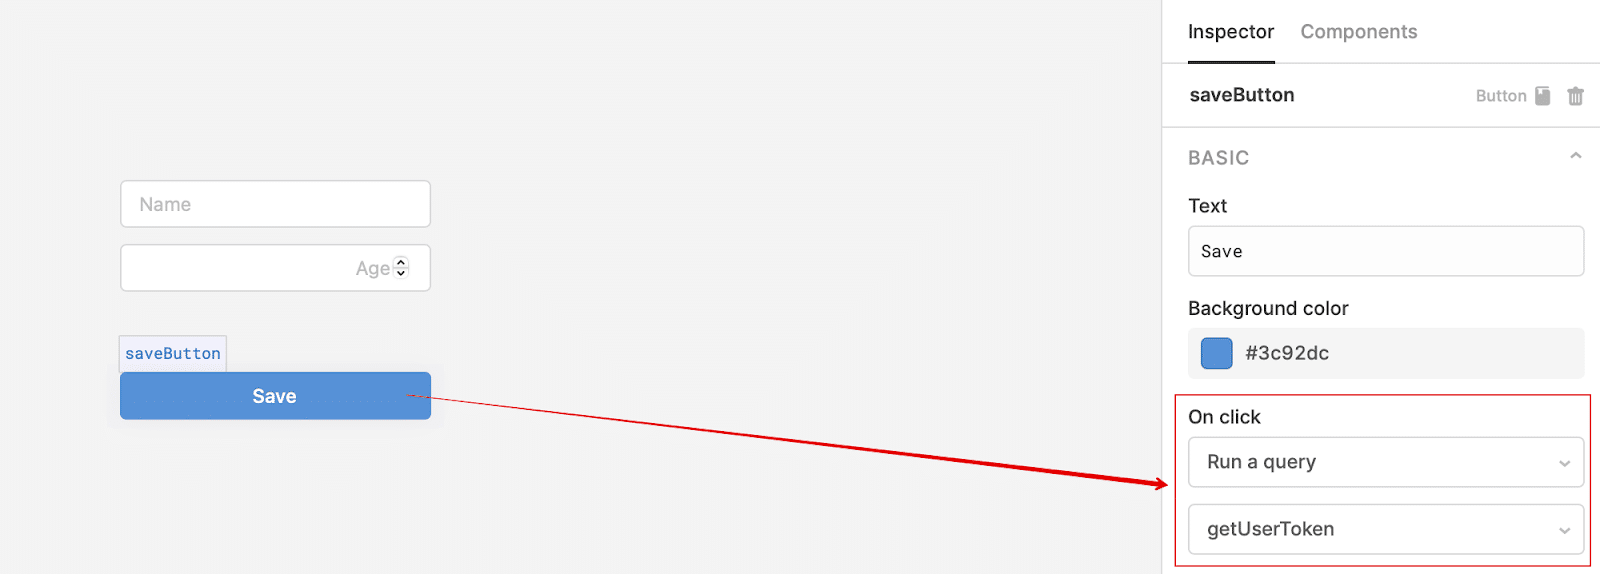
For this example, we again need two Text Input components with the identifiers nameInput (Input type: text, Placeholder text: Name) and ageInput (Input type: number, Placeholder text: Age), as well as a button with the saveButton identifier:

The object will be saved to the Person table. Let’s go to the Queries section to set up a query (read the docs about Saving Data in Backendless).
Before saving the object, we get the token of the logged-in user from local storage (saving the token is described in the Login With Backendless section). To do this, let’s create a JavaScript request named getUserToken, after which the saveObject request will be called.
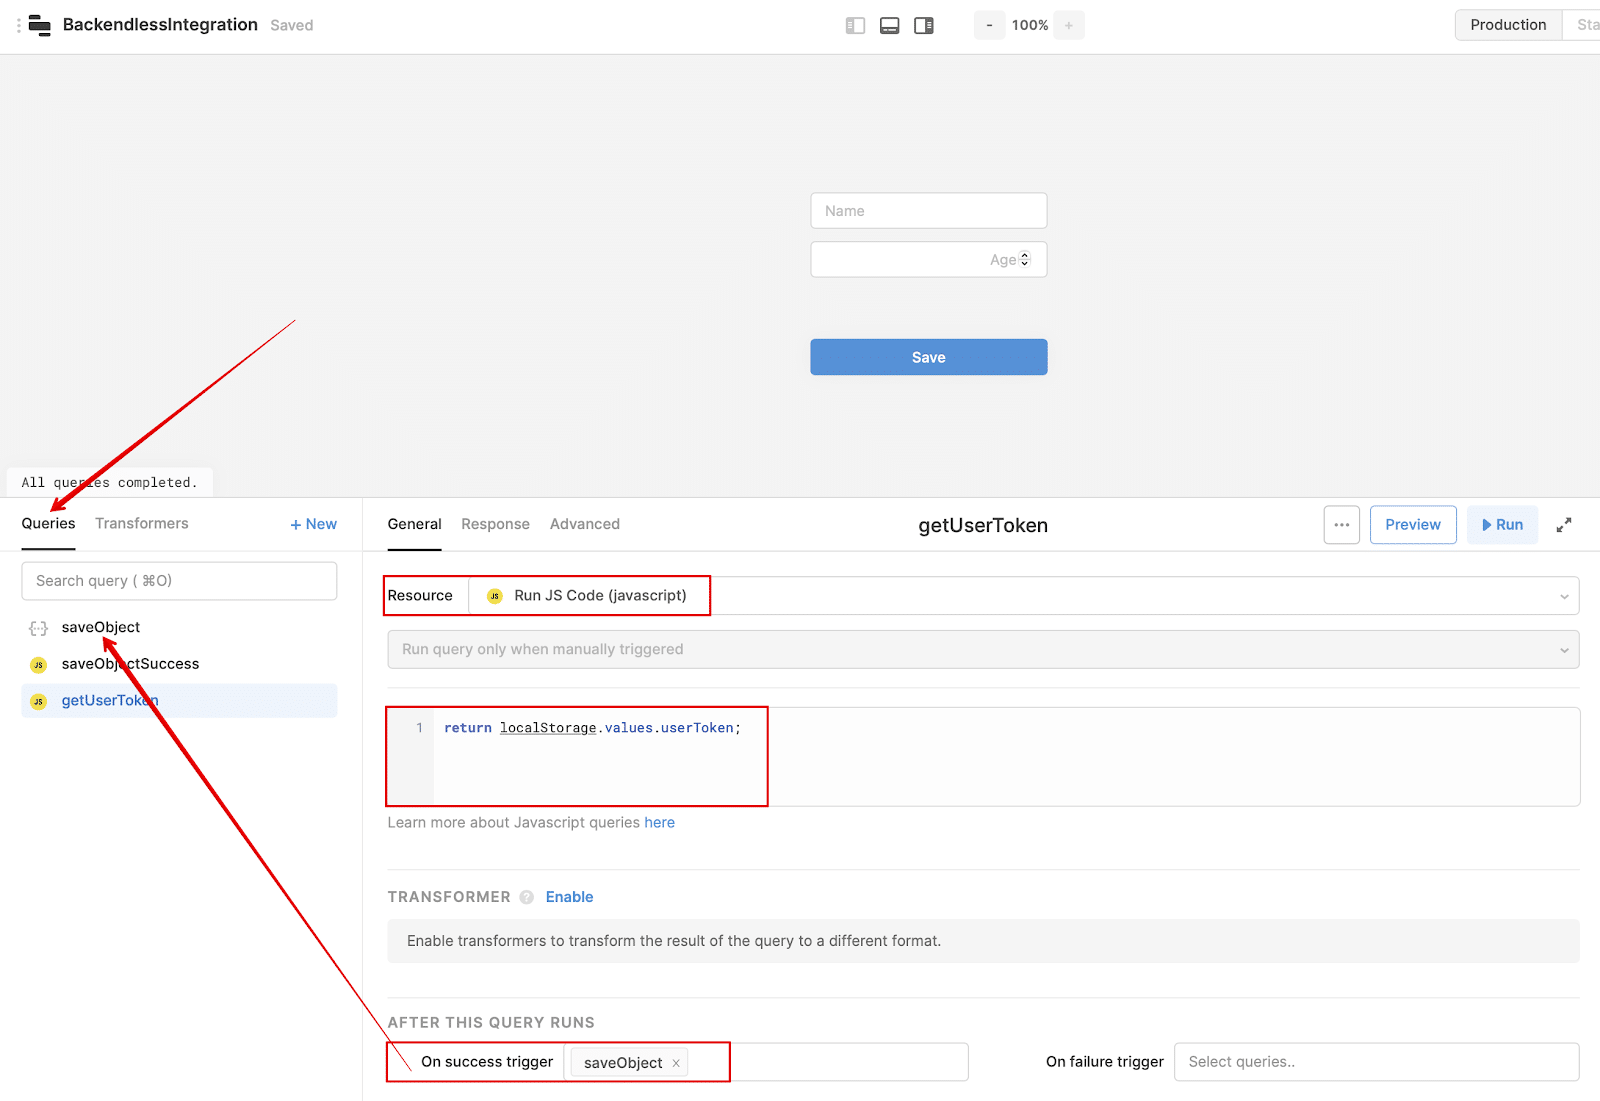
We set up the POST request, specify the url, and add to the Headers Content-Type: application/json and the user-token obtained as a result of the getUserToken request. Finally, pass the name and age parameters to the Body, the values of which are taken from the corresponding fields nameInput and ageInput:
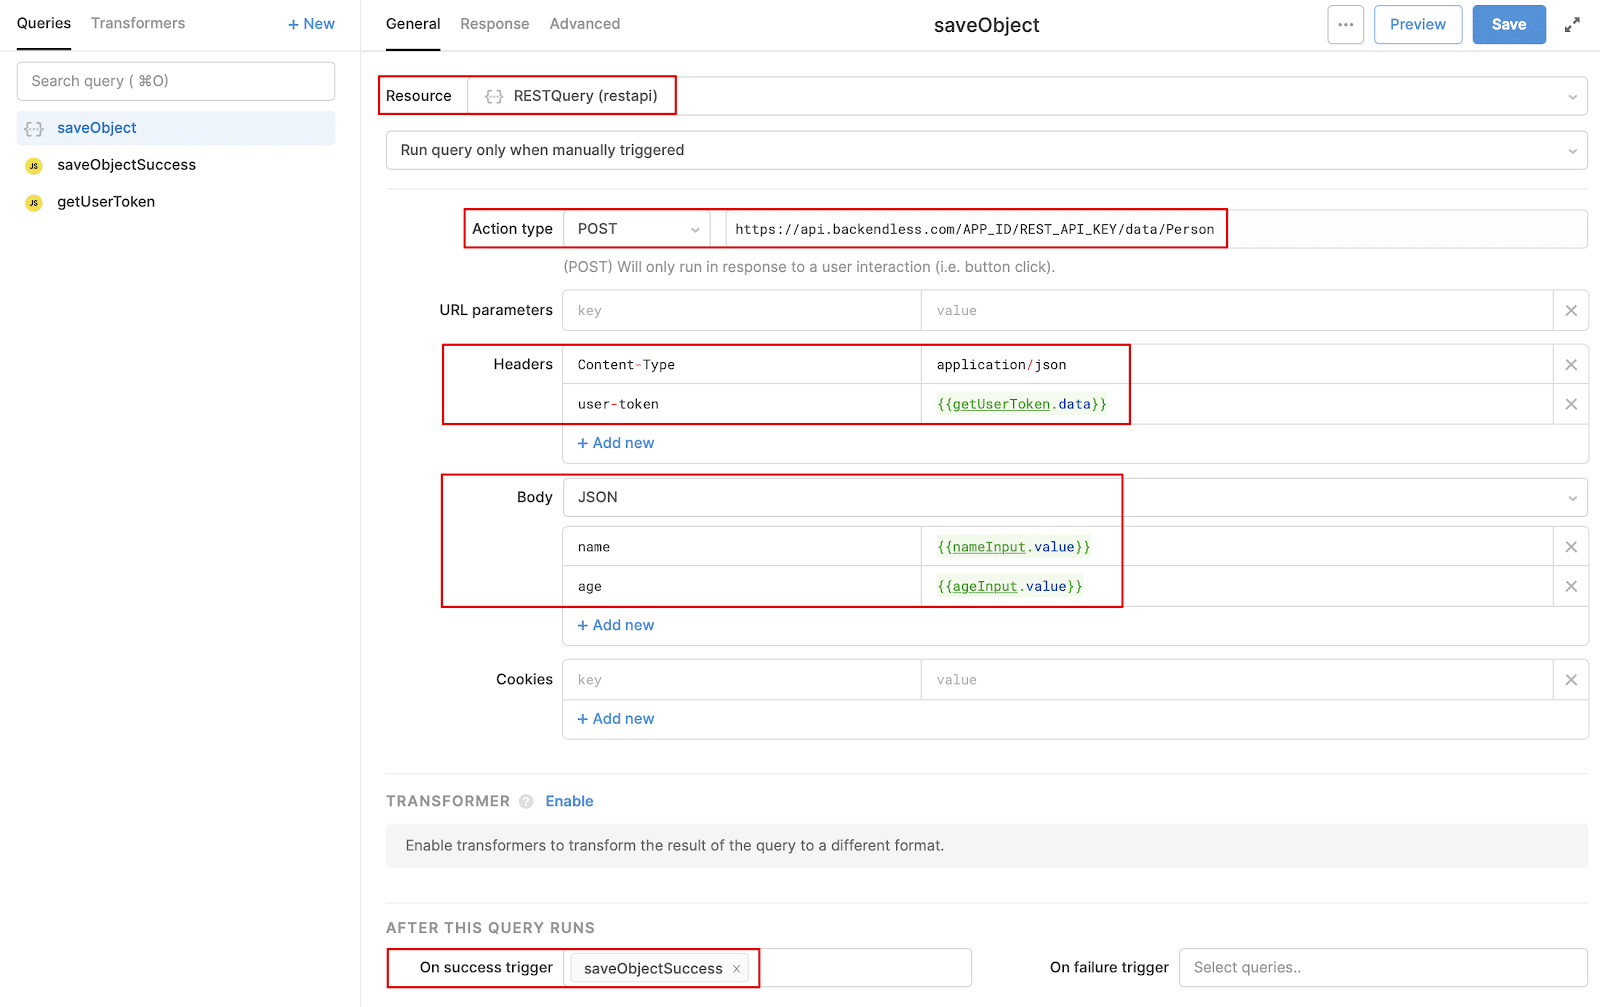
If the request is successful and the object was saved in Backendless, the saveObjectSuccess trigger will fire:

utils.showNotification({ title: "Saved successfully", description: "Object has been saved in Backendless with objectId: " + saveObject.data.objectId, notificationType: "success" });

nameInput.setValue('');
ageInput.setValue('');
The user is shown a message indicating that the save operation was successful, and the values of the nameInput and ageInput fields are cleared.
For the Save button, add an On Click event handler so that when the button is clicked, the getUserToken Query is called:
The logic is ready. In the upper right corner of the screen, click the Preview button. On the opened site, enter the name and age of the new Person object, and click Save. If the save was successful, we will receive the following message:

Run Query In Backendless
Finally, let’s put together a page to query our database and display the results.
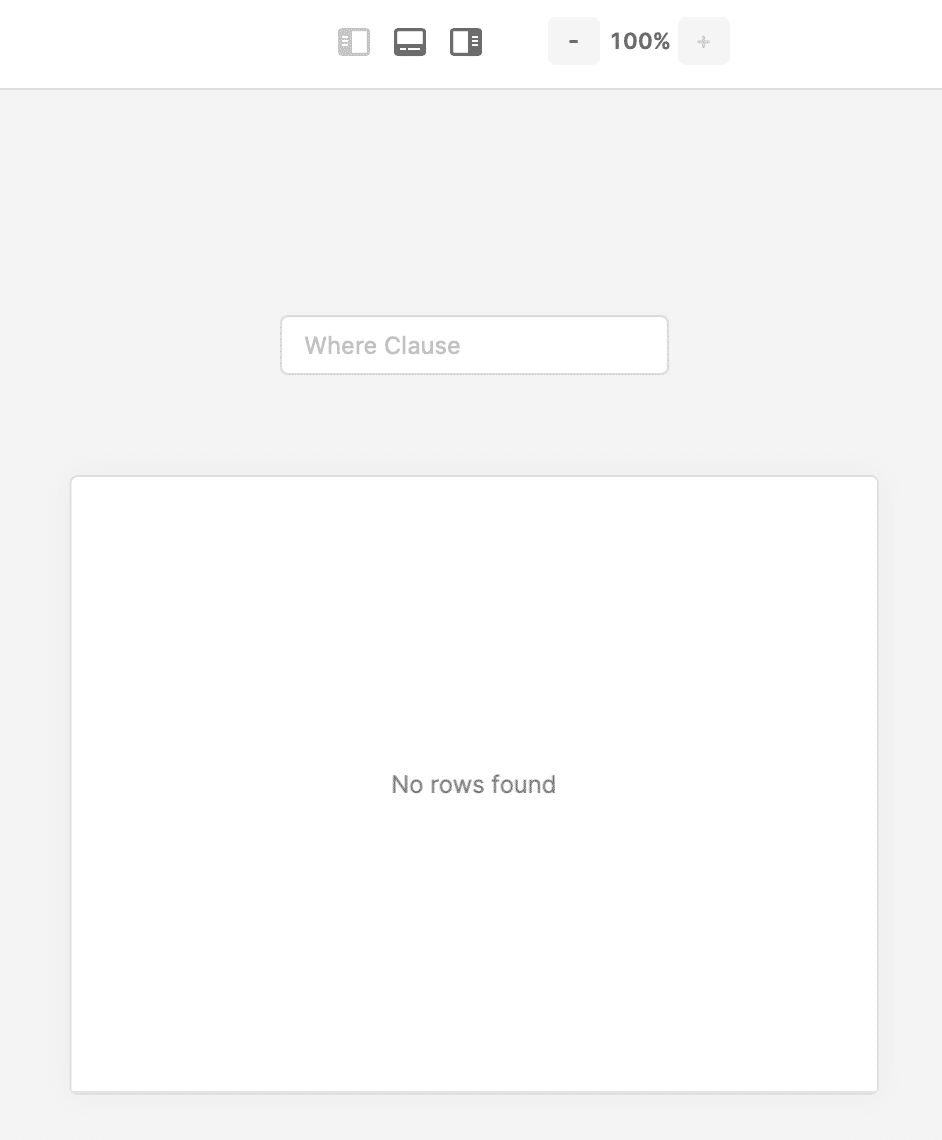
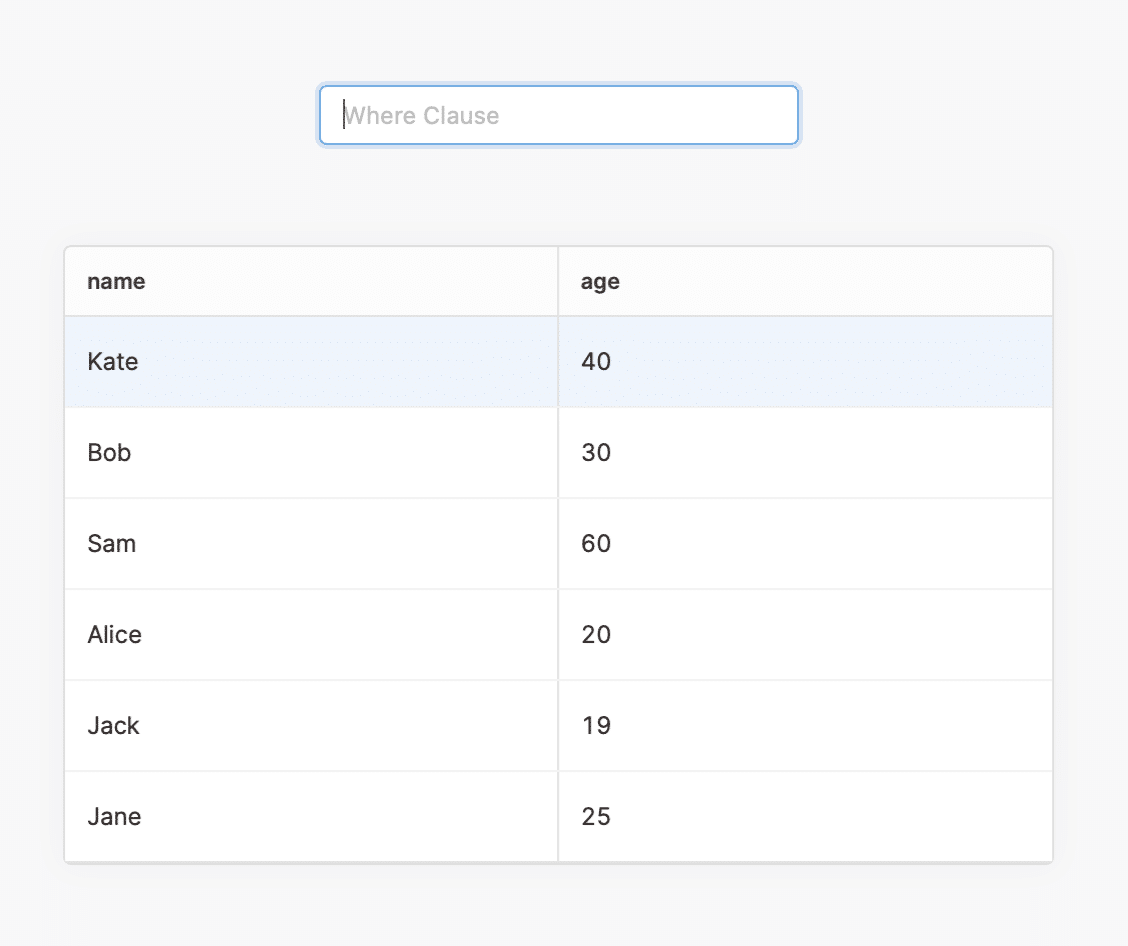
For this example, we need a single Text Input component with the whereClauseInput identifier (Input type: text, Placeholder text: Where Clause) and a table with the resultsTable identifier:
The selection of objects will come from the Person table and automatically appear in the resultsTable. Let’s go to the Queries section to set up a find query (read the Query docs).
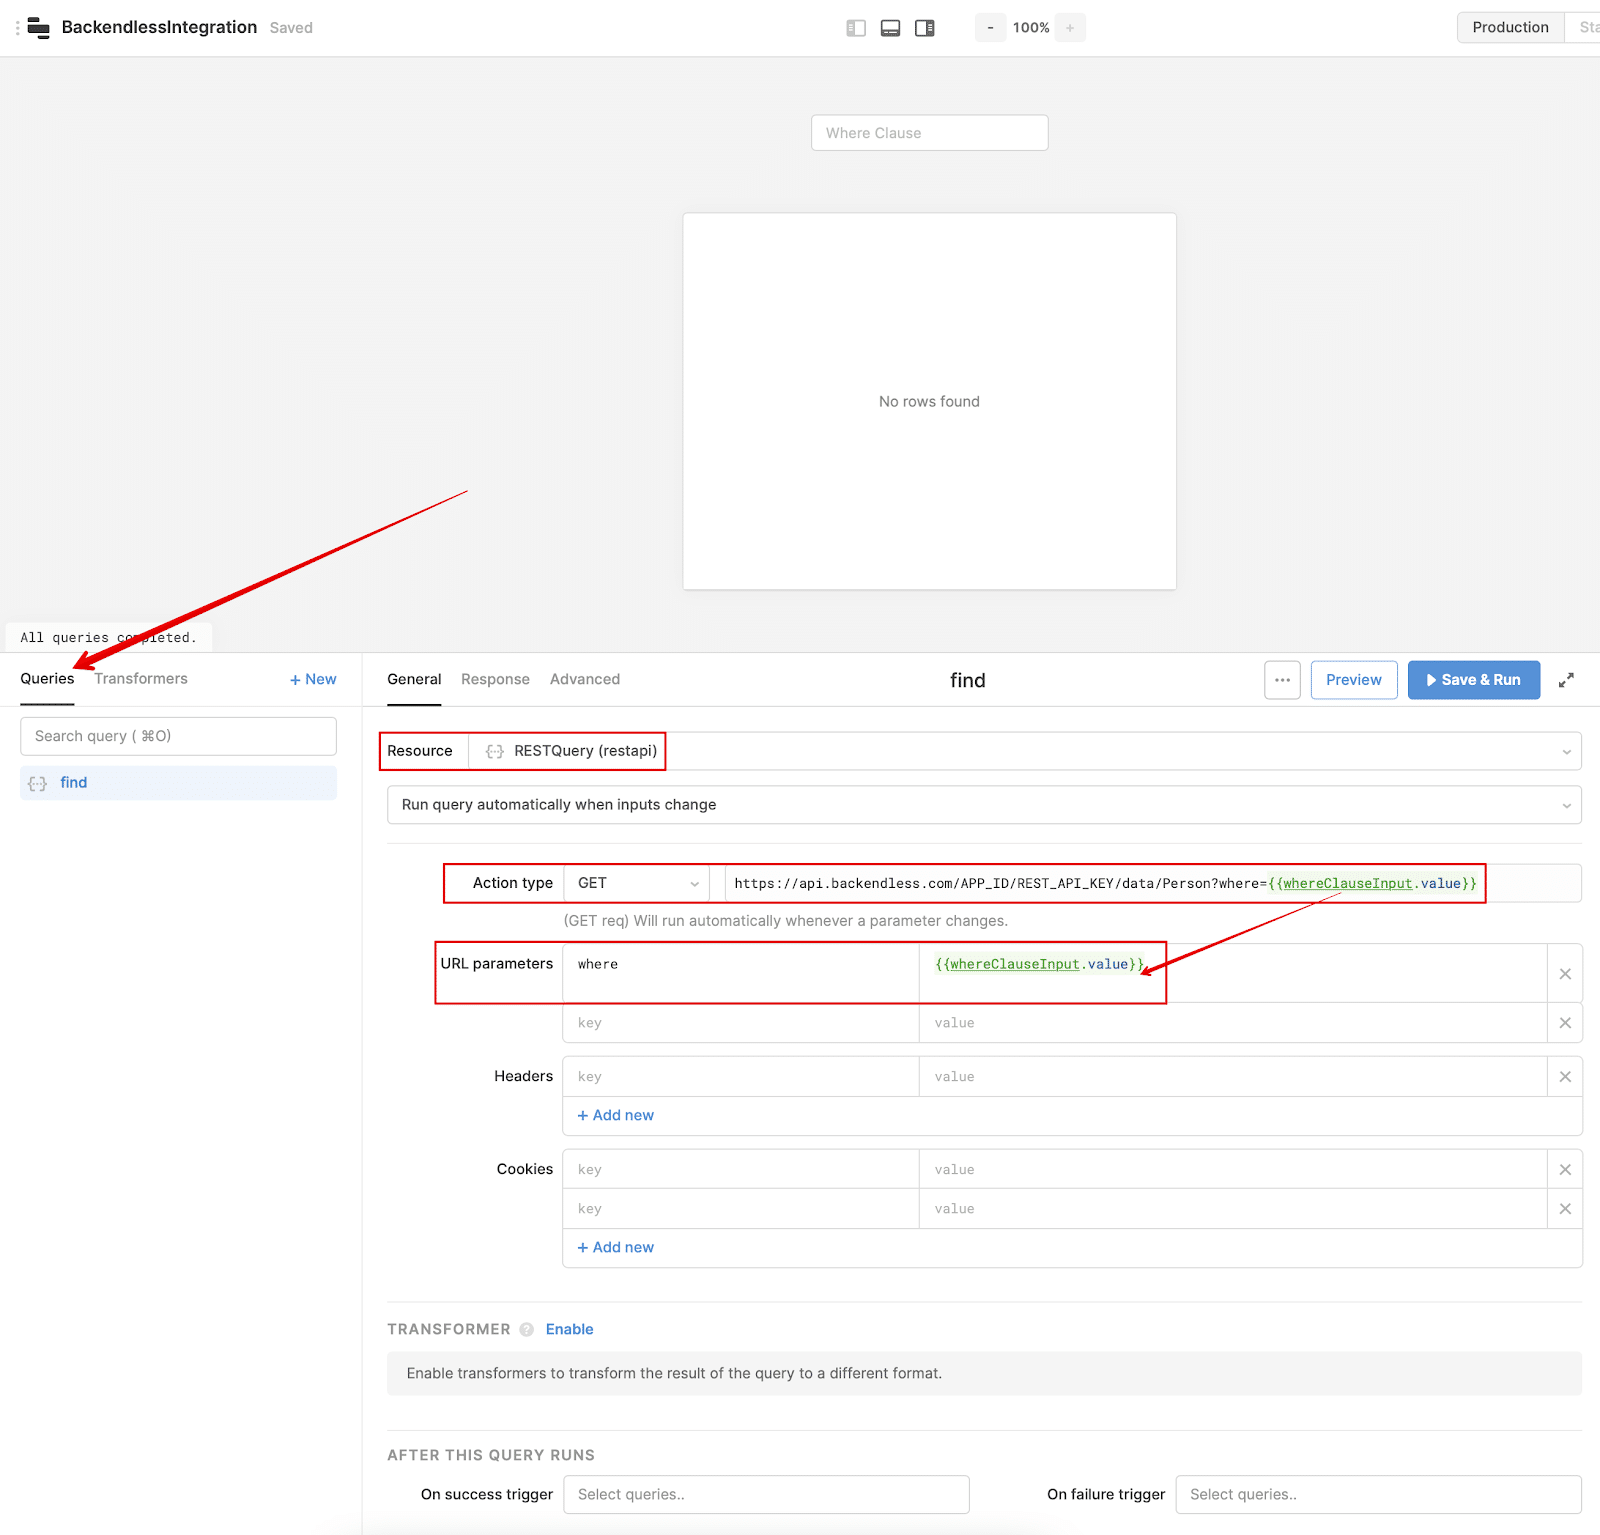
We set up a GET request, specify the url, and pass the where parameter to the URL parameters, the value of which is taken from the corresponding whereClauseInput field.
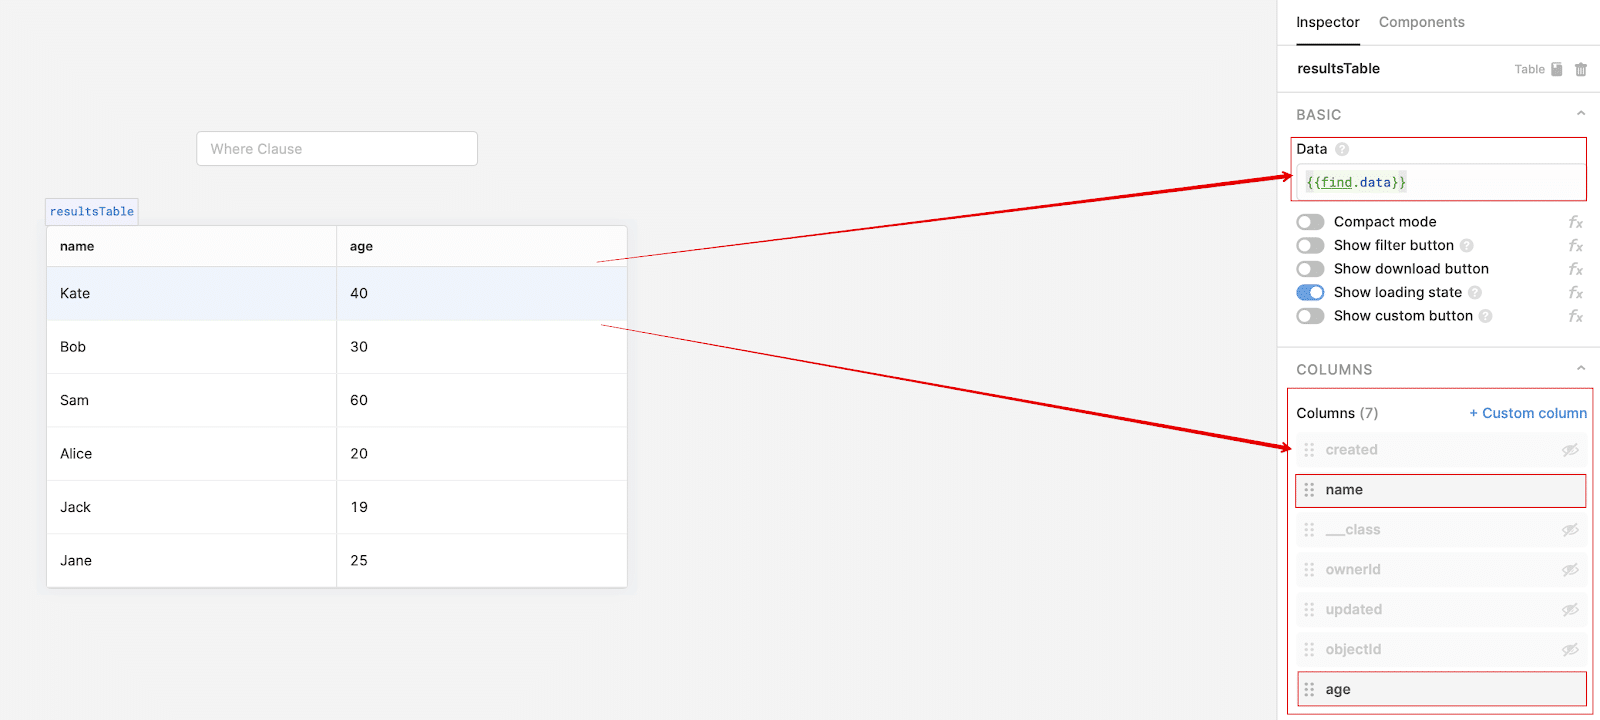
If the fetch request was successful, we will display the received data in the resultsTable. To do this, set the result of the find query as the Data Source, after which, if the selection is successful, the data and information about the object fields will immediately be displayed in the table.
Leave name and age in the displayed columns:
The logic is ready, go to the Preview mode.
Optionally, you can enter a where clause and click Find:

As a result of a query with whereClause = "age>25", we got a list of Person table objects with age greater than 25. If we execute a find query without specifying whereClause, we get a list of all objects:
Closing
You should now have a basic handle on how to interact with a Backendless backend via Retool, but this is just the tip of the iceberg. Adding a Backendless backend and database to a Retool application gives your internal tools incredible flexibility.
With Retool’s frontend interface and Backendless’ database, backend and many pre-built APIs, your possibilities become endless.
In addition to managing users and data, Backendless gives you access to timers, event handlers, and whatever Codeless logic you can think of on the backend.
Your app is virtually limitless.
Thanks for reading and Happy Codeless Coding!