How To Integrate Wix With Backendless
Wix is a popular drag-and-drop website builder that is great for building a website quickly and on a budget. In this Wix integration guide, we are going to show you how to turn your Wix site into a web app by connecting to a Backendless backend.
This tutorial is designed for both new Wix users and those with existing Wix sites.
If you are starting a new site, did you know Backendless has a no-code UI Builder that automatically integrates with your backend? Check it out here.
A successful web app or website requires much more than just an impressive user interface. Most will be supported by their backend, including servers, data storage, user management, and in many cases, logic.
The more capable the backend, the more effective and the better the user experience.
Wix offers fantastic UI development tools and is setup to allow connection to external backend resources.
That’s where Backendless comes in.
With a huge assortment of pre-built APIs and the capability to build your own codeless APIs, Backendless easily fills in all the backend gaps in your Wix website or web app.
Before we get started, you will need to create your own Wix account and a free Backendless account.
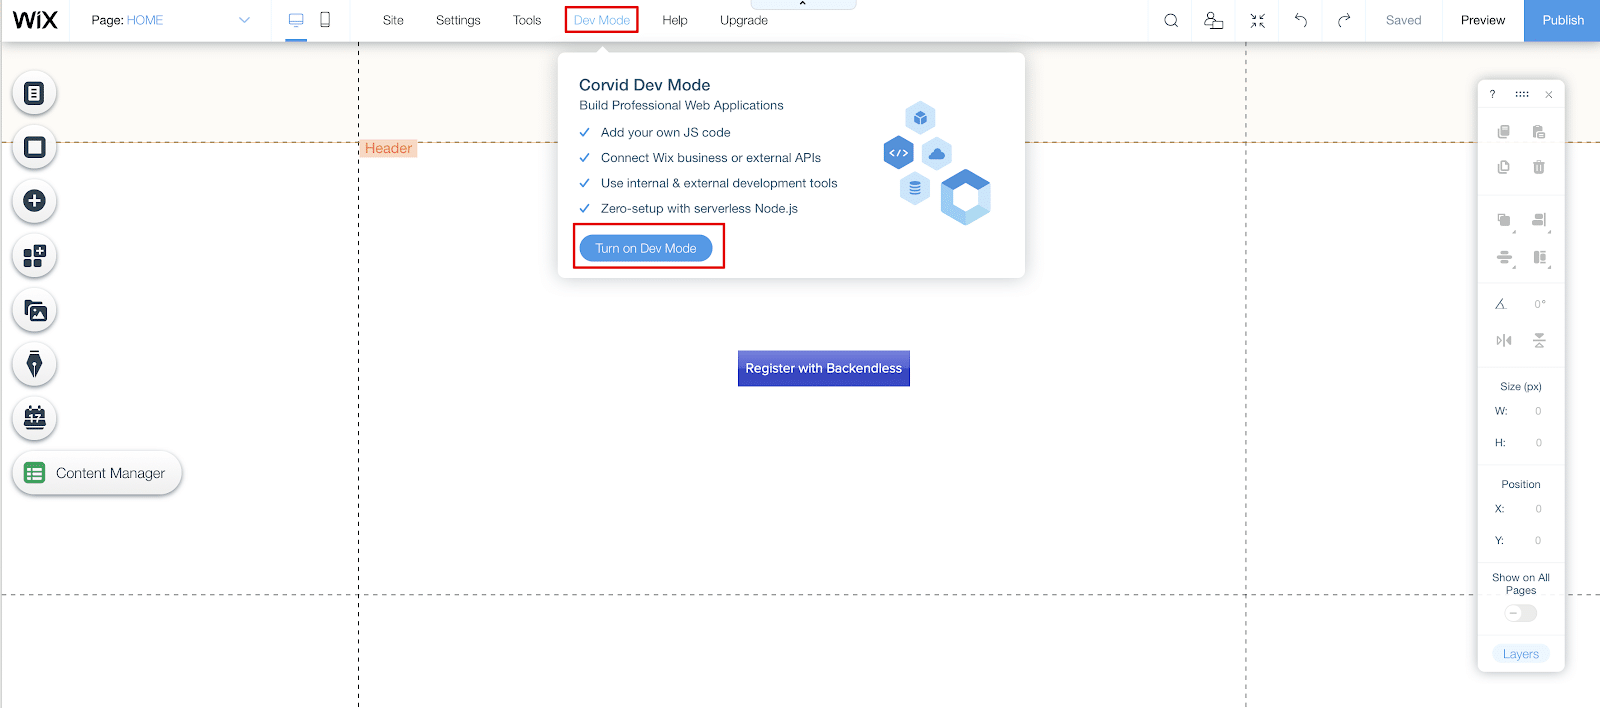
Enable Development Mode
For integration, we are going to use REST requests, which can be sent using the fetch() method. While designing, you will need to enable development mode:
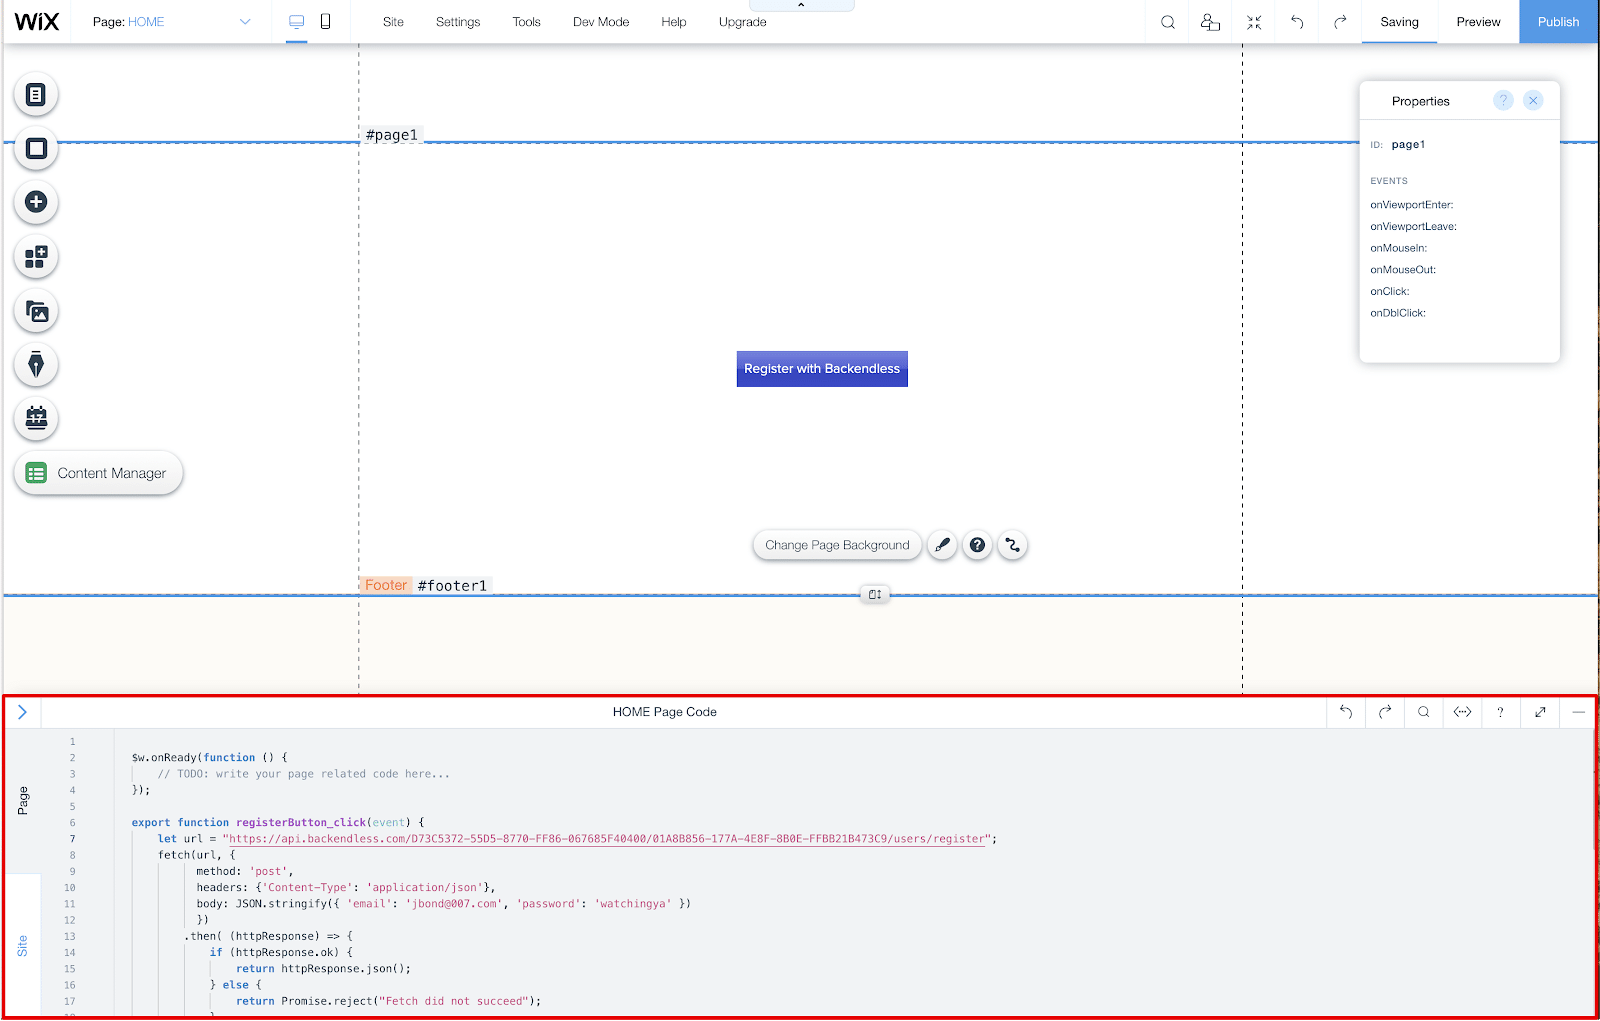
After enabling this mode, a field for writing a script will open:
User Registration With Backendless
Now let’s set up a user registration page.
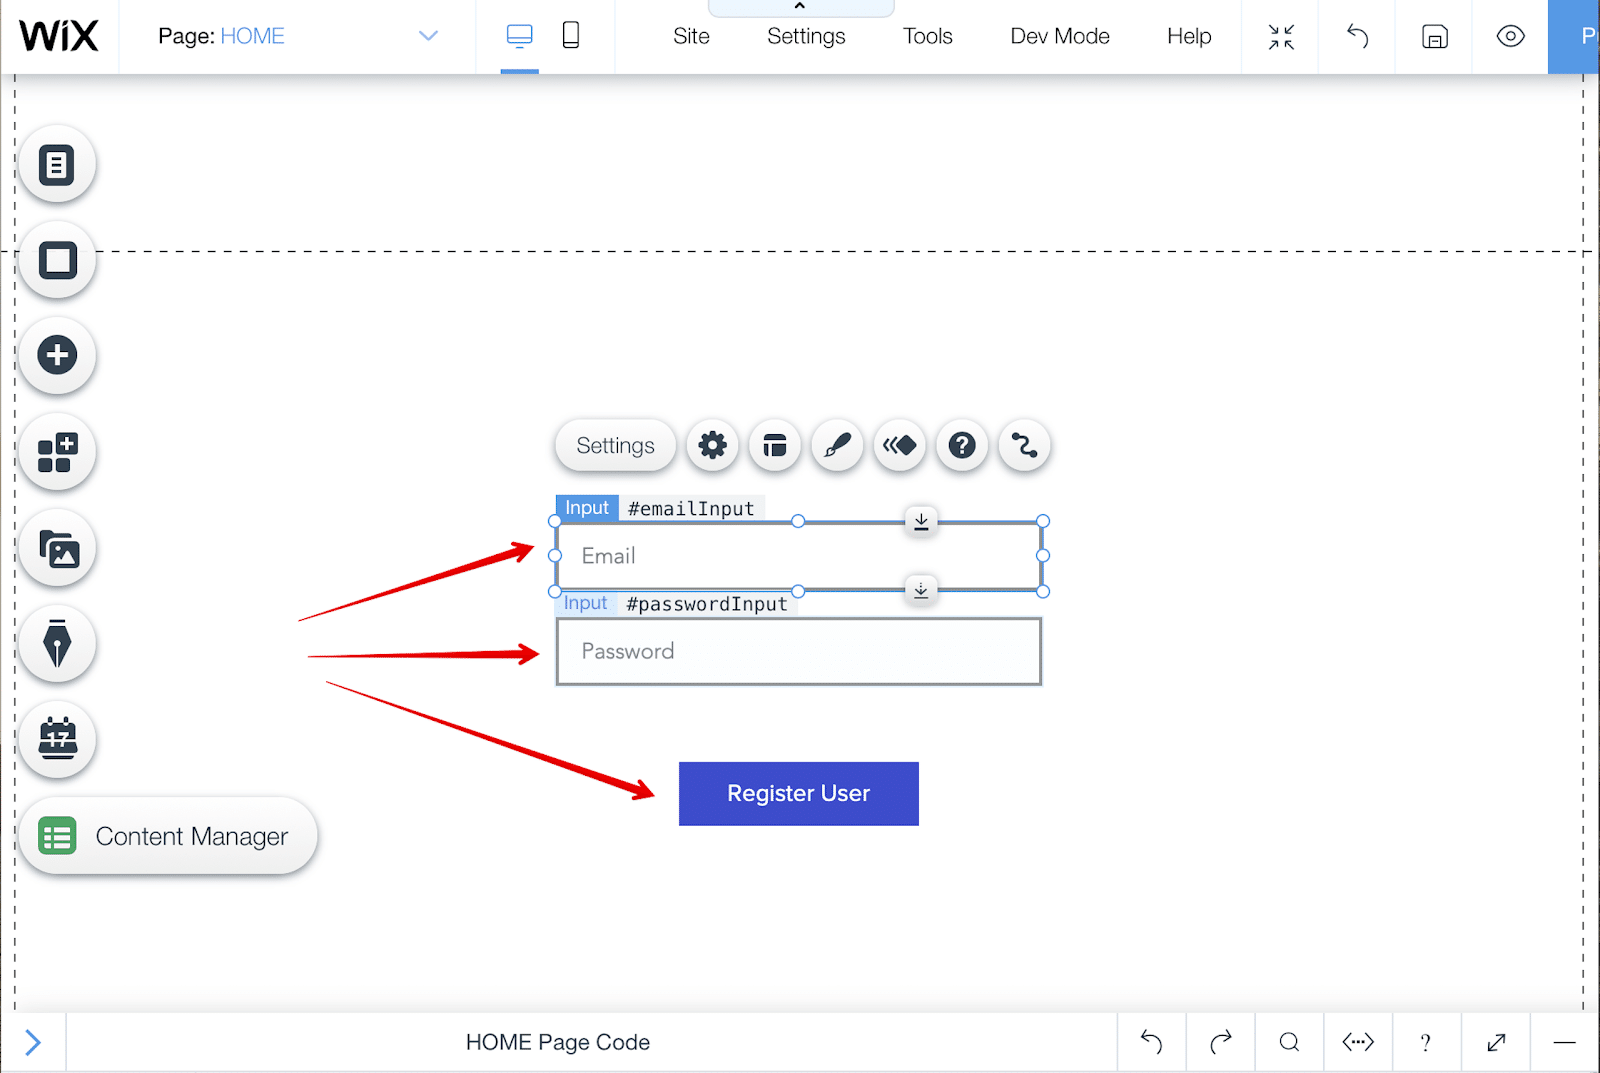
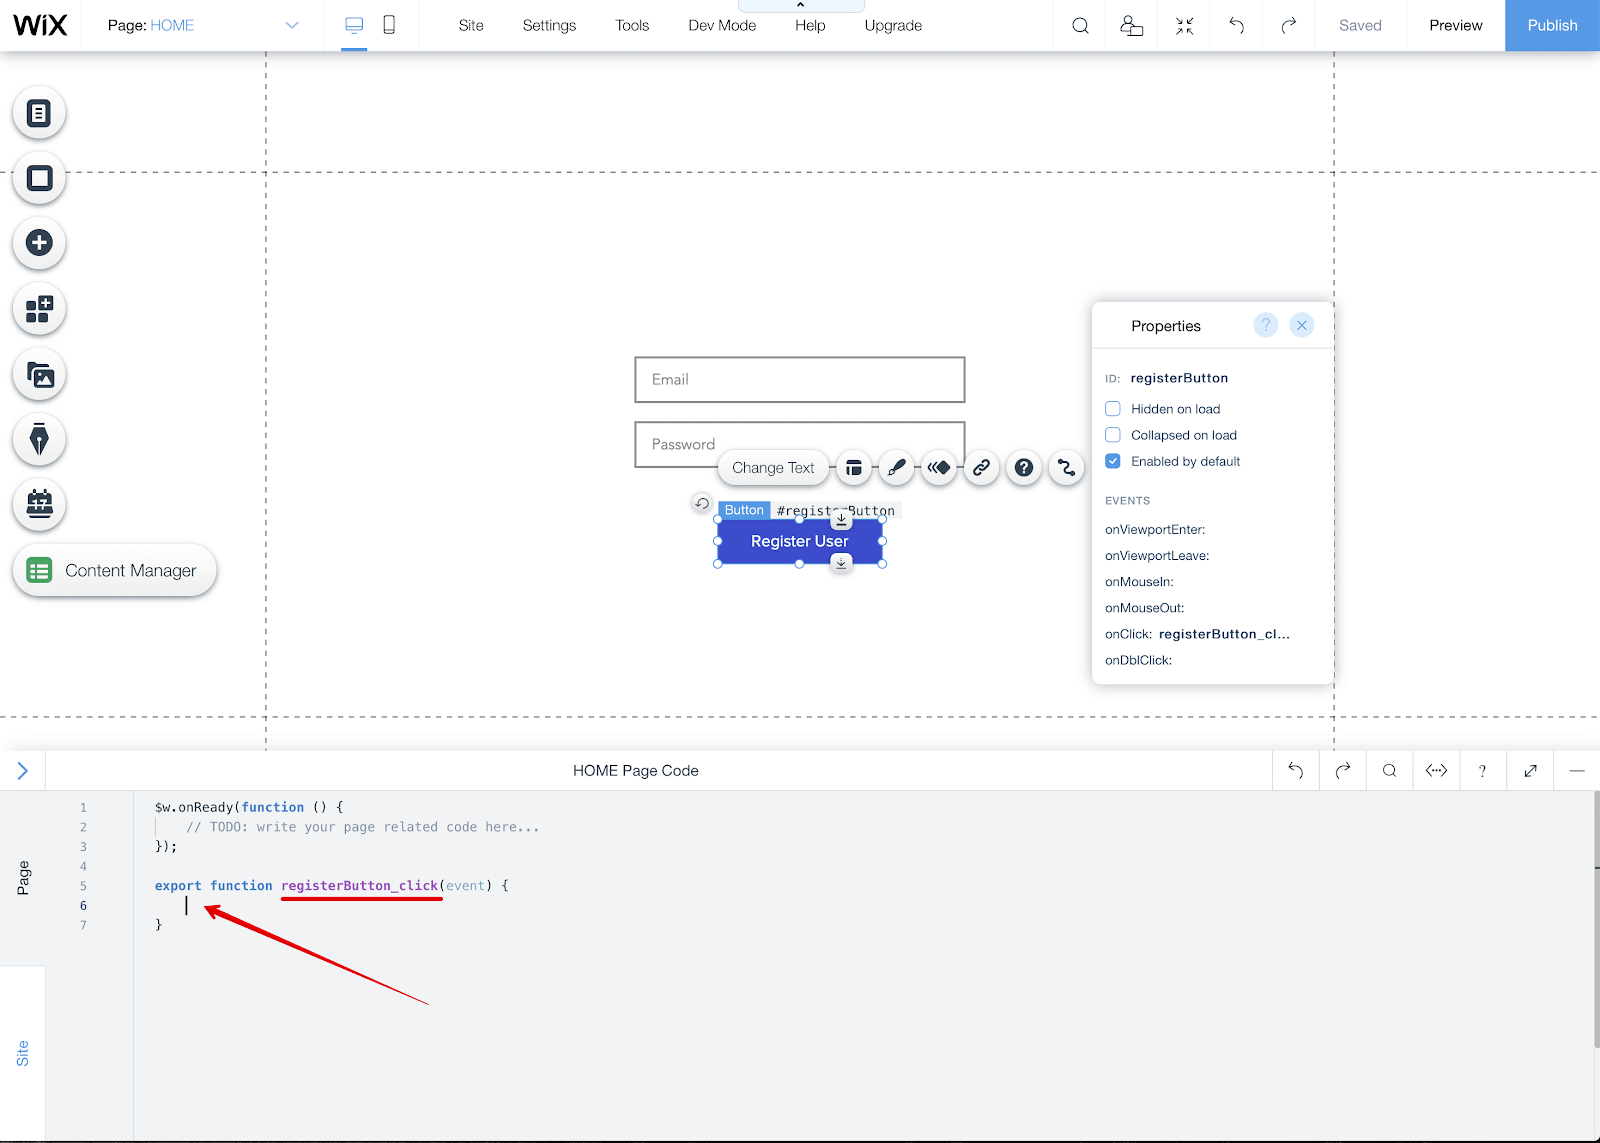
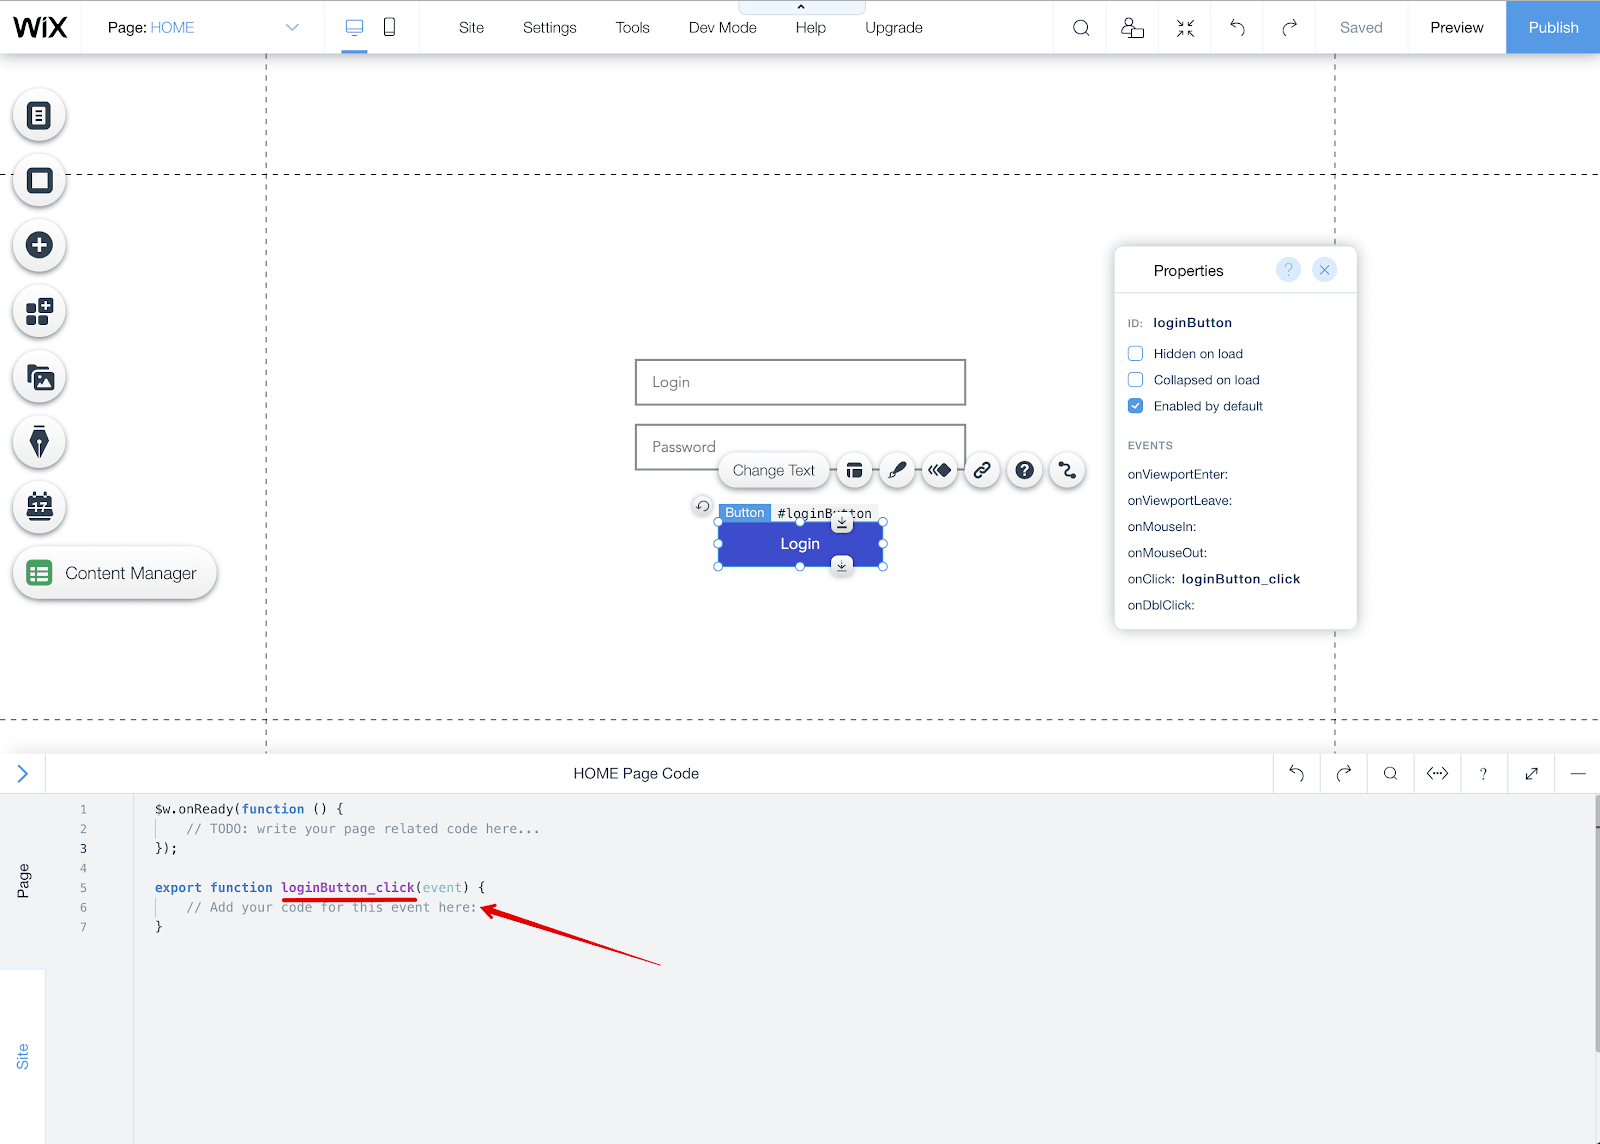
The page has 2 input components for entering an email and password with the emailInput and passwordInput identifiers. We also have a button for registering with the registerButton identifier:
Now, right-click on the button to open its properties (View Properties) and add an onClick event. In our case, this will be the registerButton_click event:

In the field for entering the code into the page, add the script that will run when clicking on the registration button:
export async function registerButton_click() {
    // get values from email and password input fields
    const email = $w('#emailInput').value
    const password = $w('#passwordInput').value

    // check if the email and password values are not empty
    if ((!email || email.length === 0) || (!password || password.length === 0)) {
         console.log('Please enter a valid email and password')

         return
    }

    // register new BackendlessUser
    const url = 'https://api.backendless.com/APP_ID/REST_API_KEY/users/register'

    const response = await fetch(url, {
         method : 'post',
         headers: { 'Content-Type': 'application/json' },
         body   : JSON.stringify({ email, password }),
    })

    const result = await response.json()

    if (!response.ok) {
         throw new Error(`Error: ${ result.message }`)
    }

    console.log('User has been registered in Backendless', result)
}
You can use the LightBox component to visualize a confirmation or registration error:
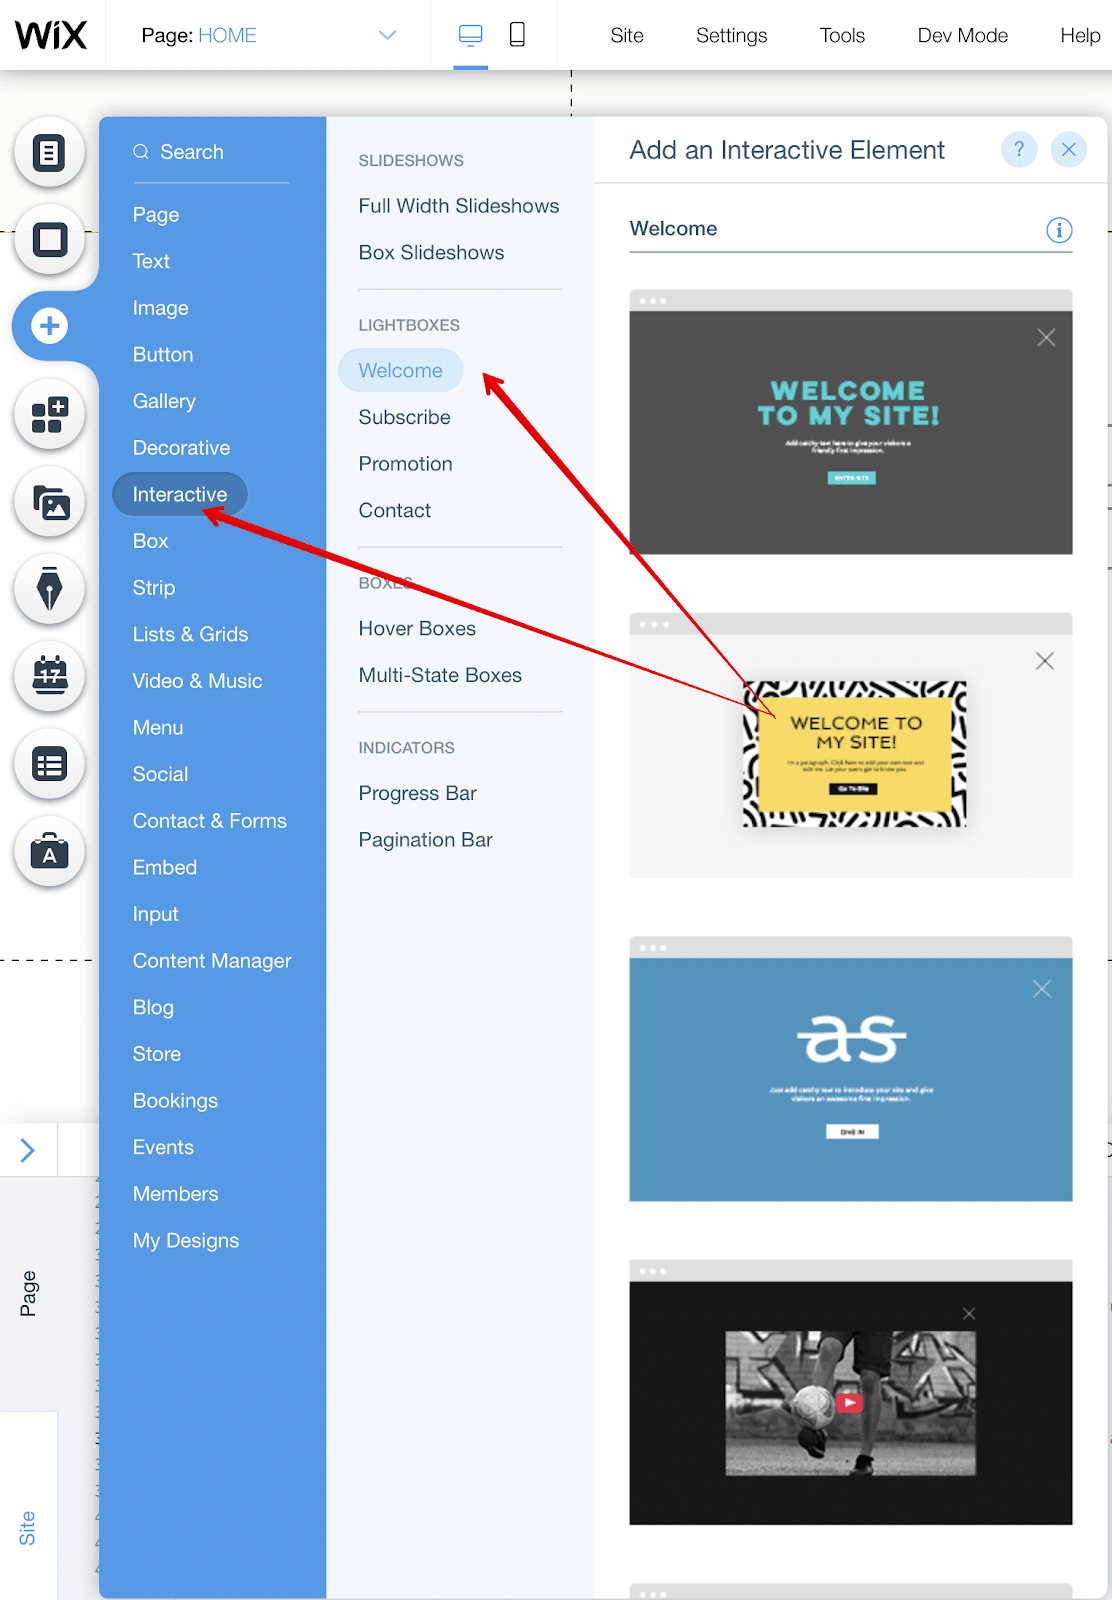
You can choose any LightBox from the suggested ones and arrange it for yourself. For our example, the LightBox will be named RegistrationResultBox. It will look like this:
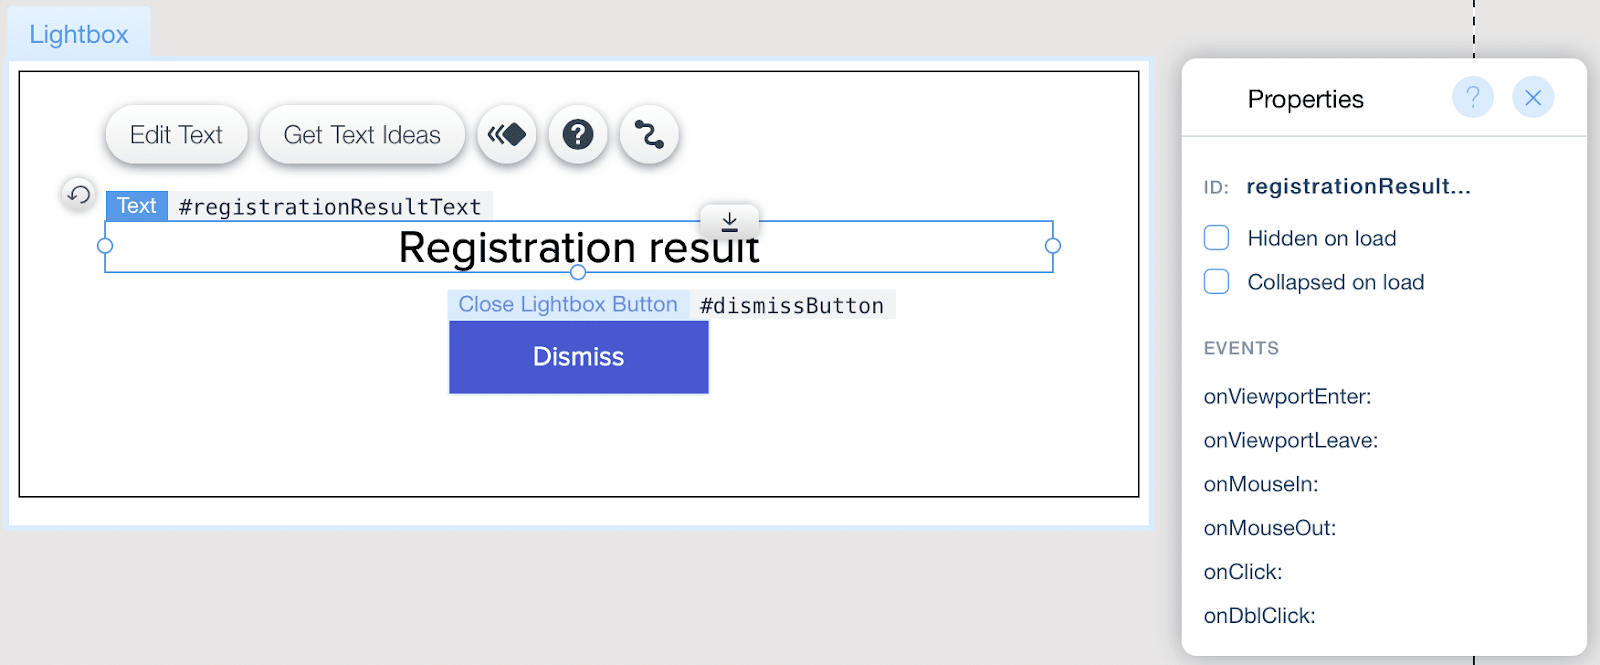
LightBox has a text component to display the result of the operation (registrationResultText) and a button to close the lightbox (dismissButton).
You also need to configure the lightbox so that it does not appear automatically when loading the page and closes when you click on the dismiss button. To do this, you need to set the appropriate triggers for the LightBox component:
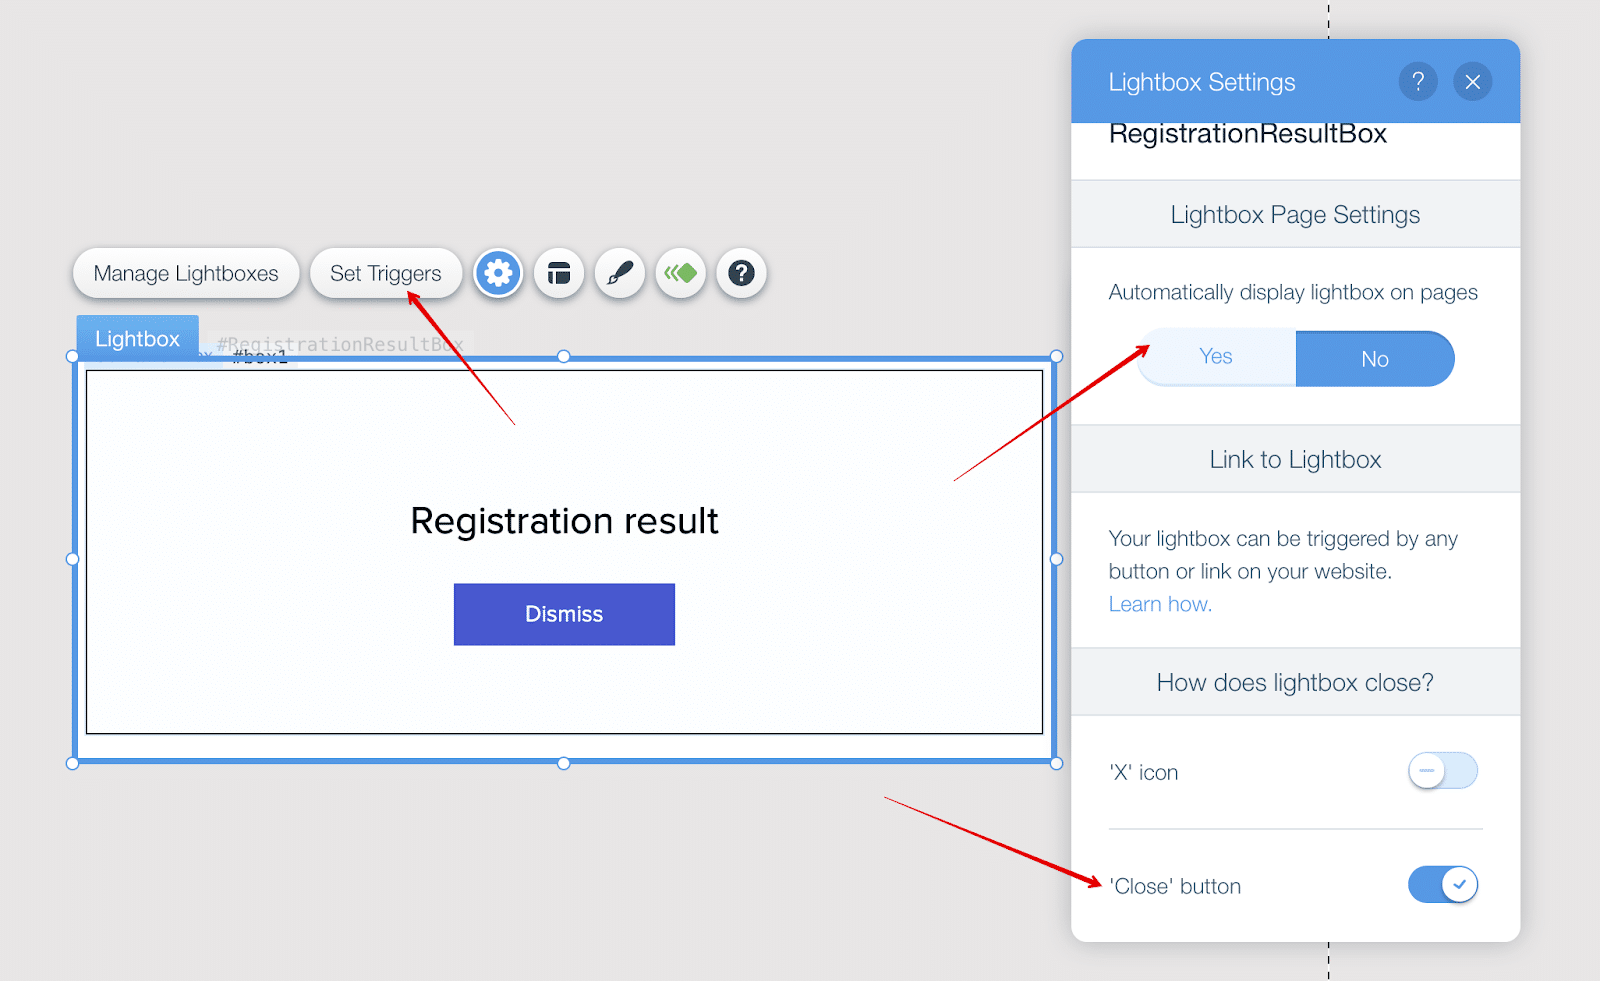
Automatically display lightbox on pages: No. How does lightbox close: ‘Close button’.
Since, in the lightbox, we will display both the successful result of the operation and the error, the corresponding messages will be sent to this component from the main page. To display the message in the text field, we will use the getContext() method to get the lightbox data. In the script entry window:
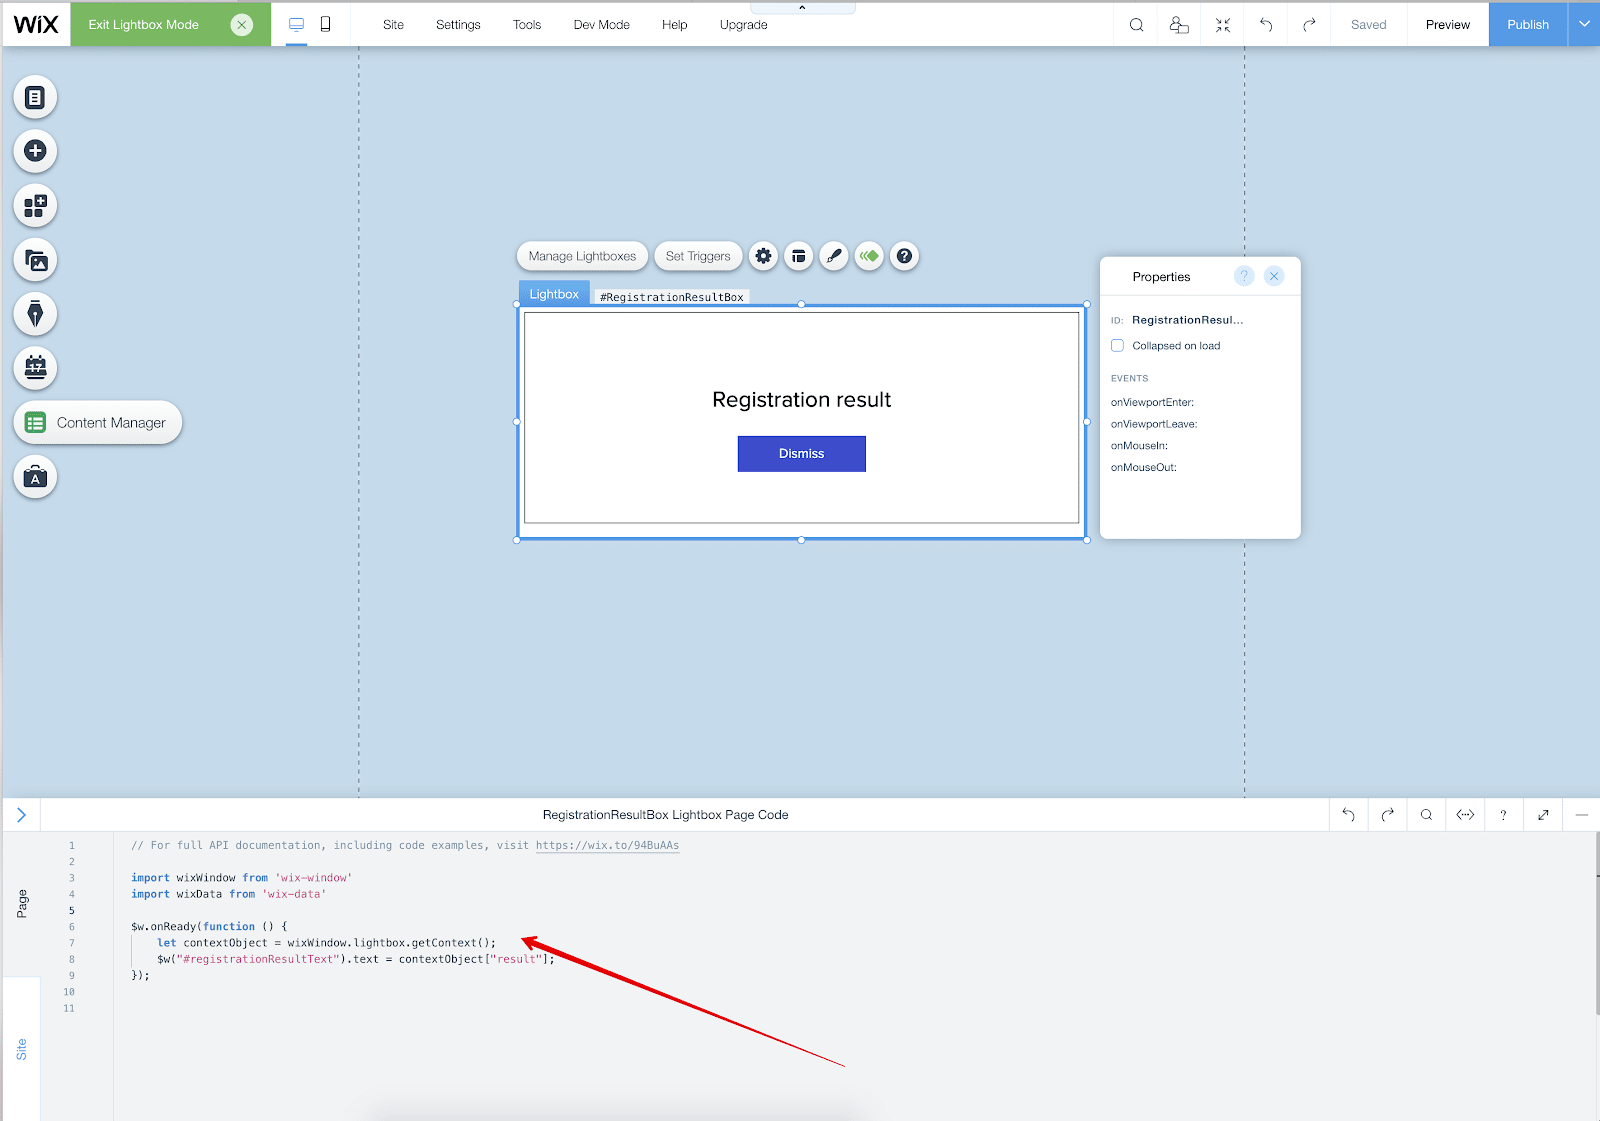
import wixWindow from 'wix-window'
import wixData from 'wix-data'

$w.onReady(function() {
    const contextObject = wixWindow.lightbox.getContext()
    $w('#registrationResultText').text = contextObject.result
})
contextObject – an object that will be passed from the main page and which contains a message about the success or error of the operation.
Now you need to return to the main page and in the button click handler:
export async function registerButton_click() {
    // get values from email and password input fields
    const email = $w('#emailInput').value
    const password = $w('#passwordInput').value

    // check if the email and password values are not empty
    if ((!email || email.length === 0) || (!password || password.length === 0)) {
         // pass message about invalid values to the lightbox
         wixWindow.openLightbox('RegistrationResultBox', { result: 'Please enter a valid email and password' })

         return
    }

    // register new BackendlessUser
    const url = 'https://api.backendless.com/APP_ID/REST_API_KEY/users/register'

    const response = await fetch(url, {
         method : 'post',
         headers: { 'Content-Type': 'application/json' },
         body   : JSON.stringify({ email, password })
    })

    const result = await response.json()

    if (response.ok) {
         // pass message about successful registration to the lightbox
         wixWindow.openLightbox('RegistrationResultBox', {
              result: `Registration successful. Now you can login as ${ result.email }`
         })
    } else {
         // pass message about failed registration to the lightbox
         wixWindow.openLightbox('RegistrationResultBox', { result: `Registration failed. ${ result.message }` })
    }

    // clear input fields
    $w('#emailInput').value = ''
    $w('#passwordInput').value = ''
}
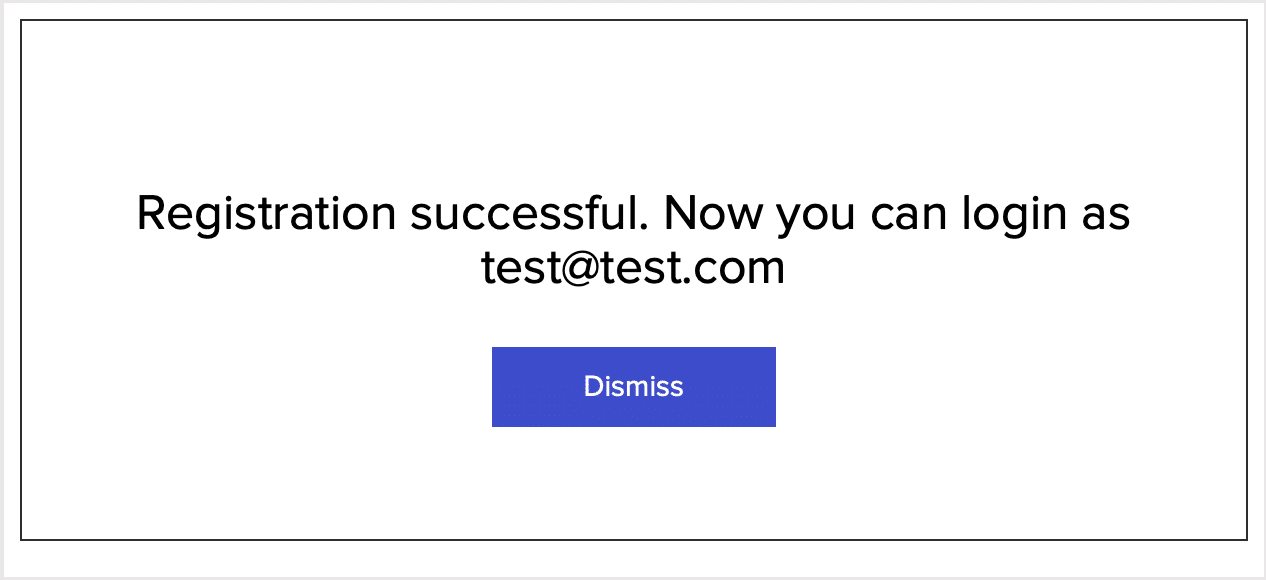
Now, after successful registration, we will receive the following message:
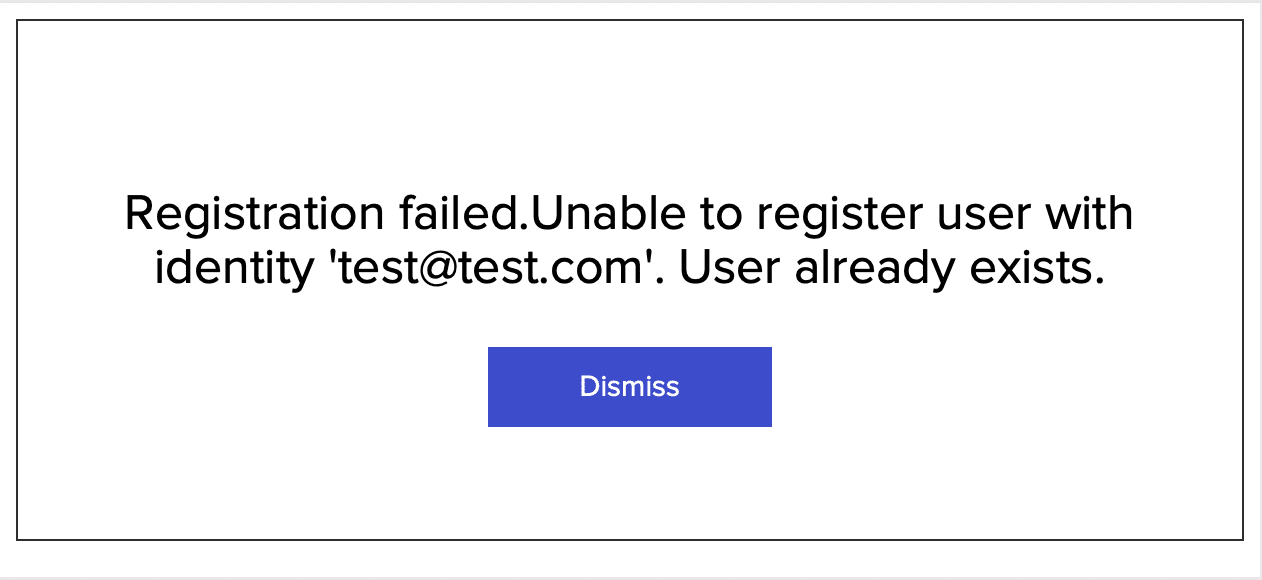
And on error:
Login With Backendless
Next, let’s build a login page for our site.
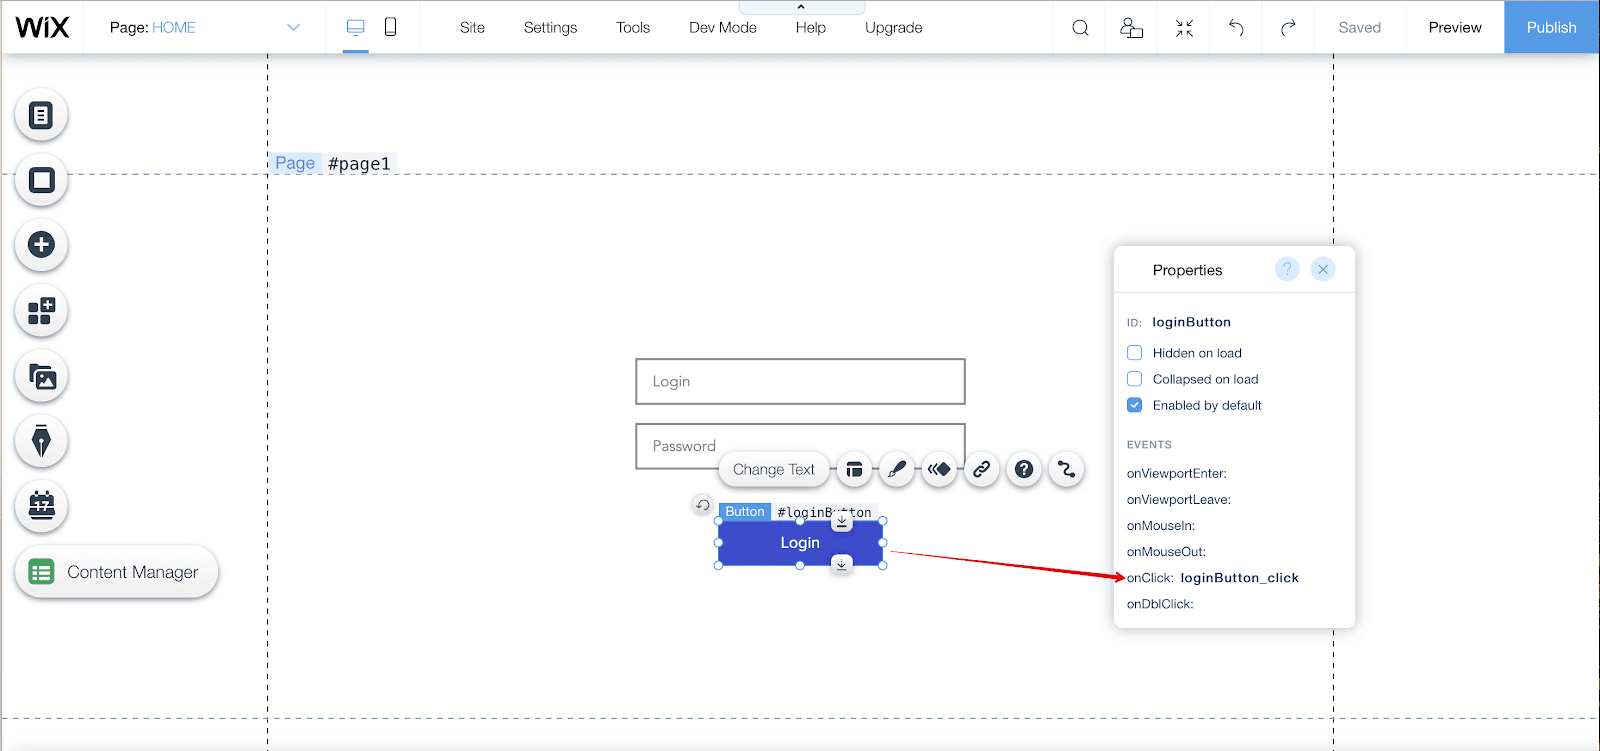
This page has 2 input components for entering the login and password with the loginInput and passwordInput identifiers, and a button for logging in with the loginButton identifier:

Right-click on the button and open its Properties (View Properties) then add an onClick event. This will be the loginButton_click event:
In the page code area, paste the following code for the registration button:
export async function loginButton_click() {
    // get values from login and password input fields
    const login = $w('#loginInput').value
    const password = $w('#passwordInput').value

    // check if the login and password values are not empty
    if ((!login || login.length === 0) || (!password || password.length === 0)) {
         console.log('Please enter a valid login and password')

         return
    }

    // login user in Backendless
    const url = 'https://api.backendless.com/APP_ID/REST_API_KEY/users/login'

    const response = await fetch(url, {
         method : 'post',
         headers: { 'Content-Type': 'application/json' },
         body   : JSON.stringify({ login, password })
    })

    const result = await response.json()

    if (response.ok) {
         console.log('User has been logged in in Backendless: ', result)
    } else {
         console.log(`Error: ${ result.message }`)
    }
}
Save Wix Data In The Backend
Now we’re going to take a look at how to add/save data in your Backendless Database. We will build a basic page to show how this works.
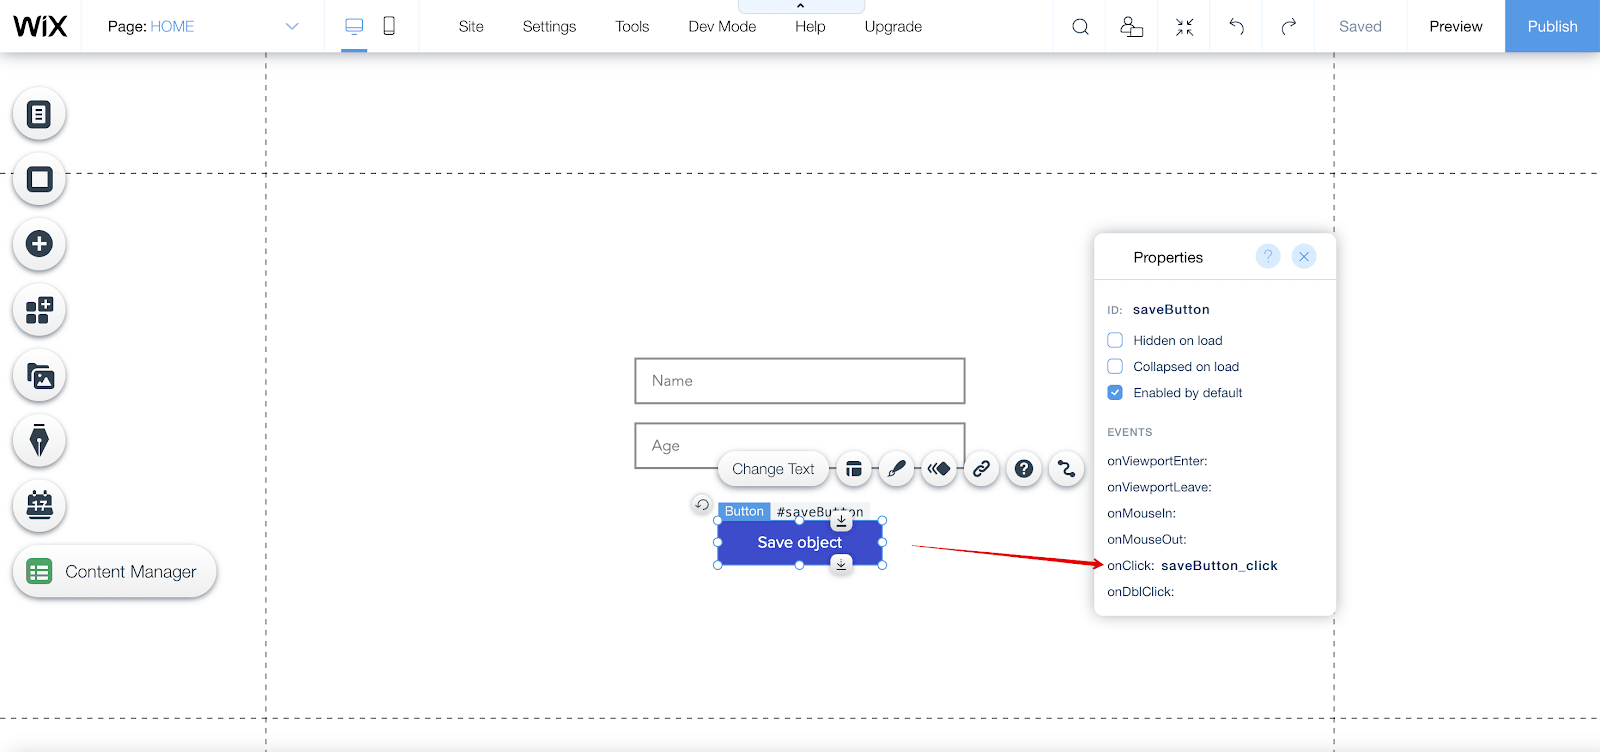
The page has 2 input components for entering name and age with IDs nameInput and ageInput, and a button for saving the object with ID saveButton:
Right-click on the button to open its properties (View Properties) and add an onClick event. This will be the saveButton_click event:
In the Page Code area, paste the following code for the registration button:
export async function saveButton_click() {
    // get values from name and age input fields
    const name = $w('#nameInput').value
    const age = parseInt($w('#ageInput').value, 10)

    // save new Person object
    const url = 'https://api.backendless.com/APP_ID/REST_API_KEY/data/Person'

    const response = await fetch(url, {
         method : 'post',
         headers: { 'Content-Type': 'application/json' },
         body   : JSON.stringify({ name, age })
    })

    const result = await response.json()

    if (response.ok) {
         console.log('Object has been saved in Backendless: ', result)
    } else {
         console.log(`Error: ${ result.message }`)
    }
}
Run Query In Backendless
Finally, let’s build a query in Wix to send a request to your database.
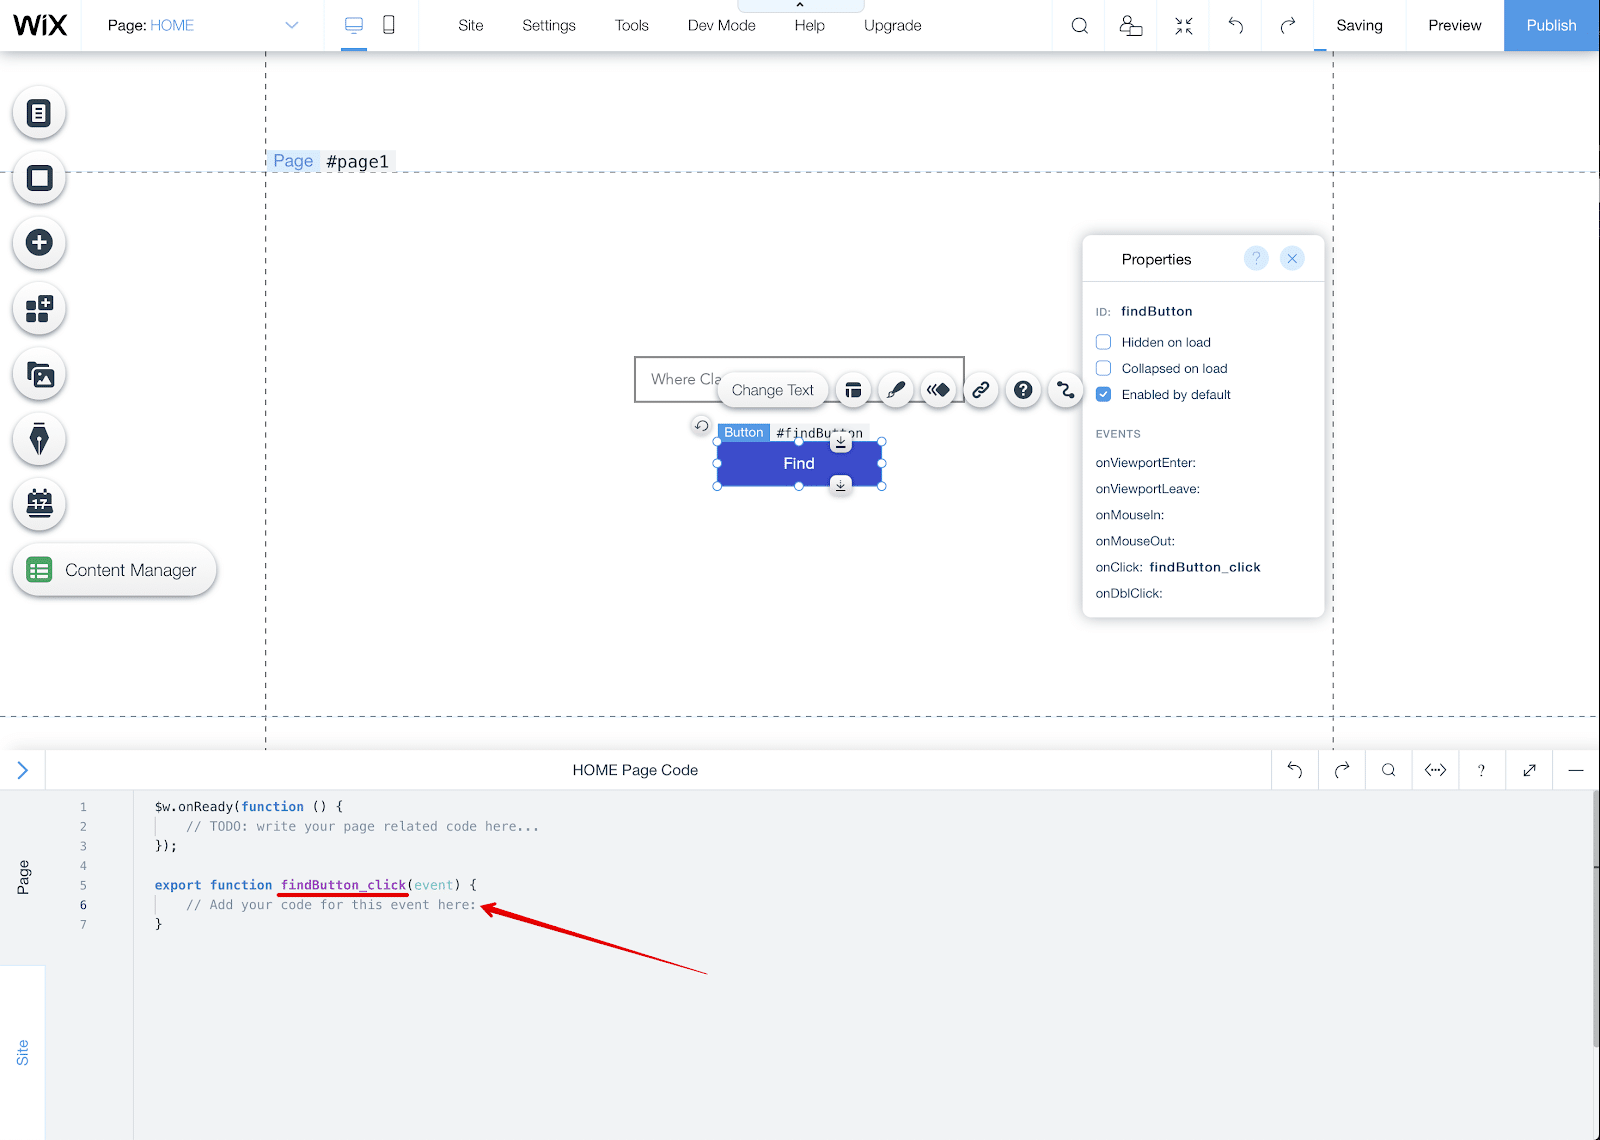
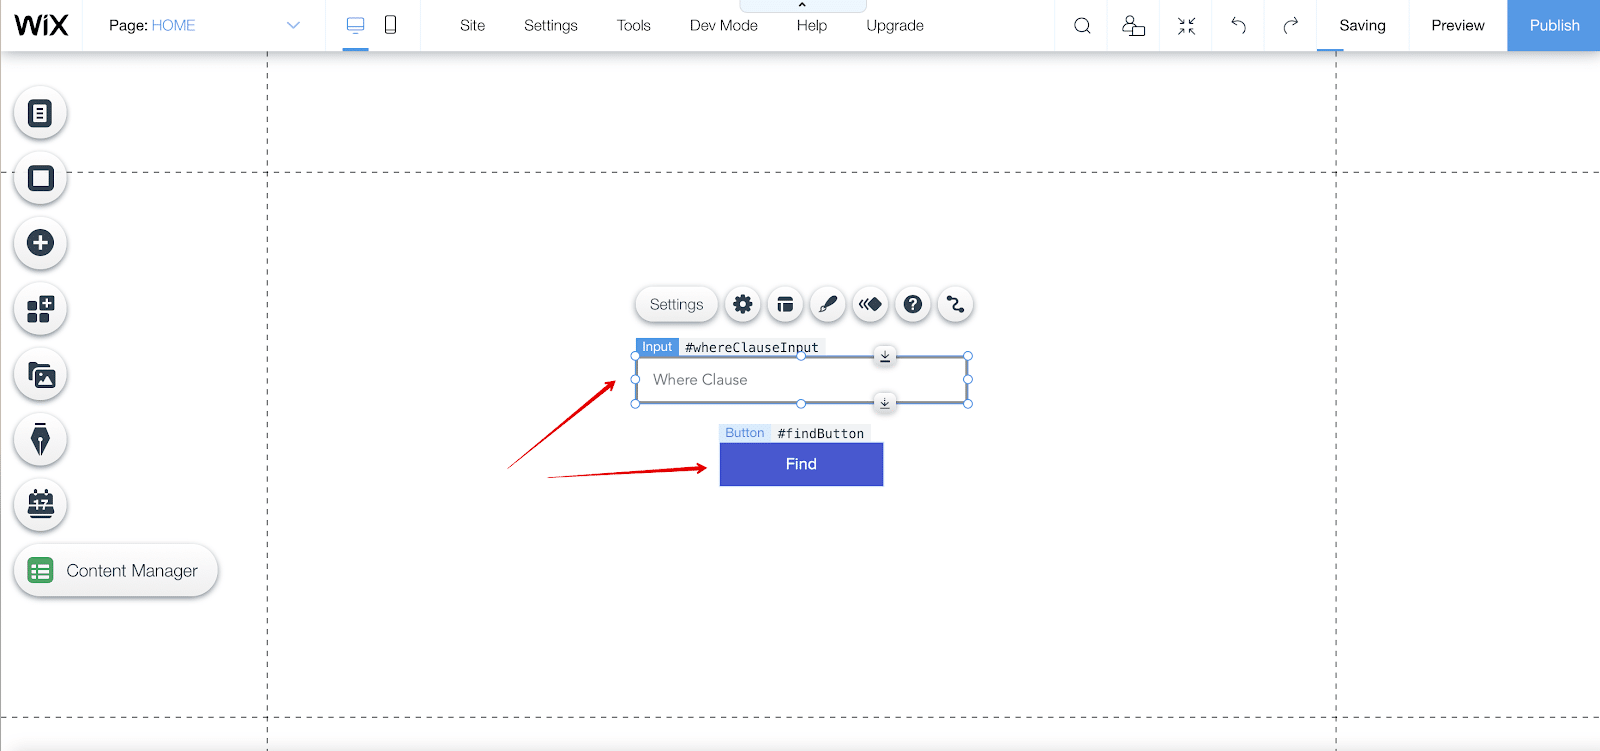
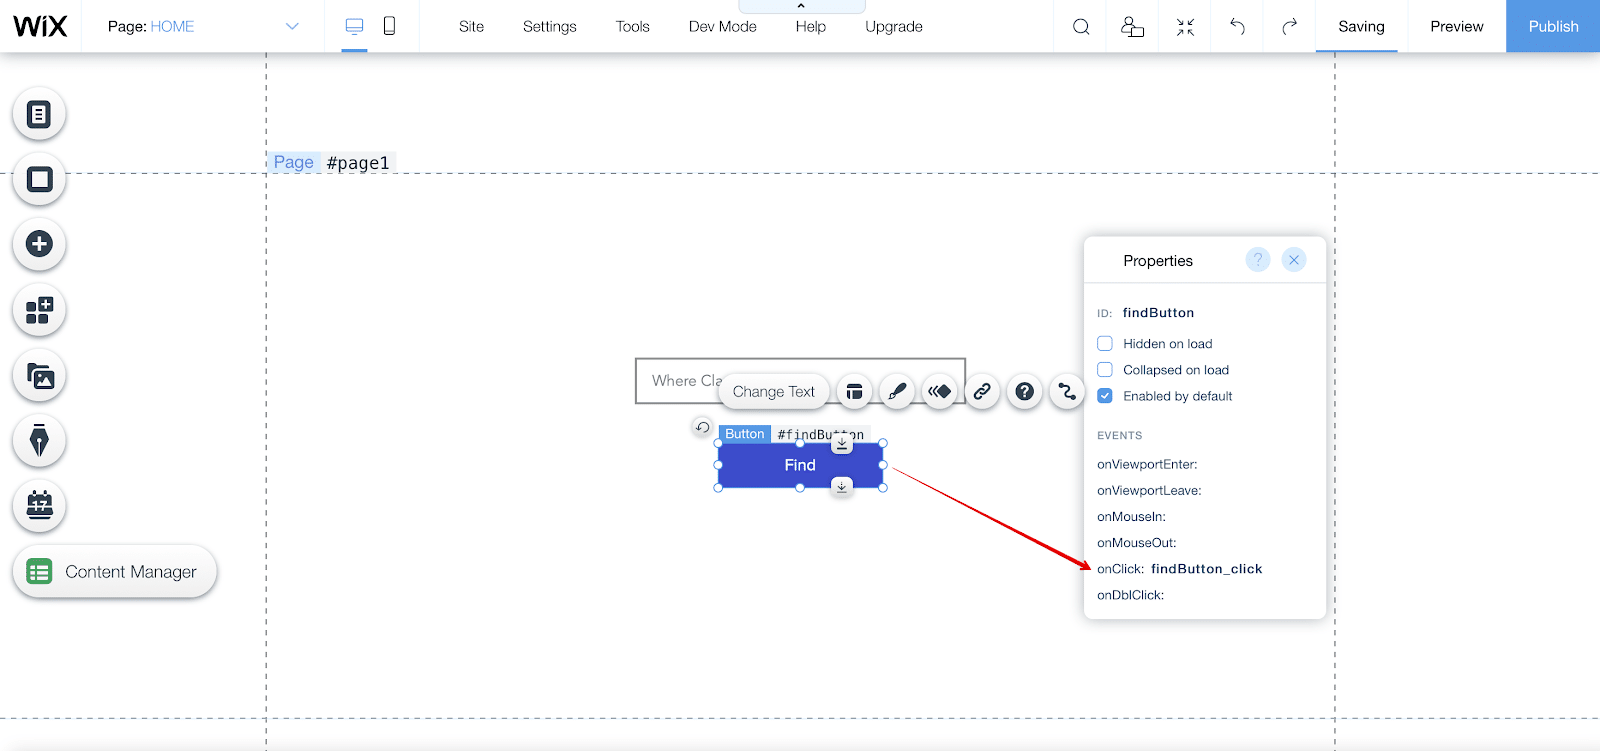
The page has an input component for entering the where clause with identifiers whereClauseInput and a button for finding objects with the identifier findButton:
Right-click on the button to open its properties (View Properties) and add an onClick event. This will be the findButton_click event:
In the page code area, add the following code for the Find button:
export async function findButton_click() {
    // get values from whereClause input field
    const whereClause = $w('#whereClauseInput').value

    // retrieve objects from Person table
    let url = 'https://api.backendless.com/APP_ID/REST_API_KEY/data/Person'

    if (whereClause.length > 0) {
         url = url.concat('?where=').concat(encodeURI(whereClause))
    }

    const response = await fetch(url, { method: 'get' })

    const result = await response.json()

    if (response.ok) {
         console.log('Objects retrieved from Backendless Person table: ', result)
    } else {
         console.log(`Error: ${ result.message }`)
    }
}
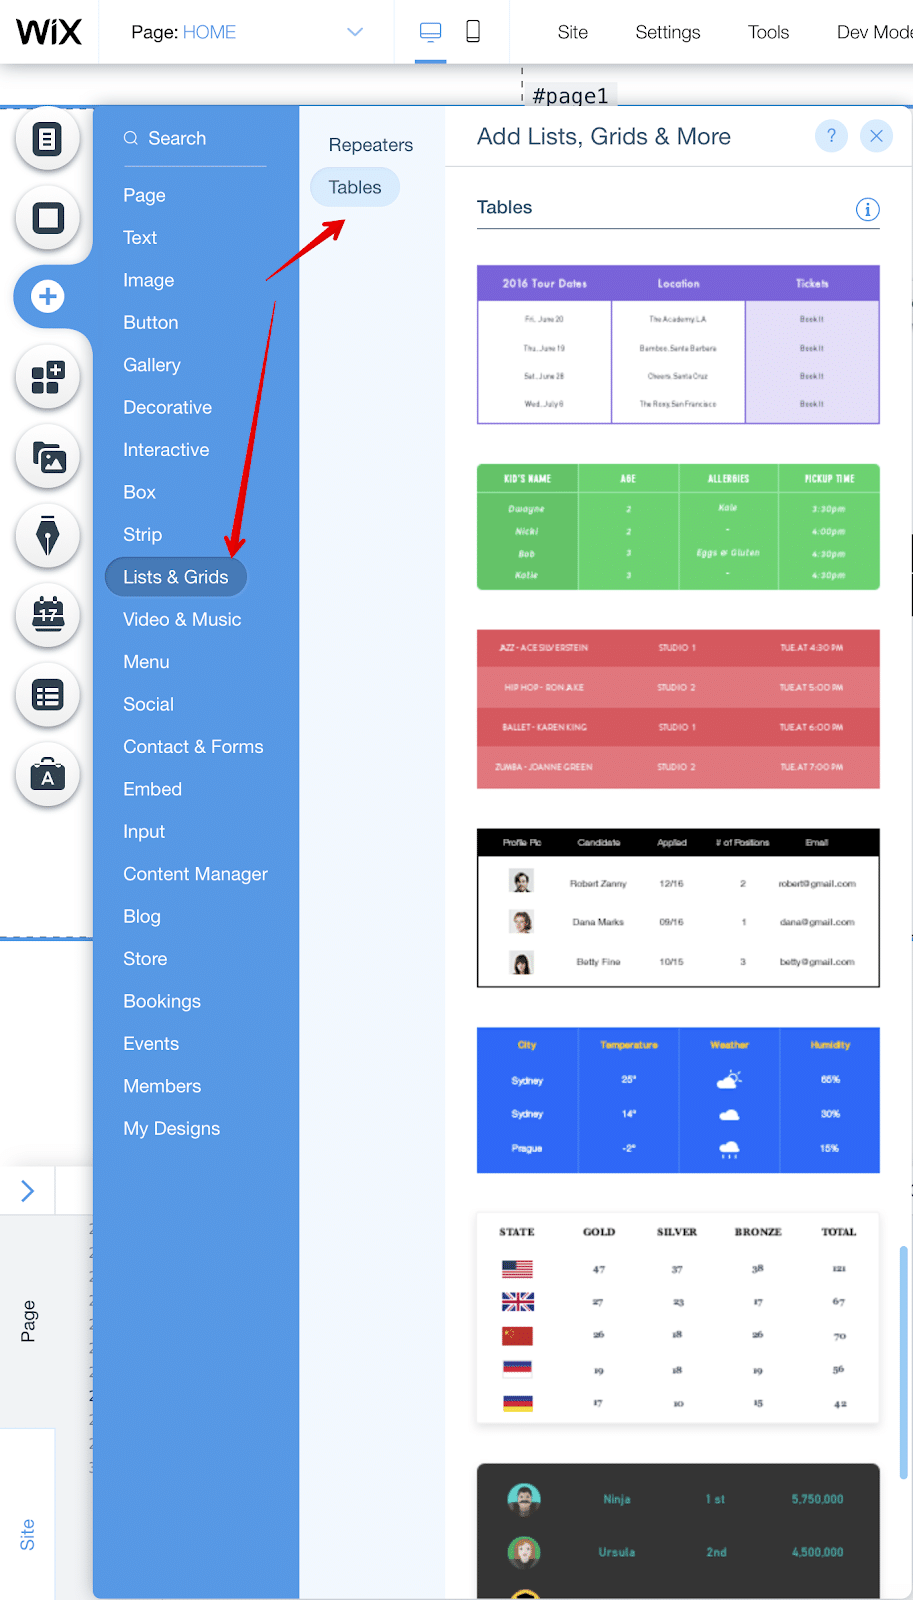
To visually display the query results, add a Table from the list of components:
Place the table under the Find button, assign the ID resultsTable to it, and configure the name (Text type) and age (Number type) fields:
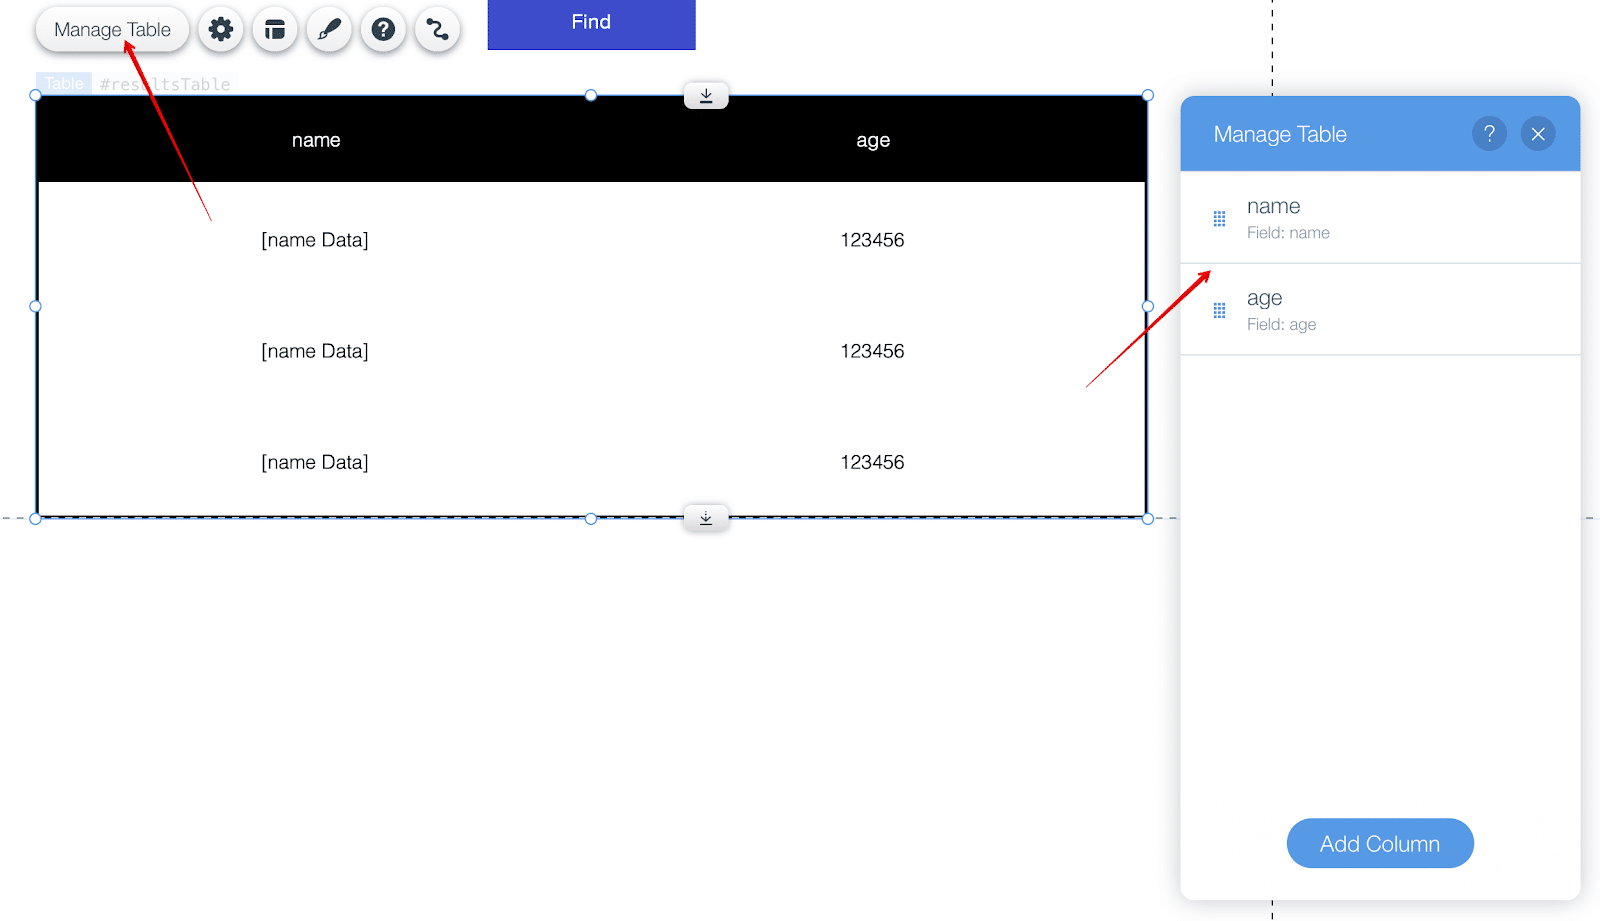
Objects with matching columns name and age are in the Person table in Backendless.
To enter the results obtained after the find query:
export async function findButton_click() {
    // get values from whereClause input field
    const whereClause = $w('#whereClauseInput').value

    // retrieve objects from Person table
    let url = 'https://api.backendless.com/APP_ID/API_KEY/data/Person'

    if (whereClause.length > 0) {
         url = url.concat('?where=').concat(encodeURI(whereClause))
    }

    const response = await fetch(url, { method: 'get' })

    const result = await response.json()

    if (response.ok) {
         $w('#resultsTable').rows = result
    } else {
         console.log(`Error: ${ result.message }`)
    }
}
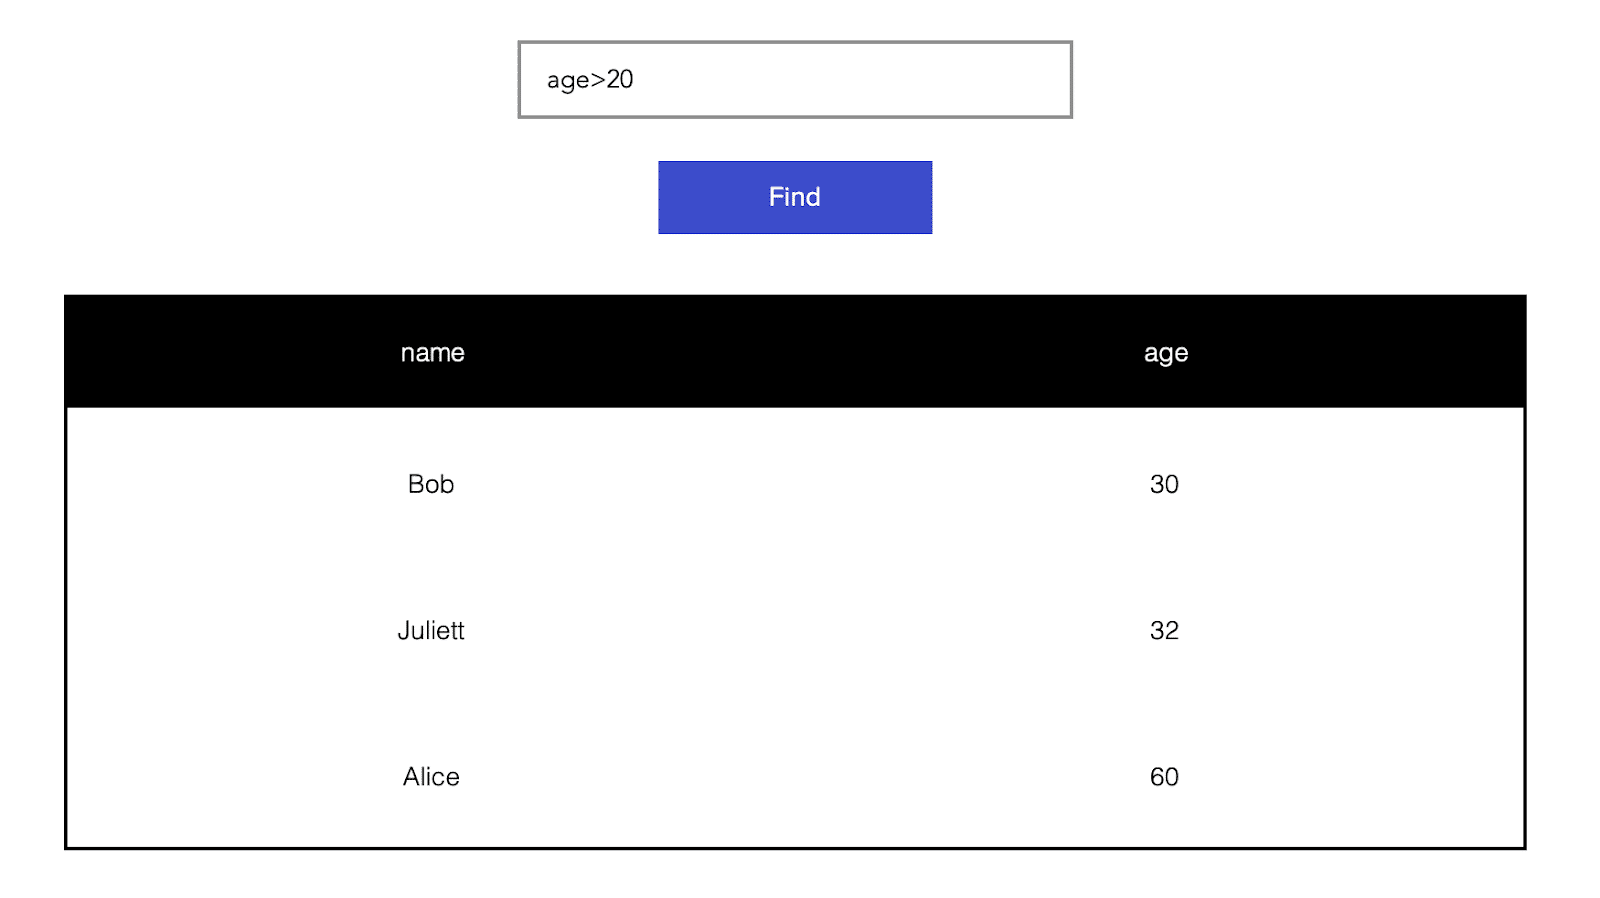
After clicking on the Find button and executing the query, the table will be populated with data:
This is the first of many integrations we will be walking you through in this space. Backendless can easily be integrated with many of the No-Code app and website builders on the market.
If there’s a builder integration you’d like to see us explore in detail, comment below or contact us.
As you saw, integrating Backendless with Wix is easy. Building your frontend and backend together with Backendless is even easier.