How to Create a Chat App that Supports Images (Part 2)
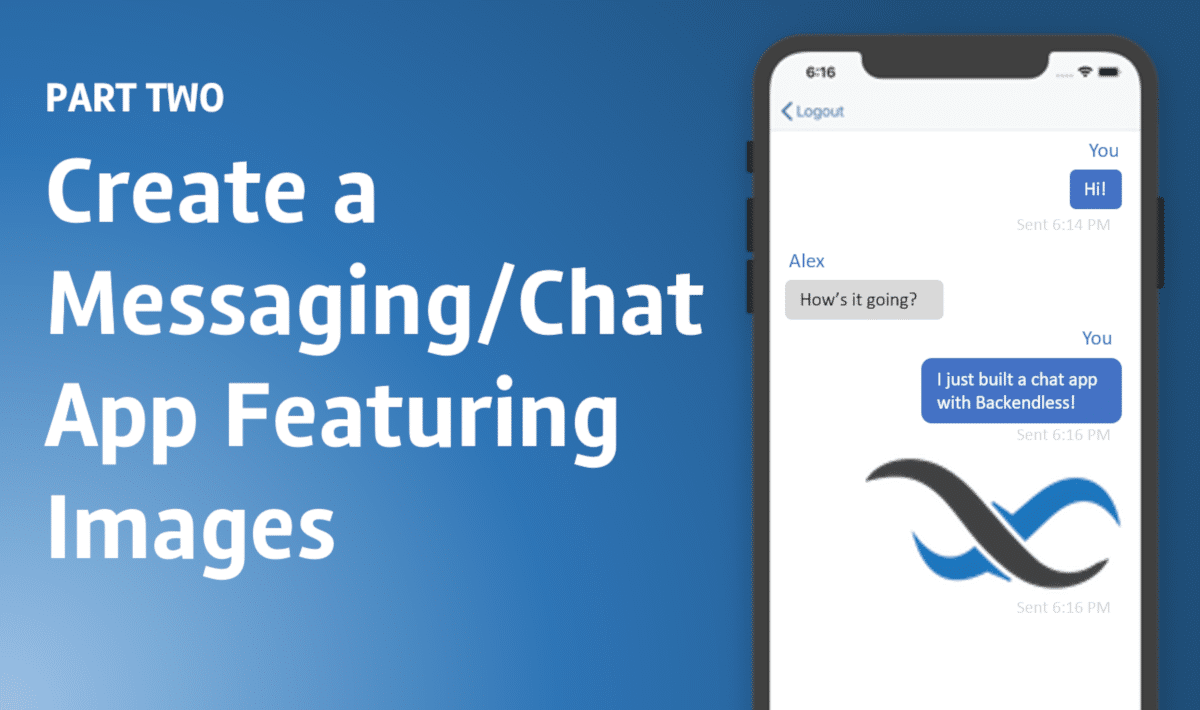
In this series of articles, we are going to show you how to make a beautiful chat app that supports sending, editing, and deleting messages with both text and images.
We will show you how to build a highly functional frontend (in this example, for iOS) that connects seamlessly with a Backendless backend. You can check out some of the many powerful uses of chat here. Check out our guide to a Flutter chat app here.
Setup and Getting Started
Part 1 of this series can be found here: How to Create a Chat App That Supports Images (Part 1)
Here is a link to the author’s Github repo for this project: https://github.com/olgadanylova/BackendlessChatApp
In the previous part, we described the basic Chat App creation. At this point, users can chat, but they don’t have the ability to edit or delete the messages they’ve already sent. Also, the chat history disappears every time the Chat App restarts. So let’s fix these defects!
You can switch to the textMessagingPart1 branch to continue from where we have stopped.
First, please add the following images to the Resources folder – they will be needed later when editing messages:
Image 1
Image 2
Adding New Functionality
Let’s start with messages history. Since we want to see all sent messages even after our app restarts, those messages should be stored on the server. We’ll use the MessageObject table and the corresponding MessageObject.swift class for this purpose:
@objcMembers class MessageObject: NSObject {

   var objectId: String?
   var userId: String?
   var userName: String?
   var messageText: String?
   var created: Date?
   var updated: Date?
}
Additional logic will occur in the ChatViewController.swift class. Let’s add and initialize two new DataStore properties to work with message objects:
private var messageStore: IDataStore!
private var messageStoreMap: IDataStore!

override func viewDidLoad() {
   super.viewDidLoad()
   self.tableView.delegate = self
   setupMessageField()
   clearMessageField()
   messages = [MessageObject]()
   subscribeForChannel()
   messageStore = Backendless.sharedInstance()?.data.of(MessageObject.self)
   messageStoreMap = Backendless.sharedInstance()?.data.ofTable("MessageObject")
   loadMessages()
}
When opening the chat, all previous messages should be loaded – this is managed in the loadMessages() function.
func loadMessages() {
   let queryBuilder = DataQueryBuilder()!
   queryBuilder.setSortBy(["created"])
   messageStore.find(queryBuilder, response: { loadedMessages in
      if let loadedMessages = loadedMessages as? [MessageObject] {
         self.messages = loadedMessages
         self.tableView.reloadData()
      }
   }, error: { fault in
      if let errorMessage = fault?.message {
         self.alert.showErrorAlert(message: errorMessage, onViewController: self)
      }
   })
}
Now we will save the message on the server before sending. The sent message contains its sending date and object id to facilitate the logic.
@IBAction func pressedSend(_ sender: Any) {
   let messageObject = MessageObject()
   if let messageText = messageInputField.text {
      messageObject.messageText = messageText.trimmingCharacters(in: CharacterSet.whitespacesAndNewlines)
   }
   if let userName = yourUser.name {
      messageObject.userName = userName as String?
   }
   else if let userEmail = yourUser.email {
      messageObject.userName = userEmail as String?
   }
   messageObject.userId = yourUser.objectId as String?

   messageStore.save(messageObject, response: { savedMessageObject in
      Backendless.sharedInstance()?.messaging.publish(self.channelName, message: savedMessageObject, response: { messageStatus in
         self.clearMessageField()
      }, error: { fault in
         if let errorMessage = fault?.message {
            self.alert.showErrorAlert(message: errorMessage, onViewController: self)
         }
      })
   }, error: { fault in
      if let errorMessage = fault?.message {
         self.alert.showErrorAlert(message: errorMessage, onViewController: self)
      }
   })
}
}
Since every sent message is stored on the server, the user can edit or delete it (but only if the message was sent by this user – it’s impossible to change someone’s else messages).
Let’s add some additional necessary properties:
@IBOutlet weak var attachmentButton: UIButton!

private var longTapped = false
private var editMode = false
private var editingMessage: MessageObject?
The channel subscription function remained practically unchanged:
func subscribeForChannel() {
   channel = Backendless.sharedInstance()?.messaging.subscribe(channelName)
   channel?.addMessageListenerDictionary({ message in
      let messageObject = MessageObject()
      if let message = message as? [String : Any] {
         if let objectId = message["objectId"] as? String {
            messageObject.objectId = objectId
         }
         if let userId = message["userId"] as? String {
            messageObject.userId = userId
         }
         if let userName = message["userName"] as? String {
            messageObject.userName = userName
         }
         if let messageText = message["messageText"] as? String {
            messageObject.messageText = messageText
         }
         if let created = message["created"] as? Int {
            messageObject.created = self.intToDate(intVal: created)
         }
         if let updated = message["updated"] as? Int {
            messageObject.updated = self.intToDate(intVal: updated)
         }
         self.messages.append(messageObject)
         self.tableView.reloadData()
      }
   }, error: { fault in
      if let errorMessage = fault?.message {
         self.alert.showErrorAlert(message: errorMessage, onViewController: self)
      }
   })
}
Also, we need to track the changes in messages – other users should see the changes you’ve made to a message. Real-time will help with this task – we will add some methods to track messages’ modification and deletion:
func addMessageListeners() {
   messageStoreMap.rt.addUpdateListener({ updatedMessage in
      if let updatedMessage = updatedMessage as? [String : Any],
         let objectId = updatedMessage["objectId"] as? String,
         let messageText = updatedMessage["messageText"] as? String,
         let message = self.messages.first(where: {$0.objectId == objectId}) {
         message.messageText = messageText
         self.tableView.reloadSections(IndexSet(integer: 0) , with: .fade)
      }
   }, error: { fault in })

   messageStoreMap.rt.addDeleteListener({ deletedMessage in
      if let deletedMessage = deletedMessage as? [String : Any],
         let objectId = deletedMessage["objectId"] as? String,
         let index = self.messages.firstIndex(where: {$0.objectId == objectId}) {
         self.messages.remove(at: index)
         self.tableView.reloadSections(IndexSet(integer: 0) , with: .fade)
      }
   }, error: { fault in })
}
Everytime somebody changes/deletes a message, everyone else will see these changes with the update and delete listeners, and the messages will be updated in chat according to the changes.
It’s necessary to unsubscribe from listeners when leaving chat:
func removeMessageListeners() {
   messageStoreMap.rt.removeAllListeners()
}
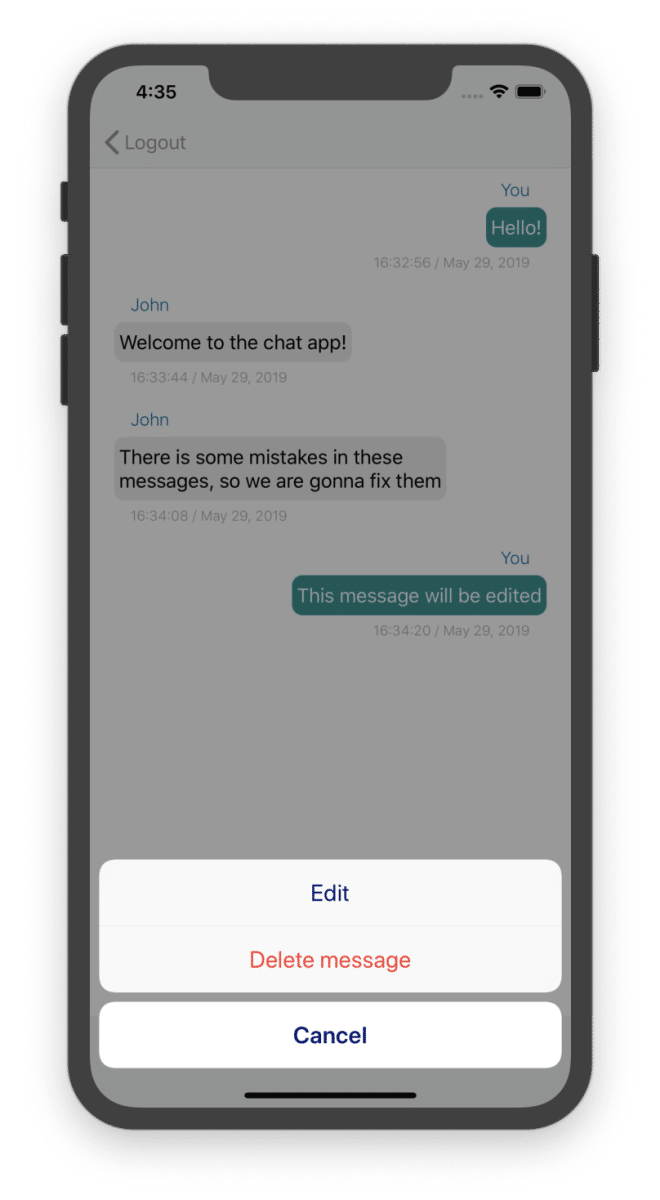
Editing mode is activated by long tap on the message. We have already added this logic, and now we will slightly change the cellForRowAt indexPath function – if the message was edited, the date of the last editing will be displayed:
func tableView(_ tableView: UITableView, cellForRowAt indexPath: IndexPath) -> UITableViewCell {
   let messageObject = messages[indexPath.row]

   let formatter = DateFormatter()
   formatter.dateFormat = "HH:mm:ss / MMM d, yyyy"

   if messageObject.userId == yourUser.objectId as String?,
      let messageText = messageObject.messageText,
      let created = messageObject.created {
      let cell = tableView.dequeueReusableCell(withIdentifier: "MyTextMessageCell", for: indexPath) as! MyTextMessageCell
      cell.textView.text = messageText

      if let updated = messageObject.updated {
         cell.dateLabel.text = "updated " + formatter.string(from: updated)
      }
      else {
         cell.dateLabel.text = formatter.string(from: created)
      }

      let longPress = UILongPressGestureRecognizer(target: self, action: #selector(longPress(sender:)))
      longPress.minimumPressDuration = 0.5
      cell.textView.addGestureRecognizer(longPress)

      return cell
   }
   else {
      if let userName = messageObject.userName,
         let messageText = messageObject.messageText,
         let created = messageObject.created {
         let cell = tableView.dequeueReusableCell(withIdentifier: "TextMessageCell", for: indexPath) as! TextMessageCell
         cell.userNameLabel.text = userName
         cell.textView.text = messageText

         if let updated = messageObject.updated {
            сell.dateLabel.text = "updated " + formatter.string(from: updated)
         }
         else {
            cell.dateLabel.text = formatter.string(from: created)
         }
         return cell
      }
   }
   return UITableViewCell()
}
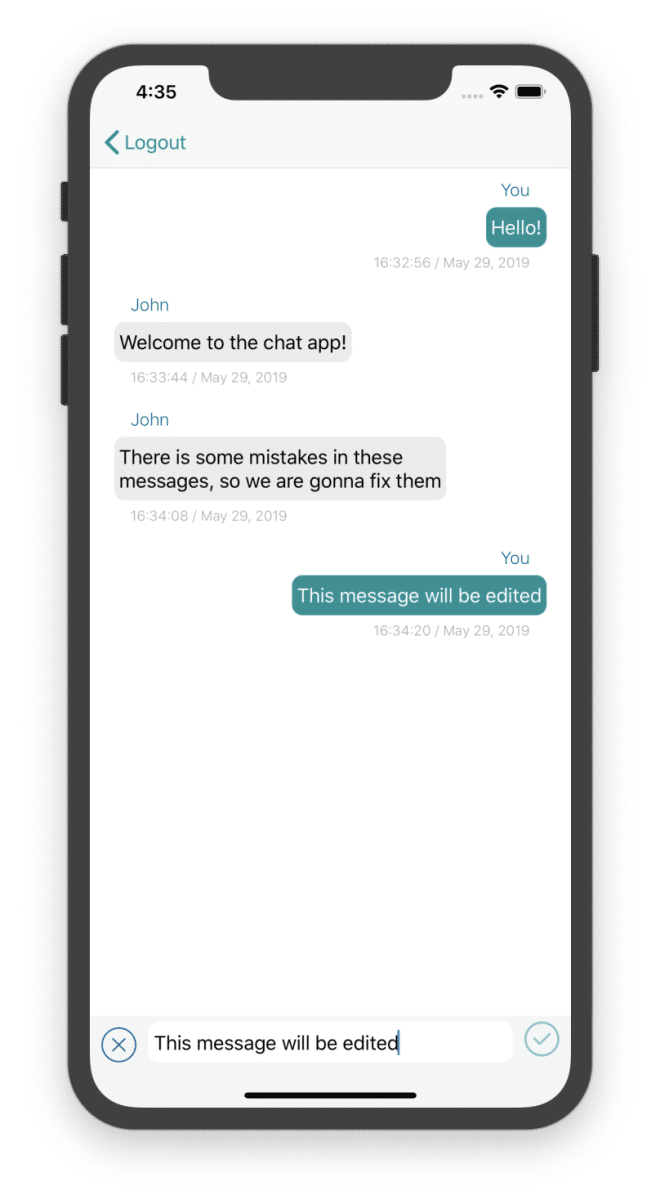
When editing a message, the editing mode is turned on – some buttons change, the text of the message is put into the messageInputField for editing. When editing is completed, this mode is disabled.
func editModeEnabled() {
   self.editMode = true
   self.messageInputField.becomeFirstResponder()
   self.sendButton.setImage(UIImage(named: "done.png"), for: .normal)
   self.attachmentButton.setImage(UIImage(named: "cancel.png"), for: .normal)
   self.attachmentButton.isEnabled = true
}

func editModeDisabled() {
   self.editMode = false
   self.clearMessageField()
   self.sendButton.setImage(UIImage(named: "send.png"), for: .normal)
   self.attachmentButton.setImage(UIImage(named: "attachment.png"), for: .normal)
   self.attachmentButton.isEnabled = false
}
With a long tap on a message, the user is given the choice of editing the message or deleting it. Add the required method to Alert.swift:
func showEditMessageAlert(onViewController: UIViewController, editAction: UIAlertAction, deleteAction: UIAlertAction, cancelAction: UIAlertAction) {
   let alert = UIAlertController(title: nil, message: nil, preferredStyle: .actionSheet)
   alert.addAction(editAction)
   alert.addAction(deleteAction)
   alert.addAction(cancelAction)
   alert.view.tintColor = darkBlueColor
   onViewController.view.endEditing(true)
   onViewController.present(alert, animated: true)
}
And now we will add the editing and deletion processing of the message by long tap:
@IBAction func longPress(sender: UILongPressGestureRecognizer) {
   if !longTapped {
      longTapped = true
      let touch = sender.location(in: self.tableView)
      if let indexPath = tableView.indexPathForRow(at: touch),
         let messageObject = self.messages?[indexPath.row],
         messageObject.userId == yourUser.objectId as String? {
         let editAction = UIAlertAction(title: "Edit", style: .default, handler: { action in
            self.editModeEnabled()
            self.editingMessage = messageObject
            self.messageInputField.text = self.editingMessage?.messageText
            self.longTapped = false
         })
         let deleteAction = UIAlertAction(title: "Delete message", style: .destructive, handler: { acion in
            self.messageStore.remove(messageObject, response: { removed in
               self.longTapped = false
            }, error: { fault in
            })
         })
         let cancelAction = UIAlertAction(title: "Cancel", style: .cancel, handler: { action in
            self.longTapped = false
         })
         alert.showEditMessageAlert(onViewController: self, editAction: editAction, deleteAction: deleteAction, cancelAction: cancelAction)
      }
   }
}
The buttons that change in edit mode are the sendButton and attachmentButton. To separate the logic of their work in editing mode and without, we’ll change their clicks handlers:
@IBAction func pressedSend(_ sender: Any) {
   if !editMode {
      let messageObject = MessageObject()
      if let messageText = messageInputField.text {
         messageObject.messageText = messageText.trimmingCharacters(in: CharacterSet.whitespacesAndNewlines)
      }
      if let userName = yourUser.name {
         messageObject.userName = userName as String?
      }
      else if let userEmail = yourUser.email {
         messageObject.userName = userEmail as String?
      }
      messageObject.userId = yourUser.objectId as String?

      messageStore.save(messageObject, response: { savedMessageObject in Backendless.sharedInstance()?.messaging.publish(self.channelName, message: savedMessageObject, response: { messageStatus in
            self.clearMessageField()
         }, error: { fault in
            if let errorMessage = fault?.message {
               self.alert.showErrorAlert(message: errorMessage, onViewController: self)
            }
         })
      }, error: { fault in
         if let errorMessage = fault?.message {
            self.alert.showErrorAlert(message: errorMessage, onViewController: self)
         }
      })
   }
   else {
      if let messageText = messageInputField.text {
         editingMessage?.messageText = messageText.trimmingCharacters(in: CharacterSet.whitespacesAndNewlines)
      }
      messageStore.save(editingMessage, response: { updatedMessageObject in
         self.editModeDisabled()
      }, error: { fault in
         if let errorMessage = fault?.message {
            self.alert.showErrorAlert(message: errorMessage, onViewController: self)
         }
      })
   }
}
We will consider the addAttachment button in the next article in more detail, but in the edit mode it corresponds to the editing mode cancellation.
@IBAction func pressedAddAttachment(_ sender: Any) {
   if !editMode {

   }
   else {
      self.editModeDisabled()
   }
}
That’s all for today. We’ve discussed how to save, edit and delete sent messages, as well as how to track these changes.
Next time, we will figure out how to send messages with pictures, but for now you can modify our application a little – for example, add the ability to delete several messages at once.
The application with the changes added in this article can be found by switching to the textMessagingPart2 branch.
Happy coding and see you soon!