How to Build a Social App Backend With Backendless (Part 2)
In Part 2 of our series, we are going to continue design backend for our Social App. So, the task for today is to implement such parts as Likes and Comments. You will see how easily you can reach this by using Backendless.
Before we begin, we suggest you go through Part 1 here.
Now, let’s pick up where we left off.
Posts Likes
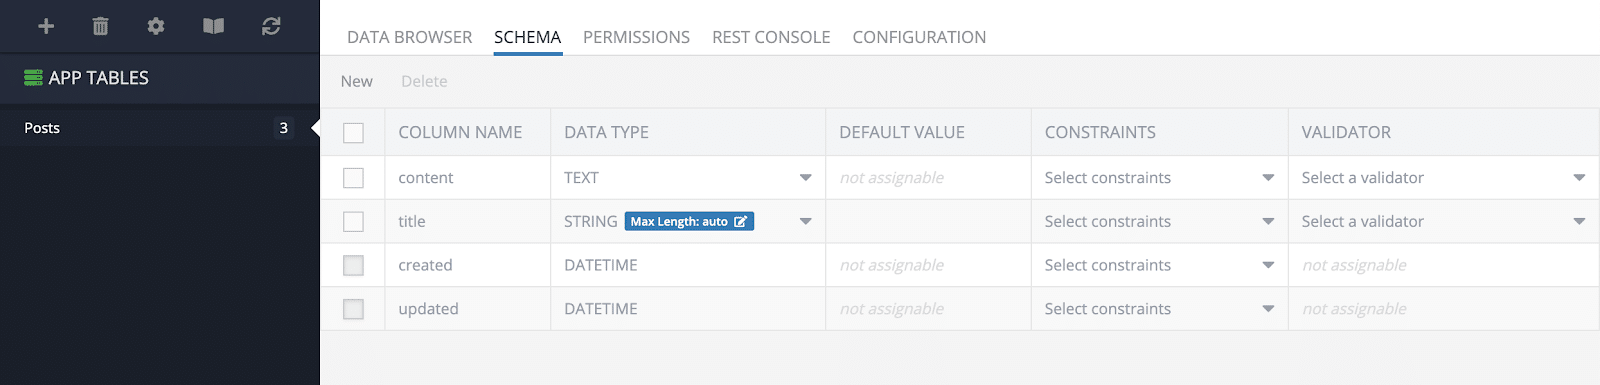
This is a very common feature that you can see in almost every social application. But before we start, let’s refresh ourselves. Let’s see what our Posts data table looks like within our Backendless Database:
Setup
As you can see, now we have only two custom columns: “content” and “title”. In order to be able to add likes for posts, we have to add a new column called “likes”. It will be a one-to-many relation to the Users table. It ensures that a given user will only be able to like the same post once.

Great, now let’s add an API method for adding and removing likes for posts. For that, go to your Business Logic (Cloud Code) and select the Coding section. We are going to add to methods to the Posts API Service.
- likePost
- unlikePost
Both methods can only be invoked by logged-in users, so let’s add this check to the top of each method:
/**
* @param {String} postId
* */
async likePost(postId) {
 const currentUserId = this.request.context.userId;

 if (!currentUserId) {
   throw new Error('You must be logged in.')
 }

 // add your code here
}

/**
* @param {String} postId
* */
async unlikePost(postId) {
 const currentUserId = this.request.context.userId;

 if (!currentUserId) {
   throw new Error('You must be logged in.')
 }

 // add your code here
}
Of course, we could move the common code into a single function and then call it in those methods to avoid code duplication, but we want to demonstrate the implementation as simple as possible.
Enabling Post Likes
In our social app’s design, adding/removing likes in posts means creating/removing relationships between posts and users. Thus, to implement the method, we have to use the AddRelations API and DeleteRelations API. These APIs look pretty simple:
Backendless.Data.of("TABLE-NAME").addRelation(parentObject, relationColumnName, childrenArray)

Backendless.Data.of("TABLE-NAME").deleteRelation(parentObject, relationColumnName, childrenArray)
Where:
TABLE-NAME– is the name of the parent table; in our case, it’s “Posts”parentObject– is a parent object or its id; in our case, it’s “postId”relationColumnName– is the name of the relation column in the parent table; in our case, it’s “likes”childrenArray– is a list of children objects or their ids which will be assigned or deleted to/from the parent object; in our case, it’s just a list with onecurrentUserId
Let’s modify these API methods and check how it works.
/**
   * @param {String} postId
   * */
  async likePost(postId) {
    const currentUserId = this.request.context.userId;

    if (!currentUserId) {
      throw new Error('You must be logged in.')
    }

    await Backendless.Data.of('Posts').addRelation(postId, 'likes', [currentUserId])
  }

  /**
   * @param {String} postId
   * */
  async unlikePost(postId) {
    const currentUserId = this.request.context.userId;

    if (!currentUserId) {
      throw new Error('You must be logged in.')
    }

    await Backendless.Data.of('Posts').deleteRelation(postId, 'likes', [currentUserId])
  }
Please make sure you are logged-in on the Business Logic invocation screen. In this example, we’re logged-in as “bob@foo.com”.
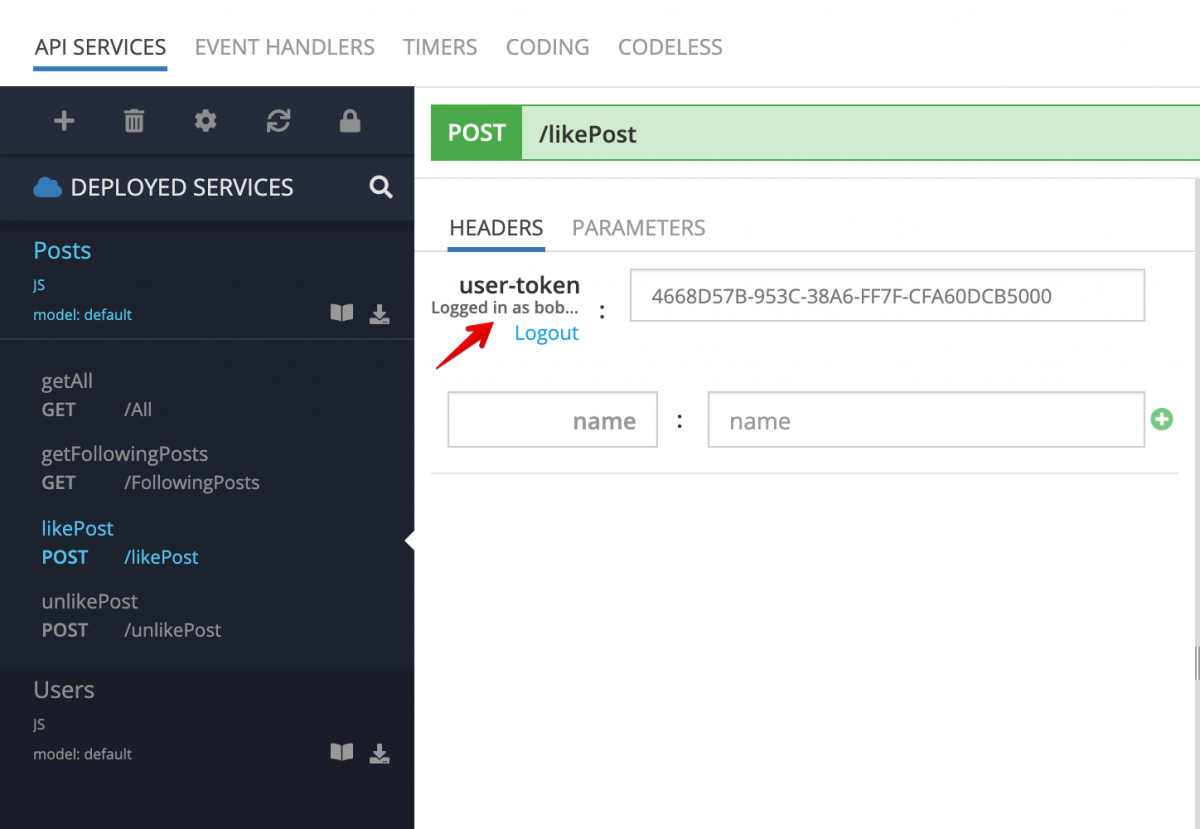
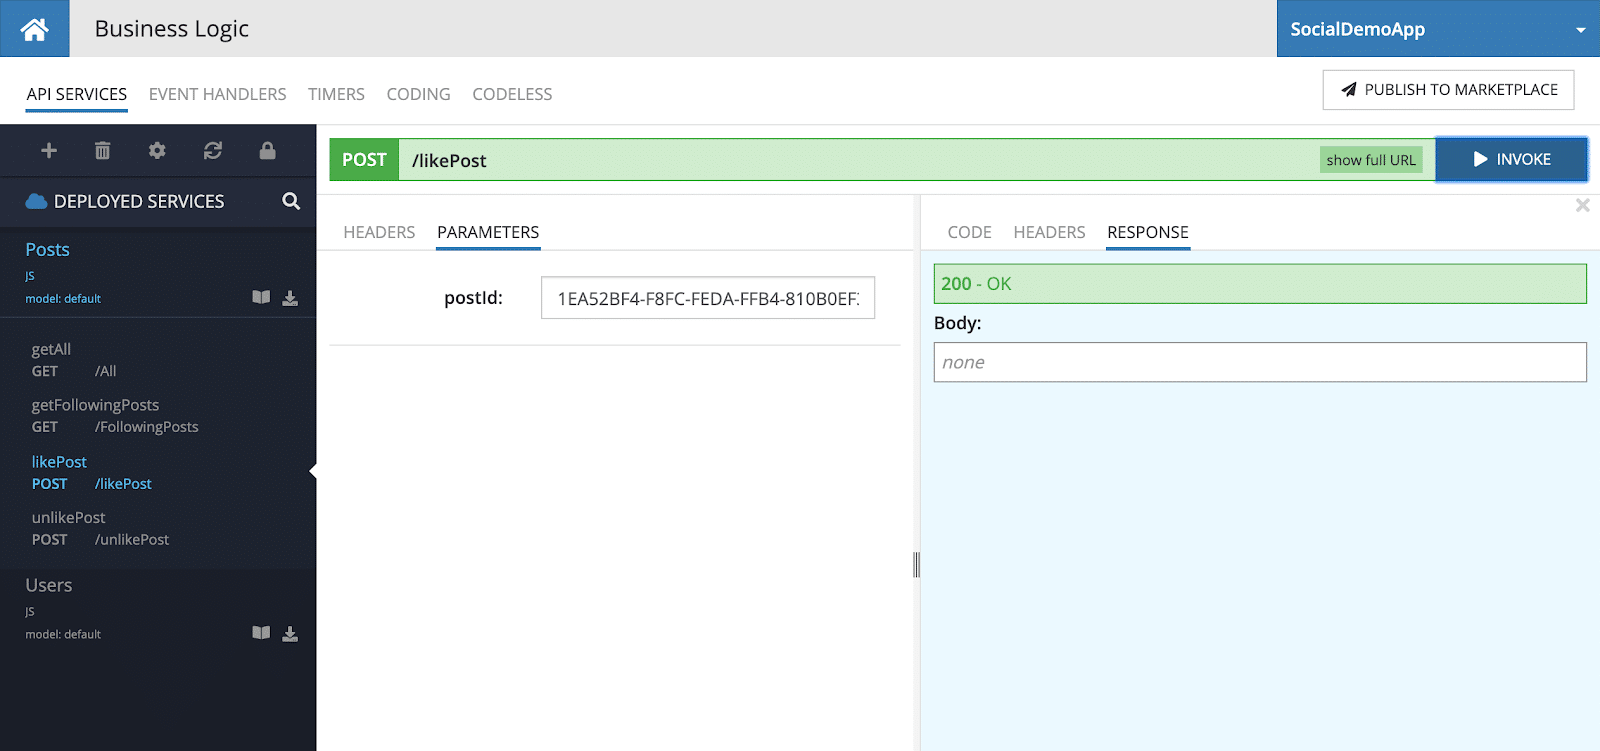
Then, go to the Data Browser and copy an objectId of any Post and come back to the screen, paste it in the Parameters section as “postId”, and invoke the API method.
Good, let’s go to the Data Browser and see what’s changed with the Post object.
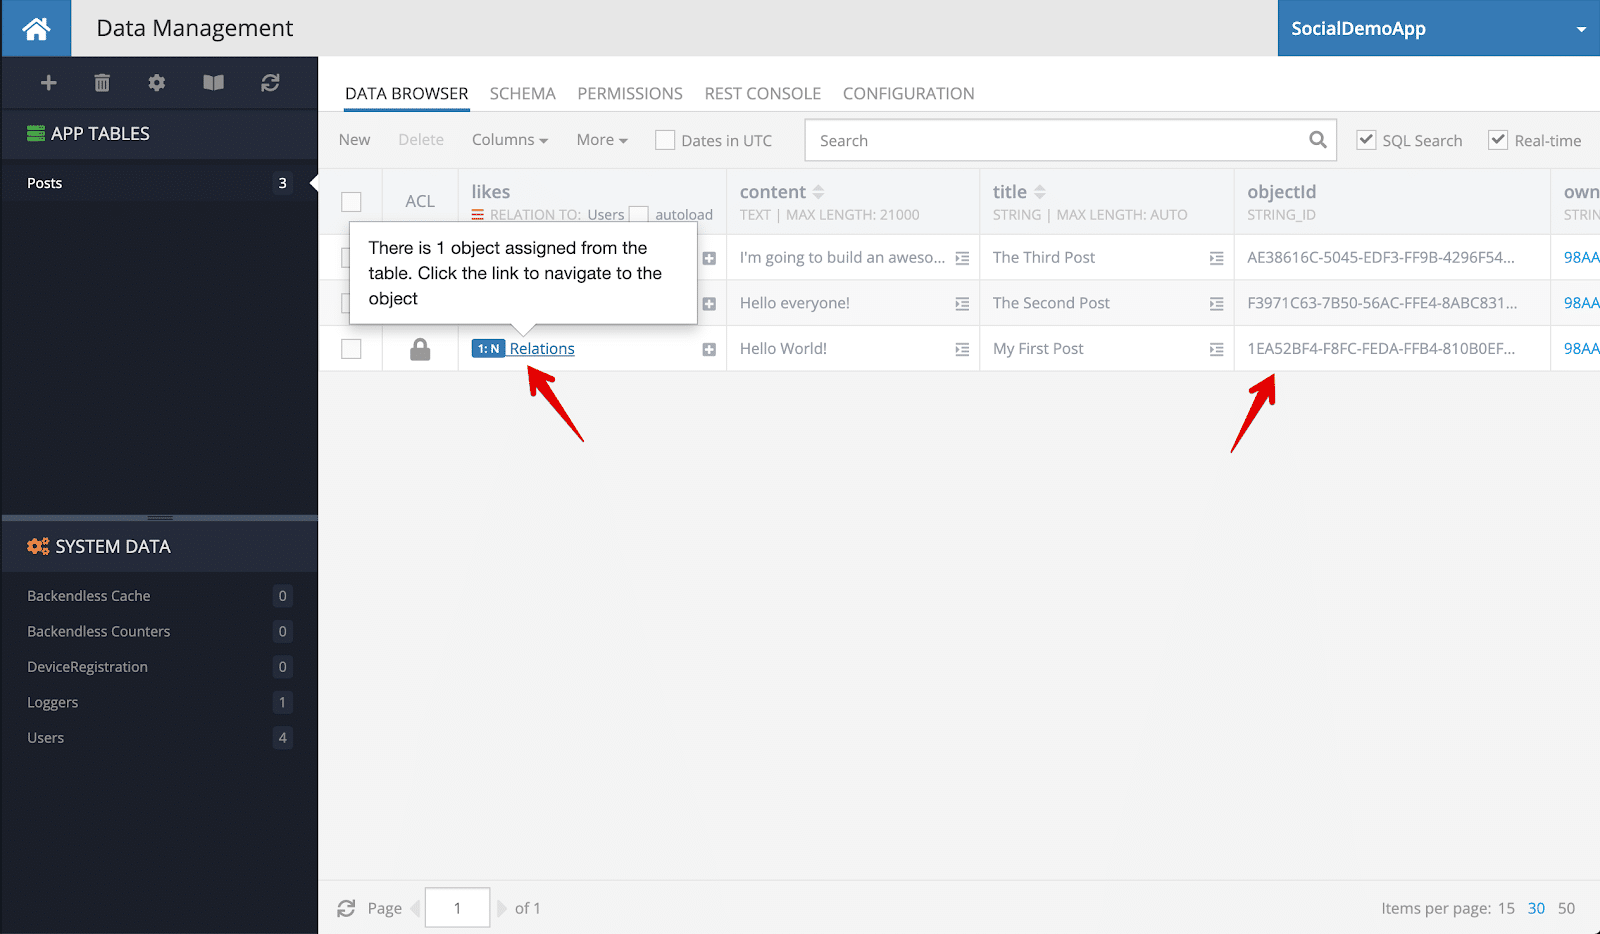
As you can see, the Post object now has a relation to the User object who liked the post. If you click the link pointed out on the screenshot above, you will be redirected to the Users table with a filter that shows only related objects to the Post object.
You can easily reset the filter by clicking on the red icon right before the Users table label (lower arrow above).
Unliking A Post
Now let’s simulate the situation when a user clicks on the “unlike” icon. For that, go back to the Business Logic invocation section and select the “unlikePost” method. Insert the same Post objectId in the Parameters section and invoke the API Service.

Now, if you go to the Data Browser, you see that the Post doesn’t have any relations anymore.

Now, you can play with these API methods for adding/removing likes on a Post object and you can use Data Browser for establishing these relations. In the next step, we are going to build a calculation for likes on each Post. Therefore, we need to have several posts with likes.
Calculating The Number Of Post Likes
So, my posts have the following relations:
- The Third Post is liked by Nick and Jack
- The Second Post is liked by Bob, Nick, Jack, and Vlad
- My First Post is liked by nobody yet

Alright, let’s modify the API methods for retrieving Posts by adding the total count of likes for each Post item to the response. For that, we are going to create a common function “loadPosts(currentUserId, whereClause)” for use in both API methods “Posts.getAll” and “Posts.getFollowingPosts”. Also, we will be able to mark each post in the response if the post is already liked by ourselves.
But, before we start, let’s highlight a few main points according to the common function:
- The function will return a list of posts where each post will be enriched with additional data such as “
totalLikesCount:Number | liked:Boolean | user:Object” - It loads posts with aggregation options to calculate how many likes each post has
- It loads likes relations for each post (by default, the
pageSizeequals 10) and tries to determine if the current user is in the list; if not, an additional request will be made - It collects all the unique publisher IDs and loads corresponding users
- There might be a maximum of three API calls
async function loadPosts(currentUserId, whereClause) {
 const postsStore = Backendless.Data.of('Posts')
 const usersStore = Backendless.Data.of('Users')

 const ITEMS_PER_PAGE = 20

 const queryWithLikes = Backendless.Data.QueryBuilder.create()
   .setPageSize(ITEMS_PER_PAGE)
   .setProperties([
     'title',
     'content',
     'created',
     'ownerId',
     'Count(likes) as totalLikesCount',
   ])
   .setGroupBy('objectId')
   .setSortBy('created desc')
   .setRelated('likes')

 if (whereClause) {
   queryWithLikes.setWhereClause(whereClause)
 }

 const posts = await postsStore.find(queryWithLikes)

 if (!posts.length) {
   return []
 }

 const ownerIds = []
 const possibleLikedPostsIds = []

 posts.forEach(post => {
   if (!ownerIds.includes(post.ownerId)) {
     ownerIds.push(post.ownerId)
   }

   post.liked = !!currentUserId && post.likes.some(like => like.objectId === currentUserId)

   if (!post.liked && post.totalLikesCount > post.likes.length && currentUserId) {
     possibleLikedPostsIds.push(post.objectId)
   }
 })

 if (possibleLikedPostsIds.length) {
   const likedPostsQuery = Backendless.Data.QueryBuilder.create()
     .setWhereClause(`objectId in (${possibleLikedPostsIds.map(d => `'${d}'`).join(',')}) and likes.objectId = '${currentUserId}'`)
     .setPageSize(ITEMS_PER_PAGE)

   const likedPosts = await postsStore.find(likedPostsQuery)
   const likedPostsIds = likedPosts.map(o => o.objectId)

   posts.forEach(post => {
     post.liked = post.liked || likedPostsIds.includes(post.objectId)
   })
 }

 const publishersQuery = Backendless.Data.QueryBuilder.create()
   .setWhereClause(`objectId in (${ownerIds.map(d => `'${d}'`).join(',')})`)
   .setPageSize(ITEMS_PER_PAGE)

 const publishers = await usersStore.find(publishersQuery)
 const publishersMap = publishers.reduce((m, user) => ({ ...m, [user.objectId]: user }), {})

 return posts.map(post => {
   const publisher = publishersMap[post.ownerId]

   return {
     userId         : publisher.objectId,
     objectId       : post.objectId,
     created        : post.created,
     title          : post.title,
     content        : post.content,
     totalLikesCount: post.totalLikesCount,
     liked          : post.liked,
     user           : {
       objectId: publisher.objectId,
       email : publisher.email,
       name : publisher.name,
     }
   }
 })
}
And now, we can use the function in our API methods.
class Posts {

 async getAll() {
   const currentUserId = this.request.context.userId

   return loadPosts(currentUserId)
 }

 async getFollowingPosts() {
   const currentUserId = this.request.context.userId;
   const query = `ownerId in (Users[objectId='${currentUserId}'].following.objectId)`

   if (!currentUserId) {
     throw new Error('You must be logged in.')
   }

   return loadPosts(currentUserId, query)
 }
…
Let’s test the code by executing the “Posts.getAll” API method.
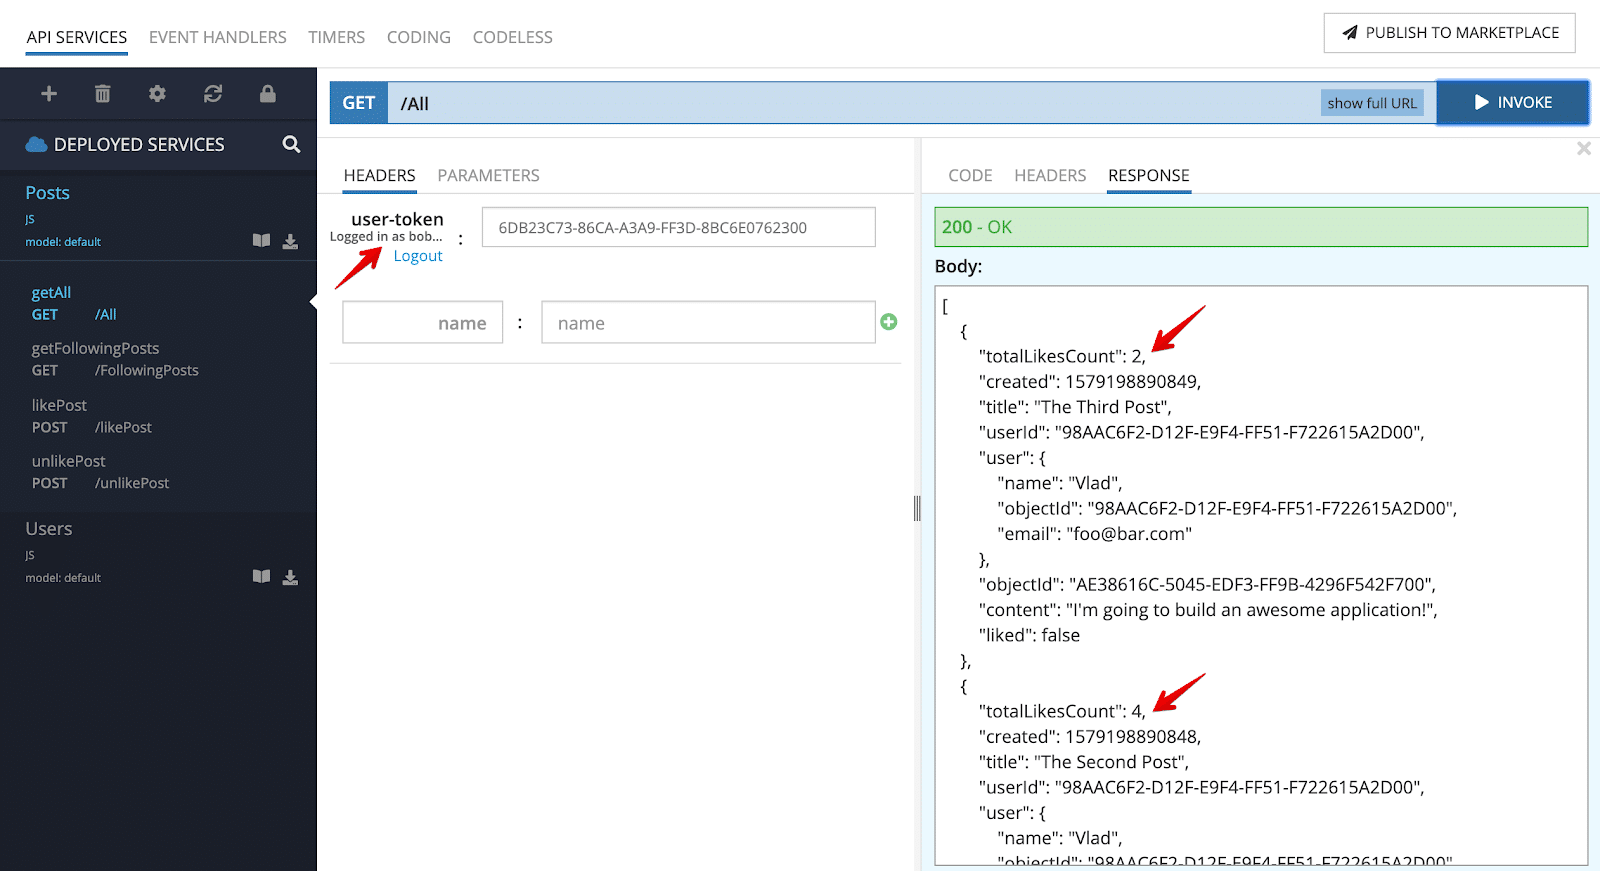
[
    {
        "totalLikesCount": 2,
        "created": 1579198890849,
        "title": "The Third Post",
        "userId": "98AAC6F2-D12F-E9F4-FF51-F722615A2D00",
        "user": {
            "name": "Vlad",
            "objectId": "98AAC6F2-D12F-E9F4-FF51-F722615A2D00",
            "email": "foo@bar.com"
        },
        "objectId": "AE38616C-5045-EDF3-FF9B-4296F542F700",
        "content": "I'm going to build an awesome application!",
        "liked": false
    },
    {
        "totalLikesCount": 4,
        "created": 1579198890848,
        "title": "The Second Post",
        "userId": "98AAC6F2-D12F-E9F4-FF51-F722615A2D00",
        "user": {
            "name": "Vlad",
            "objectId": "98AAC6F2-D12F-E9F4-FF51-F722615A2D00",
            "email": "foo@bar.com"
        },
        "objectId": "F3971C63-7B50-56AC-FFE4-8ABC83150400",
        "content": "Hello everyone!",
        "liked": true
    },
    {
        "totalLikesCount": 0,
        "created": 1579193380620,
        "title": "My First Post",
        "userId": "98AAC6F2-D12F-E9F4-FF51-F722615A2D00",
        "user": {
            "name": "Vlad",
            "objectId": "98AAC6F2-D12F-E9F4-FF51-F722615A2D00",
            "email": "foo@bar.com"
        },
        "objectId": "1EA52BF4-F8FC-FEDA-FFB4-810B0EF36800",
        "content": "Hello World!",
        "liked": false
    }
]
As you can see on the screenshot above, each post has those additional properties. You can play with changing relationships between posts and users. You can also try to log in as another user to see how the “liked” property is changing.
Post Comments
Publishing comments is a significant aspect of any social application because it enables users to share their thoughts and comments about the post. In this section, we’re going to show you how to design it.
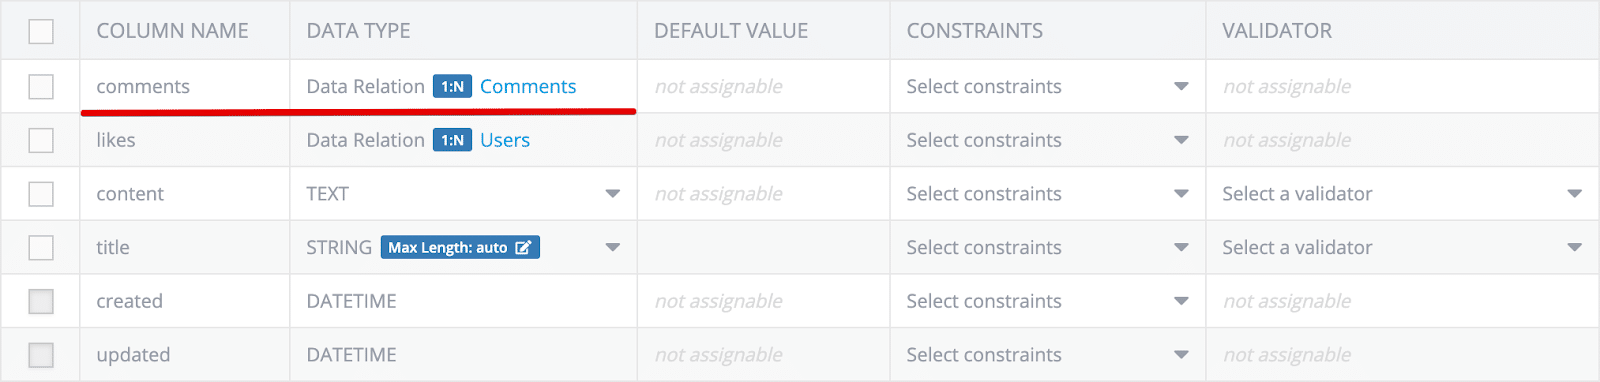
First of all, we have to create a new Data Table and call it “Comments” with only one column: “text”.

Good, now let’s set up a relationship between the Posts and Comments tables. The main idea is having a list of comments for each Post object, which gives us the ability to load comments for a particular Post.
Finally, let’s add a new API method for adding Post comments. The method will save a new comment in the Comments table and insert it into a particular post object as a data relation. So, open the Coding section and open the “services/posts.js” file for editing. Add the following code into the API service:
  /**
   * @param {String} postId
   * @param {String} comment
   * */
  async addPostComment(postId, comment) {
    const currentUserId = this.request.context.userId;

    if (!currentUserId) {
      throw new Error('You must be logged in.')
    }

    const savedComment = await Backendless.Data.of('Comments').save({ text: comment })

    await Backendless.Data.of('Posts').addRelation(postId, 'comments', [savedComment])

    return savedComment
  }
Time to check the code. Go to the Posts table, select the objectId of any post object, then go back to the Business Logic screen and select the just-added API method and invoke it with the grabbed postId. Do not forget that you must be logged-in before invoke the API method.
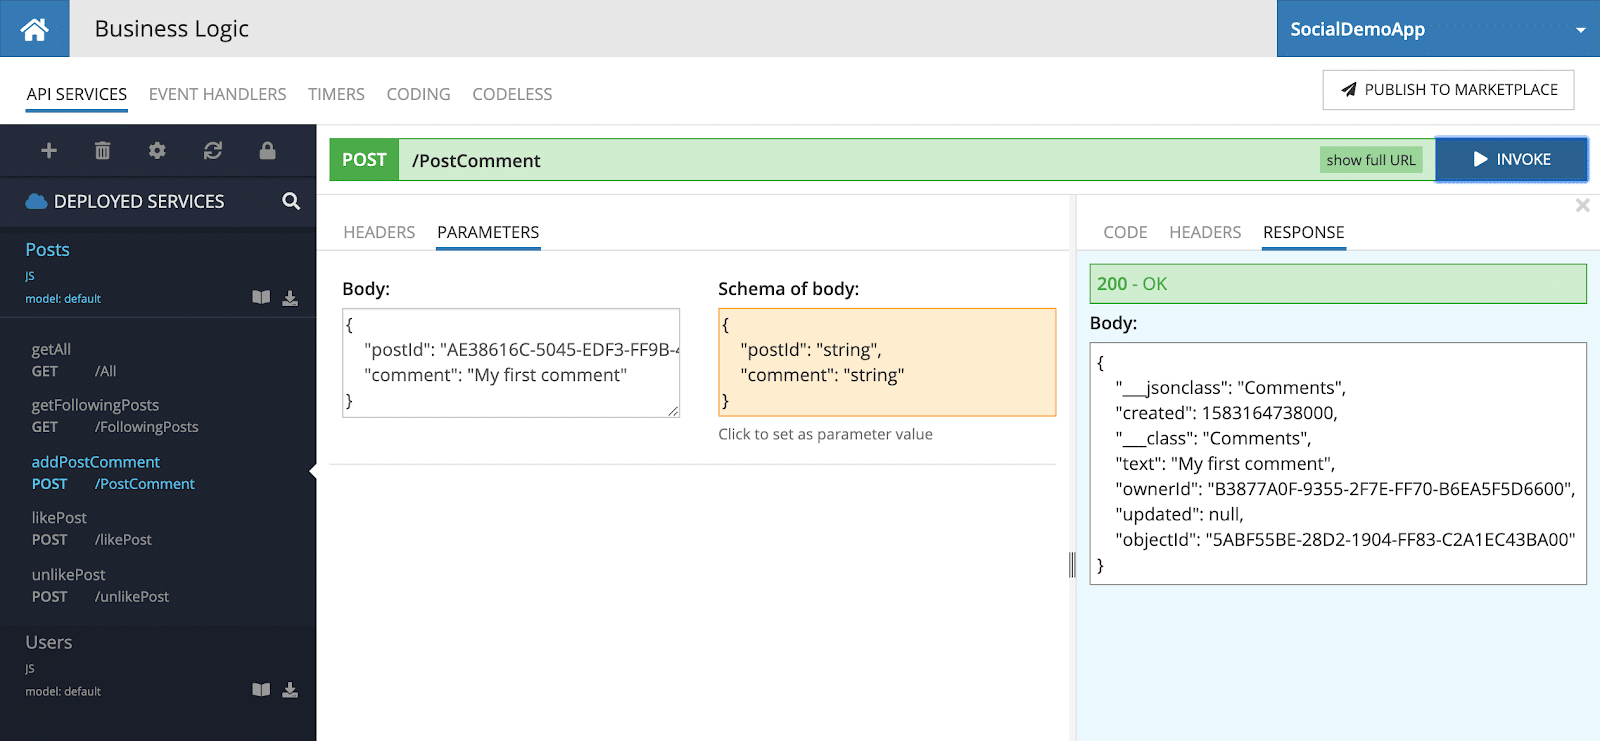
It seems like everything is good, but let’s go to the Data Browser and check it.
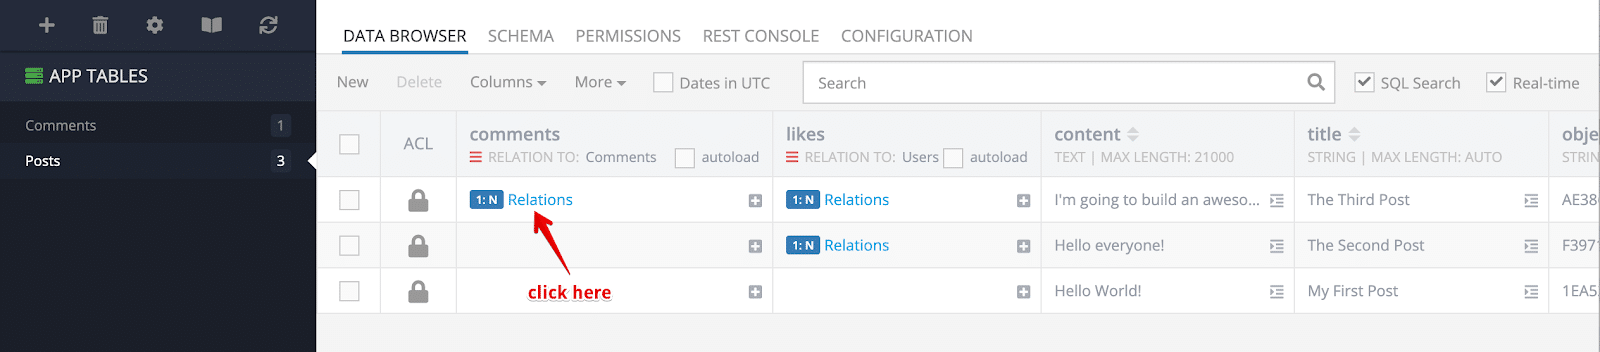
Everything looks correct, so click on the “relations” link and see the just-created comment.

Good. Let’s publish a few additional comments for different posts to have more data for testing.
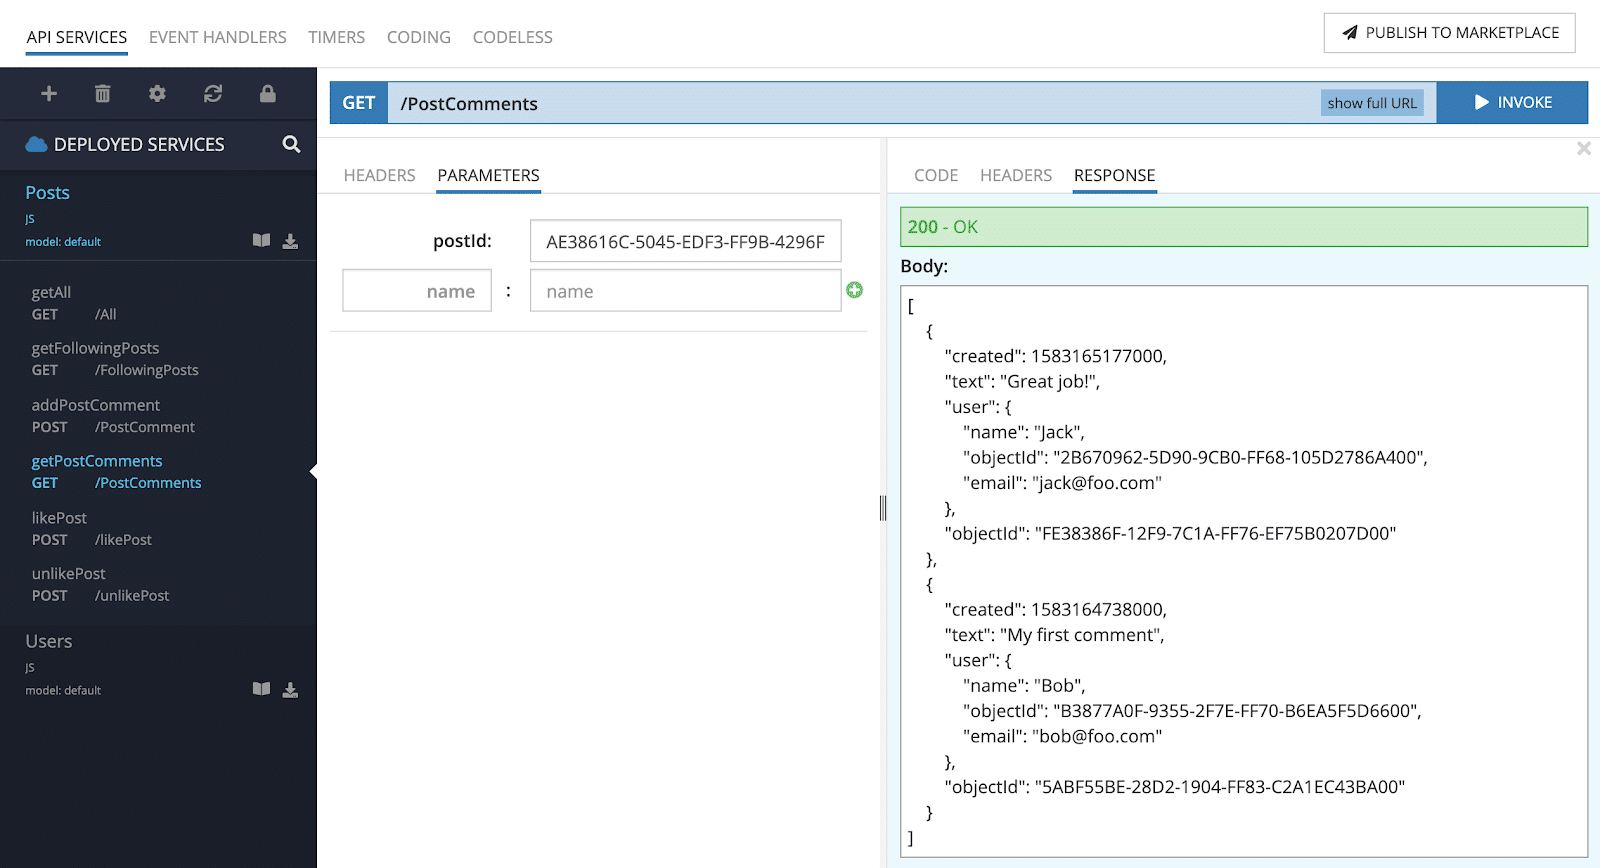
Now, let’s create a new API method for getting post comments with their publisher.
/**
* @param {String} postId
* */
async getPostComments(postId) {
 const currentUserId = this.request.context.userId

 if (!currentUserId) {
   throw new Error('You must be logged in.')
 }

 const postsStore = Backendless.Data.of('Posts')
 const usersStore = Backendless.Data.of('Users')

 const commentsQuery = Backendless.Data.LoadRelationsQueryBuilder.create()
   .setRelationName('comments')
   .setSortBy('created desc')

 const comments = await postsStore.loadRelations(postId, commentsQuery)

 if (!comments.length) {
   return []
 }

 const usersQuery = Backendless.Data.QueryBuilder.create()
   .setWhereClause(`objectId in (${comments.map(d => `'${d.ownerId}'`)})`)

 const users = await usersStore.find(usersQuery)
 const usersMap = users.reduce((m, user) => ({ ...m, [user.objectId]: user }), {})

 return comments.map(comment => {
   const user = usersMap[comment.ownerId]

   return {
     objectId: comment.objectId,
     created : comment.created,
     text   : comment.text,
     user: {
       objectId: user.objectId,
       email : user.email,
       name : user.name,
     }
   }
 })
}
If we run the API method, we will see a list of Comments:
The last thing we’re going to do is extend our common “loadPost” function by adding the “totalCommentsCount” value to each Post object. For that, we have to modernize the function by adding one more API request for retrieving Posts with their aggregated comments count. In the end, the “loadPost” function will look like:
async function loadPosts(currentUserId, whereClause) {
 const postsStore = Backendless.Data.of('Posts')
 const usersStore = Backendless.Data.of('Users')

 const ITEMS_PER_PAGE = 20

 const queryWithLikes = Backendless.Data.QueryBuilder.create()
   .setPageSize(ITEMS_PER_PAGE)
   .setProperties([
     'title',
     'content',
     'created',
     'ownerId',
     'Count(likes) as totalLikesCount',
   ])
   .setGroupBy('objectId')
   .setSortBy('created desc')
   .setRelated('likes')

 const queryWithComments = Backendless.Data.QueryBuilder.create()
   .setPageSize(ITEMS_PER_PAGE)
   .setProperties([
     'Count(comments) as totalCommentsCount'
   ])
   .setGroupBy('objectId')
   .setSortBy('created desc')

 if (whereClause) {
   queryWithLikes.setWhereClause(whereClause)
   queryWithComments.setWhereClause(whereClause)
 }

 const postsWithLikes = await postsStore.find(queryWithLikes)

 if (!postsWithLikes.length) {
   return []
 }

 const postsWithComments = await postsStore.find(queryWithComments)
 const postsWithCommentsMap = postsWithComments.reduce((m, post) => ({ ...m, [post.objectId]: post }), {})

 const posts = postsWithLikes.map(post => ({
   ...post,
   totalCommentsCount: postsWithCommentsMap[post.objectId].totalCommentsCount
 }))

 const ownerIds = []
 const possibleLikedPostsIds = []

 posts.forEach(post => {
   if (!ownerIds.includes(post.ownerId)) {
     ownerIds.push(post.ownerId)
   }

   post.liked = !!currentUserId && post.likes.some(like => like.objectId === currentUserId)

   if (!post.liked && post.totalLikesCount > post.likes.length && currentUserId) {
     possibleLikedPostsIds.push(post.objectId)
   }
 })

 if (possibleLikedPostsIds.length) {
   const likedPostsQuery = Backendless.Data.QueryBuilder.create()
     .setWhereClause(`objectId in (${possibleLikedPostsIds.map(d => `'${d}'`).join(',')}) and likes.objectId = '${currentUserId}'`)
     .setPageSize(ITEMS_PER_PAGE)

   const likedPosts = await postsStore.find(likedPostsQuery)
   const likedPostsIds = likedPosts.map(o => o.objectId)

   posts.forEach(post => {
     post.liked = post.liked || likedPostsIds.includes(post.objectId)
   })
 }

 const publishersQuery = Backendless.Data.QueryBuilder.create()
   .setWhereClause(`objectId in (${ownerIds.map(d => `'${d}'`).join(',')})`)
   .setPageSize(ITEMS_PER_PAGE)

 const publishers = await usersStore.find(publishersQuery)

 const publishersMap = publishers.reduce((m, user) => ({ ...m, [user.objectId]: user }), {})

 return posts.map(post => {
   const publisher = publishersMap[post.ownerId]

   return {
     userId            : publisher.objectId,
     objectId          : post.objectId,
     created           : post.created,
     title             : post.title,
     content           : post.content,
     totalLikesCount   : post.totalLikesCount,
     totalCommentsCount: post.totalCommentsCount,
     liked             : post.liked,
     user:{
       objectId: publisher.objectId,
       email : publisher.email,
       name : publisher.name,
     }
   }
 })
}
Now, the Posts.getAll API method returns:
[
    {
        "totalLikesCount": 2,
        "created": 1579198890849,
        "title": "The Third Post",
        "userId": "98AAC6F2-D12F-E9F4-FF51-F722615A2D00",
        "totalCommentsCount": 2,
        "user": {
            "name": "Vlad",
            "objectId": "98AAC6F2-D12F-E9F4-FF51-F722615A2D00",
            "email": "foo@bar.com"
        },
        "objectId": "AE38616C-5045-EDF3-FF9B-4296F542F700",
        "content": "I'm going to build an awesome application!",
        "liked": false
    },
    {
        "totalLikesCount": 4,
        "created": 1579198890848,
        "title": "The Second Post",
        "userId": "98AAC6F2-D12F-E9F4-FF51-F722615A2D00",
        "totalCommentsCount": 3,
        "user": {
            "name": "Vlad",
            "objectId": "98AAC6F2-D12F-E9F4-FF51-F722615A2D00",
            "email": "foo@bar.com"
        },
        "objectId": "F3971C63-7B50-56AC-FFE4-8ABC83150400",
        "content": "Hello everyone!",
        "liked": true
    },
    {
        "totalLikesCount": 0,
        "created": 1579193380620,
        "title": "My First Post",
        "userId": "98AAC6F2-D12F-E9F4-FF51-F722615A2D00",
        "totalCommentsCount": 0,
        "user": {
            "name": "Vlad",
            "objectId": "98AAC6F2-D12F-E9F4-FF51-F722615A2D00",
            "email": "foo@bar.com"
        },
        "objectId": "1EA52BF4-F8FC-FEDA-FFB4-810B0EF36800",
        "content": "Hello World!",
        "liked": false
    }
]
Each post contains the totalCommentsCount property corresponding to the count of related comments.
Conclusion
That’s all for this part of the series. You should now have a social app capable of creating posts, adding and removing likes and comments, and calculating like totals. We hope you enjoyed this article and that it was helpful for you.
Thanks for reading and, as always, happy coding with Backendless!
Thanks again Vlad for the second part of the tutorial, I have learned a lot! I only got the following error after adding that last modification to the loadPosts function:
400 – objectsListToMap is not defined
Body:
{
“code”: 0,
“message”: “objectsListToMap is not defined”,
“errorData”: {}
}
Could you help me out on that last one?
Hello Robin!
Thank you for pointing out the mistake, the objectsListToMap util function comes from out of the class and it will be fixed soon, however, you can just replace the following line:
const postsWithCommentsMap = objectsListToMap(postsWithComments)
with this one:
const postsWithCommentsMap = postsWithComments.reduce((m, post) => ({ …m, [post.objectId]: post }), {})
Also, if you have other questions or any wishes for the next tutorials I will be glad to help you out.
Happy coding with Backendless!
Perfect, now it works! I have to say I am really impressed with the speed and functionality of BackendLess.
I have been using Firebase for 1,5 year and since BackEndless caught my attention,
it is definately becoming something I would like to use instead for sure.
Since I create apps in Android Studio, I wonder how I can use this Social App Backend into a working Android Studio project.
Like how to add posts and like them on in app instead of the quick online tools.
I have already configured the real life data & social login options with BackEndless, so that already works too from the previous tutorials.
Shall I open a post in the community for this or is that going to be the part 3 of this tutorial?
Have a nice day!
This is just a backend tutorial that can be used with any clients, so I guess there won’t be the third part.
You can download client SDK for the API Service and then import it into your Android app, here is a doc https://backendless.com/docs/bl-js/bl_client_sdks.html, or you can use REST API.
If you have any problems please create a new support topic here https://support.backendless.com/.