How to Build a Social App Backend With Backendless (Part 1)
There are a lot of social applications around the world, such as Facebook, Twitter, WhatsApp, Instagram, etc. If we take a look under the hood, however, we can see they all share pretty standard features. For instance, we can’t imagine an app without the ability to establish relationships between users, or without “likes” and “comments” because they are fundamental features in social apps.
In this article, we are going to design data table structures with all the necessary data relations between tables. We are also going to create a simple API Service using JavaScript for retrieving aggregated data in a single API request. At the end of this article, we will cover Posts and Followers features. Looking ahead to the next part, we will implement such features as Likes and Comments.
Setup Backendless
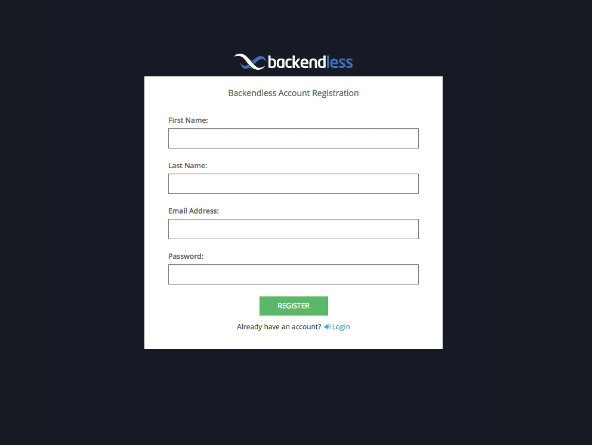
First of all, make sure you have a Backendless developer account. If you do not have one, you can register here.
Create a new Backendless Application. Ours is called SocialDemoApp, but you can choose any name you like.
User Posts
The first fundamental characteristic of any social application is publishing some news or posts, so let’s implement that. Create a new data table named “Posts” and specify basic columns [String:title, Text:content].
Each post must have a publisher but we don’t need to worry about that because there is a system column called owner. Backendless assigns the objectId of the logged-in user to the newly created data object each time, providing us with our publisher. At the end, the schema of the Posts table should look as described on the image below:

Now let’s create a dummy/test user and publish a new post using the REST Console. You can use this request body to create a new user:
{
  "email": "foo@bar.com",
  "password": "123456"
}
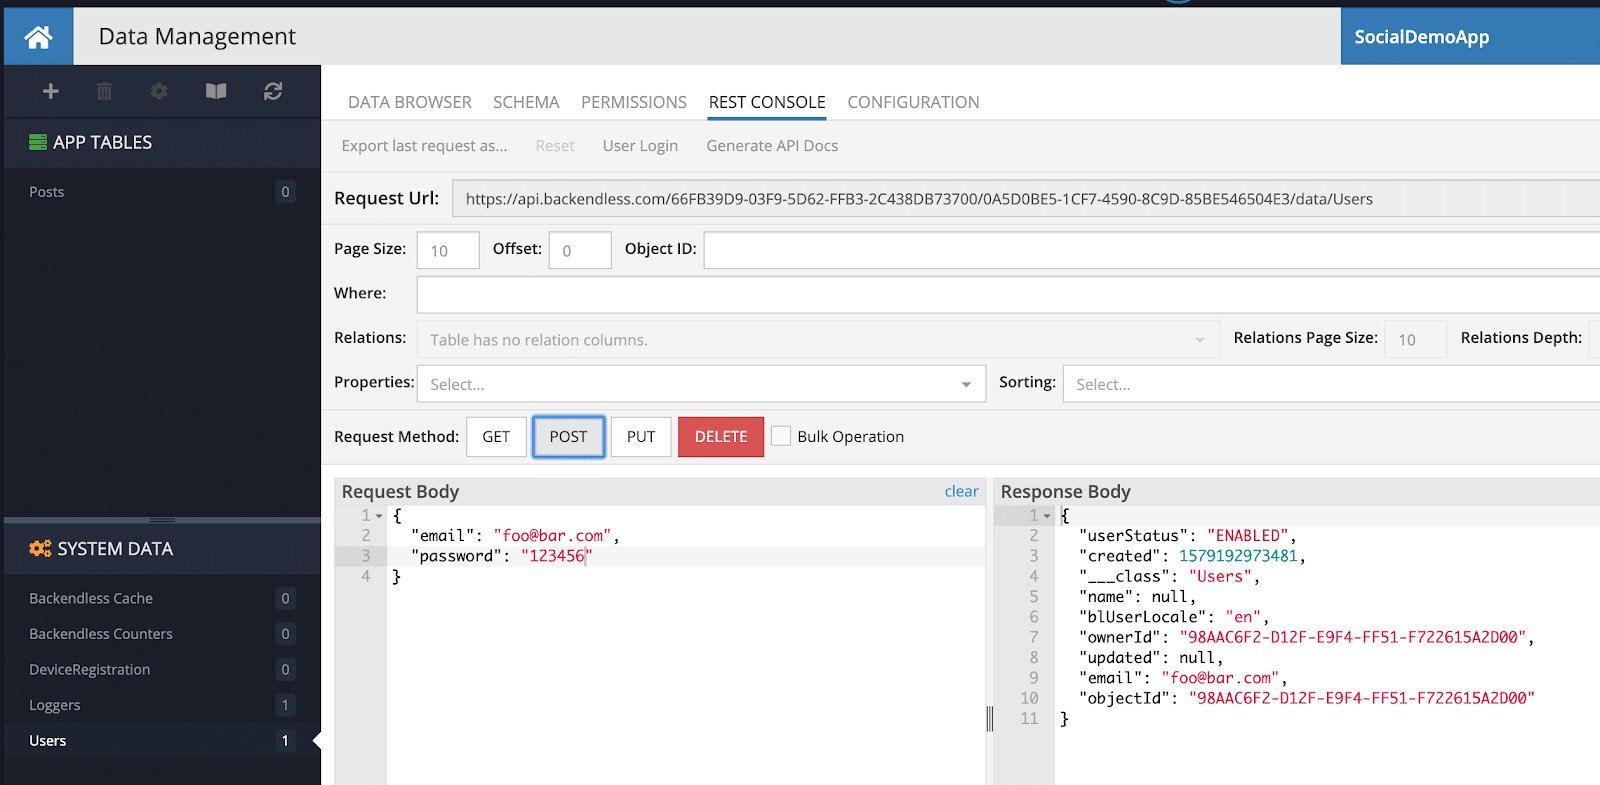
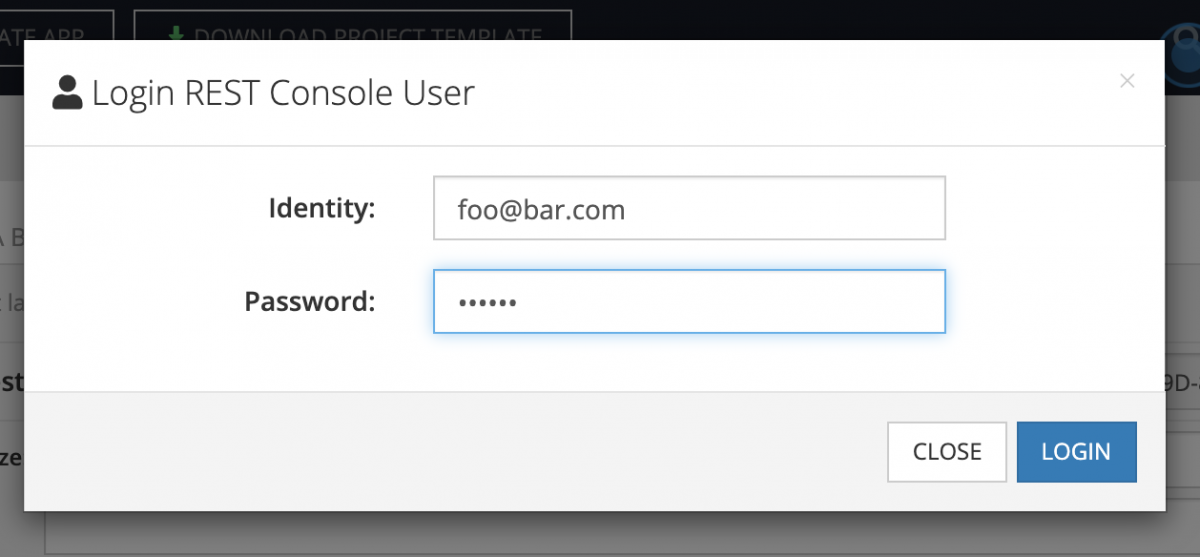
Now that a new user is created, let’s select the Posts table and create a new Post. But before that, let’s log into the REST Console to let Backendless know who is creating this post. Click on the “User Login” button in the toolbar, fill in the login and password fields and click the Login button.
And to create a new post, you can use this payload:
{
  "title": "My First Post",
  "content": "Hello World!"
}
That was pretty easy, wasn’t it? And as you can see on the screenshot below, the ownerId field is not empty. In fact, the value points to objectId of the logged-in user.
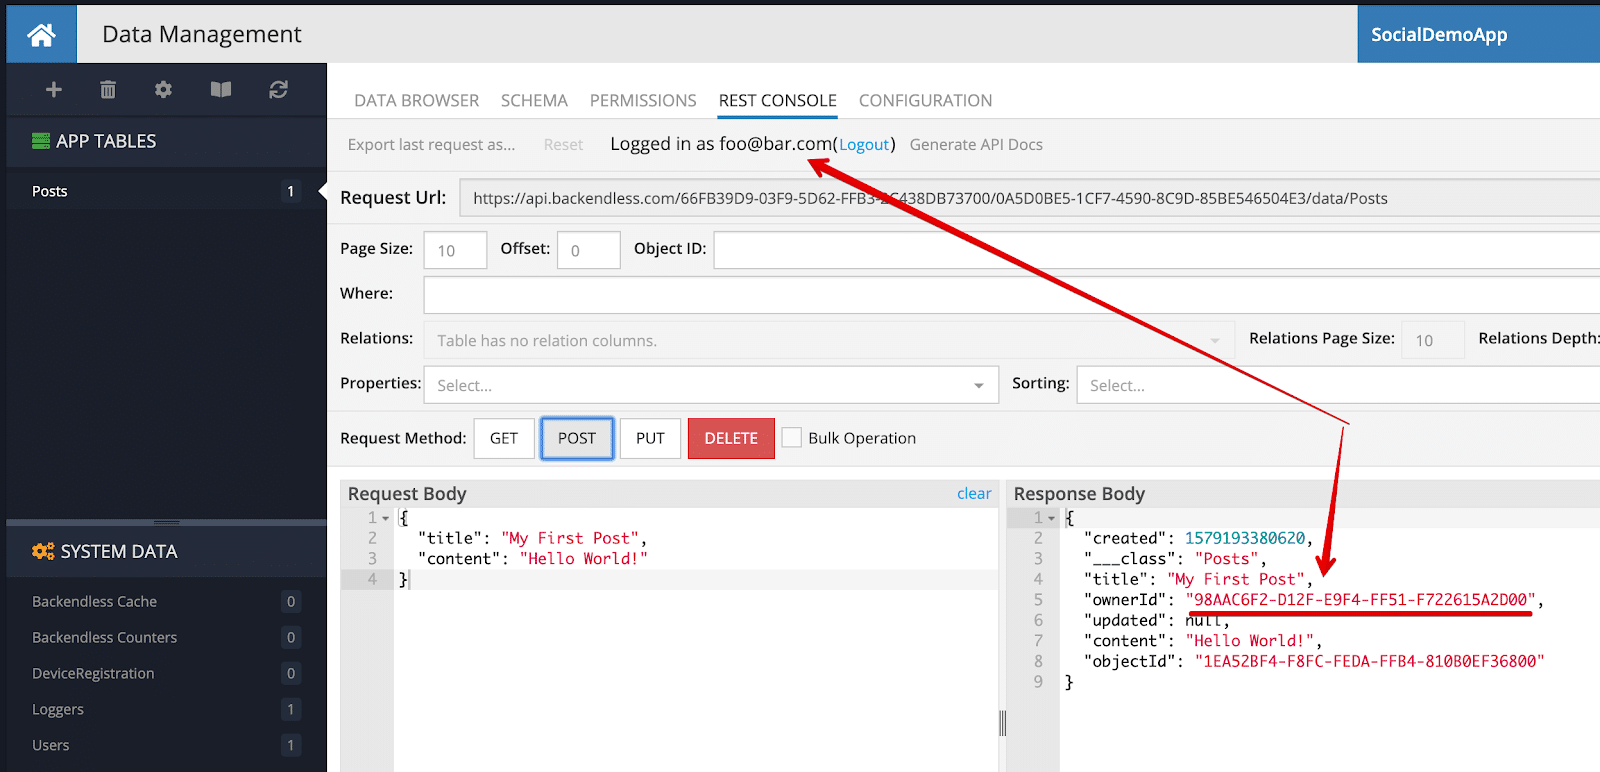
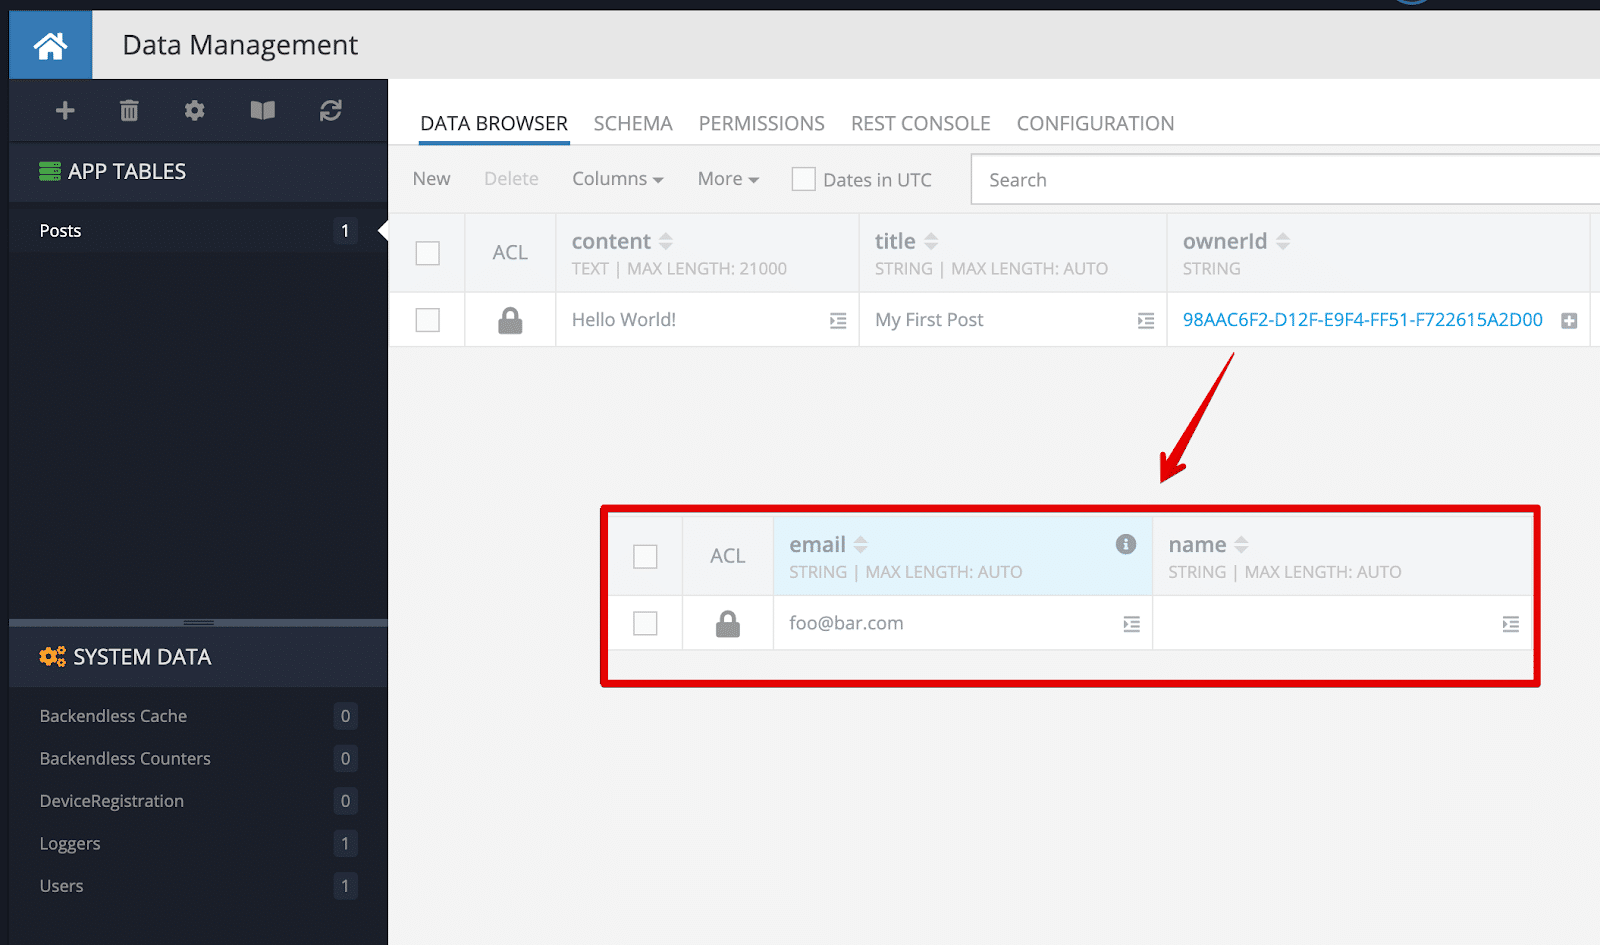
Let’s check it in Data Browser. If you click the blue link in the ownerId cell, you will be redirected to the Users table with filter.
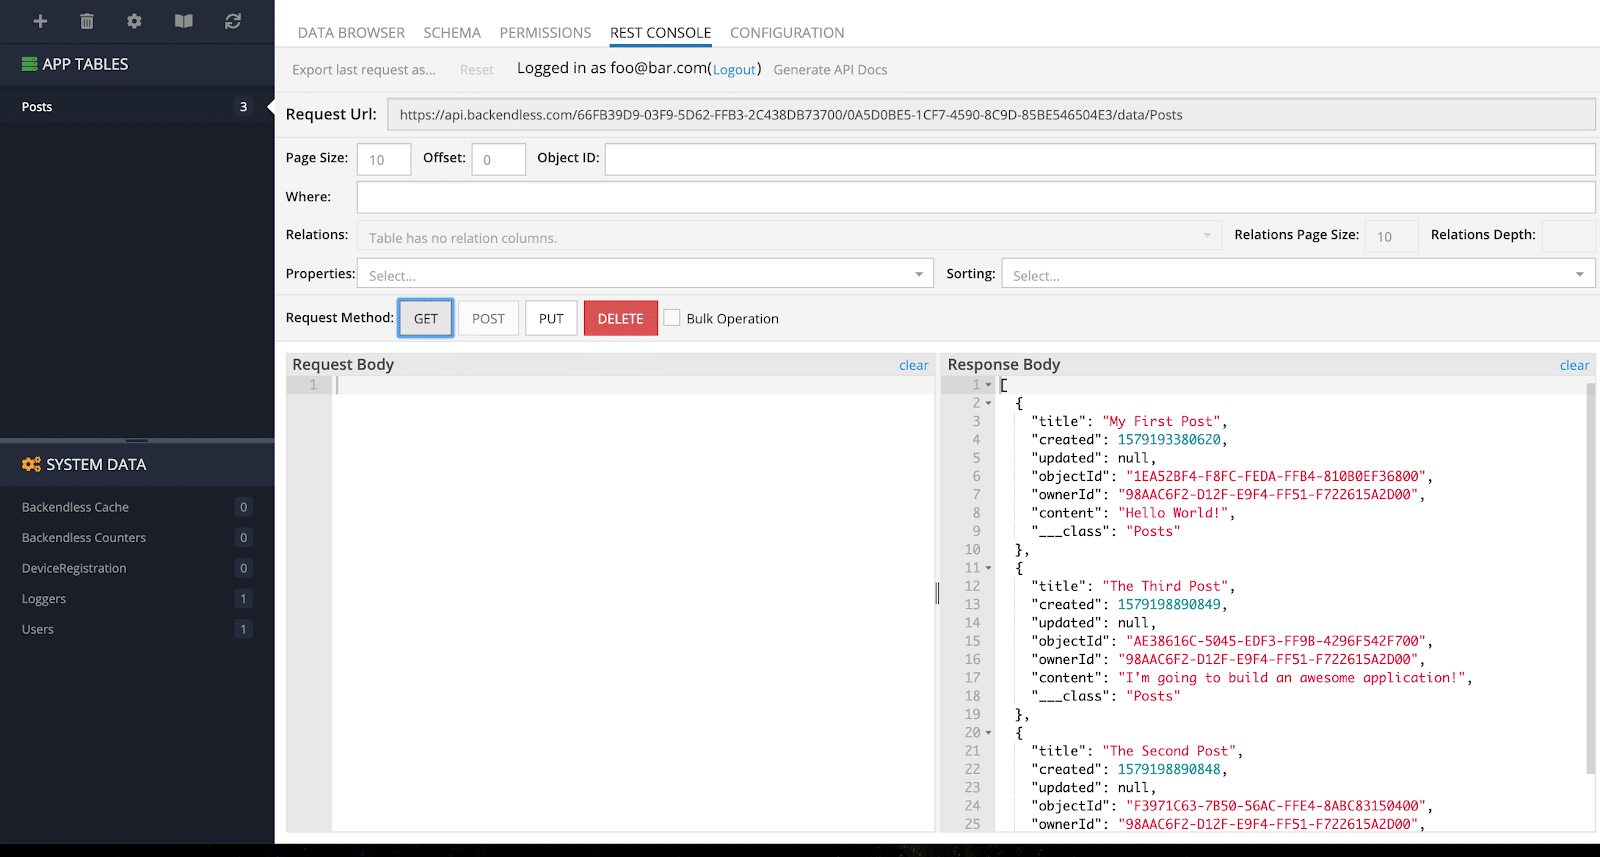
Good job, now let’s add a few posts using the Bulk Create operation in the REST Console. Insert the following content into the Request Body panel and make sure “Bulk Operation” is selected.
[
  {"title":"The Second Post", "content": "Hello everyone!"},
  {"title":"The Third Post", "content": "I'm going to build an awesome application!"}
]

Let’s try to load all the posts. To do that, deselect the “Bulk Operation” toggle and click the “GET” button. If you follow every step, you will have the following result:
Load Posts with publisher
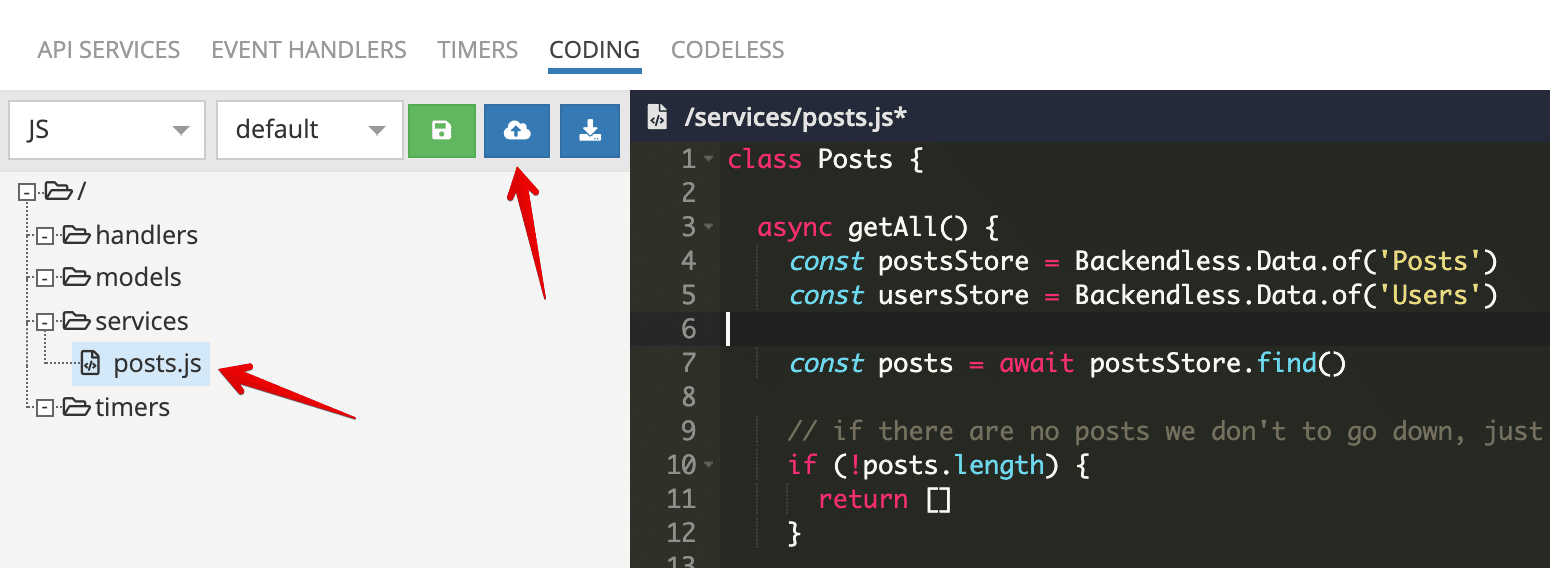
Let’s create an API Service for loading a Posts object where each post has a user (publisher) object. For that, we have to go to Business Logic (Cloud Code) and create a new file called posts.js with the following content:
class Posts {

  async getAll() {
    const postsStore = Backendless.Data.of('Posts')
    const usersStore = Backendless.Data.of('Users')

    const posts = await postsStore.find()

    // if there are no posts we don't to go down, just return an empty array
    if (!posts.length) {
      return []
    }

    const ownerIds = []

    // combine unique userIds
    posts.forEach(post => {
      if (!ownerIds.includes(post.ownerId)) {
        ownerIds.push(post.ownerId)
      }
    })

    // load only necessary users by their ids
    const usersQuery = Backendless.Data.QueryBuilder.create()
      .setWhereClause(`objectId in (${ownerIds.map(d => `'${d}'`).join(',')})`)

    const users = await usersStore.find(usersQuery)
    const usersMap = users.reduce((m, user) => ({ ...m, [user.objectId]: user }), {})

    return posts.map(post => {
      const publisher = usersMap[post.ownerId]

      // extend post object with user object
      return {
        ...post,
        user: {
          objectId: publisher.objectId,
          email : publisher.email,
          name : publisher.name,
        }
      }
    })
  }
}

Backendless.ServerCode.addService(Posts);
Press the “deploy” button as on the next image:
Good, let’s do a little test. Select the “API SERVICE” tab and select the created service and invoke it. You should receive a list of posts where each post has a user object as shown here:

Of course, we can load users on the client or send a map of users along with the list of posts, so it’s definitely up to you. The main goal of the service is to demonstrate how to use the ownerId field and move complex requests from the client to the server.
Followers
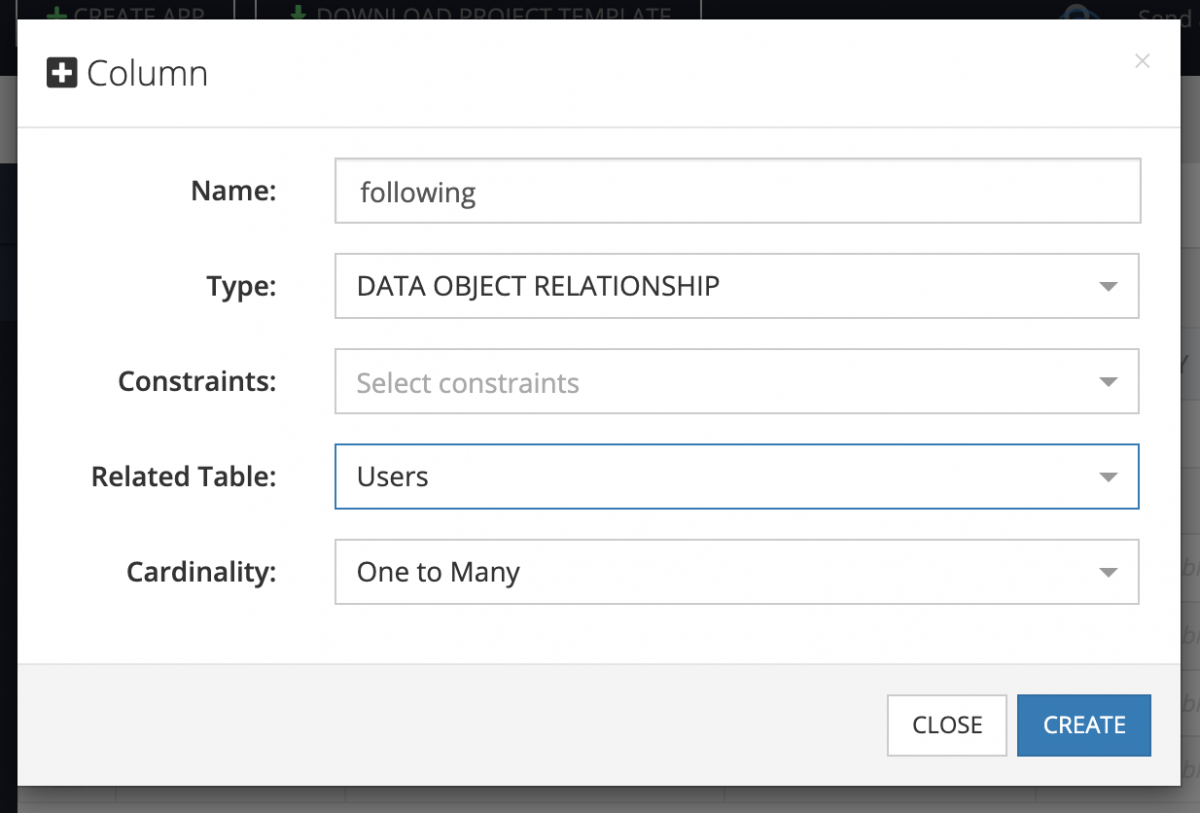
The next part of our application is building a Friendship system that gives our users the ability to subscribe to other users. To do this, we have to set up a relationship column in the Users table. For that, go to Data Service -> Schema, select the Users table, and click on the “New” button. We are going to create a new one-to-many relation column with the following name, which refers to the Users table.
Now, let’s add a few new users for testing. To do that, go to the REST Console section and create these users. As the fastest way, you can use the provided JSON below and create users using the Bulk Create operation.
[
 { "email": "jack@foo.com", "password": "123456", "name": "Jack" },
 { "email": "nick@foo.com", "password": "123456", "name": "Nick" },
 { "email": "Bob@foo.com", "password": "123456", "name": "Bob" }
]

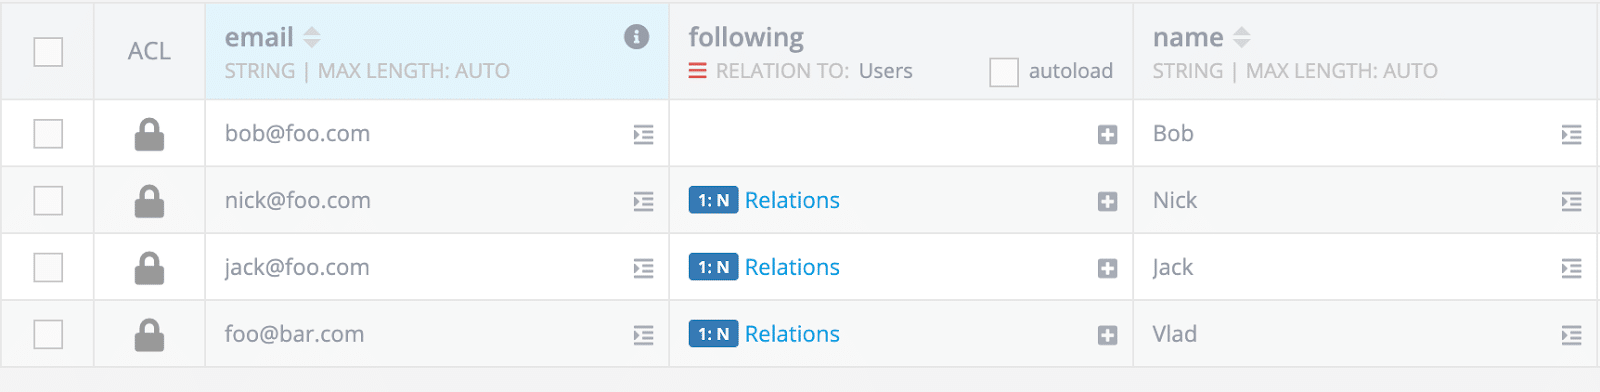
If you go to the Data Browser section, you will see four objects. Let’s establish a few relationships to see what benefit it gives.
- Vlad is following “Nick”, “Jack” and “Bob”
- Nick is following “Vlad” only
- Jack is following “Vlad” and “Bob”
Now let’s imagine the main use cases and see what queries we need corresponding to each one:
1. We want to load the users that the “Vlad” user is following
For that, we have to use Two Steps Retrieval API. You can get it using cURL or open the URL in your browser. Make sure you replace the APP_ID, API_KEY and USER_ID values with your own.
https://api.backendless.com/{APP_ID}/{API_KEY}/data/Users/{USER_ID}/following
If you receive something like the following, you did everything right:
[
 {
   "lastLogin": null,
   "userStatus": "ENABLED",
   "socialAccount": "BACKENDLESS",
   "created": 1580471352087,
   "name": "Jack",
   "email": "jack@foo.com",
   "blUserLocale": "en",
   "updated": null,
   "objectId": "2B670962-5D90-9CB0-FF68-105D2786A400",
   "ownerId": "2B670962-5D90-9CB0-FF68-105D2786A400",
   "___class": "Users"
 },
 {
   "lastLogin": null,
   "userStatus": "ENABLED",
   "socialAccount": "BACKENDLESS",
   "created": 1580471354168,
   "name": "Bob",
   "email": "bob@foo.com",
   "blUserLocale": "en",
   "updated": null,
   "objectId": "B3877A0F-9355-2F7E-FF70-B6EA5F5D6600",
   "ownerId": "B3877A0F-9355-2F7E-FF70-B6EA5F5D6600",
   "___class": "Users"
 },
 {
   "lastLogin": null,
   "userStatus": "ENABLED",
   "socialAccount": "BACKENDLESS",
   "created": 1580471353792,
   "name": "Nick",
   "email": "nick@foo.com",
   "blUserLocale": "en",
   "updated": null,
   "objectId": "D9C8D53D-05C6-2727-FF27-9AC892515600",
   "ownerId": "D9C8D53D-05C6-2727-FF27-9AC892515600",
   "___class": "Users"
 }
]
2. We want to load users who are following the “Vlad” user
For that, we can use just a whereClause: following = 'VLAD_OBJECT_ID' query parameter. As with the previous case, you can run the following URL in your browser or using cURL in your terminal:
https://api.backendless.com/{APP_ID}/{API_KEY}/data/Users?where=following%20%3D%20'VLAD_OBJECT_ID'
Do you see the same result?
[
 {
   "lastLogin": null,
   "userStatus": "ENABLED",
   "socialAccount": "BACKENDLESS",
   "created": 1580471352087,
   "name": "Jack",
   "email": "jack@foo.com",
   "blUserLocale": "en",
   "updated": null,
   "objectId": "2B670962-5D90-9CB0-FF68-105D2786A400",
   "ownerId": "2B670962-5D90-9CB0-FF68-105D2786A400",
   "___class": "Users"
 },
 {
   "lastLogin": null,
   "userStatus": "ENABLED",
   "socialAccount": "BACKENDLESS",
   "created": 1580471353792,
   "name": "Nick",
   "email": "nick@foo.com",
   "blUserLocale": "en",
   "updated": null,
   "objectId": "D9C8D53D-05C6-2727-FF27-9AC892515600",
   "ownerId": "D9C8D53D-05C6-2727-FF27-9AC892515600",
   "___class": "Users"
 }
]
Let’s improve our Business Logic by adding another API Service (Users) and move these queries into that API Service.
class Users {

 /**
  * @param {String} userId
  * @description to load users what a specific user is following to
  * */
 async getFollowingUsers(userId) {
   const usersStore = Backendless.Data.of('Users');

   const relationsQuery = Backendless.LoadRelationsQueryBuilder.create()
     .setRelationName('following');

   const users = await usersStore.loadRelations(userId, relationsQuery);

   // here you can do anything with the users list

   return users
 }

 /**
  * @param {String} userId
  * @description to load users who are following to a specific user
  * */
 async getFollowedUsers(userId) {
   const usersStore = Backendless.Data.of('Users');

   const findQuery = Backendless.Data.QueryBuilder.create()
     .setWhereClause(`following = '${userId}'`);

   const users = await usersStore.find(findQuery);

   // here you can do anything with the users list

   return users
 }
}

Backendless.ServerCode.addService(Users);
Deploy it and try it out!
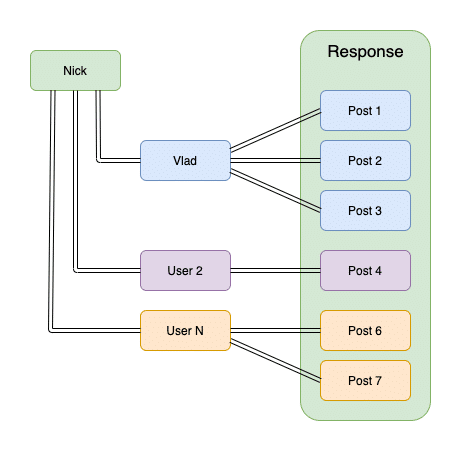
3. Load Posts of users that I’m following
One of the most powerful things that we are going to build is the ability to load posts of users we’re following. For instance: I’m Nick, and I’m following Vlad, who has three published posts, so how can I load only those three posts? The answer is – easy!
Let’s abstract the request a little:
Load Posts
Where “ownerId”
Is persisted in “following” column
of object with id “NICK_OBJECT_ID”
 So, let’s convert it into a Backendless whereClause:
ownerId in (Users[objectId='NICK_OBJECT_ID'].following.objectId)
The full URL will look like the following:
https://api.backendless.com/{APP_ID}/{API_KEY}/data/Posts?where=ownerId%20in%20(Users%5BobjectId%3D%27{NICK_OBJECT_ID}%27%5D.following.objectId)
Check this out by putting the URL into your browser and check the received result.
[
 {
   "title": "My First Post",
   "created": 1579193380620,
   "updated": null,
   "objectId": "1EA52BF4-F8FC-FEDA-FFB4-810B0EF36800",
   "ownerId": "98AAC6F2-D12F-E9F4-FF51-F722615A2D00",
   "content": "Hello World!",
   "___class": "Posts"
 },
 {
   "title": "The Third Post",
   "created": 1579198890849,
   "updated": null,
   "objectId": "AE38616C-5045-EDF3-FF9B-4296F542F700",
   "ownerId": "98AAC6F2-D12F-E9F4-FF51-F722615A2D00",
   "content": "I'm going to build an awesome application!",
   "___class": "Posts"
 },
 {
   "title": "The Second Post",
   "created": 1579198890848,
   "updated": null,
   "objectId": "F3971C63-7B50-56AC-FFE4-8ABC83150400",
   "ownerId": "98AAC6F2-D12F-E9F4-FF51-F722615A2D00",
   "content": "Hello everyone!",
   "___class": "Posts"
 }
]
Cool, isn’t it? Try to create a few new posts from different users and play with it.
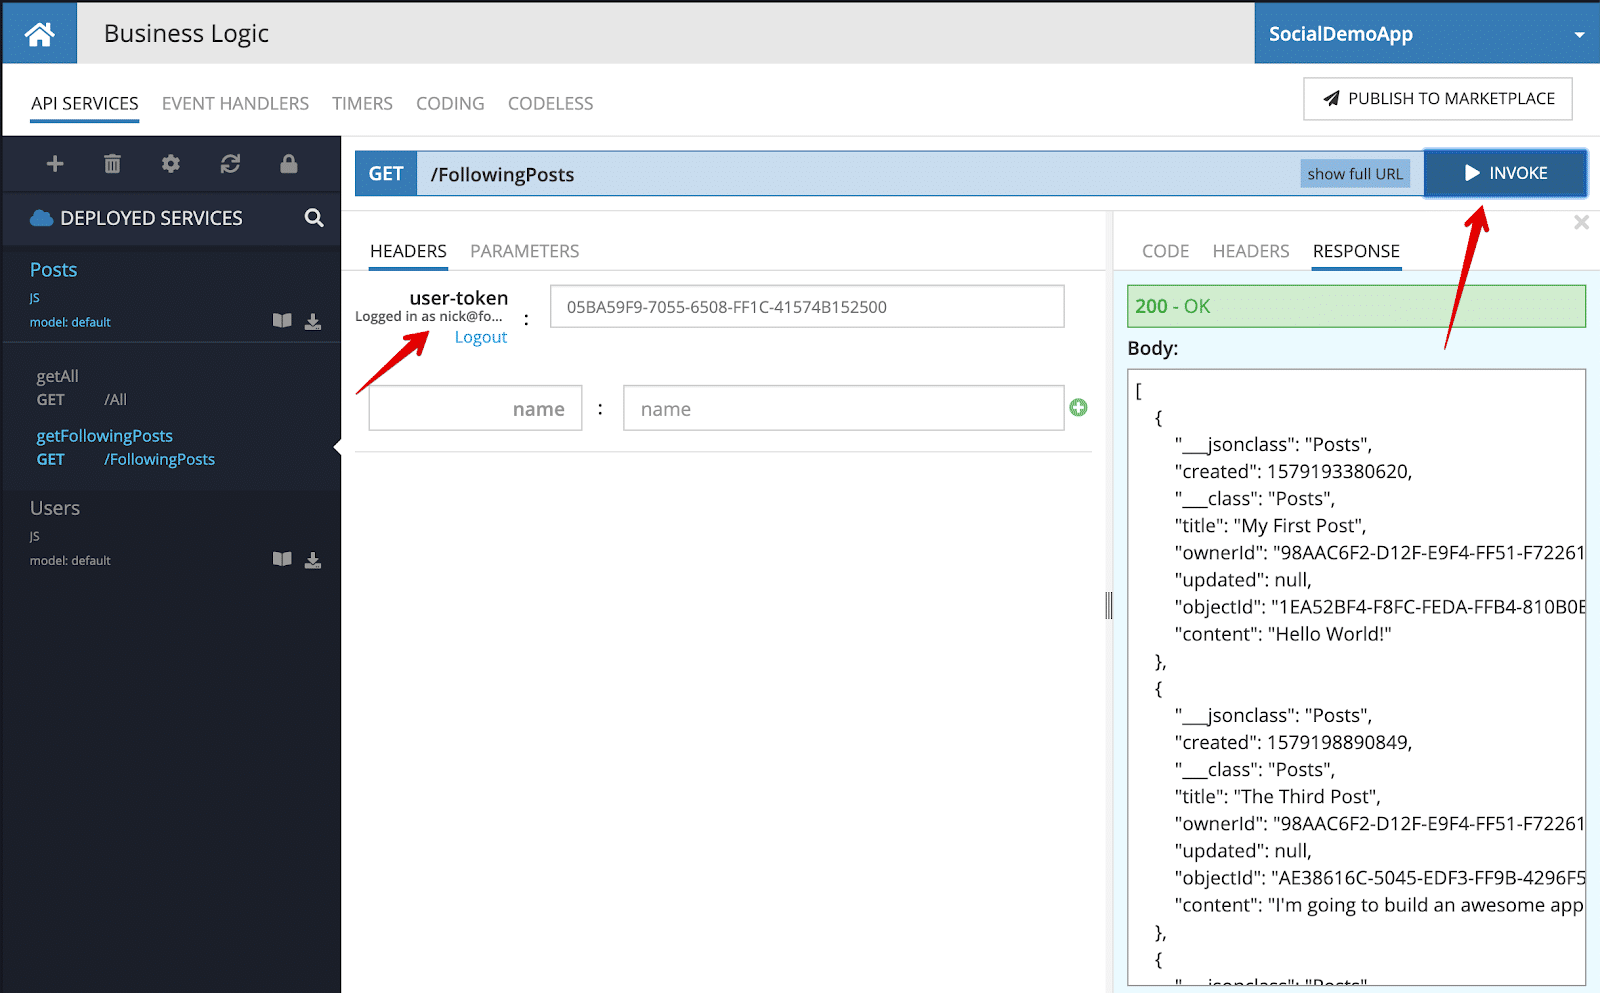
As you remember, we’ve got an API service Posts for retrieving posts. Let’s add a new method to load posts of users whom we are following. Here, we will use logged-in userID inside the API service instead of passing it as a query parameter.
Just add the following code into Posts API service:
async getFollowingPosts() {
 const currentUserId = this.request.context.userId;

 if (!currentUserId) {
   throw new Error('You must be logged in.')
 }

 const postsStore = Backendless.Data.of('Posts');

 const findQuery = Backendless.Data.QueryBuilder.create()
   .setWhereClause(`ownerId in (Users[objectId='${currentUserId}'].following.objectId)`);

 const posts = await postsStore.find(findQuery);

 // here you can do anything with the posts list

 return posts
}
Deploy and come back to the Invocation panel. As you can see in the code above, there is a conditional to check if the request comes from a logged-in user; if not, we throw an exception. Make sure before you run the API method that you are logged in. To be recognized as Nick inside the Business Logic, you can use the following credentials:
Identity: nick@foo.com
Password: 123456
It seems everything works properly.
Conclusion
Let’s stop here and summarize what we’ve done in this article. We learned how to get started building the backend of a Social Application, set up an initial data schema for Posts and Followers, and we practiced using specific queries for retrieving data relations and based on relationships, we loaded data from the parent table.
Also, we learned how to move complex data queries to the Business Logic side. In the next part, we will show how to implement a Likes and Comments system. We hope you enjoyed reading the article, and in case you have any questions, we will be glad to help you on our Support Forum.
To keep going with the project, check out Part 2 here and happy coding!
Goodjob Vladimir, this tutorial is just what I am looking for. Keep up the good work and I’ll try to follow! Looking forward to part 2 =]
Thank you, Robin! I’m happy to hear that you find it helpful. Btw, part 2 is already done, and it will be published soon!