Backendless Data Collection Tutorial for iOS (Updated)
In 2019, the BackendlessDataCollection class was added to Swift-SDK. This class conforms to the Collection protocol and allows you to retrieve and iterate over a collection of objects stored in a Backendless data table.
In this article, we are going to go step-by-step through the process of building an iOS app that utilizes the BackendlessDataCollection class.
In our previous article on this topic, we talked about the principles of how to use the “test” version of BackendlessDataCollection. However, our users have shown a lot of interest in this class so we’ve decided to make some changes that would make it easier to work with Backendless table data. We also made it possible to bind this data with iOS UI components.
Today, we’d like to tell you about the BackendlessDataCollection changes and show you how to use this class.
BackendlessDataCollection is a model of the Backendless table data that can be used as a data source for iOS/macOS collection-type views. It contains all necessary and familiar functions that you need:
add(newObject: Any)add(contentsOf: [Any])insert(newObject: Any, at: Int)insert(contentsOf: [Any], at: Int)remove(object: Any)remove(at: Int)removeAll(where shouldBeRemoved: (Identifiable) throws -> Bool)removeAll()makeIterator()sort(by: (Identifiable, Identifiable)
BackendlessDataCollection can be initialized in two ways:
init(entityType: AnyClass) |
All data from the Backendless remote table will be retrieved using pagination |
init(entityType: AnyClass, queryBuilder: DataQueryBuilder) |
All data from the Backendless remote table, corresponding to the specified queryBuilder parameters, will be retrieved using pagination |
Now let’s take a look at how to work with BackendlessDataCollection using its binding to the UITableView component as an example.
BackendlessDataCollection Project Storyboard Setup
First, open Xcode and create an iOS Single View App project. Next, close Xcode, open the Terminal, move to the root of the created folder and create a podfile:
pod init
Open the created podfile and update it:
target 'BackendlessDataCollectionSample' do

  use_frameworks!
  pod 'BackendlessSwift'

end
Save it and run this command to install all necessary dependencies:
pod install / pod update
After all the preparations are made, we can return to our project. Open the created xcworkspace file.
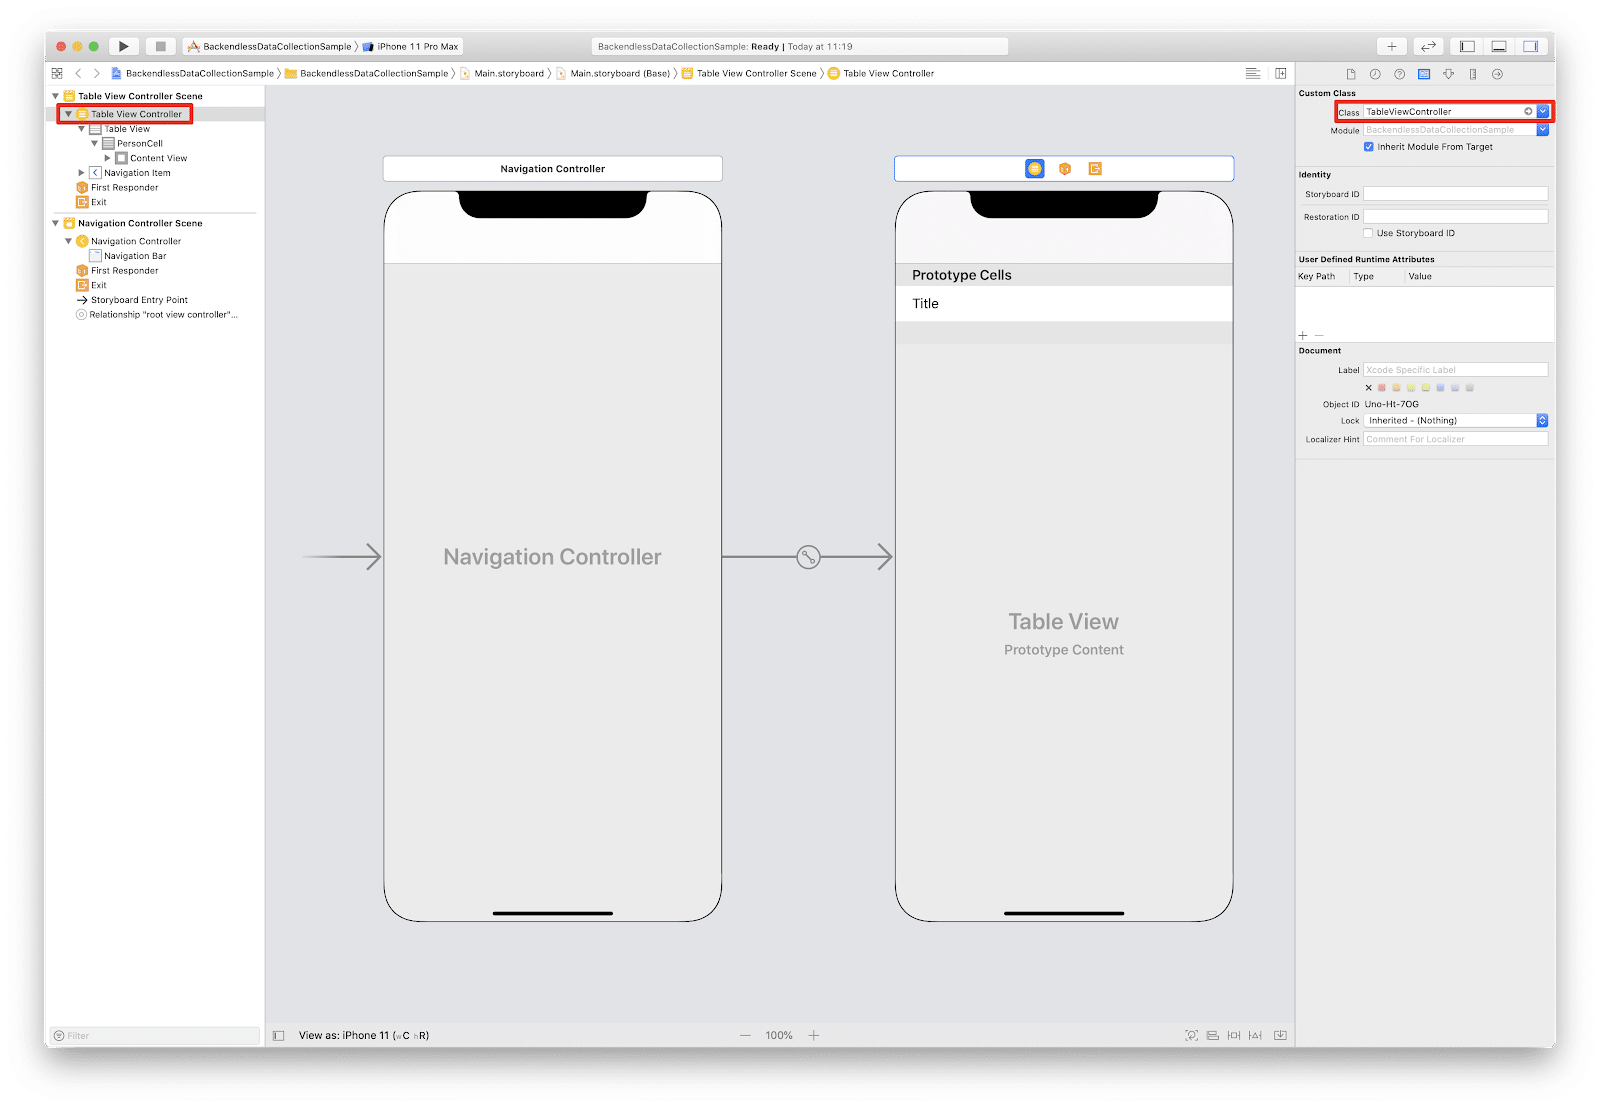
Now we should remove the ViewController.swift file from our project and View Controller Scene from Main.storyboard and add the new TableViewController.swift class and Table View Controller Scene instead.
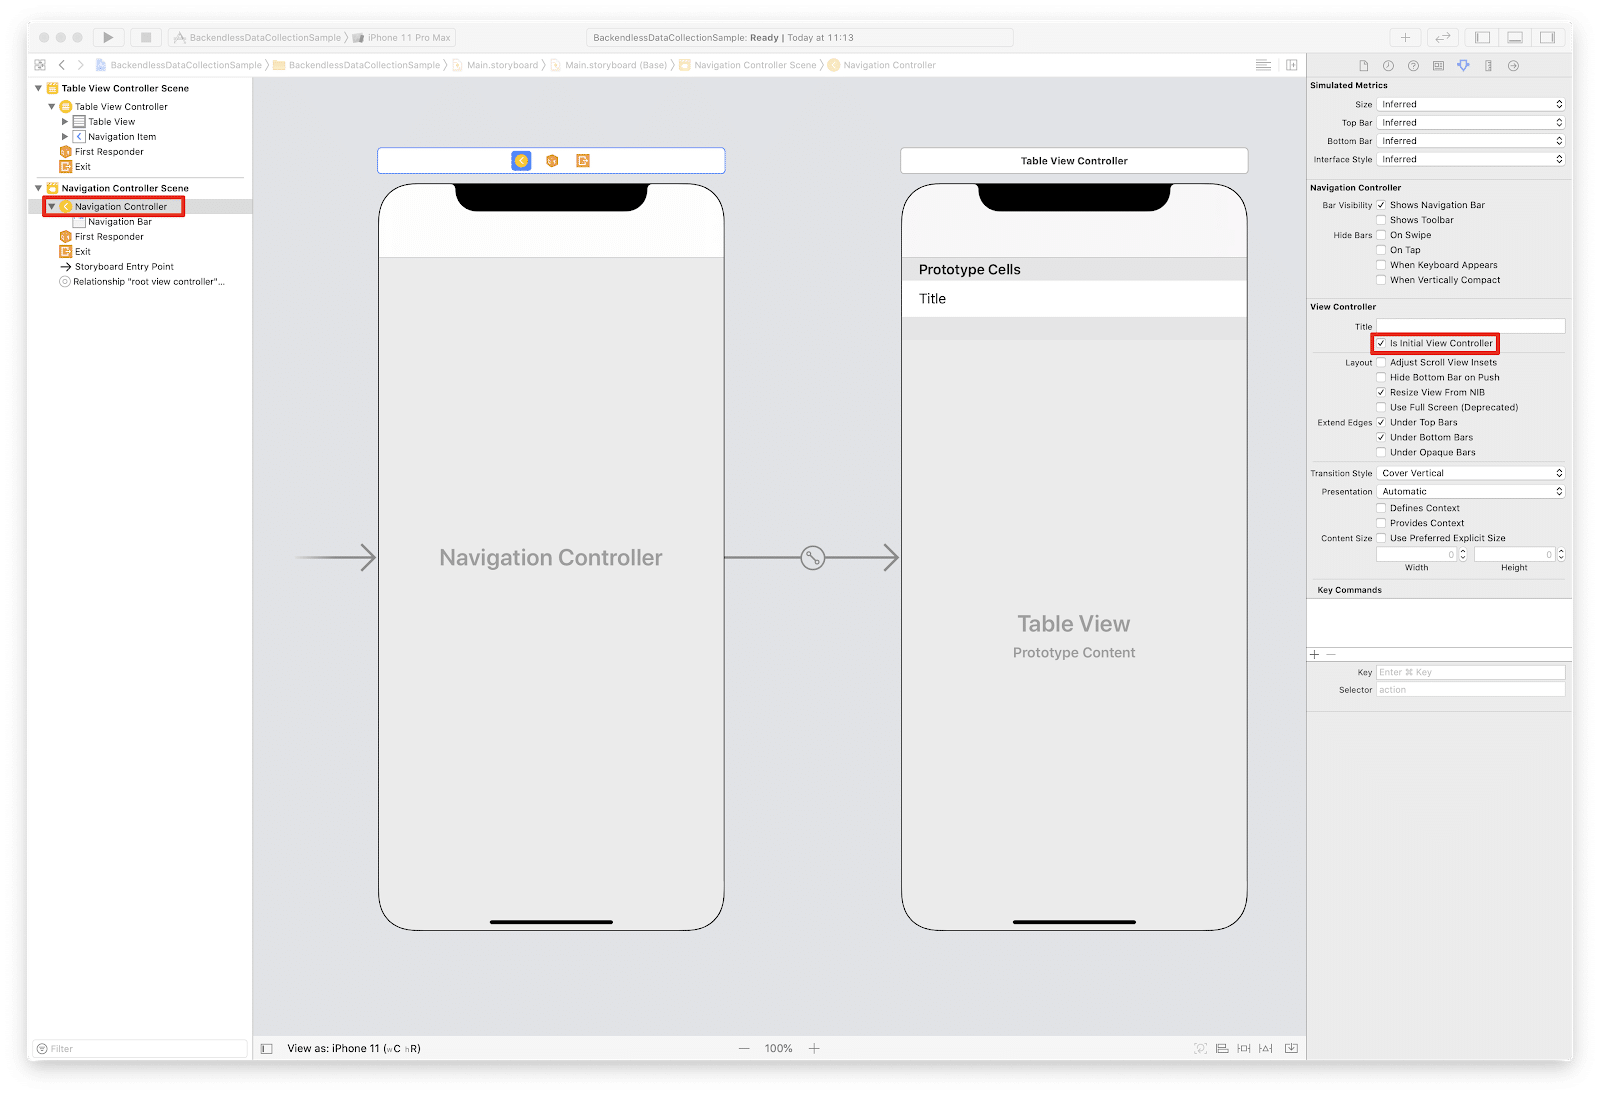
Wrap the Table View Controller Scene into the Navigation Controller (Editor – Embed in – Navigation Controller) and set it as the Initial View Controller.
 Let’s bind the
 TableViewController.swift class to the Table View Controller Scene.
 Select the
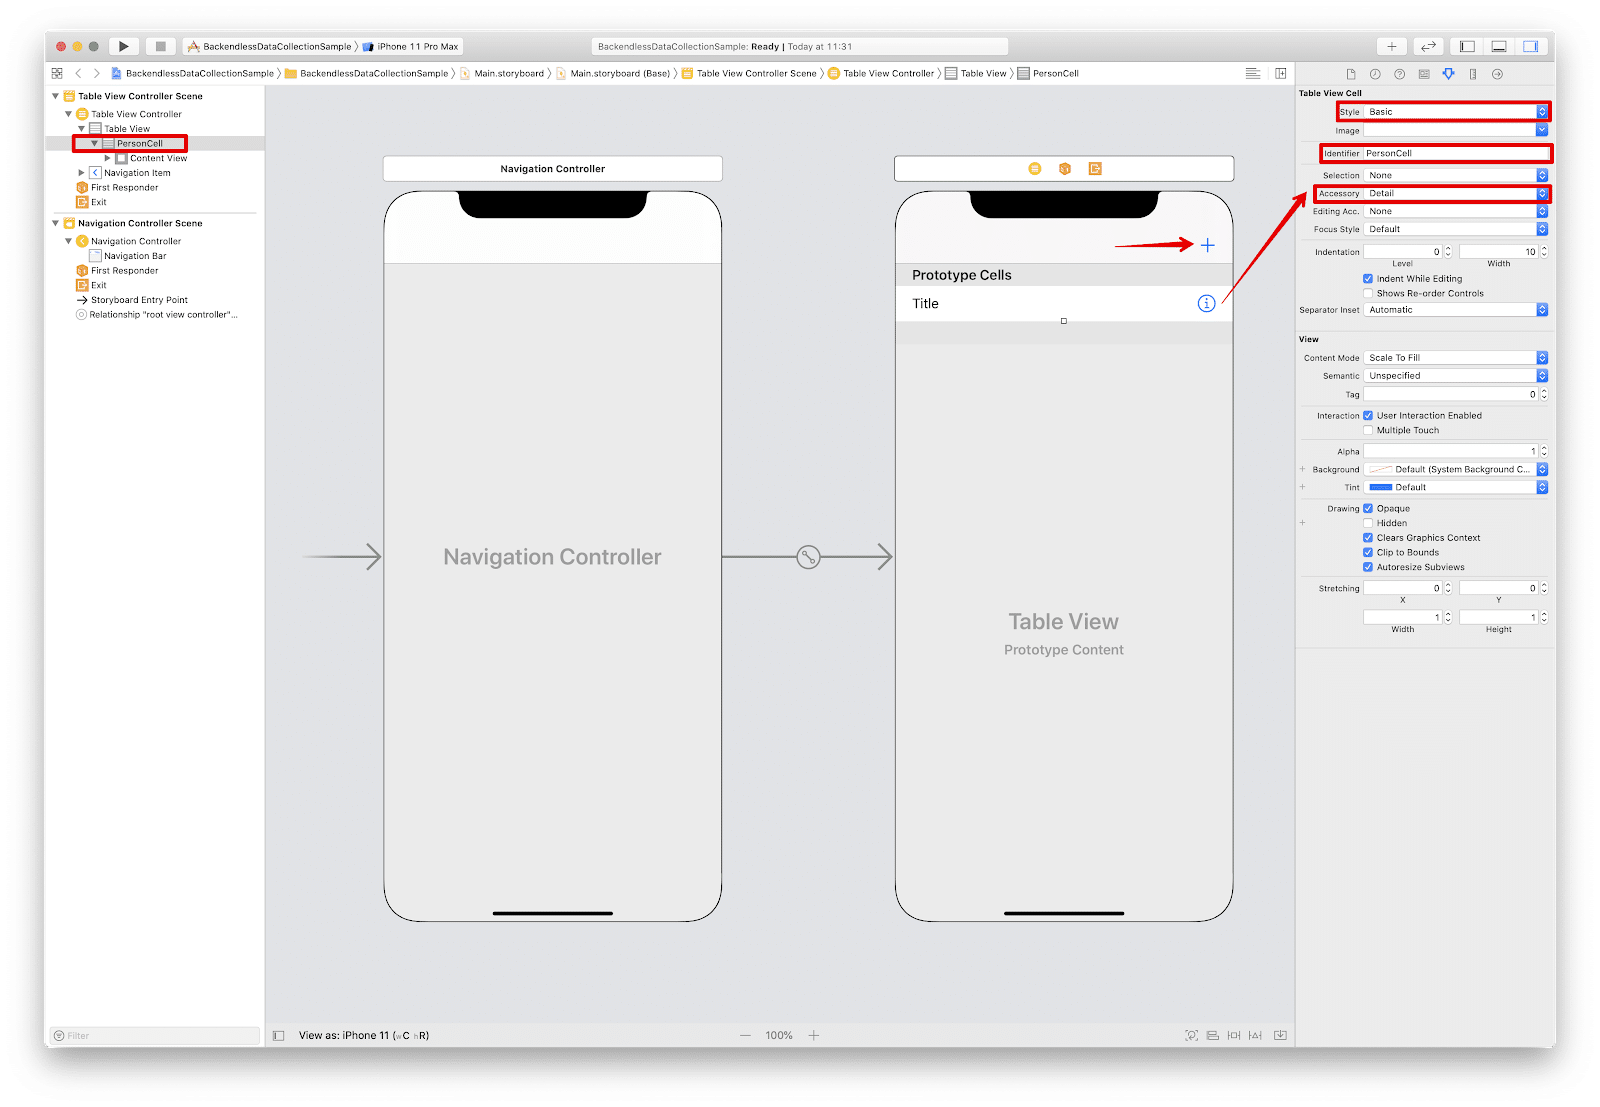
 tableView cell, set its style to Basic, its identifier to “PersonCell” and its Accessory to Detail.
 Add a Bar Button Item with system type “
Add” for creating a new record. This button needs an action, so we need to bind it to the @IBAction func pressedAdd(_ sender: Any).
Coding The Project
We’re done with Main.storyboard, so let’s start coding!
First things first, Backendless must be initialized with your Application Id and API Key. Open the AppDelegate.swift class and the Backendless initialization function:
import UIKit
import Backendless

@UIApplicationMain
class AppDelegate: UIResponder, UIApplicationDelegate {

    var window: UIWindow?

    private let HOST_URL = "https://api.backendless.com"
    private let APP_ID = "YOUR_APP_ID"
    private let API_KEY = "YOUR_APP_IOS_API_KEY"

    func initBackendless() {
        Backendless.shared.hostUrl = HOST_URL
        Backendless.shared.initApp(applicationId: APP_ID, apiKey: API_KEY)
        return
    }

    func application(_ application: UIApplication, didFinishLaunchingWithOptions launchOptions: [UIApplication.LaunchOptionsKey: Any]?) -> Bool {
        initBackendless()
        return true
    }
}
Now, we can move to BackendlessDataCollection. It will be connected to the remote Person table, so let’s create the corresponding Person.swift class.
import Backendless

@objcMembers class Person: NSObject, Identifiable {
    var objectId: String?
    var name: String?
}
As you may have noticed, the Person class conforms to the Identifiable protocol – this means the BackendlessDataCollection elements must have the objectId property with the type String. Even though BackendlessDataCollection provides the ability to iterate over it, data from the server comes in an unindexed form and the first object of our collection most likely won’t correspond to the first object in the remote database table.
So, we have Backendless initialized, the type of objects we will work with, and a tableView to display those objects. It’s time to deal with logic.
Open the TableViewController.swift file. Add:
import Backendless
The BackendlessDataCollection entity can handle only objects of one type – Person in our case.
Please, make sure your Backendless application contains the Person table with the “name” column of type String before initializing a collection.
private var people: BackendlessDataCollection?

private func setupBackendlessCollection() {
    let queryBuilder = DataQueryBuilder()
    queryBuilder.setPageSize(pageSize: 100)
    queryBuilder.setSortBy(sortBy: ["name"])
    people = BackendlessDataCollection(entityType: Person.self, queryBuilder: queryBuilder)
    DispatchQueue.main.async {
        self.tableView.reloadData()
    }
}
In the setupBackendlessCollection() function, we fill a collection with objects of type Person sorted by name with pageSize = 100.
Since the people collection is the data source for tableView, we should override the necessary tableView functions:
override func tableView(_ tableView: UITableView, numberOfRowsInSection section: Int) -> Int {
    return people?.count ?? 0
}
override func tableView(_ tableView: UITableView, cellForRowAt indexPath: IndexPath) -> UITableViewCell {
    let cell = tableView.dequeueReusableCell(withIdentifier: "PersonCell", for: indexPath)
    if let person = people?[indexPath.row] as? Person {
        cell.textLabel?.text = "\(person.name ?? "NoName")"
    }
    return cell
}
Creating, Updating and Deleting Objects
Since BackendlessDataCollection supports object creating, updating and deleting, we can add this functionality to our app.
Adding (Creating) Objects
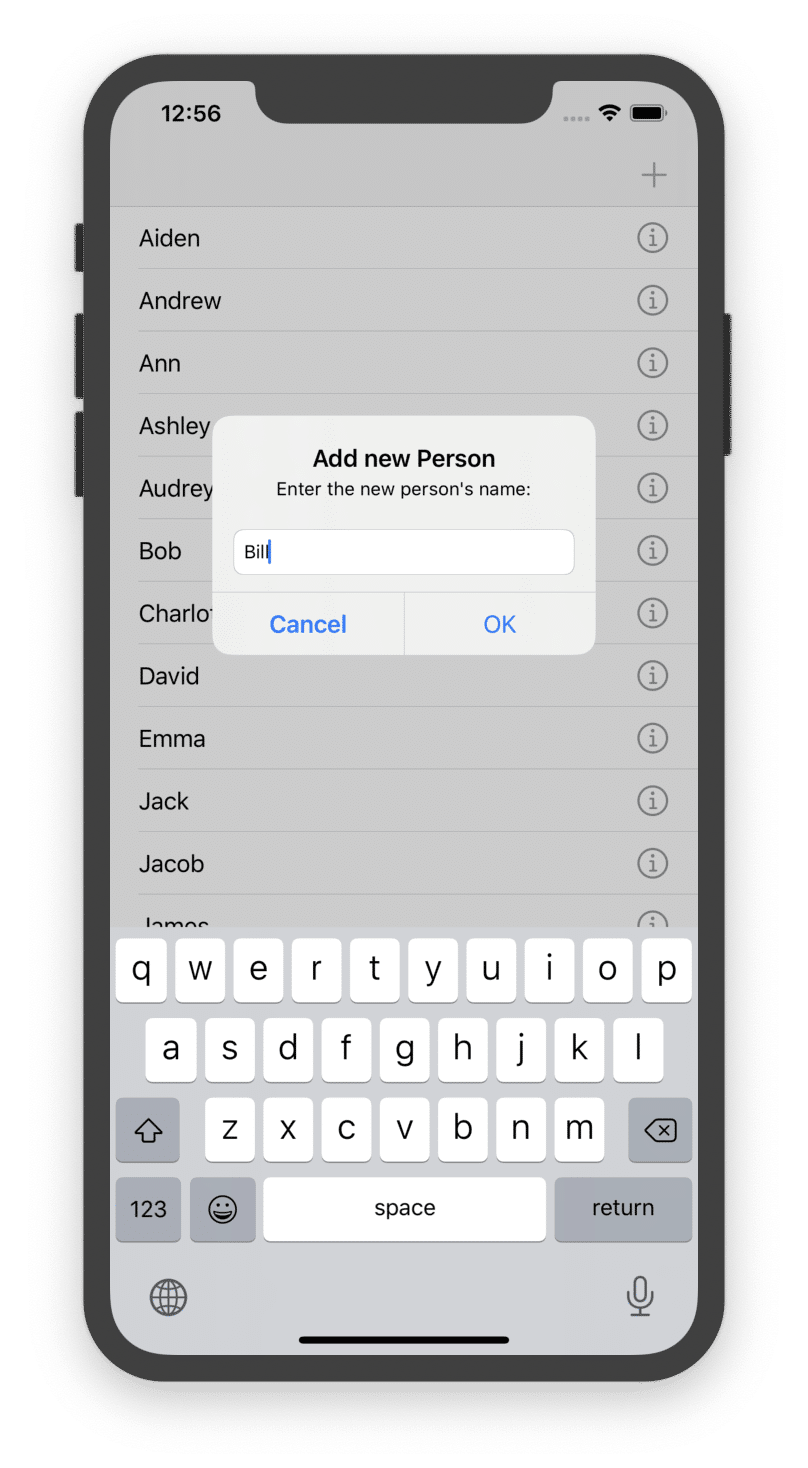
Let’s define the Add button action:
@IBAction func pressedAdd(_ sender: Any) {
    let alert = UIAlertController(title: "Add new Person", message: "Enter the new person's name:", preferredStyle: .alert)
    alert.addTextField {
        textField in textField.placeholder = "name"
    }
    alert.addAction(UIAlertAction(title: "OK", style: .default, handler: { [weak alert] _ in
        guard let nameField = alert?.textFields?[0] else {
            return
        }
        let person = Person()
        person.name = nameField.text
        self.people?.add(newObject: person)
        self.tableView.reloadData()
    }))
    alert.addAction(UIAlertAction(title: "Cancel", style: .cancel, handler: nil))
    self.present(alert, animated: true, completion: nil)
}
When the user presses the Add button, the UIAlertController appears. This alert view has a field to enter a new Person object’s name. After the OK button is pressed, a new Person object is added to the people collection and tableView‘s data is reloaded to display a newly created object. Very simple, isn’t it?
Updating Objects
Now let’s take a look at updating an object in the people collection.
Previously, we added the Detail Accessory to the tableView cells for this – every time the user presses on the Detail button, the UIAlertController appears. This alert view has a field to enter a new name for the existing Person object. After the OK button is pressed, the selected Person object is updated in the people collection and the appropriate tableView‘s row is reloaded to display these updates.
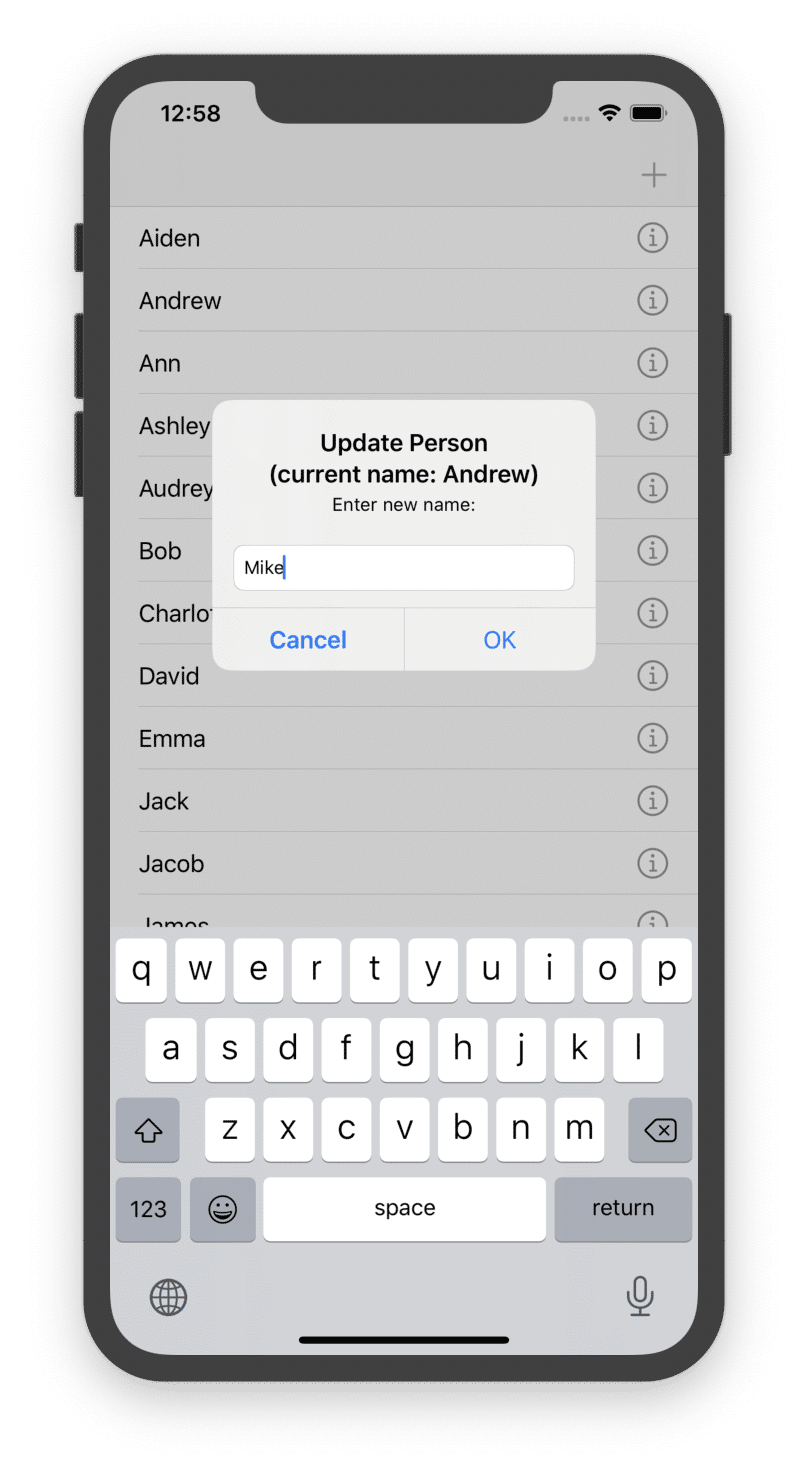
We can handle the accessory button tap by overriding the tableView(_ tableView: UITableView, accessoryButtonTappedForRowWith indexPath: IndexPath) function:
override func tableView(_ tableView: UITableView, accessoryButtonTappedForRowWith indexPath: IndexPath) {
    guard let person = people?[indexPath.row] as? Person else {
        return
    }
    let alert = UIAlertController(title: "Update Person \n(current name: \(person.name ?? "NoName"))", message: "Enter new name:", preferredStyle: .alert)
    alert.addTextField {
        textField in textField.placeholder = "name"
    }
    alert.addAction(UIAlertAction(title: "OK", style: .default, handler: { [weak alert] _ in
        guard let nameField = alert?.textFields?[0] else { return }
        person.name = nameField.text
        self.tableView.reloadRows(at: [indexPath], with: .automatic)
    }))
    alert.addAction(UIAlertAction(title: "Cancel", style: .cancel, handler: nil))
    self.present(alert, animated: true, completion: nil)
}
Deleting Objects
Now let’s move to deleting. An object can be removed by standard left swipe gesture.
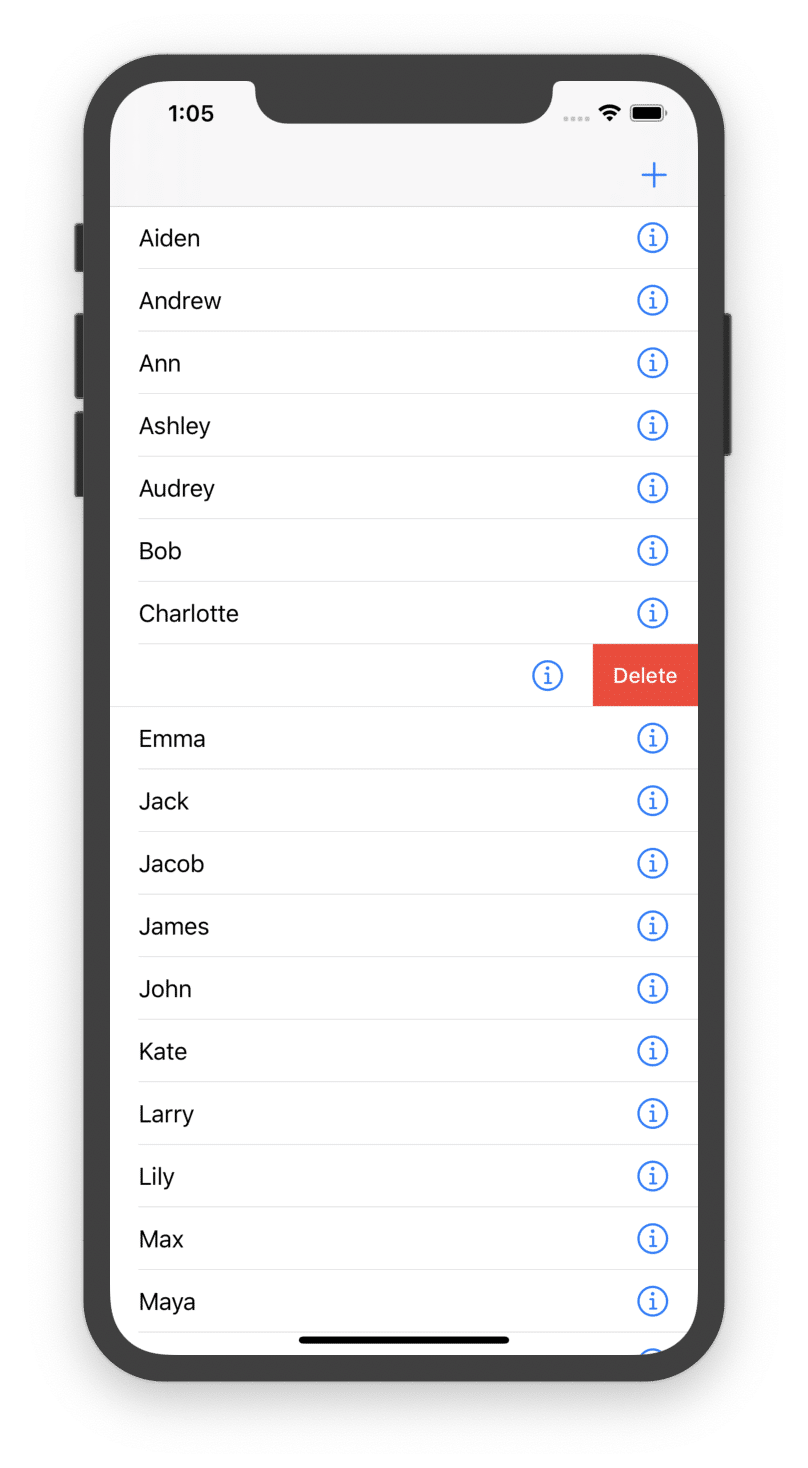
This gesture’s handler is described below:
override func tableView(_ tableView: UITableView, commit editingStyle: UITableViewCell.EditingStyle, forRowAt indexPath: IndexPath) {
    if editingStyle == .delete {
        let _ = people?.remove(at: indexPath.row)
        self.tableView.reloadData()
    }
}
This doesn’t look complicated, does it?
The entire TableViewController.swift class is shown below:
import UIKit
import Backendless

class TableViewController: UITableViewController {

    private var people: BackendlessDataCollection?

    override func viewDidLoad() {
        super.viewDidLoad()
    }

    override func viewDidAppear(_ animated: Bool) {
        super.viewDidAppear(animated)
        DispatchQueue.global().async {
            self.setupBackendlessCollection()
        }
    }

    override func tableView(_ tableView: UITableView, numberOfRowsInSection section: Int) -> Int {
        return people?.count ?? 0
    }

    override func tableView(_ tableView: UITableView, cellForRowAt indexPath: IndexPath) -> UITableViewCell {
        let cell = tableView.dequeueReusableCell(withIdentifier: "PersonCell", for: indexPath)
        if let person = people?[indexPath.row] as? Person {
            cell.textLabel?.text = "\(person.name ?? "NoName")"
        }
        return cell
    }

    override func tableView(_ tableView: UITableView, commit editingStyle: UITableViewCell.EditingStyle, forRowAt indexPath: IndexPath) {
        if editingStyle == .delete {
            let _ = people?.remove(at: indexPath.row)
            self.tableView.reloadData()
        }
    }

    private func setupBackendlessCollection() {
        let queryBuilder = DataQueryBuilder()
        queryBuilder.setPageSize(pageSize: 100)
        queryBuilder.setSortBy(sortBy: ["name"])
        people = BackendlessDataCollection(entityType: Person.self, queryBuilder: queryBuilder)
        DispatchQueue.main.async {
            self.tableView.reloadData()
        }
    }

    @IBAction func pressedAdd(_ sender: Any) {
        let alert = UIAlertController(title: "Add new Person", message: "Enter the new person's name:", preferredStyle: .alert)
        alert.addTextField {
            textField in textField.placeholder = "name"
        }
        alert.addAction(UIAlertAction(title: "OK", style: .default, handler: { [weak alert] _ in
            guard let nameField = alert?.textFields?[0] else {
                return
            }
            let person = Person()
            person.name = nameField.text
            self.people?.add(newObject: person)
            self.tableView.reloadData()
        }))
        alert.addAction(UIAlertAction(title: "Cancel", style: .cancel, handler: nil))
        self.present(alert, animated: true, completion: nil)
    }

    override func tableView(_ tableView: UITableView, accessoryButtonTappedForRowWith indexPath: IndexPath) {
        guard let person = people?[indexPath.row] as? Person else {
            return
        }
        let alert = UIAlertController(title: "Update Person \n(current name: \(person.name ?? "NoName"))", message: "Enter new name:", preferredStyle: .alert)
        alert.addTextField {
            textField in textField.placeholder = "name"
        }
        alert.addAction(UIAlertAction(title: "OK", style: .default, handler: { [weak alert] _ in
            guard let nameField = alert?.textFields?[0] else { return }
            person.name = nameField.text
            self.tableView.reloadRows(at: [indexPath], with: .automatic)
        }))
        alert.addAction(UIAlertAction(title: "Cancel", style: .cancel, handler: nil))
        self.present(alert, animated: true, completion: nil)
    }
}
At this point, we have a working iOS application that uses the BackendlessDataCollection class to retrieve data from the remote Backendless database and display it using tableView binding.
And what about synchronization, you may ask? As we’ve already discussed, the BackendlessDataCollection class is a model of the remote table data.
At this time, we’ve decided not to add the built-in server synchronization. A synchronization process requires some resources (and API calls). We’ve decided to simplify this task – users can synchronize the BackendlessDataCollection data only when necessary using the API we provide in the Swift-SDK.
You can find the completed project on GitHub here.
Thank you for reading and Happy Coding!
Can you provide this tutorial in SwiftUI?
Hello Steve,
I’ve added it to my roadmap for the nearest future.