How to Setup Push Notifications In a React Native App (Android)

In this article, we will demonstrate React Native push notification setup for Android. With Backendless, once set up, push notifications can easily be sent cross-platform to any device with your React Native app.
For iOS push notification setup for React Native, you can read our article here: How to Enable Push Notifications Using Backendless in a React Native App (iOS).
React Native is a framework for building a native mobile application using JavaScript (for more information about React Native, you can check out the documentation on Github here). A React Native app can be cross-platform, deployed as both iOS and Android apps. Backendless enables you to send React Native push notifications to both platforms simultaneously.
React Native push notifications can be sent using our push notification service APIs or from Backendless Console.
The Backendless JavaScript SDK (JS-SDK) already has full compatibility with React Native – just install it from NPM, require in your code, and go.
Since the release of Backendless 5.2.x, having only the JS-SDK is not enough to access all the Backendless features; in some cases, we need to have access to native modules for working with certain features such as push notifications.
We’ve therefore decided to create another module on JS specifically for use in a React Native environment. It’s a patch of sorts for the JS-SDK. In this article series, we’re going to show you how to use this additional JS module. There are will be a total of 3 articles:
- How to enable Push Notifications using Backendless in a React Native App (Android)
- How to enable Push Notifications using Backendless in a React Native App (iOS)
- How to customize Push Notifications using Backendless
Today, we get started with creating a simple Android application with React Native for receiving push notifications. Alright, let’s do it.
Setup Backendless
Login to Backendless Console. If you do not have a developer account, you can register for free at develop.backendless.com/registration.

Create a new Backendless application. For this walk-through, we called the app RNPushDemo.
Install React Native
As I mentioned earlier, our app will be built on React Native, so let’s install React Native as described in the documentation here. Make sure you selected the “Building Projects with Native Code” tab and “Android” as well, because in this article we are going to create an Android application.

Create Application
Next, we are going to generate our application using React Native CLI. Just run the following command in your terminal:
react-native init RNPushDemo
It may take a few minutes to run. Once it’s done, you can run the app. I use real devices for testing, but you can run on an emulator if you have one. Otherwise, you need to create a new one. The following link will help you if have any problems with running.
Go into the directory with your application and run the app.
cd ./RNPushDemo
react-native run-android
It builds your app and also runs the Metro Bundle process.

When it’s done, you will see the next screen on your device/emulator:

If it works, that means you are on the right track. In the event you don’t see the above screen, you should go through the previous steps and make sure that you followed all of the instructions.
Setup Backendless JS-SDK
Now we are going to install the Backendless JS-SDK. Run the following command in your terminal from your app’s directory:
npm i backendless -S
Now we need to initialize Backendless in our app. To initialize, we have to get the Backendless App Id and API Key. You can find these in Backendless Console on the Dashboard or on the App Setting page. As you know, we’re developing an Android application, so for “apiKey” we should use AndroidApiKey instead of JSApiKey. The JSApiKey will work, but we want to be sure that we see separate data for Android, iOS and Web applications in Backendless Analytics.

Insert the following code into “./App.js” file, but only use your AppId and ApiKey, not mine! =)
import Backendless from 'backendless'
const APP_ID = '54AED425-5613-CDD4-FFB3-F3443977XXXX';
const APP_KEY = 'D82A3D3B-4B7C-242B-FF2A-5D7987E5XXXX';
Backendless.initApp(APP_ID, APP_KEY);
That’s it! We will come back to JS-SDK a little bit later.
Setup Firebase Messaging
In order to get push notifications working in Android applications, you should use Google Cloud Messaging (GCM) or Firebase Cloud Messaging (FCM). GCM is deprecated and the API will be removed in April 2019, so in our app, we will use FCM.
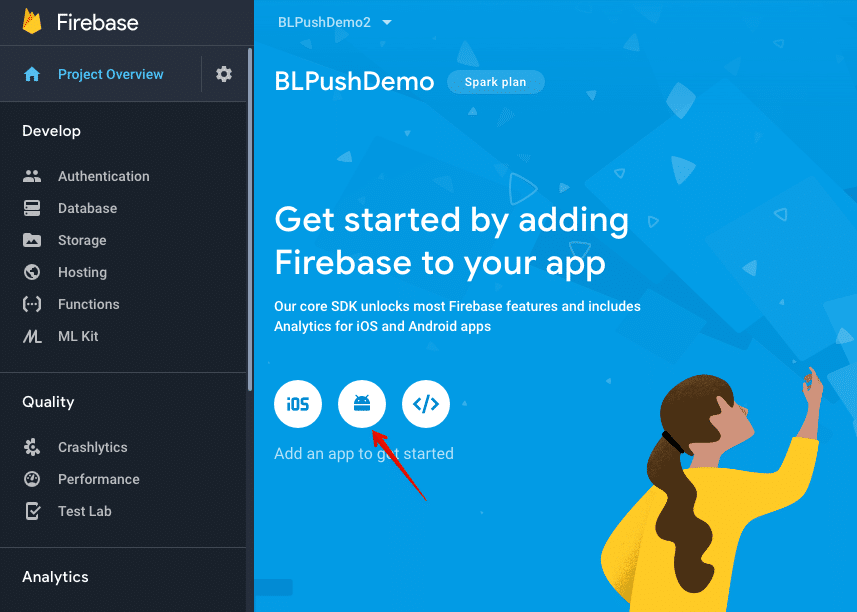
- First, you have to create a new Firebase App.
- Next, configure your app for Android. For that, just click the “Android” icon as shown in the screenshot:
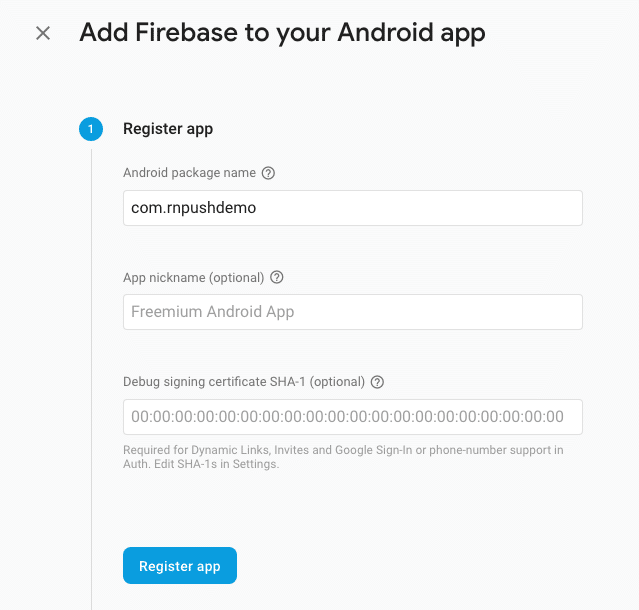
- Then, input your “Android package name”; in my case, it’s “com.rnpushdemo”. If your app name is different than mine, you can find the package name in the manifest file by the path: /{YOUR_APP_NAME}/android/app/src/main/AndroidManifest.xml
- Next, you need to download the generated “google-services.json” file and put it into your project at the following path: /{YOUR_APP_NAME}/android/app/google-services.json
- Now, add two lines as shown in the screenshot:
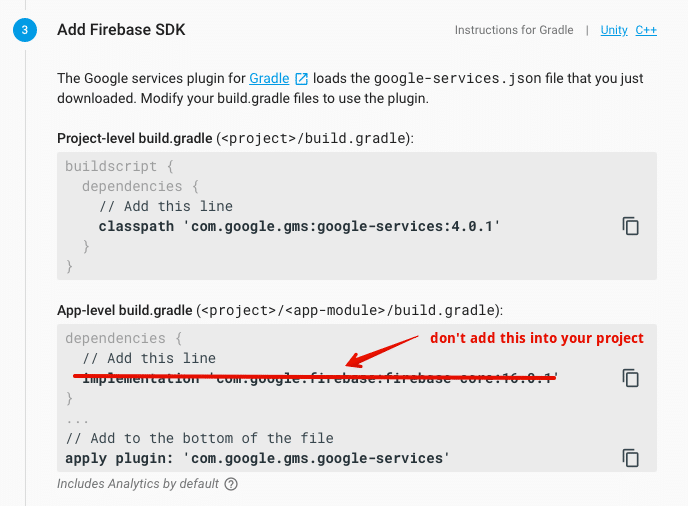
Note: the line implementation ‘com.google.firebase:firebase-core:16.0.1’ is unnecessary. - The last step you can skip for now.


In the end, you should have two modified files and one new file; make sure you have the same as me:

Now, we need to copy “Server key” from our Firebase app:

Paste the key into Backendless. You can specify channels/patterns, but for this demo, we will just select all channels.

Click “Save” and that’s it.
Setup Backendless JS-SDK Patch for React Native
The patch for the Backendless JS-SDK that we mentioned at the beginning of the article simply upgrades some methods of the SDK and, of course, also includes native implementation.
Run the following command in your terminal from your app’s directory:
npm i backendless-react-native -S
Also, inject native modules with this command:
react-native link
And import the patch right after importing Backendless JS-SDK line in the “./App.js” file:
import 'backendless-react-native'
Also, we have to increase “minSdkVersion” from 16 to 21 in /{YOUR_PROJECT_NAME}/android/build.gradle.
Finally, change the /{YOUR_PROJECT_NAME}/android/app/src/main/AndroidManifest.xml file a little bit. Add the following code right after the “com.facebook.react.devsupport.DevSettingsActivity” activity:
<receiver android:name="com.reactlibrary.RNBackendlessPushNotificationActionReceiver"/>
<service android:name="com.reactlibrary.RNBackendlessPushNotificationService">
  <intent-filter>
      <action android:name="com.google.firebase.MESSAGING_EVENT"/>
  </intent-filter>
</service>
A few explanations for why those lines are needed:
- com.reactlibrary.RNBackendlessPushNotificationService – we need this for receiving and processing push notifications and also delivering the information to JS Code.
- com.reactlibrary.RNBackendlessPushNotificationActionReceiver – we need this for processing push notification actions and delivery of the information to JS Code.
Time for a test. Let’s check if everything is still working properly. Run the following command in your terminal and check your device or emulator:
react-native run-android
Note: In the event that you see a red alert on your device, just stop Metro Bundler process and run the previous code again.
Register Device for Push Notifications
In order for Backendless to be able to deliver push notifications to the device, we need to register it. Of course, the device should be registered when the app is installed on the device, but we have a demo app so we’ll just register the device in the App constructor. To do so, add the following code to the “./App.js” file:
constructor(props) {
super(props);
Backendless.Messaging.registerDevice(['default'])
  .then(r => console.log('registerDevice:', r))
  .catch(e => console.log('registerDevice:', e));
}
Let’s check using the JS Remote Debugger. To do this, you need to shake your real device or press the menu button on the emulator to open the Dev Menu.

Press “Debug JS Remotely”. This will open a new browser page. Open the Browser Dev Console.

As you can see, there is a message stating “registerDevice”; that means that our device is registered on the server. Let’s go verify it on the Backendless Dev Console. Go to Data and select the “DeviceRegistration” table.

Yep, my device is there.
Send Push Notifications to Your React Native Android App
Now we would like to share a new feature of Backendless: it’s called Push Notification Templates. You can create a Push Notification template in just a few clicks, save it, and send it using Backendless Dev Console or Backendless API in one line. There are lots of custom configurations for the Android and iOS operating systems. This feature will be covered in more detail in another article.
For now, I’m going to create a simple push template without any extra configuration. Go to Messaging -> Push Notifications and compose a new push template. Fill out the Message, Title, and Subtitle fields:

On the right side, you can see an emulator where you can see how your push notification will look on the chosen device type.
Now, just skip WHO and OPTIONS sections and switch to SAVE. Input a template name and click the Save button.

Now we are ready to send and get our push notification on the device. Just click the Send Now button and wait a few seconds.
Here we go, I got it! Amazing, isn’t it?

Now, let’s create a new API Service and try to send a new push notification with the template. I’m going to use Codeless as, for me, it is very easy to create and use.

As you can see, it can’t be much simpler: only one line of code. Alright, let’s deploy the service and go send it.

Yes, it came! I didn’t capture a screenshot with the new push because it’s just the same as it was before when we sent from the Push Notifications Page.
Get Push Notifications in JS Code
Let’s look at another equally important feature. In many cases, you want to get a notification in JavaScript Code when a new push notification is coming, so we have an interface to do just that. There are two methods for subscribing and unsubscribing:
- Backendless.Messaging.addPushNotificationListener(callback)
- Backendless.Messaging.removePushNotificationListener(callback)
So let’s modify our App.js file a bit. Just add a few methods into the App class:
componentDidMount() {
Backendless.Messaging.addPushNotificationListener(this.onNotification);
}
componentWillUnmount() {
Backendless.Messaging.removePushNotificationListener(this.onNotification);
}
onNotification = notification => {
console.log('notification', notification)
};
Reload our app, send a new push notification and take a look in Browser Dev Console.

Looks like it works. Now you can run any logic in JS Code when a new push notification is received. Sounds cool, doesn’t it?
Conclusion
We hope this will help you implement push notifications into your own React Native app. Step-by-step, we created a native Android application and walked through how to enable push notifications. Also, we met a new Backendless feature – Push Notification Templates.
In the second article of the series, we show you how to enable React Native push notifications as iOS notifications. We will improve the application that we built today because there weren’t a lot of changes; we already have almost all that we need.
Thanks for reading, I hope you enjoyed it. Happy Building!
Thanks for sharing the great information on react-native push notifications. I appreciate your blog.