Integrating Push Notifications into a Dropsource Project
Dropsource is an online platform for developing Android and iOS applications without coding. The platform also lets you download the source code for your app so you can make changes and subsequently publish into the app store (note: downloading the source code is a paid feature). If you’re looking to add support for push notifications to your Dropsource apps, Backendless fits right in with relatively simple integration. When you add Backendless push notifications, you can instantly benefit from the following features:
- Personalized push notification content – each recipient of your push notifications can see customized content.
- Programmable action buttons with support for inline replies.
- Customizable images and icons in the payload and rendering of push notifications.
- Automatic push notification cancellation – self-destructed notifications.
- Dynamic audience targeting – the audience of the published notifications can be customized with a query.
The video below includes a demonstration of an Android Dropsource app integrated with Backendless Push Notifications, followed by a detailed overview of the actual integration process. The integration instructions are outlined in detail in this post following the video.
Integration Instructions
- Download the source code for your Dropsource app and open the project in Android studio.
- Make sure you can build the project. If the build process results in the following error:
Configuration on demand is not supported by the current version of the Android Gradle plugin
since you are using Gradle version 4.6 or above. Suggestion: disable configuration on demand
by setting org.gradle.configureondemand=false in your gradle.properties file or use a Gradle
version less than 4.6.
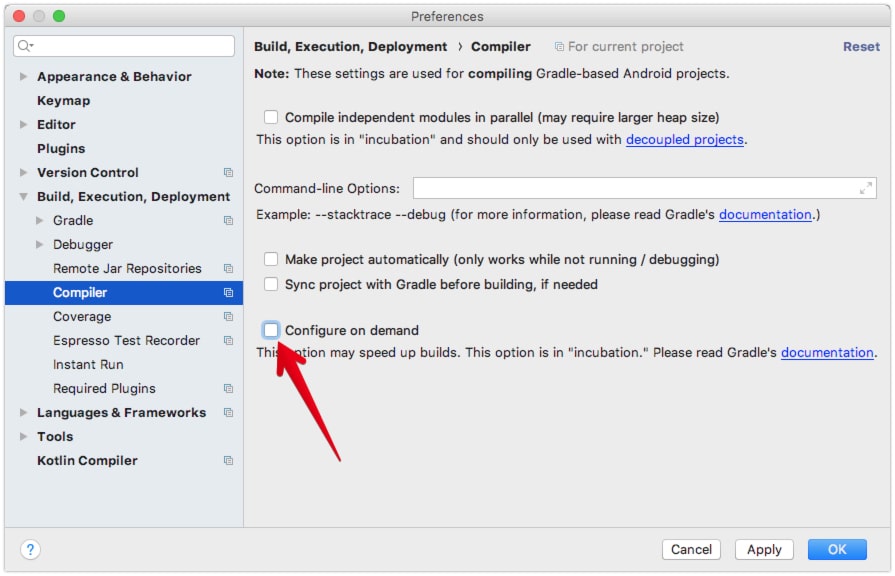
Navigate to the Android Studio properties, select Build, Execution, Deployment, then Compiler. Disable the Configure on demand option:
- Add Firebase to your project. This is required to enable FCM (Firebase Cloud Messaging), a service by Google which delivers push notifications to Android apps. Check the video for instructions (starting at 12:01). Most importantly, this step includes:
- Adding google-services.json to the /app directory of your project
- Adding the following two dependencies into the dependencies element of /app/build.gradle:
implementation 'com.google.firebase:firebase-core:16.0.5'
implementation 'com.google.firebase:firebase-messaging:17.3.4'
- Adding the following two lines at the bottom of /app/build.gradle:
apply plugin: 'com.google.gms.google-services'
com.google.gms.googleservices.GoogleServicesPlugin.config.disableVersionCheck = true
- Register FCM server key with Backendless. You can see this step in the video at 17:46.
- Add the Backendless dependency to your project. The simplest way to do this is by adding the following line to the dependencies element of /app/build.gradle: (you can check the latest version number of the Backendless SDK in the Maven Central repository):
implementation 'com.backendless:backendless:5.2.2'
- Register the Backendless Push service in Android manifest. Add the following configuration into the application element of your app’s AndroidManifest.xml file:
<service android:name="com.backendless.push.BackendlessFCMService"> <intent-filter> <action android:name="com.google.firebase.MESSAGING_EVENT" /> </intent-filter> </service> - Initialize Backendless SDK in your application. This code needs to be executed once, it makes sense to put it right into the main activity of the app. In the video the code is added in the setup() method of the DeviceRegistration activity:
Backendless.initApp( Application.getContext(),
"YOUR-BACKENDLESS-APPLICATION-ID",
"YOUR-ANDROID-API-KEY");
The YOUR-BACKENDLESS-APPLICATION-ID and YOUR-ANDROID-API-KEY values can be obtained from the main dashboard of your app in Backendless Console.
- If your Dropsource project includes user login AND if the login occurs before the device is registered with Backendless, add the following code:
String userToken = Application.getSharedPreferenceString( "userToken" );
HeadersManager.getInstance().addHeader( HeadersManager.HeadersEnum.USER_TOKEN_KEY, userToken );
- Register the device with FCM and Backendless. The code below uses the dropsourcechannel messaging channel. If you registered the FCM server key with a specific channel (step #4 above), the channel must match. Otherwise, if the FCM server key is registered for all channels, then you can register the device with any channel – you can use the channel name for the logical grouping of the registered devices:
List<String> channels = new ArrayList<String>(); channels.add( "dropsourcechannel" ); Backendless.Messaging.registerDevice(channels, new AsyncCallback<DeviceRegistrationResult>() { @Override public void handleResponse(DeviceRegistrationResult response) { Toast.makeText( Application.getContext(), "Device registered!", Toast.LENGTH_LONG).show(); } @Override public void handleFault(BackendlessFault fault) { Toast.makeText( Application.getContext(), "Error registering " + fault.getMessage(), Toast.LENGTH_LONG).show(); } }); - Run the app and send push notifications from Backendless. For an overview of Backendless Push notifications capabilities, see the overview video. More information about Backendless Push Notifications is also available in the developer guide.
