How to Monitor Real-Time Connections in an Angular App
Today we will talk about how to monitor the client’s Real-Time Connections in your Angular application. This tutorial continues the guide on how to build Angular apps with Backendless. We recommend you check out the previous article in this series before you continue because we will use the application from the previous post as the starting point for this tutorial. Alternatively, if you just want to start working with it right away, you can download the source code from this GitHub commit.
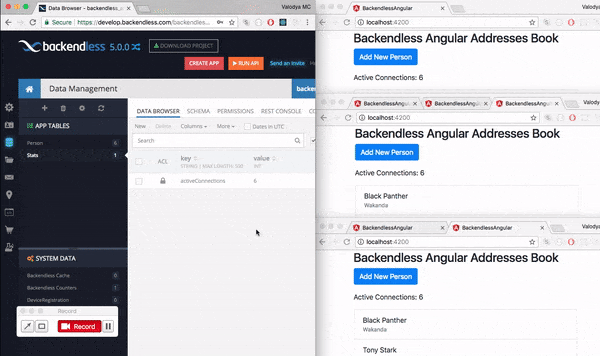
In many cases, we want to see how many application users are online or offline. For example, this might be useful in a chat application. For our demo purposes, in our application, we will add a simple counter to count all connected clients. As we explore adding that functionality, you will be introduced to Backendless Business Logic (Cloud Code), Backendless Counters, Codeless, and additional Real-Time features:
Our goal in this demo is to have a counter that updates when a new client is either connected to or disconnected from our app. For that, we will use Backendless Counters. Unfortunately, Backendless Counters do not support Real-Time updates (at the time of this writing). For now, we will use Backendless Real-Time database.
First, run our application and make sure that everything works well. Run the following command inside your application directory:
npm start
Connections Event Handlers
To monitor client connections, we will use Real-Time Event Handlers. There are several types of Real-Time event handlers, but for the implementation of our feature, we need just two of them: afterClientConnected and clientDisconnected.
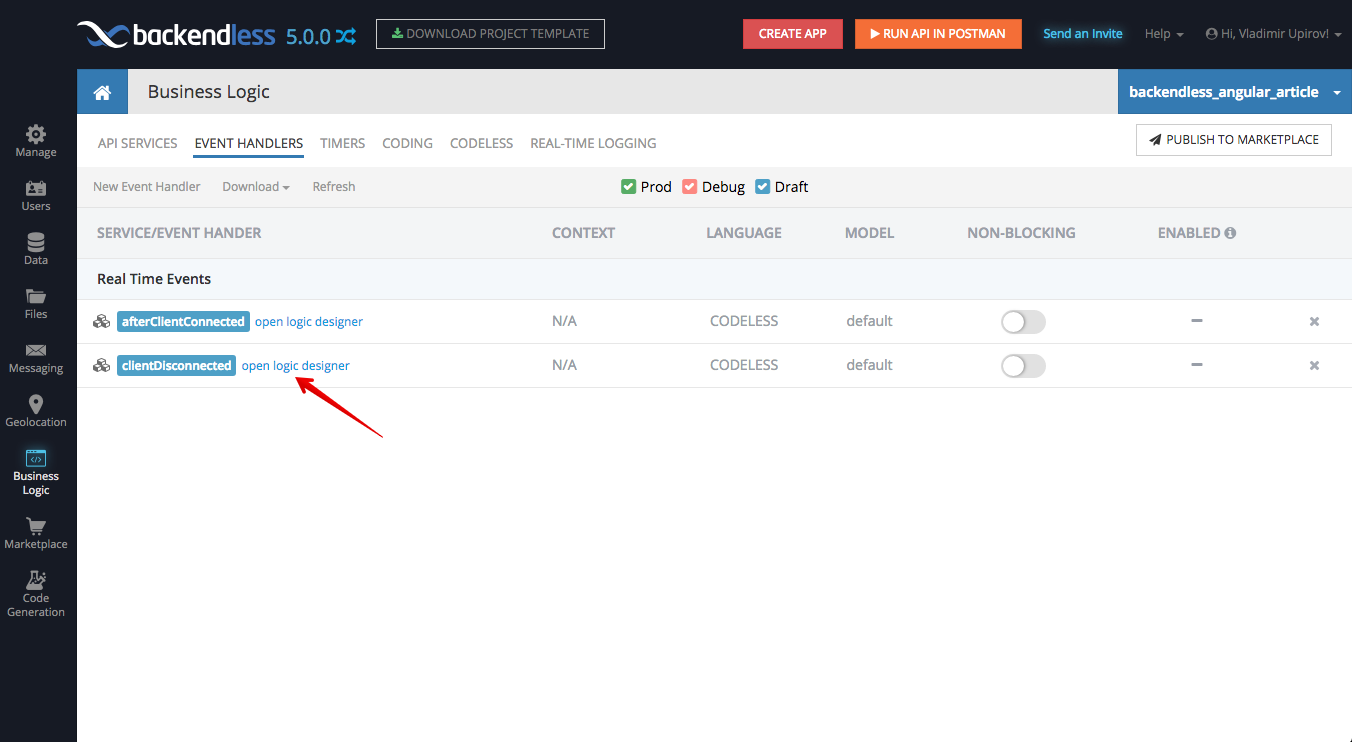
We will use Codeless logic to demonstrate what precisely happens when these events trigger. You can easily implement the same logic using either JavaScript or Java. Go to the Business Logic section of Backendless Console, select the Event Handlers tab and add both Real-Time event handlers as shown in the screenshots below:
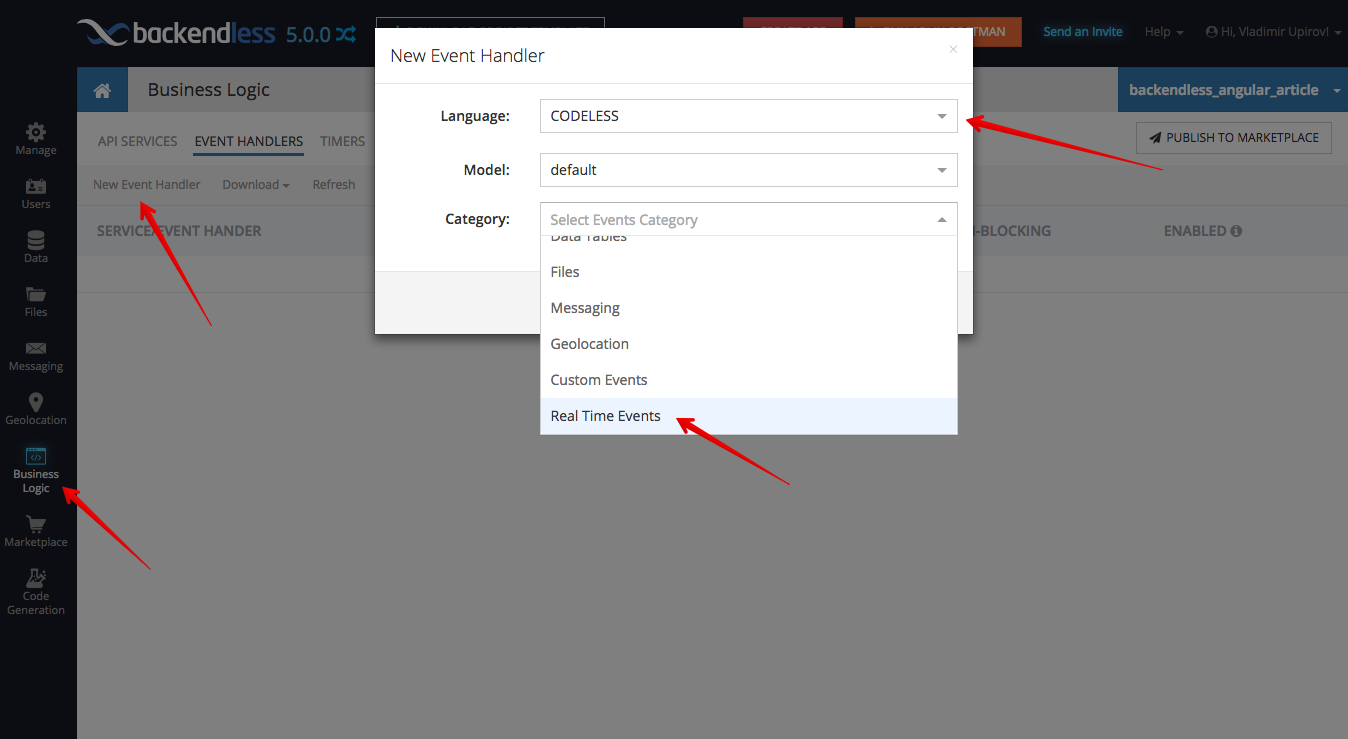


As you can see, there is the “before|after” dropdown for the clientConnectedevent. This is because there are two different events: blocking beforeClientConnectedand non-blocking afterClientConnected. You can use the beforeClientConnected event, for example, to restrict a new incoming connection or add some validation.
When a client disconnects, we have only one non-blocking clientDisconnected event because custom business logic has no influence on the disconnecting process. You can read more about the events in the Developer Guide.
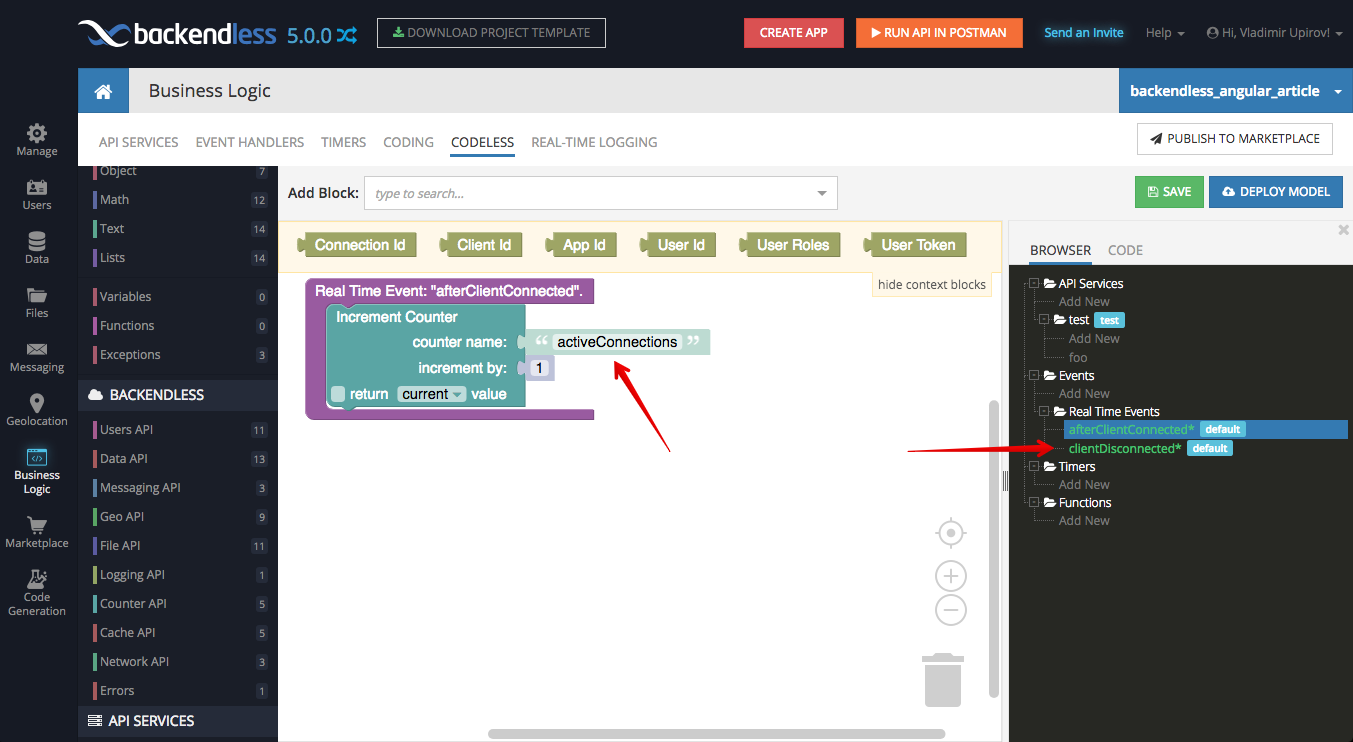
Now, let’s open Codeless Designer and add some logic.
Each time when afterClientConnected is invoked, we need to increment our counter, so let’s add logic to accomplish that. As mentioned earlier, we will implement the solution using the Real-Time Database, but for now, to see it working, let’s use Backendless Counters:

Specify a name for our counter, in my case it is activeConnections:
Now switch to the clientDisconnected event handler and add logic to decrement the counter:
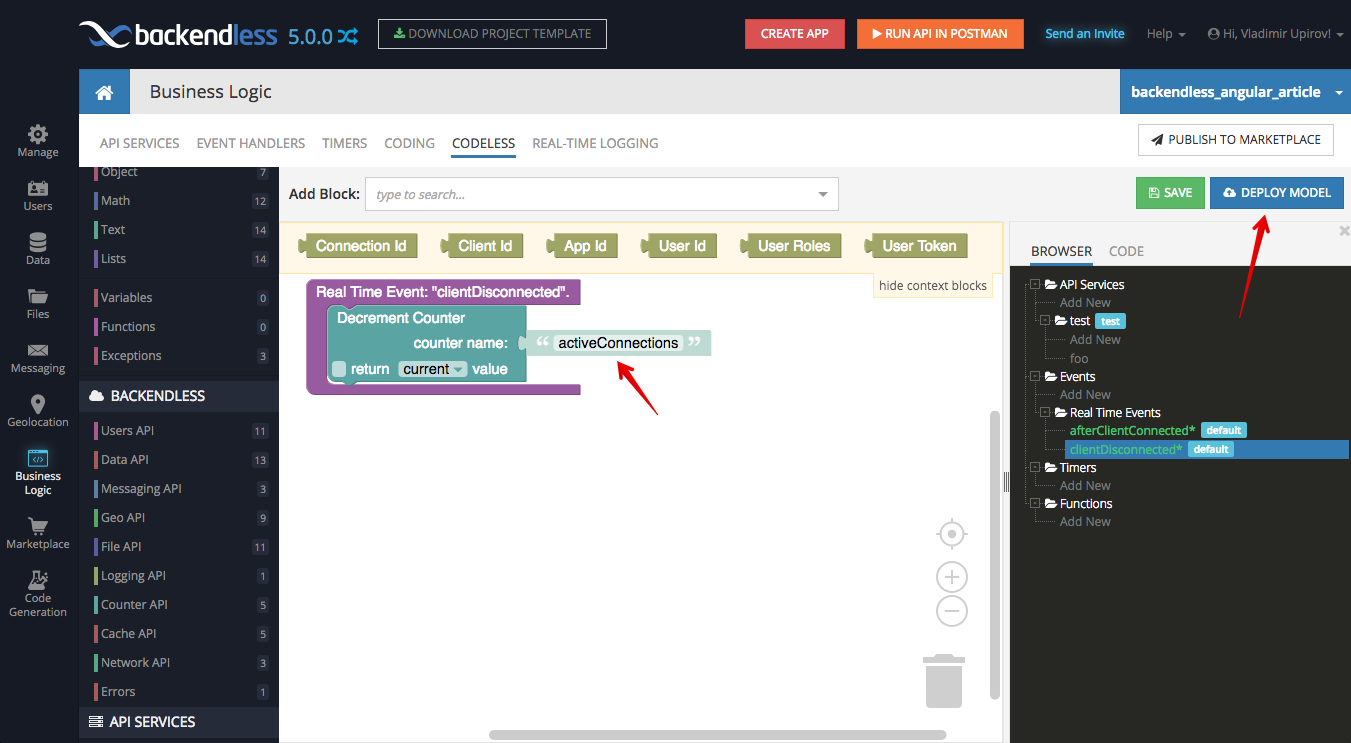
Deploy the business logic so we can see it in action. Once it deployed, go to the Data screen and select Backendless Counters in the SYSTEM DATA section.
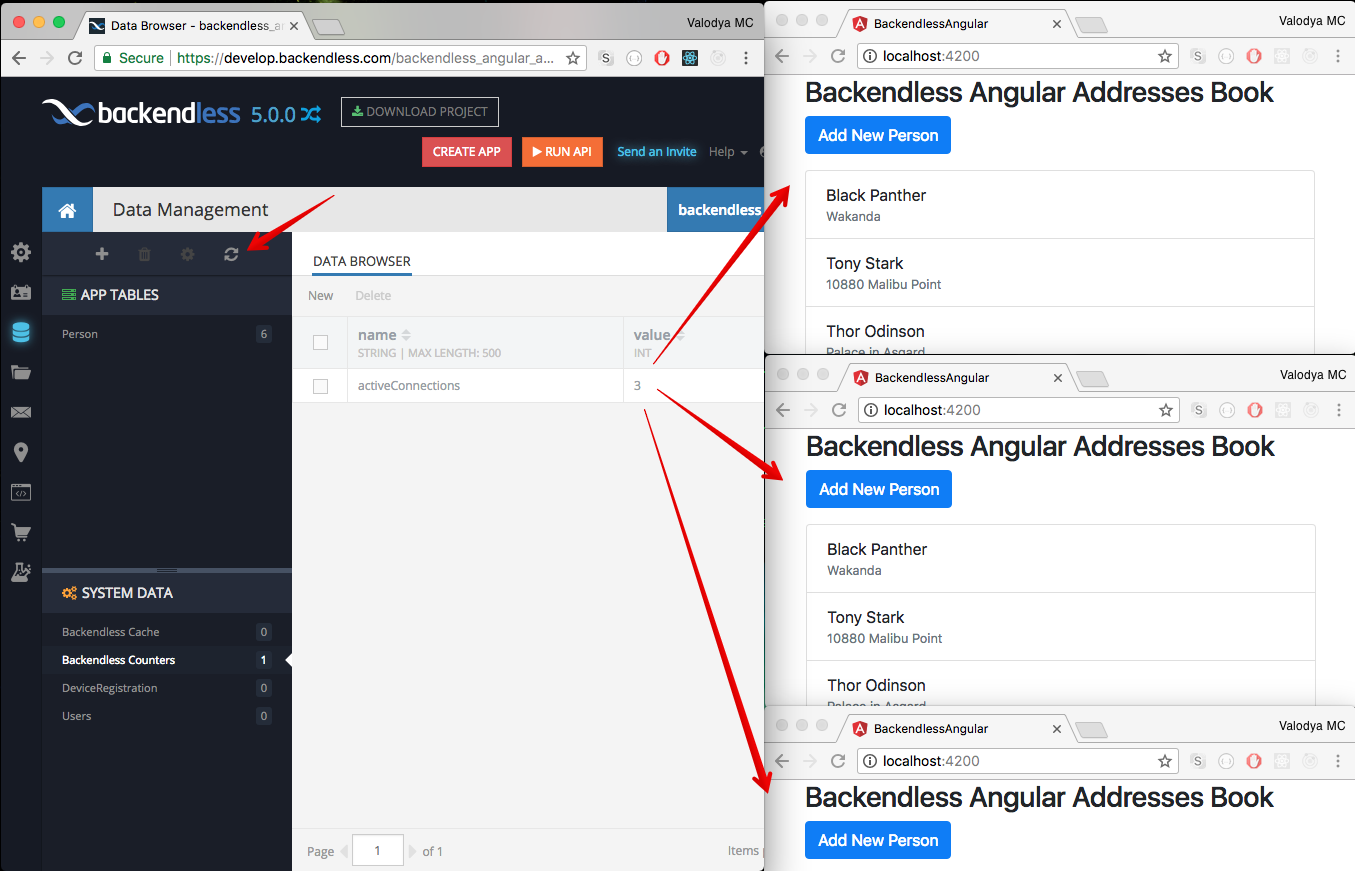
It is important to understand that when you deploy your business logic the first time with your angular application open, the counter’s value will be wrong. This may happen because the client connected before the business logic is in place. As a result, when the app disconnects, the counter will be decremented and will have a value of -1. To avoid this, close all the browser windows where the application is running and change the current value to zero in Backendless Counters as shown below:

Open a few browser windows with your application and then refresh the counters table. You can see that value changes according to how many open application instances you have:
Use Data for Counters
As we mentioned earlier, we don’t have Real-Time support for Backendless Counters as of this writing, so instead let’s use the Real-Time Database.
Create a new Table with name Stats and specify two columns: key and value

Return to Business Logic and add logic for storing the current counter value in the Stats table. The table will contain only one record where the key is activeConnection and the value contains the current value of the counter.
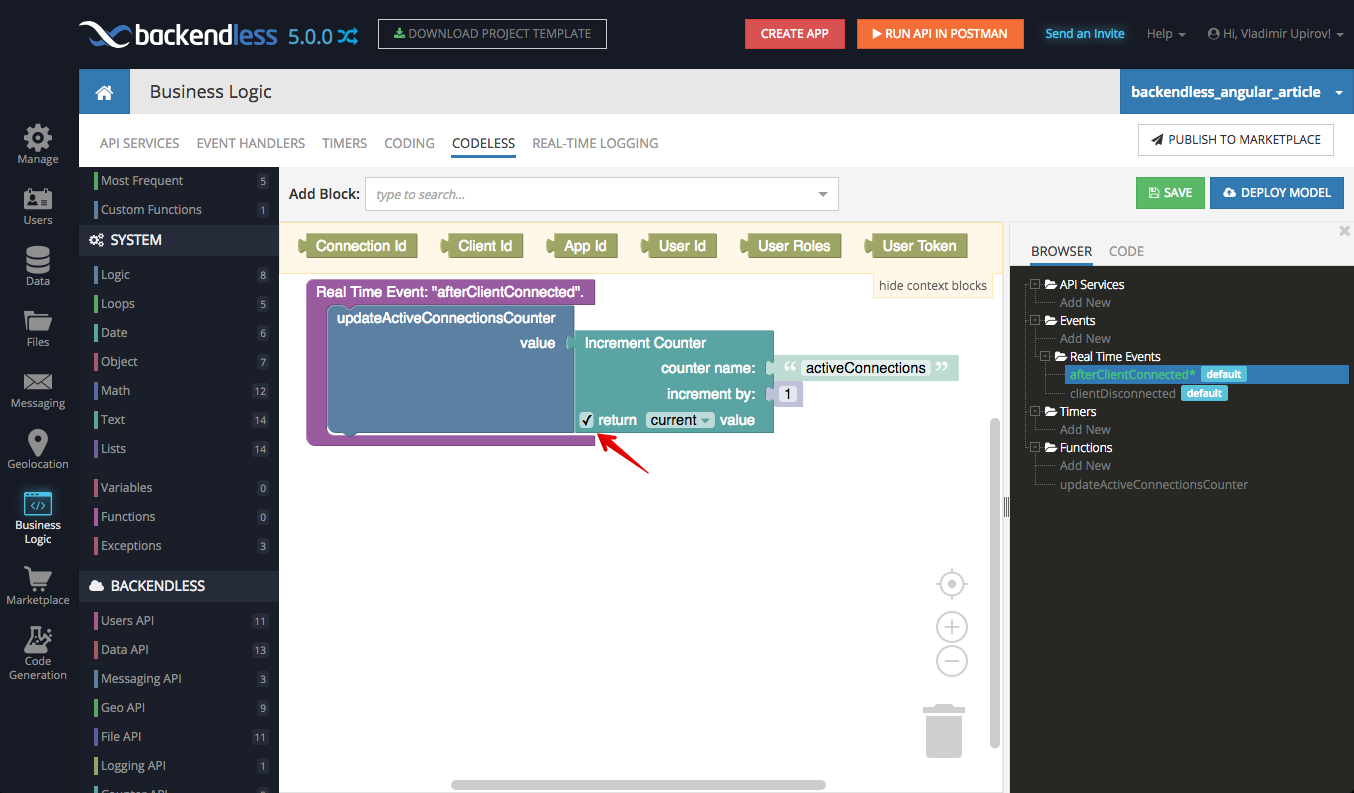
Currently, the implementation of Real-Time event handlers in our business logic updates a Backendless counter. So now we would need to modify that logic so it updates a record in the database. The logic for updating the record is the same for both use-cases: when a client connects or disconnects. The only difference is whether we increment or decrement the value. In order to re-use the database update logic for both event handlers, let’s create a custom Codeless Function.
Notice the function name is updateActiveConnectionsCounter (the name is right next to the word “Function” at the top of the very first block in the codeless logic):

Once it is created and saved, let’s use the function inside our event handlers. You can find the custom function block in the Custom Functions menu in the codeless blocks toolbar:
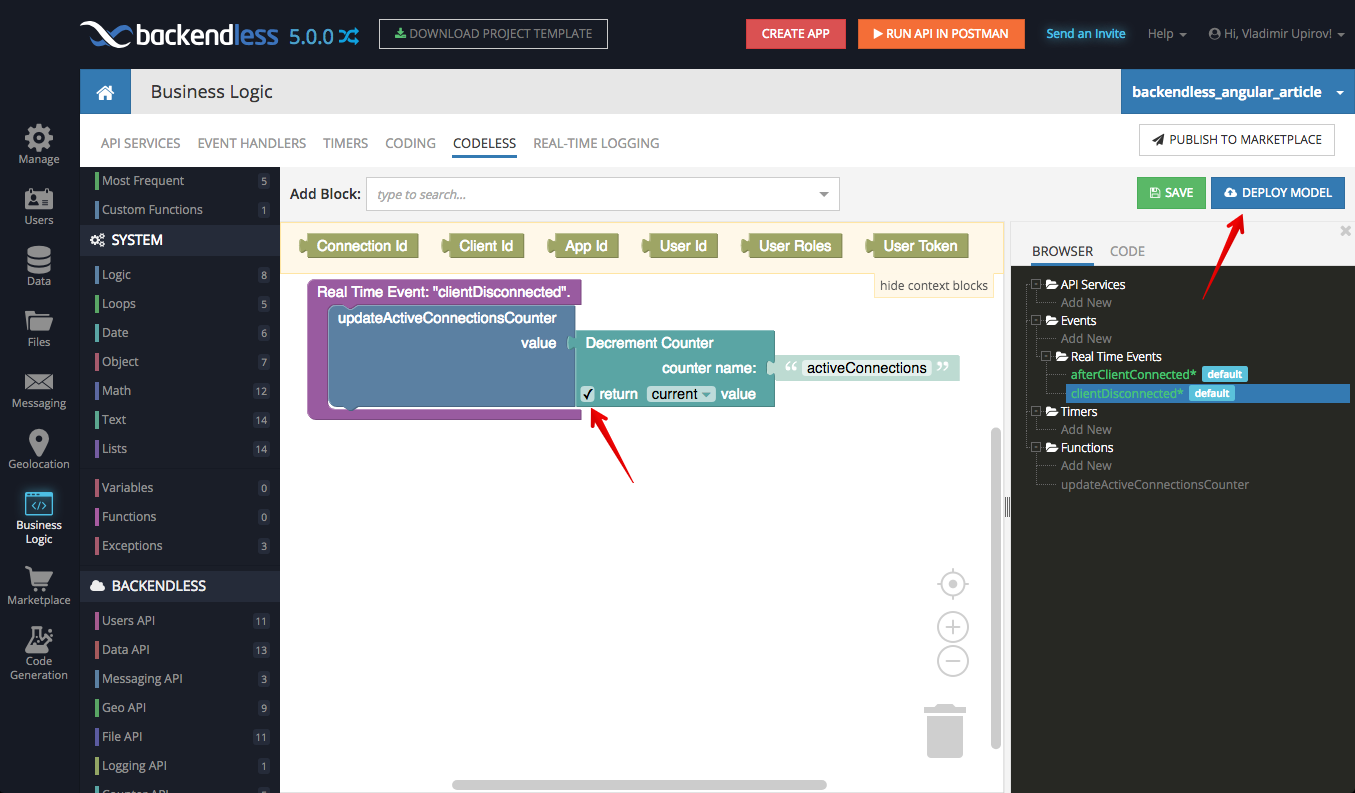
Re-deploy the logic and return to the Data screen. Open/close browser windows with the application and you will see that the object in Stats table is changing according to how many open browser windows with the application you have:

If you have the same result as in the video above, congratulations! Now we are ready to modify our Angular app to display the count of active connections.
Connection Counter in Angular Application
Create a new component and service as we did it before with Angular CLI commands and modify the code for the files shown below:
ng g component connections-counter
ng g service stats
appcomponent.html:
<div class="container">
  <div class="header">
    <h3>
      Backendless Angular Addresses Book
    </h3>
  </div>
  <app-add-new-person></app-add-new-person>
  <app-connections-counter></app-connections-counter>
  <app-persons-list></app-persons-list>
</div>
connections-counter.component.ts
import { Component, OnInit } from '@angular/core';
import { StatsService } from '../stats.service';
@Component({
  selector: 'app-connections-counter',
  templateUrl: './connections-counter.component.html',
  styleUrls: ['./connections-counter.component.css']
})
export class ConnectionsCounterComponent implements OnInit {
  constructor(private statsService: StatsService) {
  }
  ngOnInit() {
    this.statsService.init();
  }
  get activeConnections(): number {
    return this.statsService.activeConnections;
  }
}
stats.service.ts
import { Injectable } from '@angular/core';
import Backendless from 'backendless';
export class Stats {
  public objectId?: string;
  public key: string;
  public value: number;
}
const ACTIVE_CONNECTIONS_COUNTER_WHERE_CLAUSE = 'key = \'activeConnections\'';
const StatsStore = Backendless.Data.of(Stats);
@Injectable({
  providedIn: 'root'
})
export class StatsService {
  public activeConnections: number;
  init(): void {
    const query: Backendless.DataQueryBuilder = Backendless.DataQueryBuilder
      .create()
      .setWhereClause(ACTIVE_CONNECTIONS_COUNTER_WHERE_CLAUSE);
    StatsStore.find<Stats>(query).then((stats: Stats[]) => {
      if (stats[0]) {
        this.updateActiveConnectionsCounter(stats[0]);
      }
      this.addRealTimeListeners();
    });
  }
  addRealTimeListeners(): void {
    const rtHandlers: Backendless.EventHandler = StatsStore.rt();
    rtHandlers.addUpdateListener<Stats>(ACTIVE_CONNECTIONS_COUNTER_WHERE_CLAUSE, this.updateActiveConnectionsCounter.bind(this));
  }
  updateActiveConnectionsCounter(activeConnectionCounterStats: Stats): void {
    this.activeConnections = activeConnectionCounterStats.value;
  }
}
That’s all! Once your application refreshed, you can check this out.
Summary
As you can see, it wasn’t difficult to implement a Real-Time Connections Monitor in our Angular app. Now you have experience with Real-Time Event Handlers which will come very handy when you need to add centralized business logic. All the changes we made today can be found in this GitHub commit. You can take a look at the demo app by following this link.
In future posts, we will show you how to add User Services and setup some Roles Permissions to protect our app data.
Thank you for reading this post, hope you enjoyed it!