How to Create a Web App Using React and Backendless (Part 5)
ReactJS remains one of the most popular hybrid frontend development languages on the market today. In this article, we are going to continue developing a React application using Backendless as the backend by showing how to add real-time alerts to your app.
This is the fifth part in this article series. The previous four parts are:
- Basic Project Setup and Render Persons List
- Create, Update and Delete Persons
- Enable Real-Time Database
- Build and Deploy
If you have already read those articles, you should be ready to keep going. Otherwise, you have two options: the first is to read all these previous posts and build the app step-by-step, while the second one is to clone the app from this Github repository and use this commit as a starting point. Today we’re going to improve our app by integrating a notification system using that works in Real-Time (RT).
Create An Alerts Module
Most applications have a notification system for notifying users about certain changes or events. For example: “Your order has been processed” or “You’ve got a new message from John Doe”. There may be a lot of cases when notifications are vital, especially real-time notifications.
In this article, we are going to be discussing in-app notifications rather than push notifications. Therefore, our notifications system must have some kind of visual presentation and we must also have notifications storage. There are a lot of similar implementations in NPM, but for a more complete understanding, let’s build it from scratch.
First, we need to create 5 new files:
- ./src/alerts/index.js
- ./src/alerts/manager.js
- ./src/alerts/container.js
- ./src/alerts/alert.js
- ./src/alerts/style.css
Now let’s add code for these files and see what each file is for.
./src/alerts/index.js
import './style.css';

import AlertsManager from './manager'
import AlertsContainer from './container'

export default AlertsContainer

export const addAlert = (message, timeout) => AlertsManager.add({
   timeout,
   message,
});
This is an entry point of our notifications system. It requires style, re-export react component AlertsContainer and it also has public methods for adding new notifications
./src/alerts/manager.js
const ACTIVE_ITEMS_LIMIT = 1

const chr8 = () => Math.random().toString(16).slice(-8)

const AlertsManager = {

 handler: null,

 allItems   : [],
 activeItems: [],

 add({ message, timeout }) {
   const item = {
     _id   : `${chr8()}-${chr8()}`,
     timeout: timeout || 5 * 1000,
     message,
   }

   this.update([...this.allItems, item])

   return item
 },

 remove(alertId) {
   this.update(this.allItems.filter(item => item._id !== alertId))
 },

 update(allItems) {
   this.allItems = allItems
   this.activeItems = allItems.slice(0, ACTIVE_ITEMS_LIMIT)

   if (this.handler) {
     this.handler(this.activeItems)
   }
 },

 subscribe(handler) {
   this.handler = handler
   this.handler(this.activeItems)
 },

}

export default AlertsManager
This is the notifications’ collection and it is used for linking the notifications’ UI and Logic. If you’re familiar with the MVC pattern, it will be easy to understand what exactly it is for. It will collect messages and control which and how many messages must be displayed at the same time.
As it is a singleton, it gives us the ability to add new notifications from any place of our code. Of course, we could use React Context, but I think our way is better and easier to use; at least we don’t have Server Side Rendering and we can afford to have a singleton.
You can see there are two separate lists of notifications: allItems and activeItems. This is because we’ve got a visibility limit that can be configured by changing the ACTIVE_ITEMS_LIMIT variable. For example, you do not want to bother your users too frequently.
Notifications might have a displaying time, but to reduce code, we do not always set this timeout; the collection will do it for us by default.
The last but not least point is a callback (handler) that will be called each time a notifications list is changed. subscriber will be a method of AlertsContainer class.
./src/alerts/container.js
import React, { Component } from 'react'
import { TransitionGroup } from 'react-transition-group'

import AlertsManager from './manager'
import AlertView from './alert'

export default class AlertsContainer extends Component {

 state = {
   items: [],
 }

 componentDidMount() {
   AlertsManager.subscribe(this.onAlertsChange)
 }

 onAlertsChange = items => {
   this.setState({ items })
 }

 onItemClose = alert => {
   AlertsManager.remove(alert._id)
 }

 render() {
   const { items } = this.state

   return (
     <TransitionGroup className="alerts-container">
       {items.map(alert => (
         <AlertView key={alert._id} alert={alert} onClose={this.onItemClose}/>
       ))}
     </TransitionGroup>
   )
 }

}
This is a container for rendering notifications from AlertsManager. This component has its own notifications list in state to be able to re-render them on change. We keep this list synced with activeItems of AlertsManager. Also, it has the onItemClose method which is needed for removing a notification from AlertsManager when it’s going to be hidden.
For smooth animation, we use react-transition-group module from NPM, in case if you have never used it before you can read more on their docs.
./src/alerts/alert.js
import React from 'react' import { CSSTransition } from 'react-transition-group' export default class AlertView extends React.Component { componentDidMount() { this.startTimer() } componentWillUnmount() { this.stopTimer() } close = () => { this.props.onClose(this.props.alert) } stopTimer = () => { if (this.closeTimer) { clearTimeout(this.closeTimer) } } startTimer = () => { this.stopTimer() const closeTimeout = this.props.alert.timeout if (closeTimeout) { this.closeTimer = setTimeout(this.close, closeTimeout) } } render() { const { alert, ...props } = this.props return ( <CSSTransition classNames={{ enter : 'transition-enter', enterActive: 'transition-enter-active', exit : 'transition-exit', exitActive : 'transition-exit-active', }} onMouseLeave={this.startTimer} onMouseEnter={this.stopTimer} timeout={{ enter: 300, exit: 500 }} {...props}> <div className="alert alert-primary"> <button className="close" data-dismiss="alert" aria-label="Close" onClick={this.close}> <span aria-hidden="true">×</span> </button> <div className="alert-message"> {alert.message} </div> </div> </CSSTransition> ) } }
This is likely the most interesting class as it is our notification presentation and this is what your user will look at.
So let’s dig into it deeper. In actuality, this is a simple Bootstrap alert. There are not any specific UI elements since it’s just for our demo, but you can improve it by adding type icons, different colors, maybe a progress bar, etc. Feel free to upgrade it in your apps.
As you can see, we’ve got two methods for running and stopping the visibility timer. Right after the component will be rendered, we run a timer for closing this alert. Also, there is a trick; for example, if we are going to show notification with a huge message, of course we can specify a large timeout, but what if we give a possibility to stop the timer and give to the user time to read as much as they need?
For that, there are two handlers: onMouseEnter and onMouseLeave. When the user moves a cursor over the alert, we stop the closing timer and when the cursor goes away, we run it again. Once the timer expires, we just call the handler to remove the alert from AlertsManager.
./src/alerts/style.css
.alerts-container {
   position: fixed;
   right: 0;
   top: 0;
   padding: 20px;
   width: 350px;
   max-height: 100%;
   z-index: 999999;
   overflow: auto;
}

.alerts-container .alert {
   position: relative;
   overflow: hidden;
}

.alerts-container .alert .close {
   position: absolute;
   top: 3px;
   right: 5px;
   outline: none;
}

.alerts-container .alert.transition-enter {
   transform: scale(0);
}

.alerts-container .alert.transition-enter-active {
   transform: scale(1);
   transition: all 300ms cubic-bezier(0, 0, 0.5, 1.5);
}

.alerts-container .alert.transition-exit {
   transform: scale(1);
}

.alerts-container .alert.transition-exit-active {
   transform: scale(0);
   transition: all 300ms ease-in-out;
}
This is just style for our alerts.
Alright, let’s check what we’ve got, but first, let’s enable the notifications system in our app by changing the ./src/app.js file:
import React from 'react';

import Persons from './persons';
import Alerts, { addAlert } from './alerts';

window.addAlert = addAlert

export default function App() {
 return (
   <div className="container">
     <div className="header">
       <h3>
         Backendless React Addresses Book
       </h3>
     </div>

     <Persons/>

     <Alerts/>
   </div>
 );
}
The next line is just for testing, so it can be removed once we make sure it works properly:
window.addAlert = addAlert
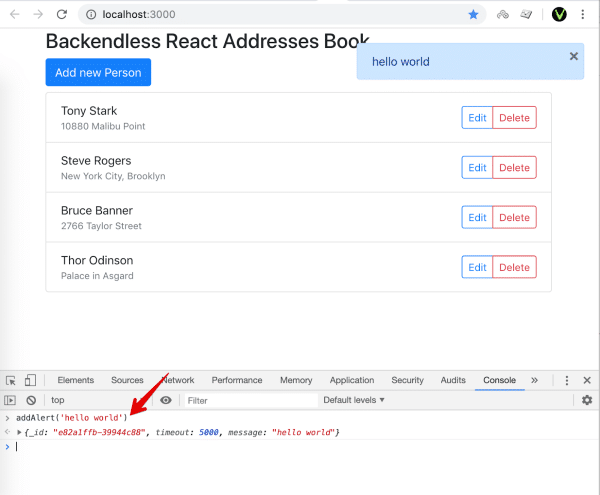
Now, run/open your app and run the following code in the browser Dev Console:
addAlert('Hello World')
If you have the same result as you see in the image below, you’re ready to continue. Otherwise, please check the previous steps.
 Person’s Changes Notification
Let’s consider a simple case. We would like to be notified once a person object is changed. In order to do this, we have to modify the ./src/respons/index.js file a little:
- Import “addAlert” method from “../alerts”, and
- Replace RT methods with the following:
componentWillMount(){
 this.props.loadPersons();

 this.personRT = Backendless.Data.of('Person').rt();

 this.personRT.addCreateListener(this.onPersonCreate);
 this.personRT.addUpdateListener(this.onPersonUpdate);
 this.personRT.addDeleteListener(this.onPersonRemove);
}

componentWillUnmount() {
 this.personRT.removeCreateListener(this.onPersonCreate);
 this.personRT.removeUpdateListener(this.onPersonUpdate);
 this.personRT.removeDeleteListener(this.onPersonRemove);
}

onPersonCreate = person => this.props.onPersonCreate(person)
onPersonRemove = person => this.props.onPersonRemove(person)

onPersonUpdate = person => {
 addAlert(`Person with name "${person.name}" has been changed`)

 this.props.onPersonUpdate(person)
}
Now let’s test it. I’m going to change the name “Bruce Banner” to “Hulk”, and right after I click the “save” button, I should see an alert that the person has been changed. Let’s see if it worked.
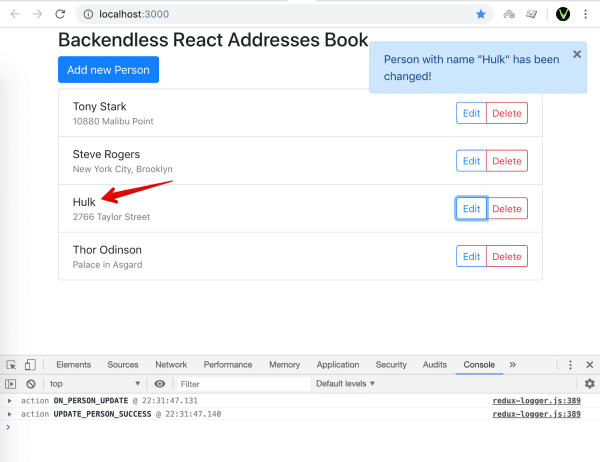 Great! Now we’ve got one more interesting thing to take a look at. In the Dev Console, you can see that RT Action
 ON_PERSON_UPDATE had been called before we received a response from the server for UPDATE_PERSON_SUCCESS over REST API. This tells us that Real-Time is faster than REST. However, in our case, it’s a problem because we do not want to see notifications about actions that we performed, do we?
Create A Delay To Compensate For Latency
We can solve the issue by integrating “Latency Compensation”. The main idea is to put changes into Redux store before sending a request to the server. Then, if the server returns a Success response, we just update it with this response. Otherwise, if the server responds with an error, we simply revert the object that was in Redux store before sending the request.
So, go to ./src/store/actions/persons.js and replace the code for the updatePerson action with the following:
export const updatePerson = person => (dispatch, getState) => {
 const persons = getPersons(getState()).list
 const prevPerson = persons.find(p => p.objectId === person.objectId)

 return dispatch({
   person,
   prevPerson,
   types  : [t.UPDATE_PERSON, t.UPDATE_PERSON_SUCCESS, t.UPDATE_PERSON_FAIL],
   apiCall: () => Backendless.Data.of('Person').save(person),
 })
};
As you can see, we put the previousPerson object into the action body along with nextPerson. We use three actions instead of one to catch each request state in the person reducer. Let’s describe logic for these two actions in ./src/store/reducers/persons.js:
[t.UPDATE_PERSON]        : (state, action) => updatePerson(state, action.person),
[t.UPDATE_PERSON_SUCCESS]: (state, action) => updatePerson(state, action.result),
[t.UPDATE_PERSON_FAIL]   : (state, action) => updatePerson(state, action.prevPerson),
Before sending a request to the server, we replace the existing person object in the store with the new one. When it’s done, we replace it with the person from the server. And in case it fails, we just replace with the previous object.
In our simple case, we want to receive a notification only if the person name is changed, so we have to add some condition in the onPersonUpdate method of Persons Component:
onPersonUpdate = person => {
 const { persons } = this.props

 const personInStore = persons.find(p => p.objectId === person.objectId)

 if (personInStore && person.name !== personInStore.name) {
   addAlert(`Person with name "${personInStore.name}" has changed his name to "${person.name}"!`)
 }

 this.props.onPersonUpdate(person)
}
Alright, let’s check if we can see a notification on the screen when we update a person.
 No notifications have been displayed, which is what we intended. And in the Dev Console, now you can see three actions; the first one updates store by changing person before the RT event is received.
Final Test Of Our Alert
Now let’s do another test: try to change any person’s name on a separate web window.
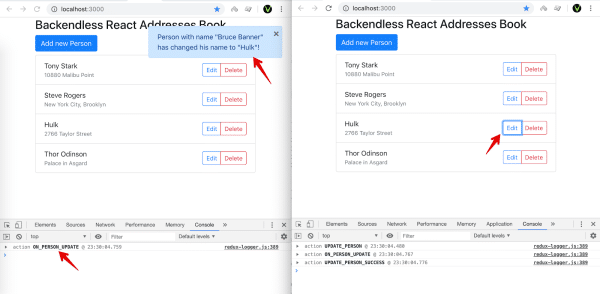 When we change “Bruce Banner” to “Hulk” in the second web window, we receive a notification on the first one. Cool, isn’t it?
Alright, that’s all we’re going to cover in this article. As you can see, the main point is to build a simple alert system and then use it in a way that makes sense for your application. Once you’ve got it, you can show any notifications from real-time or from any place in your app. All the changes we made today can be found on github.com using this link.
Thanks for reading and, as always, Happy Coding!
Please make a video series on these and the app blueprint articles!
This way non-technical people can more easily follow step by step with the videos!