Developing a Custom Alexa Skill to Control an IoT Device
If you have any smart IoT devices in your home or office and tried controlling them with Alexa, you might wonder how it actually works. In this guide, you will learn about building a custom Alexa skill that will let you control a wi-fi enabled light bulb with Alexa. You will be able to turn the light on/off and change the light colors. You can see a demo of the completed project as well as an overview of its components in the video below:
The solution consists of the following components:
- Amazon Alexa-enabled device (such as an Amazon Echo).
- A custom Alexa skill, which is an API service running in Backendless.
- Backendless SDK for Alexa, which provides functionality greatly reducing the amount of work you need to do when working with Alexa requests.
- An API service that contains the logic of controlling the light bulb.
- A wi-fi enabled light bulb, for this we used a LIFX bulb.
The diagram below illustrates all the components and how they relate to one another:
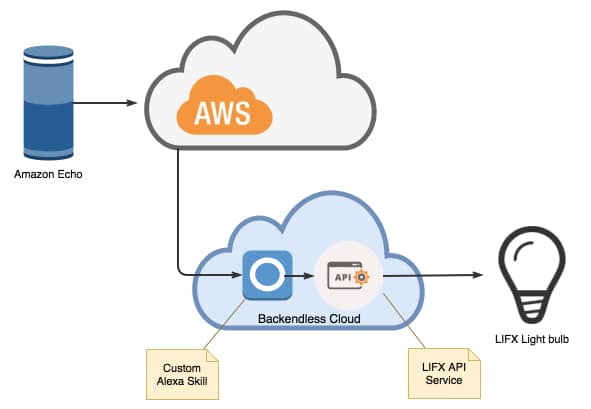
It is important to note that this solution does not require you to use AWS Lambda; it can be implemented entirely in Backendless. Even with the the free plan in Backendless, you can build and run a custom Alexa skill.
The process of developing this solution makes more sense to do in the reverse order, that is:
- Start with the LIFX API Service
- Implement the Alexa skill
- Register the skill with Amazon
The reason for that order is the plain inter-component dependency.
LIFX API Service
This is the code containing the logic for communicating with the light bulb. The code is published into Backendless, which automatically turns it into an API service. The service APIs provide the functionality for controlling the light bulb, such as turning it on or off and changing the light color. For detailed instructions on how to develop, test and deploy the service, see the following blog post:
Developing and API Service with JavaScript and additional NPM modules.
Implement Custom Alexa Skill
A custom skill consists of two parts: the code that handles requests sent by Alexa and the skill registration with Amazon. In this step, you will focus on the implementation of the skill. A skill implementation in Backendless must be an API service. It can be done with any server-side language supported by our platform, which includes JavaScript, Java or Codeless. In this guide, we will use Codeless and we plan to update it with code listing for Java/JavaScript.
- If you do not have an account in Backendless, register and create an app in Backendless Console.
- Make sure to install the Backendless SDK for Alexa.
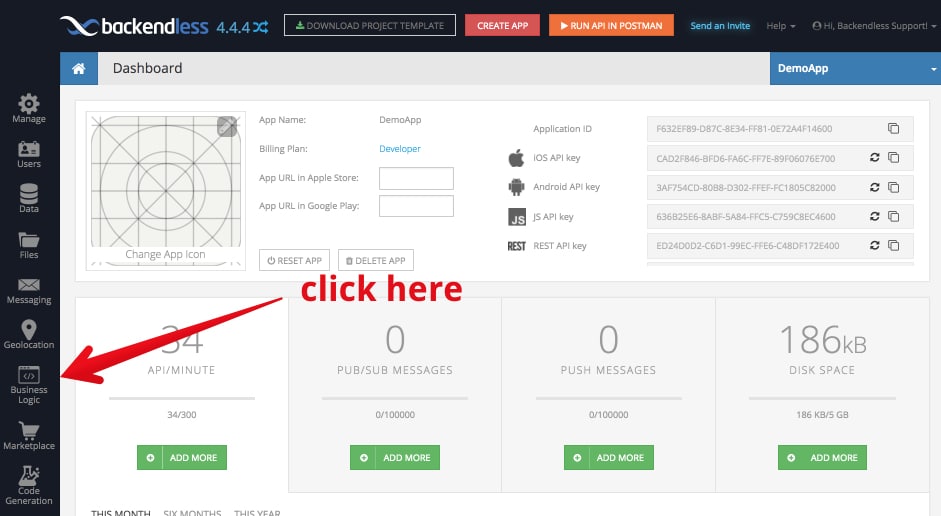
- Click the Business Logic (Cloud Code) icon in the vertical column of icons on the left side of the interface:
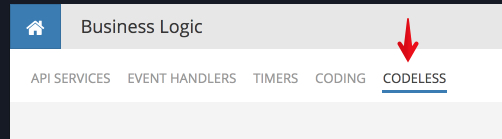
- Switch to the CODELESS section:
- Click the Add New link under API Services in the BROWSER panel. In the popup that shows, enter AlexaLightsService and click SAVE.
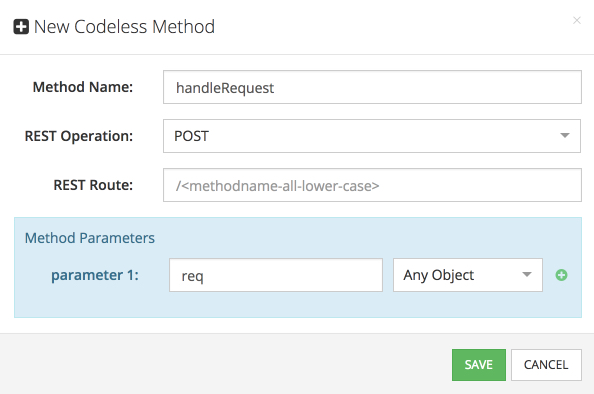
- You will be prompted to create a method for the new service. Enter the information as shown below and click SAVE:
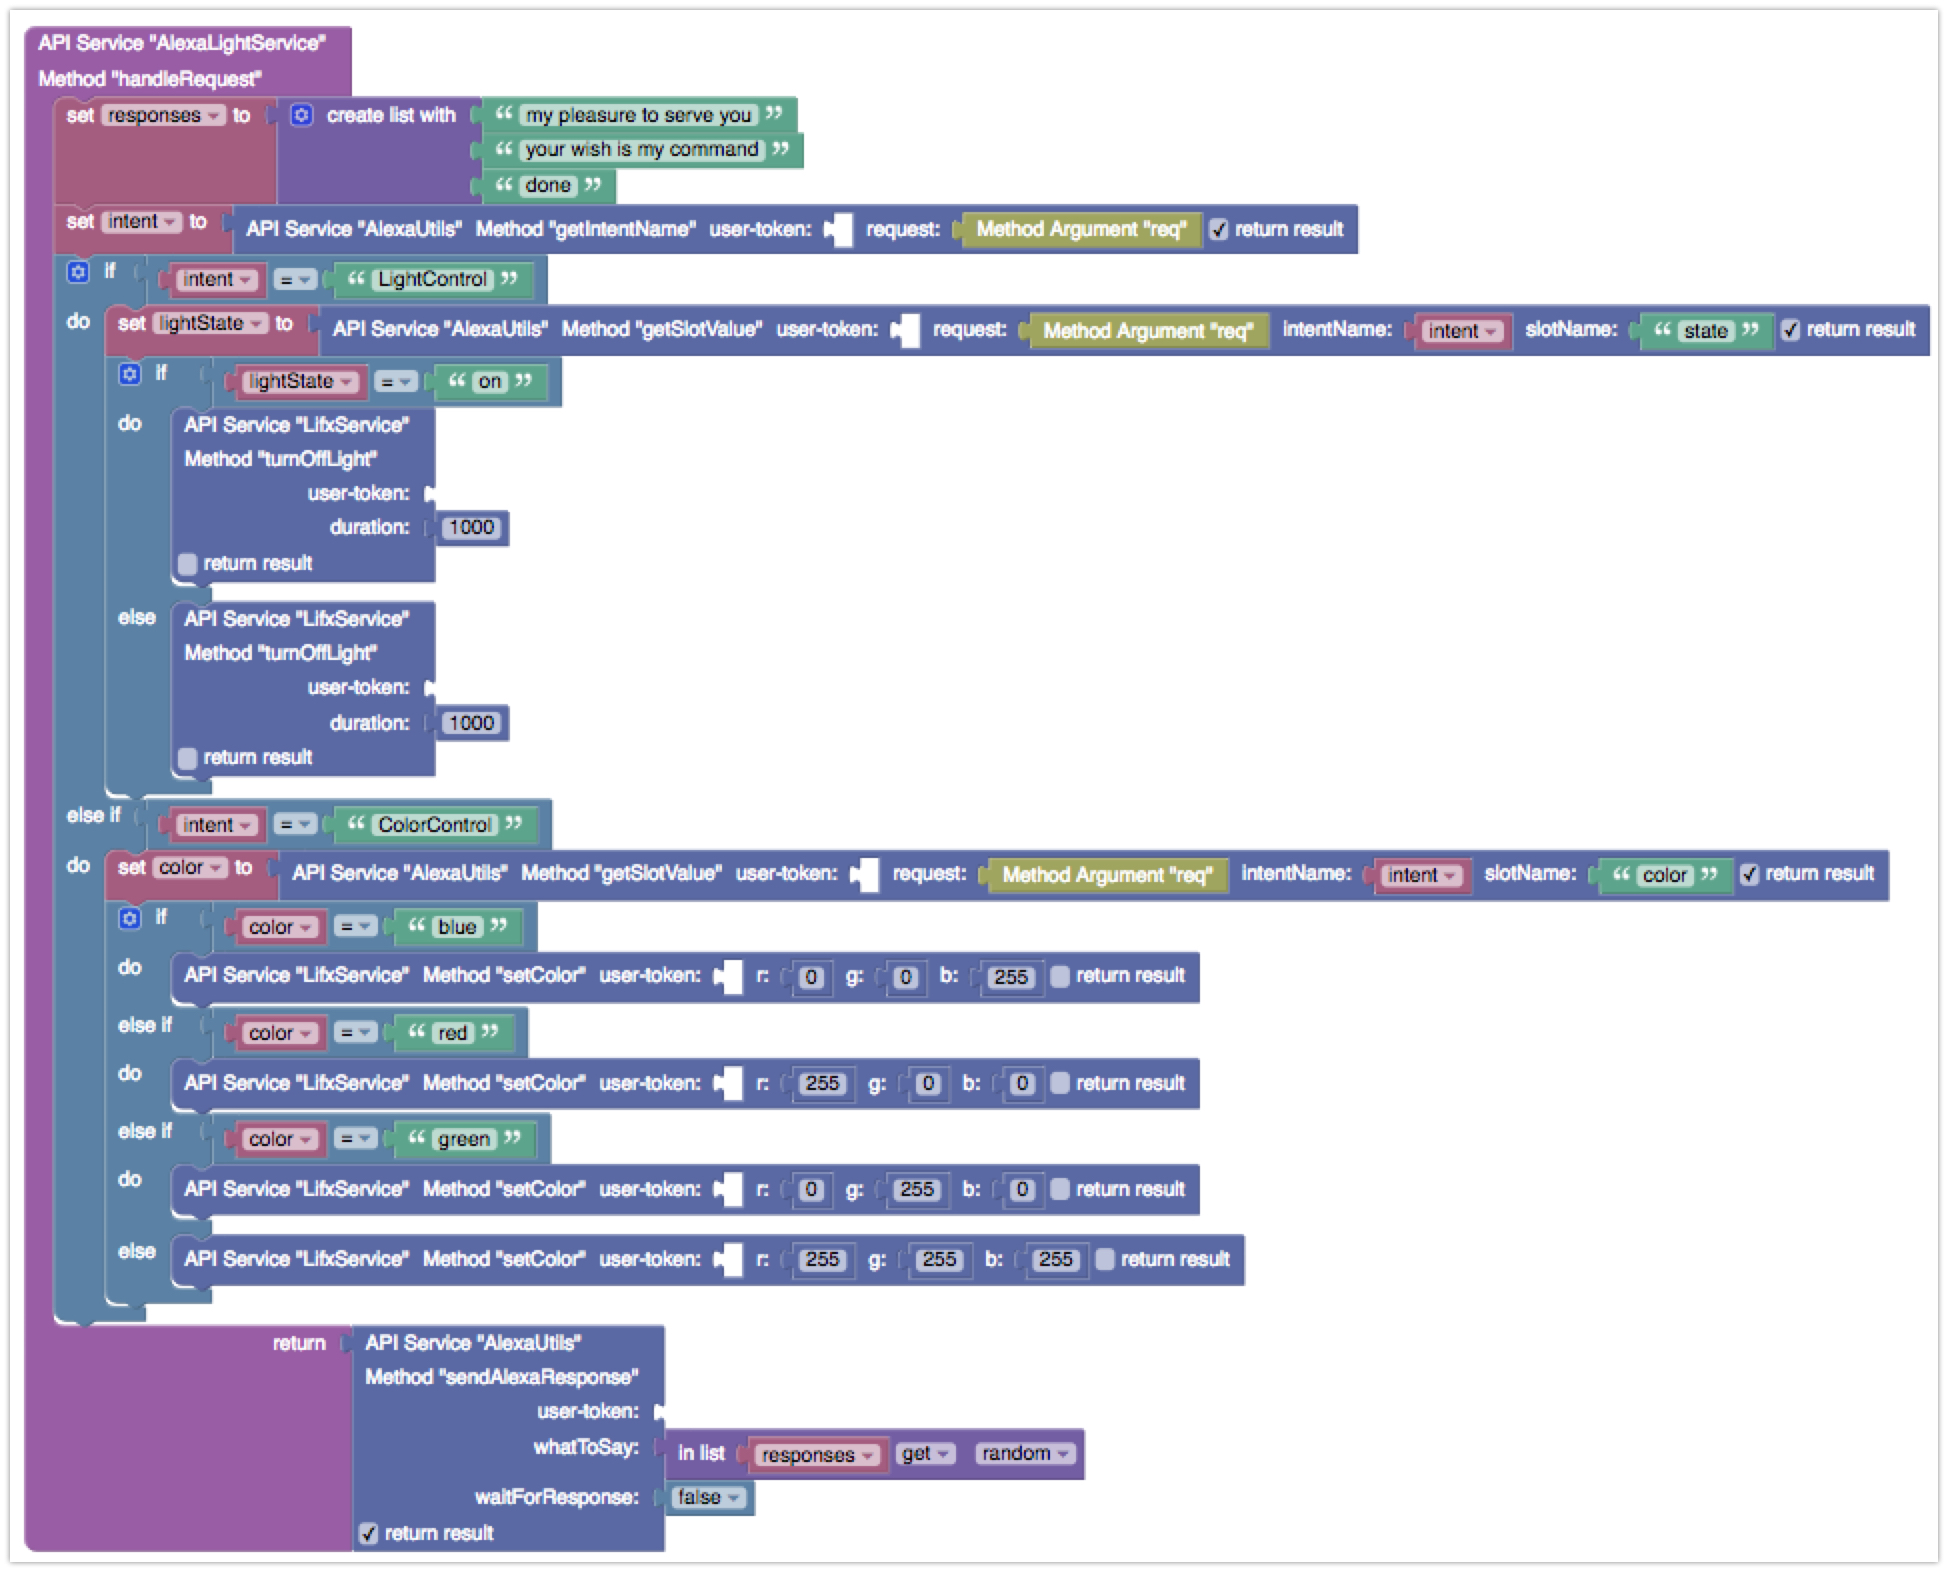
- Codeless creates a placeholder for the service method, which you can edit by adding the method’s logic. The complete listing of the method’s logic is below. Notice that some blocks are the custom functions implemented above as well as the LifxService service methods – these methods became available in Codeless when the LIFX API Service was deployed in an earlier step.
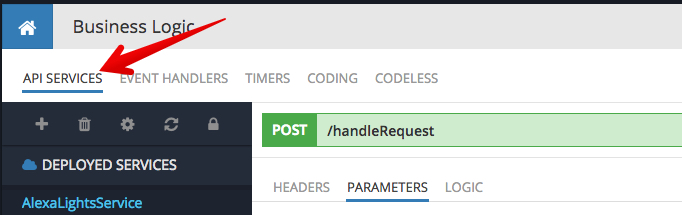
- Click the DEPLOY MODEL button when you are done editing the Codeless logic. This will deploy the service and make it available for invocations. The service can be tested directly from Backendless Console. To do this, click the API SERVICES tab as shown below:
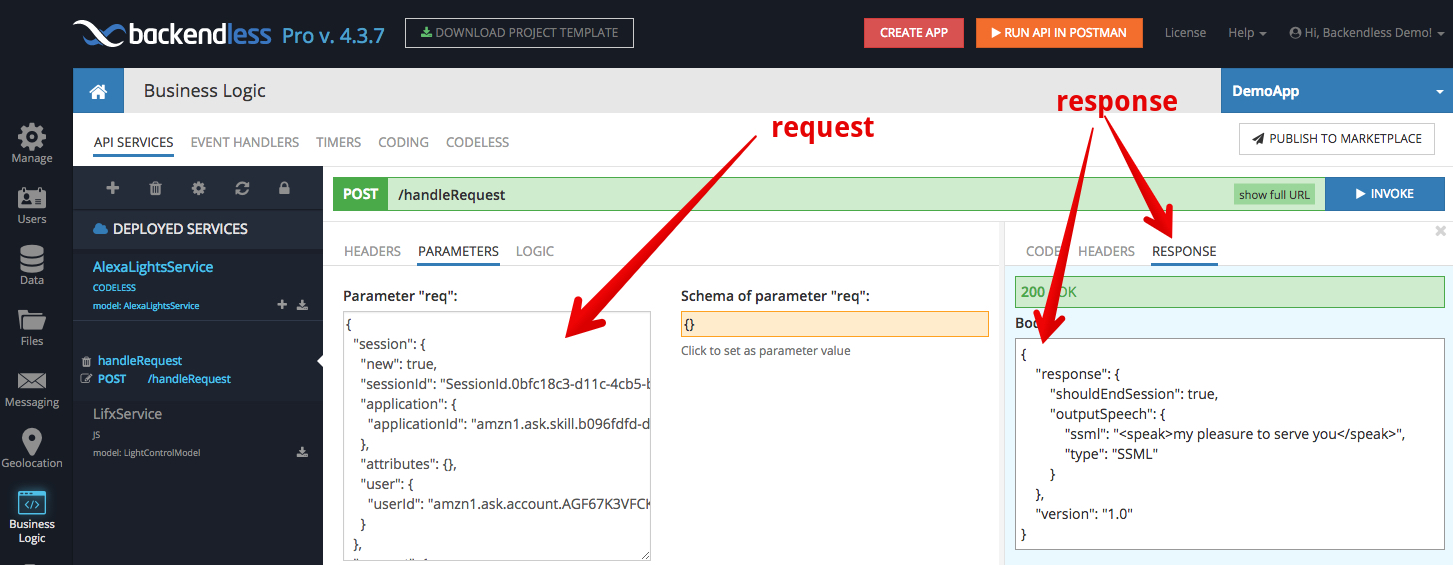
- Make sure the AlexaLightsService is selected. Backendless Console will let you invoke the service right from its user interface. To invoke the handleRequest method, you need to know the format of the request message. The request is in a special format as Alexa creates it. You can see a sample request below. Copy/paste the text below into the req field and click the INVOKE button:
{
  "session": {
    "new": true,
    "sessionId": "SessionId.0bfc18c3-d11c-4cb5-beea-cd03a5cdea52",
    "application": {
      "applicationId": "amzn1.ask.skill.YOUR-SKILL-ID-HERE"
    },
    "attributes": {
    },
    "user": {
      "userId": "amzn1.ask.account.SOMEID"
    }
  },
  "request": {
    "type": "IntentRequest",
    "requestId": "EdwRequestId.a3f8c85b-f8cf-472d-af68-013fd934b438",
    "intent": {
      "name": "LightControl",
      "slots": {
        "state": {
          "name": "state",
          "value": "on"
        }
      }
    },
    "locale": "en-US",
    "timestamp": "2018-01-02T23:47:27Z"
  },
  "context": {
    "AudioPlayer": {
      "playerActivity": "IDLE"
    },
    "System": {
      "application": {
        "applicationId": "amzn1.ask.skill.YOUR-SKILL-ID-HERE"
      },
      "user": {
        "userId": "amzn1.ask.account.SOMEID"
      },
      "device": {
        "supportedInterfaces": {
        }
      }
    }
  },
  "version": "1.0"
}
If the invocation is successful, you should see the following:
- Finally, click the show full URL button in the green bar which says POST /handleRequest. It will display the full URL of the API service operation. The URL will be used in the next section where you will register the custom Alexa skill.


Registering a Custom Alexa Skill with Amazon
The final part in creating this solution is registering the skill you “coded” in the previous section with Amazon. This will make the skill available on your Alexa-enabled devices.
- Login to Amazon Developer Portal and select Alexa and create a new skill.
- Use magic light for the invocation name.
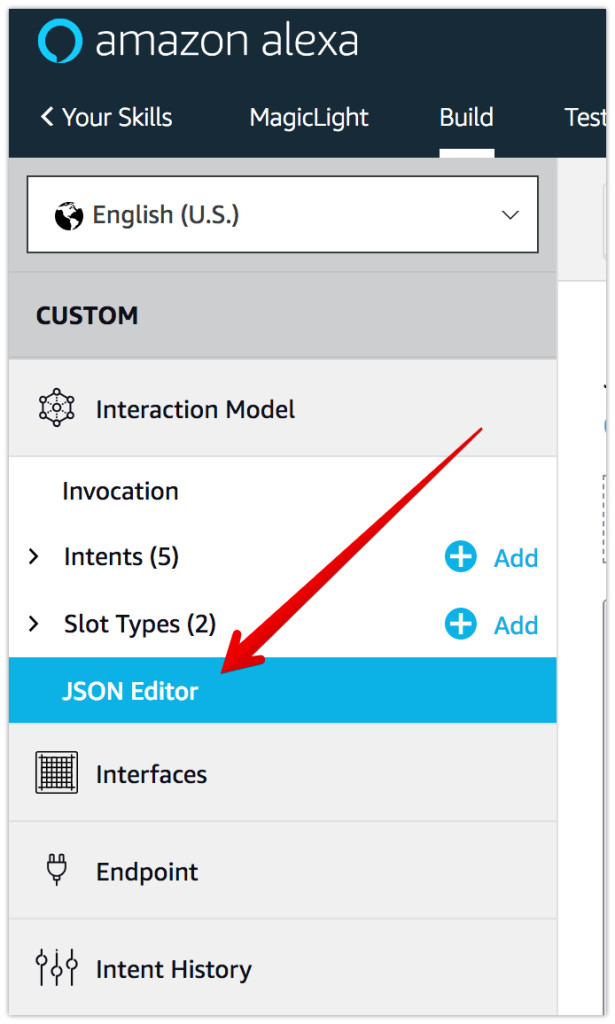
- Select JSON Editor in the menu:
- Paste the following schema definition into the editor area on the page:
{ "interactionModel": { "languageModel": { "invocationName": "magic light", "intents": [ { "name": "AMAZON.CancelIntent", "samples": [ ] }, { "name": "AMAZON.HelpIntent", "samples": [ ] }, { "name": "AMAZON.StopIntent", "samples": [ ] }, { "name": "LightControl", "slots": [ { "name": "state", "type": "states" } ], "samples": [ "turn the light {state}", "turn it {state}", "turn {state} the light", "lights {state}" ] }, { "name": "ColorControl", "slots": [ { "name": "color", "type": "colors" } ], "samples": [ "set the color of the light to {color}", "set the color to {color}", "change the color to {color}", "make it {color}", "change light to {color}", "to turn {color}" ] } ], "types": [ { "name": "colors", "values": [ { "name": { "value": "red" } }, { "name": { "value": "blue" } }, { "name": { "value": "green" } }, { "name": { "value": "purple" } }, { "name": { "value": "yellow" } }, { "name": { "value": "orange" } } ] }, { "name": "states", "values": [ { "name": { "value": "on" } }, { "name": { "value": "off" } } ] } ] } } } - Click the Save Model button and then Build Model.
- Click the Endpoint menu and select the HTTPS option.
- Paste the Backendless API service endpoint into the Default Region input field. For the “Select SSL certificate type” dropdown, select “My development endpoint is a subdomain of a domain that has a wildcard certificate from a certificate authority”. Click the Save Endpoints button.
- At this point the skill is ready and you can test it either using the Test section in the Amazon Developer Portal or using an Alexa-enabled device.

Enjoy!