How to Setup Push Notifications In a React Native App (iOS)

In this article, we will demonstrate iOS push notification setup for a React Native app. With Backendless, once set up, push notifications can easily be sent cross-platform to any device.
For Android push notification setup for React Native, you can read our article here: How to Enable Push Notifications Using Backendless in a React Native App (Android).
If you have not read the article for Android, we recommend you to begin there as we implemented a basic React Native setup and configured a Backendless App. All the code what we used in the previous article can be found on this Github repo. In the repo, there are several commits to separate the main steps. We will use this commit as an entry point for today’s article.
Upgrade Backendless ReactNative JS-SDK
Since we published the article for Android, the backendless-react-native module has been changed. There were a few fixes and changes in JavaScript methods. So let’s upgrade backendless and backendless-react-native modules to the latest versions.
As of this writing, the latest version is 0.1.3, and check if our Android app is still available to receiving push notifications. To upgrade the module, just run the following command in your terminal (while in your directory):
npm i backendless@latest backendless-react-native@latest -S

backendless@5.2.10
backendless-react-native@0.1.3
Also, let’s upgrade react and react-native to latest versions to keep our app up to date. This step is optional, so feel free to skip it.
npm i react@latest react-native@latest -S

react-native@0.59.5
react@16.8.6
That’s it, let’s check if everything still works. Run your Android app and send a push notification from Backendless Console or through API.
After this upgrade, my Android app starts to fail, so I had to make some changes to the build configuration. You can find all the changes at this commit.
API Keys
Today we have two applications – one iOS and one Android – that share almost the same code, but we want to know which platform sent each API call. Reasons we might want to know this include:
We want to see analytics for each device OS separately:

Or, we would like to specify roles and permissions according to each device type:

We can do so by using corresponding API keys for each device OS.
Import Platform from the react-native module. Replace the code for initializing your Backendless App with the following code:
const APP_ID = 'YOUR_APP_ID';

const API_KEY = Platform.select({
ios : 'YOUR_IOS_API_KEY',
android: 'YOUR_ANDROID_API_KEY'
});

Backendless.initApp(APP_ID, API_KEY);
You can find all the changes by the following commit.
Basic iOS Push Notification Setup For React Native
Time to configure our iOS app, but first we have to configure an Apple Certificate. You can do so by following the steps in this doc.
Then, make sure that your Bundle Identifier has the same value as your certificate, and also select your team for both targets. In my case, they are called RNPushDemo and RNPushDemoTests.

The next step is enabling Push Notifications Compatibility.

Add the RNBackendless native module into your project’s libraries:

And add the RNBackendless to Link Binary With Libraries section in the Build Phases tab for your main target:

Modify your AppDelegate.m file as follows:
#import <RNBackendless/RNBackendless.h>
- (void)application:(UIApplication *)application didRegisterUserNotificationSettings:(UIUserNotificationSettings *)notificationSettings
{
  [RNBackendless didRegisterUserNotificationSettings:notificationSettings];
}

- (void)application:(UIApplication *)application didRegisterForRemoteNotificationsWithDeviceToken:(NSData *)deviceToken
{
  [RNBackendless didRegisterForRemoteNotificationsWithDeviceToken:deviceToken];
}

- (void)application:(UIApplication *)application didFailToRegisterForRemoteNotificationsWithError:(NSError *)error
{
  [RNBackendless didFailToRegisterForRemoteNotificationsWithError:error];
}

- (void)userNotificationCenter:(UNUserNotificationCenter *)center didReceiveNotificationResponse:(nonnull UNTextInputNotificationResponse *)response withCompletionHandler:(nonnull void (^)(void))completionHandler
{
  [RNBackendless didReceiveNotificationResponse:response];

  completionHandler();
}

- (void)application:(UIApplication *)application didReceiveRemoteNotification:(NSDictionary *)userInfo
{
  [RNBackendless didReceiveRemoteNotification:userInfo];
}

- (void)application:(UIApplication *)application didReceiveRemoteNotification:(NSDictionary *)userInfo
fetchCompletionHandler:(void (^)(UIBackgroundFetchResult))completionHandler
{
  [RNBackendless didReceiveRemoteNotification:userInfo];

  completionHandler(UIBackgroundFetchResultNewData);
}
Add as the first line of didFinishLaunchingWithOptions implementation the following:
[UNUserNotificationCenter currentNotificationCenter].delegate = self;
That’s enough to start receiving simple Remote Push Notifications. Let’s run our app and take a look at what we have.
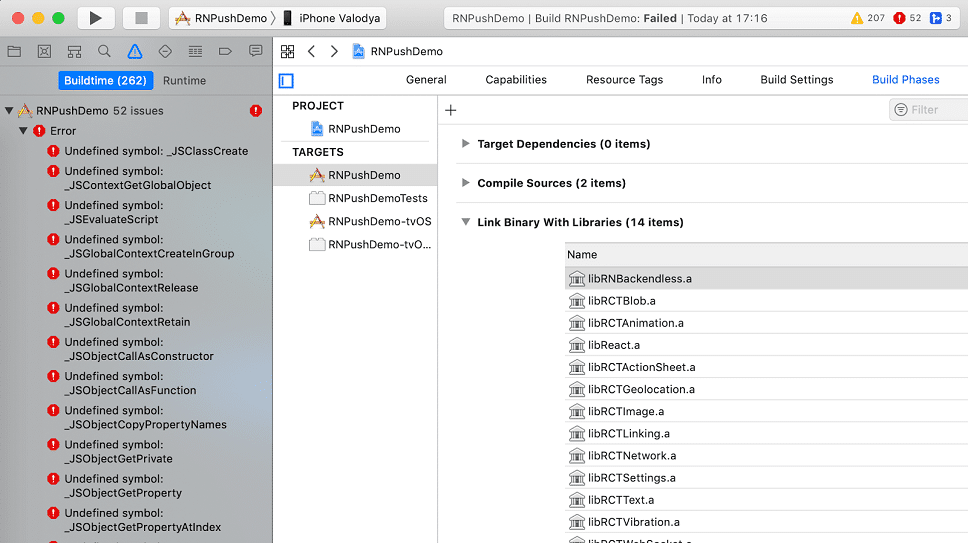
As you can see, the build has failed. =(

But there is a very simple solution which has helped me: I just added JavaScriptCode.framework (see the screenshot below).

When the app is up, you can see a system iOS confirmation for allowing the device to receive push notifications:

That’s because we register the device in our app constructor, which means each time the app starts, we call a device registration method and under the hood, the backendless-react-native module requests a deviceToken from APNS. That’s why you can see this confirmation; once you tap on any button the alert won’t show on the next app launch.
export default class App extends Component<Props> {

 constructor(props) {
   super(props);

   Backendless.Messaging.registerDevice(['default'])
     .then(r => console.log('registerDevice:', r))
     .catch(e => console.log('registerDevice:', e));
 }
...
Let’s check the device registration in Backendless Console. For that, go to Data Service and select the DeviceRegistration table. As you can see now, there are two devices:

You can find all the changes in this commit.
Receiving a Simple Push Notification
Let’s do a little test. We’re going to send a notification from Backendless Console. In the previous article for Android, we created a “test” Push Template, so select it and send.

Alright, looks like it works, but as you can see there is no attachment image. That’s because we used the basic configuration of an Xcode project. In the next section, we will fix it.

As you know, in our app we subscribe to notifications, and each time the app is open and we receive a new push notification, we will log the notifications.
componentDidMount() {
 Backendless.Messaging.addPushNotificationListener(this.onNotification);
}

componentWillUnmount() {
 Backendless.Messaging.removePushNotificationListener(this.onNotification);
}

onNotification = notification => {
 console.log('notification', notification)
};

Advanced iOS Push Notification Setup For React Native
In order to receive more complex push notifications with images, buttons, custom headers, etc., we have to add some code in our React Native app that is able to process received push notifications before displaying them on the device. This can be done by adding the NotificationService Extension which works even if our app is completely closed.
So, let’s add it:


Add the following to the service React libraries and RNBackendless library in the Link Binary With Libraries section:
- JavaScriptCore.framework
- libRCTWebSocket.a
- libReact.a
- libRNBackendless.a

Also, you must add Other Linker Flags in the Build Settings for the NotificationService Extension:
-ObjC
$(inherited)
-lc++

In order to display a push notification based on a Push Notification Template, we need to enable App Groups in the Capabilities section for the extension (you can read more here). The most important thing is your group must contain the BackendlessPushTemplates phrase.


Also, we have to do the same thing and for the main target:


The last step we have to complete is to change the didReceiveNotificationRequest implementation in the NotificationService.m file. Replace it with the following code:
- (void)didReceiveNotificationRequest:(UNNotificationRequest *)request withContentHandler:(void (^)(UNNotificationContent * _Nonnull))contentHandler {
  self.contentHandler = contentHandler;
  self.bestAttemptContent = [request.content mutableCopy];

  [RNBackendless processMutableContent:request withContentHandler:contentHandler];
}
And of course import the RNBackendless module:
#import <RNBackendless/RNBackendless.h>
It’s time for a demo. Let’s send a push notification from Backendless Console, and see what we’ve got now.

As you may recall, our “test” Push Template has a Rich Media URL; it’s just an image stored on the Backendless Files. Also, we have configured the Button Options, but we will talk about that in the next article because Push Notification Buttons have lots of configurations and behaviors.

Here we go, now we can see the image in the received push notification and the notification buttons as well. Looks pretty good, doesn’t it? As you can see, with the Notification Service Extension we implemented, rich push notifications come through.


You can find all the changes in this commit.
Sending Push Notifications to Your React Native App Through API
Now that we know that sending from the Console works, let’s check how it works if we send push notification from API. In the previous article, we implemented an API Service for sending push notifications with a template. Let’s create a few new API Methods. One will send a simple push notification with only a message field, and another one will send more complex push notifications. We will use Codeless Cloud Code for this new service.


As you know, we have a subscription to notifications:
Backendless.Messaging.addPushNotificationListener(this.onNotification);
So, making sure your app is opened (otherwise the listener won’t work), send a push notification one more time. We receive the following object:
{
 "messageId": "message:CBD1C026-AB93-4206-B53B-9F377675A8E4",
 "message": "simple push notification",
 "title": null,
 "subtitle": null
}
It’s as simple as it can be, right?
Now, let’s create an API Method for sending more complex/customized push notifications. I’m going to specify a title, subtitle, badge, and attachment file. Make sure that you have a mutable-content:1 header. In the header, you can send any data and then use it in your app.


Let’s see what we’ve received in notifications listener:
{
 "android-content-text": "android-content-text",
 "messageId": "message:F39A231A-5E79-4656-BCB6-A7C469B90732",
 "ios-alert-title": "ios-alert-title",
 "ios-badge": "3",
 "myCustomHeaderKey": "myCustomHeaderValue",
 "mutable-content": "1",
 "message": "ios-alert-body",
 "ios-alert": "alert message",
 "ios-alert-subtitle": "ios-alert-subtitle",
 "title": "ios-alert-title",
 "subtitle": "ios-alert-subtitle",
 "badge": 3,
 "ios-alert-body": "ios-alert-body",
 "android-ticker-text": "android-ticker-text",
 "attachmentUrl": "https://backendlessappcontent.com/5337DEB0-BE36-32E7-FF41-891739299E00/AB63245C-134B-F4A6-FFC2-DE8ABB4D2000/files/banner-4.jpg"
}
Conclusion
Good job, if you have the same result as we do, you everything did right! As you can see, it may take some time to configure your Xcode project, but once you have handled it, your react native app will be able to receive remote push notifications no matter how you send them, through Backendless Console or through API.
I hope you enjoyed the article and in case if you’ve got any issues or problems or you have any proposals for improving the backendless-react-native module, just contact us on our support forum or our slack channel. Thanks for reading and happy coding!