Real-time data delivery is one of the most important elements of mobile application development. This is primarily for the reason that users want to see up-to-date data in the UI without any additional actions or gestures to update the information. Android developers get a real-time data out of the box with Backendless and we call it our Real-Time Database. This article will show you how to make real-time Android application with Backendless.
Applications using Backendless SDK for Android can subscribe to changes happening in a data table in the database. This quick guide will help you to get an understanding of how Backendless real-time database works. You will build a basic Android app displaying a list of movies.
The movie list will be dynamically updated any time when the data changes in the database. The changes in the database which will be displayed in the application in real-time include: new movies saved in the database, existing movies modified or deleted.
Sample Data
The sample application developed as a part of this quick start guide requires some data to be stored in the database. This section of the guide contains instructions for populating the database with sample data. There are several ways for getting data into Backendless Database, however, in this guide we will consider only two methods, both of them use Backendless Console. The first one imports data from a CSV file, the second one uses the built-in REST Console:
Create a file called Movies.csv with the following content:
"description(STRING(100))","rating(STRING(36))","release_year(STRING(36))","title(STRING(36))","objectId(STRING_ID)","ownerId(STRING(36))","created(DATETIME)","updated(DATETIME)"
"A Intrepid Documentary of a Sumo Wrestler And a Astronaut who must Battle a Composer in The Outback","G","2006","CROSSROADS CASUALTIES","2AF53B19-6A91-0F28-FF05-85980DFEE500",null,"Tue Jul 02 08:26:30 UTC 2019",null
"A Thoughtful Tale of a Woman And a A Shark who must Conquer a Dog in A Monastery","NC-17","2006","JASON TRAP","56B0EBD9-3C2B-68D6-FFFB-7EE98388A000",null,"Tue Jul 02 08:26:30 UTC 2019",null
"A Touching Drama of a Crocodile And a Crocodile who must Conquer a Explorer in Soviet Georgia","G","2006","DESTINY SATURDAY","81F71483-A809-4662-FF43-951511680000",null,"Tue Jul 02 08:26:30 UTC 2019",null
"A Epic Drama of a Mad Scientist And a Explorer who must Succumb a Waitress in An Abandoned Fun House","PG","2006","SKY MIRACLE","D1040D67-A9E8-72C0-FF4B-88E219616A00",null,"Tue Jul 02 08:26:30 UTC 2019",null
"A Action-Packed Reflection of a Car And a Moose who must Outgun a Car in A Shark Tank","R","2006","PLUTO OLEANDER","D9B7498B-CF23-6D70-FFB8-0AA56859C000",null,"Tue Jul 02 08:26:30 UTC 2019",null
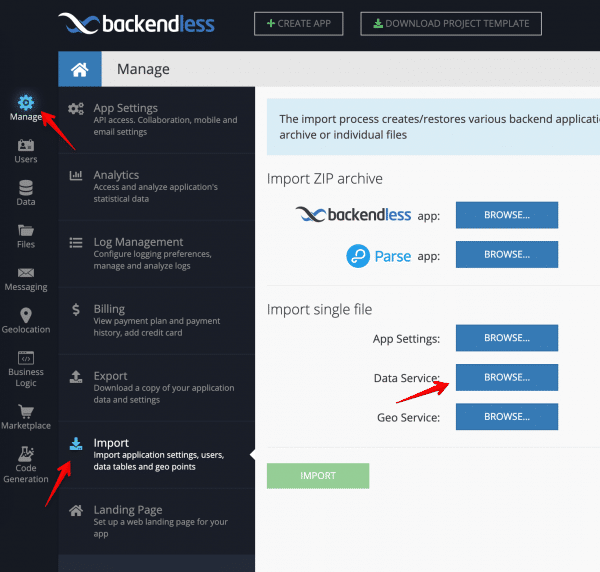
Open Backendless Console and navigate to Manage -> Import section and import the file as described on the screenshot below:
Click the IMPORT button. This will add the data into the Movies data table. The name of the table in the database is the same as the name of the CSV file.
Open Backendless Console and click the Data icon. Create a new data table with the name “Movies”:
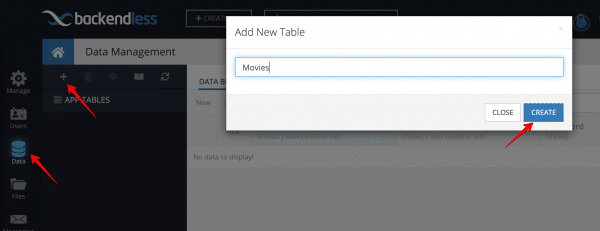
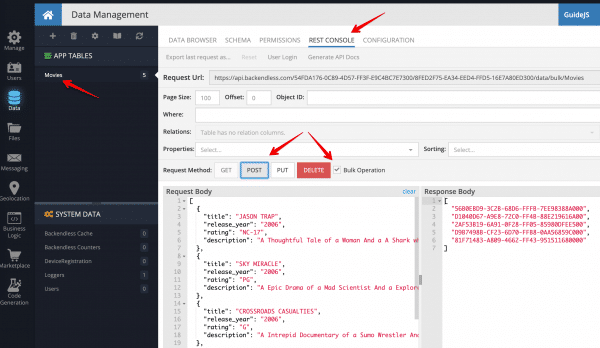
You will be prompted to create columns in the new data table. Cancel out as the columns will be created dynamically with the following instructions. Click the REST Console tab. You will make a single API call which will create data table schema and will save some sample data for the app:
- Copy the JSON shown below and paste it into the Request body field.
- Select the Bulk Operation checkbox
- Click the POST button to submit the API request.
[
 {
  "title": "JASON TRAP",
  "release_year": "2006",
  "rating": "NC-17",
  "description": "A Thoughtful Tale of a Woman And a A Shark who must Conquer a Dog in A Monastery"
 },
 {
  "title": "SKY MIRACLE",
  "release_year": "2006",
  "rating": "PG",
  "description": "A Epic Drama of a Mad Scientist And a Explorer who must Succumb a Waitress in An Abandoned Fun House"
 },
 {
  "title": "CROSSROADS CASUALTIES",
  "release_year": "2006",
  "rating": "G",
  "description": "A Intrepid Documentary of a Sumo Wrestler And a Astronaut who must Battle a Composer in The Outback"
 },
 {
  "title": "PLUTO OLEANDER",
  "release_year": "2006",
  "rating": "R",
  "description": "A Action-Packed Reflection of a Car And a Moose who must Outgun a Car in A Shark Tank"
 },
 {
  "title": "DESTINY SATURDAY",
  "release_year": "2006",
  "rating": "G",
  "description": "A Touching Drama of a Crocodile And a Crocodile who must Conquer a Explorer in Soviet Georgia"
 }
]
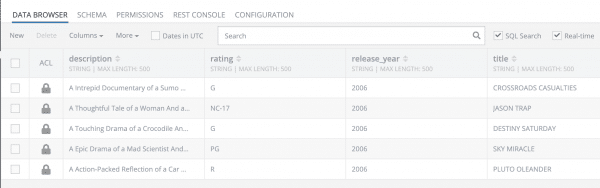
You can verify that the data has been stored in the database by clicking the DATA BROWSER tab:
Movies List App
Create the Android project and add the following lines into the dependencies element in gradle.build to configure the Backendless library and the real-time database integration. Make sure to replace VERSION FROM MAVEN with a specific version number:
dependencies {
implementation 'com.backendless:backendless:VERSION FROM MAVEN'
implementation 'androidx.recyclerview:recyclerview:1.1.0-beta01'
implementation ('io.socket:socket.io-client:1.0.0') {
// excluding org.json which is provided by Android
exclude group: 'org.json', module: 'json'
}
}
Add the Internet permission to your AndroidManifest.xml:
<uses-permission android:name="android.permission.INTERNET" />
Create layout resource file “item_movie.xml” to display the movie object in the list.
<?xml version="1.0" encoding="utf-8"?>
<LinearLayout xmlns:android="http://schemas.android.com/apk/res/android"
   android:layout_width="match_parent"
   android:layout_height="wrap_content"
   xmlns:tools="http://schemas.android.com/tools"
   android:padding="8dp"
   android:orientation="vertical">

   <TextView
       android:id="@+id/title_txt"
       android:layout_width="wrap_content"
       android:layout_height="wrap_content"
       tools:text="Title"
       android:textSize="18sp"
       android:textStyle="bold"
       android:textColor="#000" />

   <TextView
       android:id="@+id/description_txt"
       android:layout_width="match_parent"
       android:layout_height="wrap_content"
       android:textColor="#000"
       tools:text="description" />

   <RelativeLayout
       android:layout_width="match_parent"
       android:layout_height="wrap_content">

       <TextView
           android:id="@+id/rating_txt"
           android:layout_width="wrap_content"
           android:layout_height="wrap_content"
           android:textColor="#000"
           android:textStyle="bold"
           tools:text = "R" />

       <TextView
           android:id="@+id/release_year_txt"
           android:layout_width="wrap_content"
           android:layout_height="wrap_content"
           android:layout_toEndOf="@id/rating_txt"
           android:paddingStart="8dp"
           android:textColor="#000"
           android:textStyle="bold"
           tools:text="1996" />

       <TextView
           android:id="@+id/added_txt"
           android:layout_width="wrap_content"
           android:layout_height="wrap_content"
           android:layout_alignParentEnd="true"
           tools:text="Added now" />

   </RelativeLayout>

   <View
       android:layout_width="match_parent"
       android:layout_height="1dp"
       android:background="#000"
       android:layout_marginTop="4dp"/>

</LinearLayout>
Open your activity_main.xml file and add the code to display the list of movies:
<?xml version="1.0" encoding="utf-8"?>
<LinearLayout
xmlns:android="http://schemas.android.com/apk/res/android"
xmlns:app="http://schemas.android.com/apk/res-auto"
xmlns:tools="http://schemas.android.com/tools"
android:layout_width="match_parent"
android:layout_height="match_parent"
tools:context=".MainActivity"
android:background="#fff">

<androidx.recyclerview.widget.RecyclerView
android:id="@+id/movies_recycler_view"
android:layout_width="match_parent"
android:layout_height="wrap_content" />

</LinearLayout>
Then create the class Movies.java to represent movie object in database:
import java.util.Date;

public class Movies {
   private Date created;
   private String release_year;
   private String ownerId;
   private String title;
   private String rating;
   private String objectId;
   private String description;
   private java.util.Date updated;

   public java.util.Date getCreated() {
       return created;
   }

   public String getReleaseYear() {
       return release_year;
   }

   public void setReleaseYear(String releaseYear) {
       this.release_year = releaseYear;
   }

   public String getOwnerId() {
       return ownerId;
   }

   public String getTitle() {
       return title;
   }

   public void setTitle(String title) {
       this.title = title;
   }

   public String getRating() {
       return rating;
   }

   public void setRating(String rating) {
       this.rating = rating;
   }

   public String getObjectId() {
       return objectId;
   }

   public String getDescription() {
       return description;
   }

   public void setDescription(String description) {
       this.description = description;
   }

   public java.util.Date getUpdated() {
       return updated;
   }
}
Create the MoviesAdapter class:
import androidx.recyclerview.widget.RecyclerView;

import java.text.SimpleDateFormat;
import java.util.ArrayList;
import java.util.Locale;

public class MoviesAdapter extends RecyclerView.Adapter {
   private ArrayList movies = new ArrayList<>();
   private SimpleDateFormat dateFormat;

   public MoviesAdapter() {
       dateFormat = new SimpleDateFormat("E MMM d yyyy", Locale.getDefault());
   }

   @NonNull
   @Override
   public MoviesViewHolder onCreateViewHolder(@NonNull ViewGroup parent, int viewType) {
       View view = LayoutInflater.from(parent.getContext())
           .inflate(R.layout.item_movie, parent, false);
       return new MoviesViewHolder(view);
   }

   @Override
   public void onBindViewHolder(@NonNull MoviesViewHolder holder, int position) {
       Movies movie = movies.get(position);
       holder.title.setText(movie.getTitle());
       holder.description.setText(movie.getDescription());
       holder.rating.setText(movie.getRating());
       holder.releaseYear.setText(movie.getReleaseYear());
       holder.added.setText("added " + dateFormat.format(movie.getCreated()));
   }

   @Override
   public int getItemCount() {
       return movies.size();
   }

   public void setMovies(ArrayList movies) {
       this.movies = movies;
       notifyDataSetChanged();
   }

   class MoviesViewHolder extends RecyclerView.ViewHolder {
       private TextView title;
       private TextView description;
       private TextView rating;
       private TextView releaseYear;
       private TextView added;

       MoviesViewHolder(@NonNull View view) {
           super(view);
           title = view.findViewById(R.id.title_txt);
           description = view.findViewById(R.id.description_txt);
           rating = view.findViewById(R.id.rating_txt);
           releaseYear = view.findViewById(R.id.release_year_txt);
           added = view.findViewById(R.id.added_txt);
       }
   }
}
Also add the following code to your activity:
import androidx.appcompat.app.AppCompatActivity;
import androidx.recyclerview.widget.LinearLayoutManager;
import androidx.recyclerview.widget.RecyclerView;

import android.os.Bundle;
import android.util.Log;

import com.backendless.Backendless;
import com.backendless.IDataStore;
import com.backendless.async.callback.AsyncCallback;
import com.backendless.exceptions.BackendlessFault;
import com.backendless.persistence.DataQueryBuilder;

import java.util.ArrayList;
import java.util.List;

public class MainActivity extends AppCompatActivity {
   private static final String API_HOST = "https://api.backendless.com";
   private static final String APP_ID = "YOUR_APP_ID";
   private static final String APP_KEY = "YOUR_API_KEY";
   private static final String TAG = "RTDatabase";
   private RecyclerView recyclerView;
   private MoviesAdapter adapter;
   private IDataStore moviesStore = Backendless.Data.of(Movies.class);
   private ArrayList moviesList;

   @Override
   protected void onCreate(Bundle savedInstanceState) {
       super.onCreate(savedInstanceState);
       setContentView(R.layout.activity_main);
       initUI();
       initBackendless();
       enableRealTime();
       getMovies();
   }

   private void initUI() {
       recyclerView = findViewById(R.id.movies_recycler_view);
       recyclerView.setLayoutManager(new LinearLayoutManager(this));
       adapter = new MoviesAdapter();
       recyclerView.setAdapter(adapter);
   }

   private void initBackendless() {
       Backendless.setUrl(API_HOST);
       Backendless.initApp(this, APP_ID, APP_KEY);
   }

   private void enableRealTime() {
       // we will add code for Real Time Database here
   }

   private void getMovies() {
       DataQueryBuilder queryBuilder = DataQueryBuilder.create();
       queryBuilder.setPageSize(100);
       queryBuilder.setSortBy("created");
       moviesStore.find(queryBuilder, new AsyncCallback<List>() {
           @Override
           public void handleResponse(List response) {
               moviesList = new ArrayList<>(response);
               adapter.setMovies(moviesList);
           }

           @Override
           public void handleFault(BackendlessFault fault) {
             Toast.makeText(MainActivity.this,
               "Error occurred: " + fault.getMessage(), Toast.LENGTH_SHORT).show();
           }
       });
   }
}
Code Review
Backendless Initialization
The class starts with the method which initializes Backendless SDK:
private static final String API_HOST = "https://api.backendless.com";
private static final String APP_ID = "YOUR_APP_ID";
private static final String APP_KEY = "YOUR_API_KEY";

private void initBackendless() {
   Backendless.setUrl(API_HOST);
   Backendless.initApp(this, APP_ID, APP_KEY);
}
Make sure to put your application ID and API Key into the code. You can find them in Backendless Console on the Manage -> App Settings screen.
RecyclerView
There is MoviesAdapter for RecyclerView that renders Movies objects in UI:
public class MoviesAdapter extends RecyclerView.Adapter
Retrieving a List of Movies
The following line of code obtains a reference to the Movies data table:
private IDataStore moviesStore = Backendless.Data.of(Movies.class);
Then the code loads database records with paging and sorting options:
private void getMovies() {
   DataQueryBuilder queryBuilder = DataQueryBuilder.create();
   queryBuilder.setPageSize(100);
   queryBuilder.setSortBy("created");
   moviesStore.find(queryBuilder, new AsyncCallback<List>() {
       @Override
       public void handleResponse(List response) {
           moviesList = new ArrayList<>(response);
           adapter.setMovies(moviesList);
       }

       @Override
       public void handleFault(BackendlessFault fault) {
           Toast.makeText(MainActivity.this,
             "Error occurred: " + fault.getMessage(), Toast.LENGTH_SHORT).show();
       }
   });
}
Once the data is loaded, the result is a collection of movie objects. The collection is assigned to variable moviesList. The moviesList variable is important for real-time integration, we will come to it a little bit later. And also when data is loaded, it is rendered. In case if an error occurs, we will catch it and show the error message. The enableRealTime method is left empty for now.
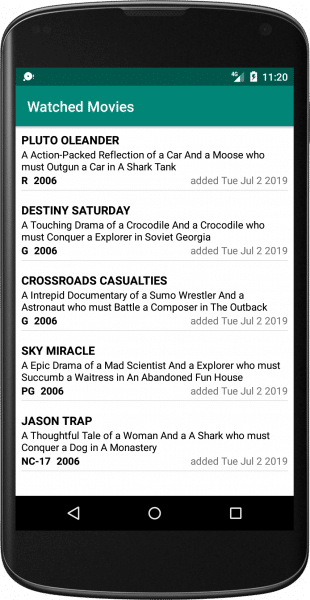
With the code we have added by now you can already experience the app. To do this build and run the project either in an emulator or on a device. You should see the following screen:
About Real Time Database
Before we continue, let’s review what Backendless Real Time Database is. In most cases, you want your application to display the up-to-date data without any additional user actions (such as pull to refresh for instance) or any additional requests to the server. In Backendless Real Time Database, there are three main events which, once triggered, get your clients app synchronized with the server data:
- create – this event is delivered to the client app when a new object is created on the server
- update – this event is delivered to the client app when an existing object is changed on the server
- delete – this event is delivered to the client app when an existing object is deleted on the server
All our SDKs (JS, Android, iOS and .NET) include necessary logic responsible for establishing and maintaining a connection to our real-time servers. The SDKs also provide the API to subscribe to the events listed above. For more information see the Real-Time Database API documentation.
Integrating the Real Time Database Into the Android App
Now we got to the final part of the guide – adding real-time subscriptions to the code. When a new database record in the Movies</code table is created, or an existing one is updated or deleted, we want the app to be notified about it and re-render the UI. Additionally, we need to maintain an up-to-date list in the app. For this purpose the code uses the moviesList variable. The list of movies in the UI will correspond to the objects in moviesList variable.
To add the real-time integration, modify the enableRealTime function as shown below:
private void enableRealTime() {
   EventHandler rtHandlers = moviesStore.rt();

   rtHandlers.addCreateListener(new AsyncCallback() {
       @Override
       public void handleResponse(Movies response) {
           moviesList.add(response);
           adapter.setMovies(moviesList);
       }

       @Override
       public void handleFault(BackendlessFault fault) {
           Log.e(TAG, fault.getMessage());
       }
   });

   rtHandlers.addUpdateListener(new AsyncCallback() {
       @Override
       public void handleResponse(Movies response) {
           for (int i = 0; i < moviesList.size(); i++) {
               if (moviesList.get(i).getObjectId().equals(response.getObjectId())) {
                   moviesList.set(i, response);
               }
           }
           adapter.setMovies(moviesList);
       }

       @Override
       public void handleFault(BackendlessFault fault) {
           Log.e(TAG, fault.getMessage());
       }
   });

   rtHandlers.addDeleteListener(new AsyncCallback() {
       @Override
       public void handleResponse(Movies response) {
           Iterator iterator = moviesList.iterator();
           while (iterator.hasNext()) {
               Movies movie = iterator.next();
               if (movie.getObjectId().equals(response.getObjectId())) {
                   iterator.remove();
               }
           }
           adapter.setMovies(moviesList);
       }

       @Override
       public void handleFault(BackendlessFault fault) {
           Log.e(TAG, fault.getMessage());
       }
   });
}
As you can see, the code is very straight-forward. There are three subscriptions for each event (a new movie is created, a movie is updated, and a movie is deleted):
createListener– new movie record is pushed into moviesList and the UI is re-renderedupdateListener– the updated movie object, which is the argument of the listener function, replaces one in moviesList and the UI is re-rendereddeleteListener– the deleted movie object is removed from movieList and the UI is re-rendered
Let’s check what we’ve got:
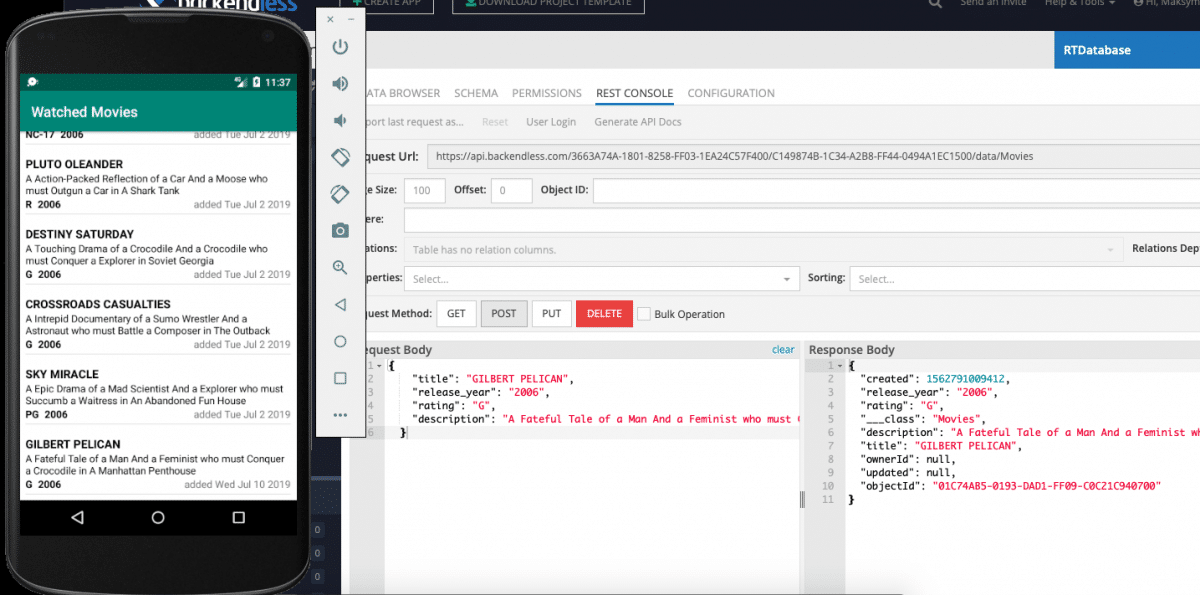
Experience Real-Time Database Integration
- Open the browser with Backendless Console and the created Android app.
- Create a new movie record in Backendless Console’s Data Browser, you will see the new movie cell will be rendered immediately in the Android app.
- Also try changing or deleting a few records in Data Browser and watch how fast the changes are reflected in the app.
- The same operation can be done in REST Console or using any other our SDKs (iOS, JS, REST …)
That’s all folks, happy coding!