Client-side Setup
Flutter integration in Backendless is implemented in a Flutter plugin. Follow the steps below to enable the integration in your application:
-
Step 1: Register the plugin
To use this plugin in your Flutter project, addbackendless_sdkas a dependency in your pubspec.yaml file. (make sure to use the latest released version in the pubspec file):
dependencies: backendless_sdk: ^7.2.3 -
Step 2: Import the Backendless SDK:
Add the following import to your Dart code:
import 'package:backendless_sdk/backendless_sdk.dart'; -
Step 3: Initialize the Backendless SDK:
The the client application must initialize the SDK with one of the approaches shown below. -
Using your Backendless subdomain name: Every Backendless application receives a subdomain under the
backendless.appdomain. The subdomain is in the format ofxxxx.backendless.app. The subdomain is used to identify your backend when the client app uses Backendless APIs and also to run client-side applications created with UI Builder. To see the subdomain name assigned to your application navigate to the main dashboard of your application, you will see the Backendless subdomain field. Use the copy icon on the right side of the field to copy the value: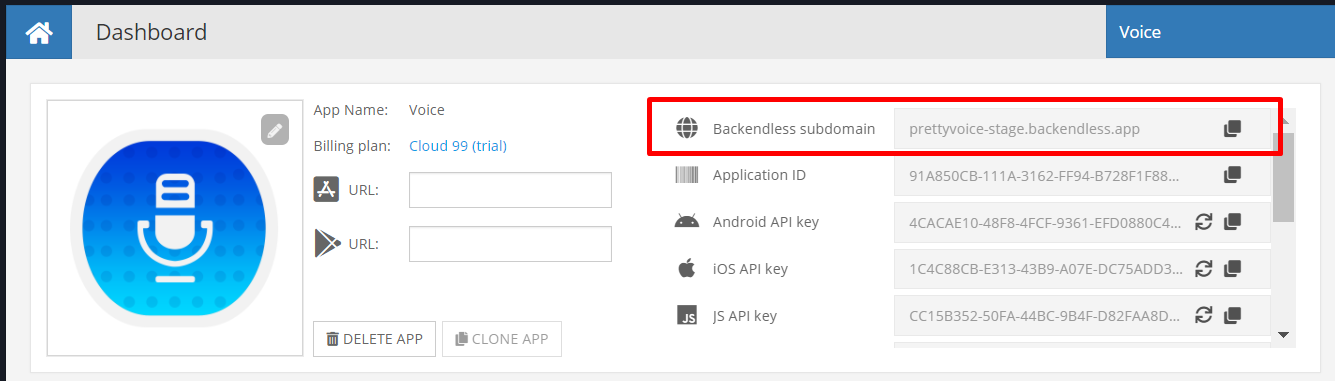
The code to initialize your Flutter application with your subdomain name is:
@override void initState() { super.initState(); Backendless.initApp( customDomain: "https://xxxx.backendless.app" ); } -
Your own domain name. You can assign a custom domain to your application using the Manage > App Settings > Custom Domain section of Backendless Console. When a custom domain is assigned, your Flutter application should be initialized with the following code:
@override
void initState() {
  super.initState();
  Backendless.initApp( "http://your-own-custom-domain.com" );
}
To enable SSL for your custom domain, make sure your application is on the Scale plan. Configure a custom domain in Backendless Console, we will gladly generate an SSL certificate for your domain. - Backendless native endpoint. Every Backendless cluster (hosting zone) has a native endpoint. Your application's backend is running in one of the clusters below. It is important to make sure to use the endpoint that correspond to the cluster. The North American endpoint is automatically embedded in the SDK, it is not necessary to set it in the code, however, the EU endpoint must be explicitly specified. Use the code below based on the cluster your app is in:
North American cluster:
@override
void initState() {
  super.initState();
  Backendless.initApp(applicationId: APPLICATION_ID, androidApiKey: ANDROID_API_KEY, iosApiKey: IOS_API_KEY);
}
South American cluster:
@override
void initState() {
  super.initState();
  Backendless.setUrl("https://api.sa.backendless.com")
  Backendless.initApp(applicationId: APPLICATION_ID, androidApiKey: ANDROID_API_KEY, iosApiKey: IOS_API_KEY);
}
European Union cluster:
@override
void initState() {
  super.initState();
  Backendless.setUrl("https://eu-api.backendless.com")
  Backendless.initApp(applicationId: APPLICATION_ID, androidApiKey: ANDROID_API_KEY, iosApiKey: IOS_API_KEY);
}
The values for"APPLICATION_ID"and API key arguments must be obtained from Backendless Console. They are available on the main dashboard as well as the Manage > App Settings screen. -
Real-Time Dependency. If you plan on using the real-time database and/or messaging in your application, add the following dependency in android/app/build.gradle:
implementation ('io.socket:socket.io-client:1.0.0') { // excluding org.json which is provided by Android exclude group: 'org.json', module: 'json' } -
Step 5: Use the Backendless APIs in your code. Below is a sample code which stores an object in Backendless database:
Backendless.initApp(applicationId: APPLICATION_ID, androidApiKey: ANDROID_API_KEY, iosApiKey: IOS_API_KEY);
// create a Map object. This will become a record in a database table
Map testObject = new Map();

// add a property to the object.
// The property name ("foo") will become a column in the database table
// The property value ("bar") will be stored as a value for the stored record
testObject["foo"] = "bar";

// Save the object in the database. The name of the database table is "TestTable".
Backendless.data.of("TestTable").save(testObject).then(
  (response) => print("Object is saved in Backendless. Please check in the console."));
Proguard Configuration
If your Flutter application uses code shrinker (for example Proguard or R8), it is necessary to add the following configuration parameters to your Proguard config:
-dontwarn com.backendless.**
-dontwarn weborb.**
-keep class weborb.** {*;}
-keep class com.backendless.** {*;}
Application ID and API Keys
Values for the APPLICATION_ID, ANDROID_API_KEY and IOS_API_KEY arguments in the application initialization call must be obtained through the Backendless Console:
- Login to your account and select the application.
- Click the Manage icon from the vertical icon-menu on the left.
- The App Settings section is selected by default. The interface contains values for Application ID and API keys for each supported client-side environment.
- Use the Copy icon to copy the value into the system clipboard.

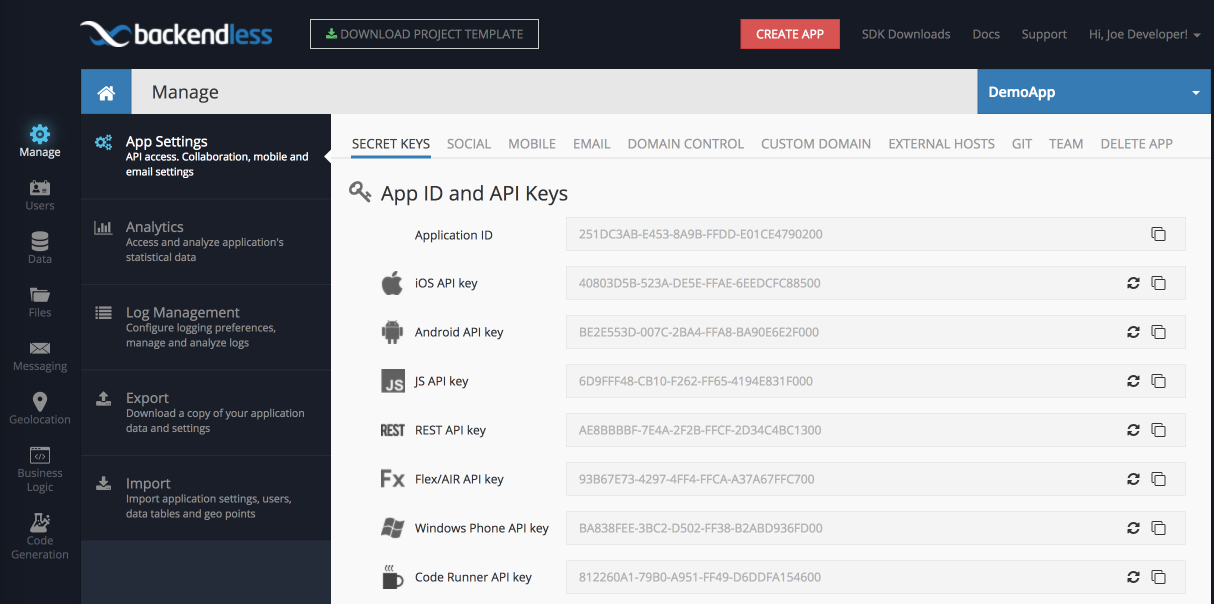
Make sure to use the "Android API Key" and "iOS API key" for the ANDROID_API_KEY and IOS_API_KEY arguments accordingly.