Cache and CDN Integration
The Backendless File Storage feature incorporates configuration options that facilitate content caching through CDN services. Content caching offers several advantages, including the ability to geographically distribute content, thereby reducing network latency. Additionally, it leads to a decrease in the utilization of the file download API and contributes to enhanced application performance.
You can set up caching preferences both at the folder level and for individual files within Backendless. If you configure caching at the folder level, it will be applied recursively to all files contained within that folder and its subfolders. However, keep in mind that if a specific individual file has its own caching configuration, it will override the folder-level settings.
Cache Control
To configure cache settings, follow these steps:
- Go to the Files section within the Backendless Console.
- Find the specific folder or file for which you want to set up caching.
- Click on the icon indicated in the screenshot below:
![]()
When you click the icon, the following popup is displayed where you can configure the caching options.This will allow you to access and modify the cache configuration according to your requirements.
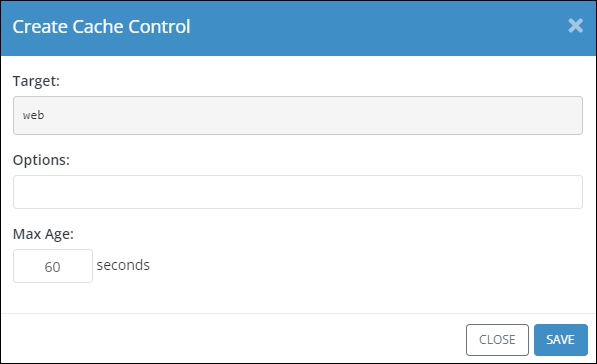
In the Target field, you will find the name of the folder or file for which you are setting up caching.
In the Options field, you should provide a value that serves as a directive within the Cache-Control header. You can refer to the Cache-Control documentation for a comprehensive list of available directives. The value you input in this field should align with the configuration requirements of the CDN service you intend to utilize. In many scenarios, the "public" directive suffices. It's important to note that this field can accommodate multiple directives, separated by commas.
In the Max Age field, you should enter a numerical value that determines the duration, in seconds, for which a cached file will be retained in the CDN cache. Once this duration has passed, the cached file will be invalidated, and it will be fetched anew from Backendless.
CDN Integration
The process of integrating with a CDN usually follows these steps:
- Create a CDN Account: Begin by registering an account with a CDN service provider.
- Domain Name Allocation: Allocate a domain name and associate it with your CDN account or service. This domain name will be used to access your content through the CDN.
- Hostname Configuration: Specify the hostname of your Backendless application within the CDN settings. This is the hostname assigned to your application by Backendless, it is in the
XXX.backendless.appformat. This step informs the CDN about the origin location from which the files need to be fetched. - DNS Configuration. Configure a CNAME (or A) DNS record for the hostname from step 2. The CDN service provides the instructions for the value of the CNAME record. This points the domain name to the CDN service.
- SSL Certificate Allocation: Obtain and allocate an SSL certificate for the domain name you assigned in step 2. This certificate ensures secure communication between users and your content delivered through the CDN.
By following these steps, you establish a seamless connection between your Backendless application and the CDN, optimizing content delivery and enhancing the overall user experience.
CDN with Host Override
The choice of hostname to specify in step 3 will vary based on the capabilities of the CDN service you opt for. It hinges on whether the CDN service provides support for the "Host override" feature. This feature, once configured, directs the CDN service to utilize a designated hostname in the Host request header.
If the CDN service you are utilizing offers support for the "Host override" option, it's recommended to employ the XXX.backendless.app hostname for step 3. This hostname is associated with your Backendless application and can be retrieved from the Backendless Console by accessing the Manage > App Settings screen.
Keep in mind that the "Host override" option necessitates a specific value to be configured. This value must align with the XXX.backendless.app hostname. By maintaining consistency between the specified hostname and the "Host override" value, you ensure precise handling of requests by the CDN service and accurate content delivery from the intended source.
CDN without Host Override
If the CDN service you're opting for does not support the Host Override feature, the integration instructions differ as outlined below:
- Create a CDN Account: Begin by registering an account with your chosen CDN service provider.
- Domain Name Allocation: Select a domain name that will serve as the access point for your Backendless application and files. Create a CNAME record in your DNS for the chosen domain name. This CNAME record should be mapped to one of the following:
develop.backendless.com(for apps in the North American cluster)eu-develop.backendless.com(for apps in the European Union cluster) - Domain Name Configuration in Backendless: Add your chosen domain name within the Backendless Console by navigating to Manage > App Settings > Custom Domains.
- Domain Name Configuration in CDN: Use the same domain name from Step 2 and associate it with your CDN account or service. This domain name will be used to access your content through the CDN.
- Hostname Configuration: In the CDN settings, specify the hostname of your Backendless application. This hostname is in the format of
XXX.backendless.appand is assigned by Backendless. This step informs the CDN about the source location for fetching files. - DNS Configuration: Remove the previously created CNAME record from Step 2, and set up a new CNAME (or A) DNS record for the hostname from Step 2. Follow the instructions provided by the CDN service to configure the value of the CNAME record. This step directs the domain name to the CDN service.
- SSL Certificate Allocation: Obtain and allocate an SSL certificate for the domain name you assigned in Step 2. This certificate ensures secure communication between users and the content delivered through the CDN.
By following these instructions, you can successfully integrate your Backendless application with the CDN service, even without the Host Override feature.
Integration Demo Video
The video below offers a comprehensive overview of the CDN Integration feature, along with step-by-step instructions for setting up the integration between the Fastly CDN service and Backendless.