Using GraphQL With Backendless
GraphQL is a powerful language that allows you to extract data from your backend via a single endpoint that can take complex queries and return data in a structure that is appropriate for the client. In this article, we will create a simple application to manage articles. For API, we will use the GraphQL implementation for Java (https://github.com/graphql-java/graphql-java).
Database Schema
As an example, we will build an endpoint that will return information about articles, their authors, and comments. The domain entities form a deep graph which we will need for the example. We will have the following entities in our database schema:
1. Article table schema
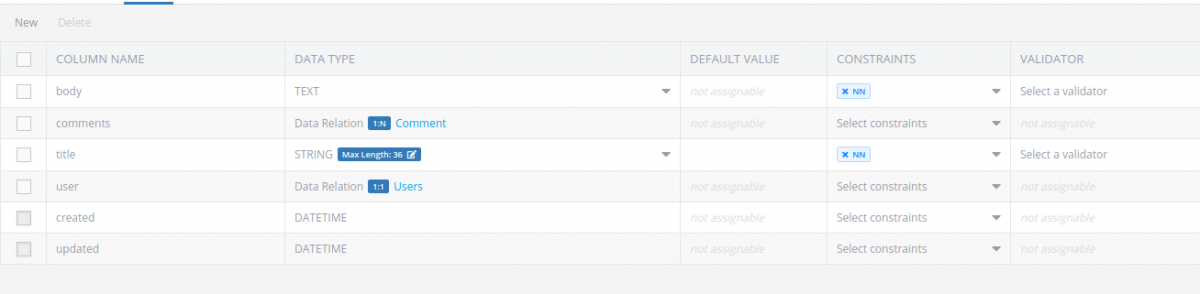
2. Comment table schema

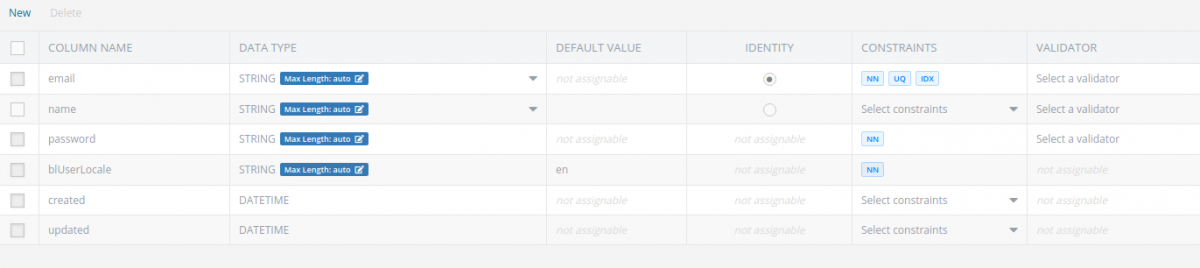
3. User table schema
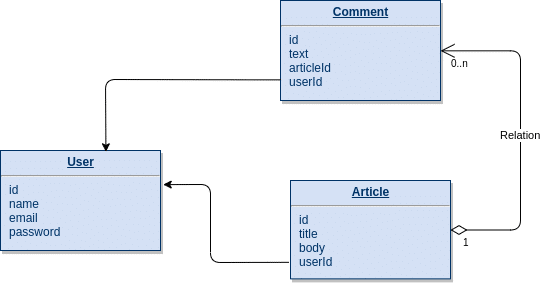
All relations between entities can be seen in the chart below:
Fill tables with data in a way that each table has at least one record. All data that was used for this article will be shown as a result of a “select all” query call to the GraphQL endpoint.
Let’s move to our backend logic.
Project Preparations
Download from Backendless Console a draft project for business logic. Unzip it and open it in an IDE of your choosing. Download from Maven Central the jar artifact for GraphQL-Java library and put it in “libs” directory of the project. For this tutorial, version 13 of the library was used as the last stable one.
A full list of available versions can be checked by the following link (https://mvnrepository.com/artifact/com.graphql-java/graphql-java). You also need to download and place into the “libs” folder all compile dependencies of this library.
Now let’s create a custom Backendless service called “GraphQLEndpoint” with one method “process”. This service will process all queries from the client code:
package com.graphql.services;

import com.backendless.servercode.BackendlessService;

import java.util.Collections;
import java.util.Map;

@BackendlessService( name = "graph_ql" )
public class GraphQLEndpoint
{
  public Map<String, Object> process( String query )
  {
    return Collections.emptyMap();
  }
}
In the code throughout the remainder of this article, the samples package and import statements will be omitted for brevity reasons.
Now we must build the project and run ./CodeRunner.sh locally to verify that all dependencies are present and work properly. After that, we can deploy it to Backendless online.
All required preparations have now been made and its time to start configuring GraphQL itself.
API Queries
First, we need to create the schema for the endpoint. In short, the schema is the description of queries and their results. It includes information about the names of queries and params that they receive. It also includes information about the result data structure, such as field names and types.
When we create a schema, we define the requirements of our API. So we must think carefully about the structure of query results and queries themselves.
For our example, the schema will contain only two queries:
findAllArticlesfor retrieving all articles. It will be able to return a list of articles with nested related entities.findArticleByIdfor retrieving an article by its identifier. It will be able to return a specific article with its nested related entities.
For each table, we will create a type that will describe the fields of entities (names and types).
The schema will look like this:
schema {
    query: Query
}

type Query {
    findAllArticles: [Article]
    findArticleById(objectId: ID!): Article
}

type Article {
    objectId: ID
    title: String
    body: String
    user: User
    commentsAmount: Int
    comments: [Comment]

}

type User {
    objectId: String
    name: String
    email: String
}

type Comment {
    objectId: ID
    text: String
    user: User
}
Place this schema in the schema.graphqls file and put it under the src folder.
As you can see, in types that describe entities, most of the fields match those from the entities. Other fields are synthetic and we must tell GraphQL how to calculate them. The logic for the calculation of synthetic fields in GraphQL is called a “fetcher”.
Actually, for all fields in GraphQL, fetchers are used. Those fetchers are called “property-fetchers” and they simply map values from the database entity to the result data transfer object. They all can be redefined by a custom fetcher.
Also, it is required that fetchers must be provided for queries. In our case, we must create fetchers for “findAllArticles” and “findArticleById”. We also will create fetchers for fields with relations. In this way, related data will be loaded only in cases where it is required by the client.
All fetchers are listed below:
package com.graphql.services;

import com.backendless.Backendless;
import com.backendless.persistence.LoadRelationsQueryBuilder;
import graphql.schema.DataFetchingEnvironment;

import java.util.List;
import java.util.Map;

public class DataFetchers
{
  public static List<Map> findAllArticles( DataFetchingEnvironment dataFetchingEnvironment )
  {
    return Backendless.Data.of( "Article" ).find();
  }
  public static Map findArticleById( DataFetchingEnvironment dataFetchingEnvironment )
  {
    return Backendless.Data.of( "Article" ).findById(
            dataFetchingEnvironment.<String>getArgument( "objectId" )
    );
  }

  public static List<Map<String, Object>> articleComments( DataFetchingEnvironment dataFetchingEnvironment )
  {
    return loadRelations( "Article", "comments", dataFetchingEnvironment );
  }

  public static int articleCommentsAmount( DataFetchingEnvironment dataFetchingEnvironment )
  {
    return articleComments( dataFetchingEnvironment ).size();
  }

  public static Map commentAuthor( DataFetchingEnvironment dataFetchingEnvironment )
  {
    return loadRelations( "Comment", "user", dataFetchingEnvironment ).get( 0 );
  }

  public static Map articleAuthor( DataFetchingEnvironment dataFetchingEnvironment )
  {
    return loadRelations( "Article", "user", dataFetchingEnvironment ).get( 0 );
  }

  private static List<Map<String, Object>> loadRelations(
          String parentName,
          String relationName,
          DataFetchingEnvironment dataFetchingEnvironment
  )
  {
    LoadRelationsQueryBuilder<Map<String, Object>> builder = LoadRelationsQueryBuilder.ofMap().setRelationName( relationName );

    return Backendless.Data.of( parentName ).loadRelations(
            (String) dataFetchingEnvironment.<Map<String, Object>>getSource().get( "objectId" ),
            builder
    );
  }
}
Fetchers are grouped in a separate class called DataFetchers. Now we add logic to the GraphQLEndpoint:
@BackendlessService( name = "graph_ql" )
public class GraphQLEndpoint
{
  private GraphQL graphQL;

  public GraphQLEndpoint()
  {
    String dsl = new Scanner( this.getClass().getClassLoader().getResourceAsStream( "schema.graphqls" ) ).useDelimiter( "\\Z" ).next();
    TypeDefinitionRegistry registry = new SchemaParser().parse( dsl );
    RuntimeWiring runtimeWiring = buildWiring();
    GraphQLSchema schema = new SchemaGenerator().makeExecutableSchema( registry, runtimeWiring );
    graphQL = GraphQL.newGraphQL( schema ).build();

  }

  public Map<String, Object> process( String query )
  {
    return graphQL.execute( query ).toSpecification();
  }

  private RuntimeWiring buildWiring()
  {
    return RuntimeWiring.newRuntimeWiring()
            .type(
                    TypeRuntimeWiring.newTypeWiring( "Query" ).dataFetcher( "findAllArticles", DataFetchers::findAllArticles )
            )
            .type(
                    TypeRuntimeWiring.newTypeWiring( "Query" ).dataFetcher( "findArticleById", DataFetchers::findArticleById )
            )
            .type(
                    TypeRuntimeWiring.newTypeWiring( "Article" ).dataFetcher( "commentsAmount", DataFetchers::articleCommentsAmount )
            )
            .type(
                    TypeRuntimeWiring.newTypeWiring( "Article" ).dataFetcher( "comments", DataFetchers::articleComments )
            )
            .type(
                    TypeRuntimeWiring.newTypeWiring( "Article" ).dataFetcher( "user", DataFetchers::articleAuthor )
            )
            .type(
                    TypeRuntimeWiring.newTypeWiring( "Comment" ).dataFetcher( "user", DataFetchers::commentAuthor )
            )
            .build();
  }
}
In the constructor of the service, an executable schema is created. It requires two dependencies – type definition registry and runtime wiring for custom data fetchers. The first dependency is built from the file with the schema. The second dependency is created and configured by the method buildWiring. This method binds schema fields to our data fetchers.
All required preparations have been made. Now we must build sources and deploy them to the Backendless. After deployment, go to the Business Logic (Cloud Code) tab. In this area, you will see your service:

Let’s select all data from our API. For this action, we must send the following query:
{
  findAllArticles {
    objectId,
    title,
    body,
    commentsAmount,
    user {
      objectId,
      name,
      email
    },
    comments {
      objectId,
      text,
      user {
        objectId,
        name,
        email
      }
    }
  }
}
We must specify explicitly each field that we want to see in the result. The response for this query will contain articles with related authors, comments and authors of comments:
{
    "data": {
        "findAllArticles": [
            {
                "commentsAmount": 2,
                "comments": [
                    {
                        "text": "Great article",
                        "user": {
                            "name": "Steven",
                            "objectId": "6C5C41EB-EC51-683C-FF18-D19628F66E00",
                            "email": "steven.grey@example.com"
                        },
                        "objectId": "6A91AA0D-154A-0847-FF5A-1D57771CE500"
                    },
                    {
                        "text": "Waiting for second article on this topic",
                        "user": {
                            "name": "Robert",
                            "objectId": "6EEDAFEC-937A-F0F9-FF8F-5D55D9E8E500",
                            "email": "robert.mock@example.com"
                        },
                        "objectId": "D4AEF2A7-ECA9-8FDF-FF69-0195621DFE00"
                    }
                ],
                "title": "What Is API As A Service?",
                "body": "In order to discuss what API as a Service is, we must first understand what APIs and API Services...",
                "user": {
                    "name": "Robert",
                    "objectId": "6EEDAFEC-937A-F0F9-FF8F-5D55D9E8E500",
                    "email": "robert.mock@example.com"
                },
                "objectId": "47025034-4446-681D-FFC1-57A912A15E00"
            },
            {
                "commentsAmount": 0,
                "comments": [],
                "title": "Using GraphQL with Backendless",
                "body": "GraphQL is powerful specification that allow you extract data from...",
                "user": {
                    "name": "Jesse",
                    "objectId": "BD7100BD-B864-4BAF-FF3D-55A6D314FF00",
                    "email": "jesse.sanders@example.com"
                },
                "objectId": "983D4F04-5175-2183-FF0C-FDB768EEF500"
            }
        ]
    }
}
If we want to retrieve a specific article and the number of comments it has, we must send another query to the same endpoint:
{
  findArticleById(objectId: \"47025034-4446-681D-FFC1-57A912A15E00\") {
    objectId,
    title,
    body,
    commentsAmount
  }
}
The response for this query will be:
{
    "data": {
        "findArticleById": {
            "commentsAmount": 2,
            "title": "What Is API As A Service?",
            "body": "In order to discuss what API as a Service is, we must first understand what APIs and API Services...",
            "objectId": "47025034-4446-681D-FFC1-57A912A15E00"
        }
    }
}
That’s it. At this time, we have a fully functioning GraphQL by which we can query our data. But API is not only about reading data; it is also for writing data, too. This is true for GraphQL as well. In the next step, we will implement “mutations” for our API.
API Mutations
GraphQL describes “create” and “update” operations as mutations. To demonstrate this feature, we will implement a function for adding comments to articles. As a result, some changes must be made to our project.
First, the GraphQL API schema must be updated. The new function “addComment” must be added to it. The function definition is as follows:
type Mutation {
    addComment(articleId: ID!, comment: CommentInput!): [Comment]
}

input CommentInput {
    objectId: ID
    text: String
    userId: String
}
The backend receives article ID and object of CommentInput type and returns a list of all article comments. CommentInput is a special type for input params. Next, we need to update the schema definition:
schema {
    query: Query
    mutation: Mutation
}
Logic must also be updated. The mutation is handled like a query. The resolver for the mutation will look like this:
public class DataResolvers
{
  public static List<Map<String, Object>> addComment( DataFetchingEnvironment dataFetchingEnvironment )
  {
    String articleId = dataFetchingEnvironment.getArgument( "articleId" );
    Map<String, Object> commentData = dataFetchingEnvironment.getArgument( "comment" );

    Map<String, Object> article = new HashMap<>();
    article.put( "objectId", articleId );
    Map<String, Object> comment = new HashMap<>();
    comment.put( "text", commentData.get( "text" ) );
    Map<String, Object> user = new HashMap<>();
    user.put( "objectId", commentData.get( "userId" ) );
    comment = Backendless.Data.of( "Comment" ).save( comment );
    Backendless.Data.of( "Comment" ).addRelation( comment, "user", Collections.singleton( user ) );
    Backendless.Data.of( "Article" ).addRelation( article, "comments", Collections.singleton( comment ) );

    LoadRelationsQueryBuilder<Map<String, Object>> builder = LoadRelationsQueryBuilder.ofMap().setRelationName( "comments" );

    return Backendless.Data.of( "Article" ).loadRelations(
            articleId,
            builder
    );
  }
}
The above is more complicated compared to other resolvers. Let’s investigate this step-by-step:
- The comment is stored to the database;
- A relation between the comment and a user is created;
- A relation between the specified article and the comment is created;
- All article comments are selected from the database and returned to the client.
This resolver is registered like other resolvers. Add the following code to the method buildWiring in the GraphQlEndpoint class:
.type(
        TypeRuntimeWiring.newTypeWiring( "Article" ).dataFetcher( "commentsAmount", DataFetchers::articleCommentsAmount )
)
These are all the changes needed to add mutations to our API. You can now build and deploy the project to Backendless.
Let’s check how the mutation works. Go to the Business Logic tab in Backendless and input this query:
mutation {
  addComment(articleId: \"983D4F04-5175-2183-FF0C-FDB768EEF500\", comment: { text: \"Test\", userId: \"BD7100BD-B864-4BAF-FF3D-55A6D314FF00\"}) {
    text,
    user {
      objectId,
      name
    }
  }
}
The above query will add a new comment to the article with the ID 983D4F04-5175-2183-FF0C-FDB768EEF500. The response will contain all comments on this article:
{
    "data": {
        "addComment": [
            {
                "text": "Test",
                "user": {
                    "name": "Jesse",
                    "objectId": "BD7100BD-B864-4BAF-FF3D-55A6D314FF00"
                }
            }
        ]
    }
}
That’s all. We now have a GraphQL API that supports read and write operations. You can add more mutations and queries on your own.
Summary
As you can see, with GraphQL we implemented all API as one endpoint. If we had developed it as REST API, there would be at least three endpoints. The more entities we have, the more endpoints REST API will have. If you want to retrieve only part of the entity information, you would be forced to create a separate endpoint for it. This can lead to many sets of endpoints or different versions of API for different clients.
With GraphQL there will be no such a problem since you can control the amount of information you need. Also, you need only one API call for retrieving related entities.
Thanks for reading and Happy Coding!