Real-Time Database Quick Start Guide for JavaScript Developers
Real-time data delivery is one of the most important elements of mobile (and web) application developing. Primarily for the reason that users want to see up-to-date data in the UI without any additional actions/gestures to update the information. This capability is provided out of the box in Backendless and we call it Real-Time Database. Applications using Backendless SDK for JavaScript can subscribe to changes happening in a data table in the database. This quick guide will help you to get an understanding how Backendless real-time database works. You will build a basic JS app displaying a list of movies. The movie list will be dynamically updated any time when the data changes in the database. The changes in the database which will be displayed in the application in real-time include: new movies saved in the database, existing movies modified or deleted.
Sample Data
The sample application developed as a part of this quick start guide requires some data to be stored in the database. This section of the guide contains instructions for populating the database with sample data. There are several ways for getting data into Backendless database, however, in this guide we will consider only two methods, both of them use Backendless Console. The first one imports data from a CSV file, the second one uses REST Console:
Create a file called Movies.csv with the following content:
"description(STRING(100))","rating(STRING(36))","release_year(STRING(36))","title(STRING(36))","objectId(STRING_ID)","ownerId(STRING(36))","created(DATETIME)","updated(DATETIME)"
"A Intrepid Documentary of a Sumo Wrestler And a Astronaut who must Battle a Composer in The Outback","G","2006","CROSSROADS CASUALTIES","2AF53B19-6A91-0F28-FF05-85980DFEE500",null,"Tue Jul 02 08:26:30 UTC 2019",null
"A Thoughtful Tale of a Woman And a A Shark who must Conquer a Dog in A Monastery","NC-17","2006","JASON TRAP","56B0EBD9-3C2B-68D6-FFFB-7EE98388A000",null,"Tue Jul 02 08:26:30 UTC 2019",null
"A Touching Drama of a Crocodile And a Crocodile who must Conquer a Explorer in Soviet Georgia","G","2006","DESTINY SATURDAY","81F71483-A809-4662-FF43-951511680000",null,"Tue Jul 02 08:26:30 UTC 2019",null
"A Epic Drama of a Mad Scientist And a Explorer who must Succumb a Waitress in An Abandoned Fun House","PG","2006","SKY MIRACLE","D1040D67-A9E8-72C0-FF4B-88E219616A00",null,"Tue Jul 02 08:26:30 UTC 2019",null
"A Action-Packed Reflection of a Car And a Moose who must Outgun a Car in A Shark Tank","R","2006","PLUTO OLEANDER","D9B7498B-CF23-6D70-FFB8-0AA56859C000",null,"Tue Jul 02 08:26:30 UTC 2019",null
Open Backendless Console and navigate to Manage -> Import section and import the file as described on the screenshot below:
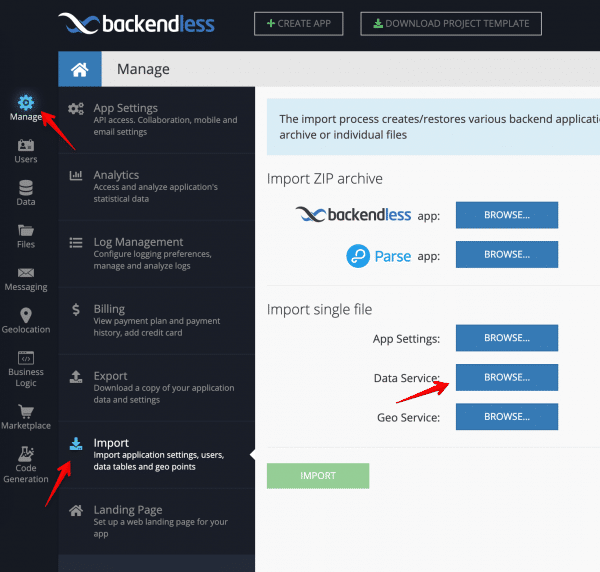
Click the IMPORT button. This will add the data into the Movies data table. The name of the table in the database is the same as the name of the CSV file.
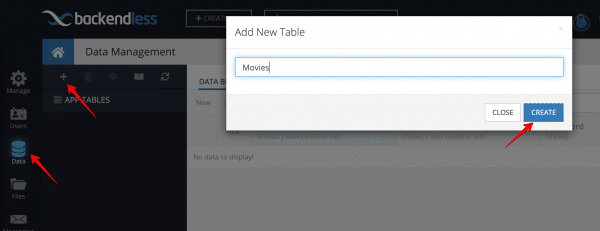
Open Backendless Console and click the Data icon. Create a new data table with the name “Movies”:
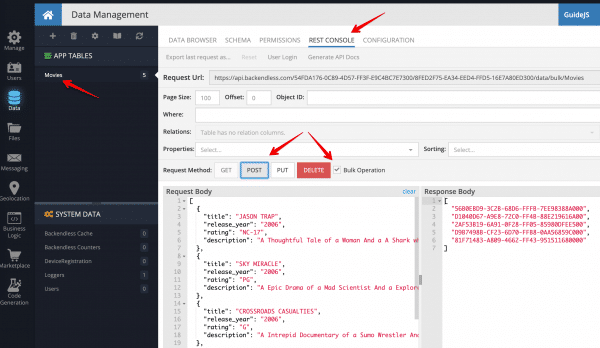
You will be prompted to create columns in the new data table. Cancel out as the columns will be created dynamically with the following instructions. Click the REST Console tab. You will make a single API call which will create data table schema and will save some sample data for the app:
- Copy the JSON shown below and paste it into the Request body field.
- Select the Bulk Operation checkbox
- Click the POST button to submit the API request.
[
 {
  "title": "JASON TRAP",
  "release_year": "2006",
  "rating": "NC-17",
  "description": "A Thoughtful Tale of a Woman And a A Shark who must Conquer a Dog in A Monastery"
 },
 {
  "title": "SKY MIRACLE",
  "release_year": "2006",
  "rating": "PG",
  "description": "A Epic Drama of a Mad Scientist And a Explorer who must Succumb a Waitress in An Abandoned Fun House"
 },
 {
  "title": "CROSSROADS CASUALTIES",
  "release_year": "2006",
  "rating": "G",
  "description": "A Intrepid Documentary of a Sumo Wrestler And a Astronaut who must Battle a Composer in The Outback"
 },
 {
  "title": "PLUTO OLEANDER",
  "release_year": "2006",
  "rating": "R",
  "description": "A Action-Packed Reflection of a Car And a Moose who must Outgun a Car in A Shark Tank"
 },
 {
  "title": "DESTINY SATURDAY",
  "release_year": "2006",
  "rating": "G",
  "description": "A Touching Drama of a Crocodile And a Crocodile who must Conquer a Explorer in Soviet Georgia"
 }
]
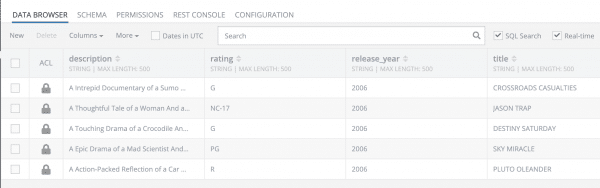
You can verify that the data has been stored in the database by clicking the DATA BROWSER tab:
Movies List App – HTML
Create the index.html file with the following content:
<!doctype html>
<html lang="en">
<head>
  <!-- Required meta tags -->
  <meta charset="utf-8">
  <meta name="viewport" content="width=device-width, initial-scale=1, shrink-to-fit=no">

  <!-- Bootstrap CSS -->
  <link rel="stylesheet" href="https://stackpath.bootstrapcdn.com/bootstrap/4.3.1/css/bootstrap.min.css" integrity="sha384-ggOyR0iXCbMQv3Xipma34MD+dH/1fQ784/j6cY/iJTQUOhcWr7x9JvoRxT2MZw1T" crossorigin="anonymous">

  <title>Backendless | RT Database</title>
</head>
<body style="background: #161a24;">
  <main class="container" style="margin: 10vh auto;">
    <div class="row">
      <div class="mx-auto mb-4">
        <img src="https://backendless.com/wp-content/themes/backendless/img/logo.png"/>
      </div>
    </div>

    <div class="row mb-2">
      <h2 class="mx-auto text-center text-white">Watched Movies</h2>
    </div>

    <div id="movies-list" class="row"></div>
  </main>

  <script src="https://code.jquery.com/jquery-3.3.1.js" integrity="sha256-2Kok7MbOyxpgUVvAk/HJ2jigOSYS2auK4Pfzbm7uH60=" crossorigin="anonymous"></script>
  <script src="https://api.backendless.com/sdk/js/latest/backendless.min.js"></script>
  <script src="app.js"></script>
</body>
</html>
One of the <script> lines imports Backendless SDK for JavaScript:
<script src="https://api.backendless.com/sdk/js/latest/backendless.min.js"></script>
The other one imports the code with the application’s logic. This code is written in the section below:
<script src="app.js"></script>
Movies List App – JS
Create the app.js file with the following content. The code is reviewed right after the listing. If your application is hosted in our European data center, make sure to change the API_HOST constant as shown below:
const API_HOST = 'https://eu-api.backendless.com';
(function () {
const API_HOST = 'https://api.backendless.com';
const APP_ID = 'YOUR_APP_ID';
const API_KEY = 'YOUR_API_KEY';

Backendless.serverURL = API_HOST;
Backendless.initApp(APP_ID, API_KEY);

const movieCardTemplate = movie => $(`
  <div class="col-md-4 col-sm-6 mb-4">
    <div class="card">
      <div class="card-body">
        <h5 class="card-title text-truncate">${movie.title}</h5>
        <p class="card-text" style="height: 100px;overflow: hidden;"><small>${movie.description}</small></p>
        <div class="d-flex justify-content-between">
          <div>
            <span class="badge badge-primary">${movie.rating}</span>
            <span class="badge badge-secondary">${movie.release_year}</span>
          </div>
          <p class="card-text"><small class="text-muted">added ${new Date(movie.created).toDateString()}</small></p>
        </div>
      </div>
    </div>
  </div>
`);

const errorTemplate = error => $(`
  <div class="alert alert-danger flex-fill" role="alert">
    <h4 class="alert-heading">${error.message}</h4>
    <hr>
      <pre>${error.stack}</pre>
  </div>
`);

const $moviesList = $('#movies-list');
const moviesStore = Backendless.Data.of('Movies');
let moviesList;

moviesStore.find(Backendless.DataQueryBuilder.create().setPageSize(100).setSortBy('created'))
  .then(result => {
    moviesList = result;

    renderList();

    enableRealTime();
  })
 .catch(renderError);

function renderList() {
  $moviesList.html('');

  moviesList.forEach(movie => {
  $moviesList.append(movieCardTemplate(movie));
});
}

function renderError(error) {
  $moviesList.html(errorTemplate(error));
}

function enableRealTime() {
  // we will add code for Real Time Database here
}
})();
Code Review
Backendless Initialization
The code starts with the block which initializes Backendless SDK:
const API_HOST = 'https://api.backendless.com';
const APP_ID = 'YOUR_APP_ID';
const API_KEY = 'YOUR_API_KEY';

Backendless.serverURL = API_HOST;
Backendless.initApp(APP_ID, API_KEY);
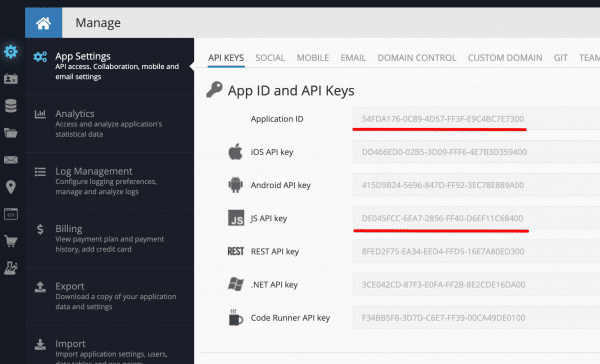
Make sure to put your application ID and API Key into the code. You can find them in Backendless Console on the Manage -> App Settings screen:
HTML Templates
There are two functions movieCardTemplate and errorTemplate which are HTML templates. They accept an object and return jQuery which will be rendered in UI.
Retrieving a List of Movies
The following line of code obtains a reference to the Movies data table:
const moviesStore = Backendless.Data.of('Movies');
Then right after, the code loads database records with paging and sorting options:
moviesStore.find(Backendless.DataQueryBuilder.create().setPageSize(100).setSortBy('created'))
Once the data is loaded, the result is a collection of movie objects. The collection is assigned to variable moviesList. The moviesList variable is important for real-time integration, we will come to it a little bit later. And also when data is loaded, it is rendered – the rendering code is in the renderList() function. In case if an error occurs, we will catch it and also render in the UI. The enableRealTime function is left empty for now.
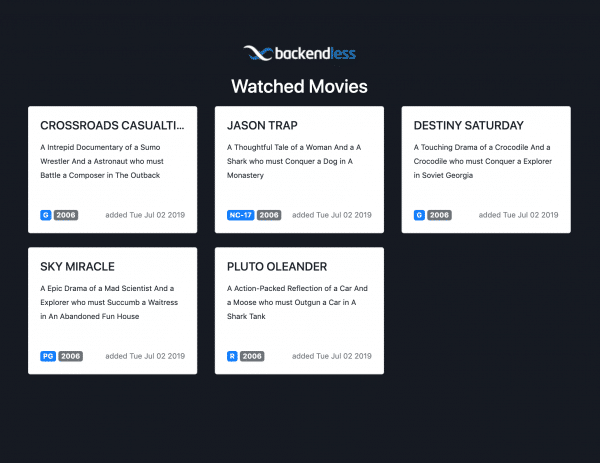
With the code we have added by now you can already experience the app. To do this open index.html in a web browser. You should see the following screen:
About Real Time Database
Before we continue, let’s review what Backendless Real Time Database is. In most cases, you want your application to display the up-to-date data without any additional user actions (such as pull to refresh for instance) or any additional requests to the server. In Backendless Real Time Database there are three main events, which, once occurred, get your clients app synchronized with the server data:
create– this event is delivered to the client app when a new object is created on the serverupdate– this event is delivered to the client app when an existing object is changed on the serverdelete– this event is delivered to the client app when an existing object is deleted on the server
All our SDKs (JS, Android, iOS and .NET) include necessary logic responsible for establishing and maintaining a connection to our real-time servers. The SDKs also provide the API to subscribe to the events listed above. For more information see the Real-Time Database API documentation.
Integrating Real-Time Into the App
Now we got to the final part of the guide – adding real time subscriptions to the code. When a new database record in the “Movies” table is created, or an existing one is updated or deleted, we want the app to be notified about it and re-render the UI. Additionally, we need to maintain an up-to-date list in the app. For this purpose the code uses the “moviesList” variable. The list of the Movie cards in the UI will correspond to the objects in “moviesList” variable.
To add the real-time integration, modify the “enableRealTime” function as shown below:
function enableRealTime() {
const rtHandlers = moviesStore.rt();

rtHandlers.addCreateListener(movie => {
  moviesList = [...moviesList, movie];

  renderList();
});

rtHandlers.addUpdateListener(movie => {
  moviesList = moviesList.map(m => m.objectId === movie.objectId ? movie : m);

  renderList();
});

rtHandlers.addDeleteListener(movie => {
  moviesList = moviesList.filter(m => m.objectId !== movie.objectId);

  renderList();
});
}
As you can see, the code is very straight-forward. There are three subscriptions for each event (a new movie is created, a movie is updated and a movie is deleted):
- createListener – new movie record is pushed into moviesList and the UI is re-rendered
- updateListener – the updated movie object, which is the argument of the listener function, replaces one in moviesList and the UI is re-rendered
- deleteListener – the deleted movie object is removed from movieList and the UI is re-rendered
Let’s check what we’ve got:
- Open two browsers – one with the app and another one with Backendless Console
- Create a new movie record in Backendless Console’s Data Browser, you will see the new movie card will be rendered immediately on web page with app
- Also try changing or deleting a few records in Data Browser and watch how fast the changes are reflected in the app
- The same operation can be done in REST Console or using any other our SDKs (Android, iOS, REST ….)
That’s all folks, happy coding!