This guide will help you get up and running with Backendless quickly so you can start using the Backendless REST API in your applications. At the end of the guide, you will have the basic knowledge of using the user registration and data persistence APIs. This guide uses the curl command line utility to generate REST requests sent to the Backendless servers.
- Login to your Backendless account or register to create a new one.
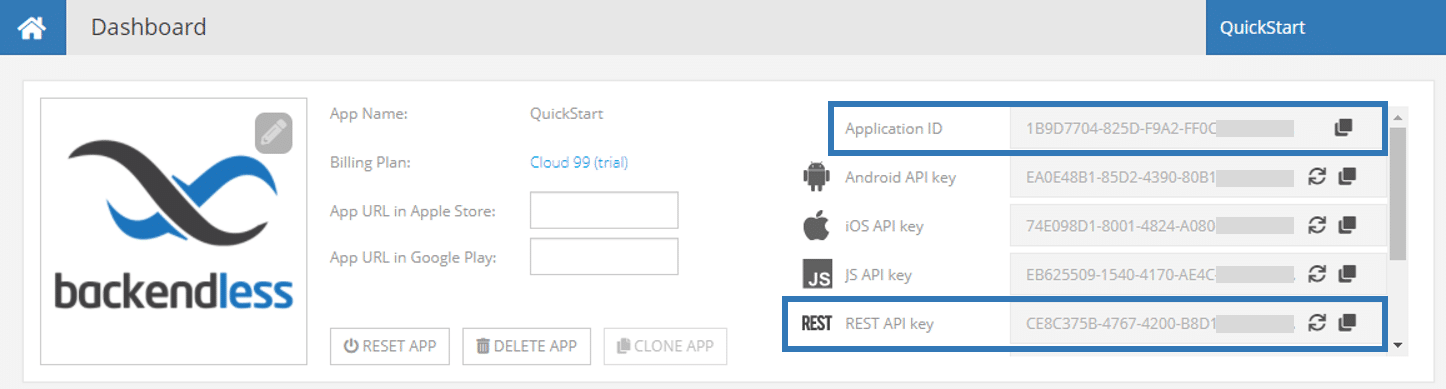
-
Locate the Application ID and the REST API Key of your backend on the main dashboard screen. These values will be used later in the guide:

- The first REST request you will send is to register a user for your app. Open a command prompt/terminal window and make sure you can run the
curlcommand. All Backendless REST requests use the application ID and the REST API key in the endpoint URL. Make sure to substitute the <app-id> and <rest-api-key> in the URLs below with the values for your app. - A
curlcommand to register a user is:curl \ -H Content-Type:application/json \ -X POST \ -v 'https://api.backendless.com/<app-id>/<rest-api-key>/users/register' \ -d '{"email":"john.smith@foo.bar", "name":"John", "password":"123456seven"}'
Enter the command in your terminal window and press Enter.
- When the request finishes successfully, your response would look like the one in the screenshot below (the HTTP response code and response body are highlighted). If the HTTP code is 200 – then everything worked fine and the user is registered. The server response body is a JSON object representing the created user. !Note: to avoid showing verbose requests and responses we will not use the “-v” flag in the subsequent curl examples in this guide

- You can verify that the user has been created by opening the Data screen of Backendless console. The user will appear in the Users table (which is selected by default).
- Now that the user has been created, you can login that user with the command below:
curl \
-H Content-Type:application/json \
-X POST \
'https://api.backendless.com/<app-id>/<rest-api-key>/users/login' \
-d '{"login":"john.smith@foo.bar", "password":"123456seven"}'
- Take a look at the response of the login operation. This is also a JSON object representing the logged-in user. The response body contains an important property called
user-token( it is marked with a white rectangle in the screenshot below ). Copy the value of that property:

- The next step is to create a data object (API doc) in the Backendless database. The object will be an arbitrary object called
Comment. Notice that the request contains an HTTP header calleduser-token. It indicates that the request is made by a logged-in user (the same user who was logged-in in the previous step). The user automatically becomes the owner of the created object. Run the following command:curl \ -H user-token:<value-obtained-from-server-in-step-8> \ -H Content-Type:application/json \ -X POST \ 'https://api.backendless.com/<app-id></rest-api-key>/data/Comment' \ -d '{"message":"Hi, I am here!"}'
- The response sent by the server contains a JSON representation of the created
Commentobject. It has a system assigned fields:-
objectIdis assigned by Backendless and uniquely identifies the object in the database. -
ownerIdcontains theobjectIdof the user who created the object.

-
- Now you can refresh the Data screen of Backendless console and verify that the
Commenttable has been created and it contains an object created by user “john.smith@foo.bar”.
Enjoy!