Getting Started with Backendless and Flutter

This guide will help you develop a basic mobile application up and running with the Backendless backend and Flutter frontend. Follow the steps below to build your first app with Backendless:

  1. Login to Backendless Console. The username and password are what you entered during the installation process. If you do not have a Backendless account, click the Register link on the Backendless Console login screen and create a new developer account.
  2. Select or create an app. If you do not have any applications in your account, you will be prompted to create one.
  3. Click the Download Project Template button from the dropdown below your username:
    Download Project Template - Flutter
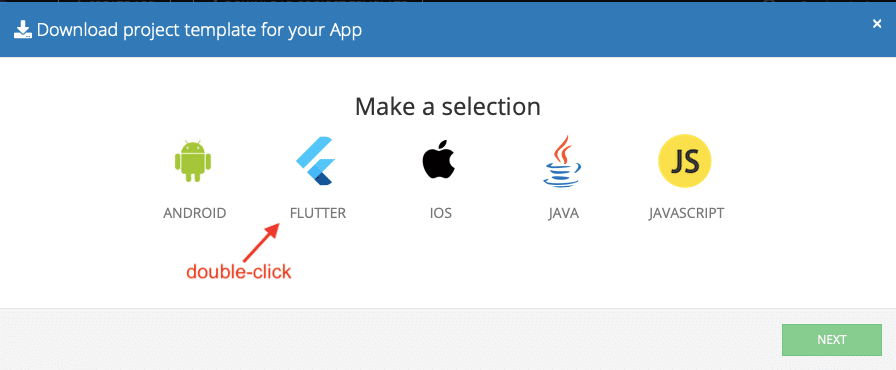
  4. Double click the Flutter icon in the download project template popup to download a Flutter project initialized to use Backendless:
  5. The downloaded ZIP file contains a Flutter project. Open the project in an IDE (for example Visual Studio).
  6. The project contains main.dart file. It contains your application ID, Android API Key, iOS API Key, and the API endpoint URL. Additionally, this file includes Backendless SDK initialization and sample code which stores an object in the database of your Backendless app. Below is an example of the generated code. Please keep in mind that the application ID and the API keys for your application will be different:
    import 'package:flutter/material.dart';
    import 'package:backendless_sdk/backendless_sdk.dart';
    
    void main() => runApp(MyApp());
    
    class MyApp extends StatelessWidget {
     @override
     Widget build(BuildContext context) {
       return MaterialApp(
         title: 'Flutter Demo',
         theme: ThemeData(
           primarySwatch: Colors.blue,
         ),
         home: MyHomePage(title: 'Flutter Demo Home Page'),
       );
     }
    }
    
    class MyHomePage extends StatefulWidget {
     MyHomePage({Key key, this.title}) : super(key: key);
    
     final String title;
    
     @override
     _MyHomePageState createState() => _MyHomePageState();
    }
    
    class _MyHomePageState extends State {
     String _status = 'Object is saving to the real time database...';
     String _savedValue = '...';
     Map _savedTestObject;
     IDataStore


     _testTableDataStore;
     TextEditingController _controller;
    
     static const String SERVER_URL = 'https://api.backendless.com';
     static const String APPLICATION_ID = '58C9FBE2-6D22-55C6-FF31-B06277160500';
     static const String ANDROID_API_KEY = '80E2550B-362A-1633-FFD8-E8672B545C00';
     static const String IOS_API_KEY = 'FE9AA305-67A8-E6C3-FF14-264DA88B5300';
    
    
     @override
     void initState() {
       super.initState();
    
       _controller = TextEditingController();
    
       Backendless.setUrl(SERVER_URL);
       Backendless.initApp(
         APPLICATION_ID,
         ANDROID_API_KEY,
         IOS_API_KEY);
    
       Map testObject = Map();
       testObject['foo'] = 'Hello World';
       _testTableDataStore = Backendless.data.of('TestTable');
       _testTableDataStore.save(testObject).then((response) {
         _savedTestObject = response;
         _subscribeForObjectUpdate();
         setState(() {
           _status = 'Object has been saved in the real-time database';
           _savedValue = response['foo'];
         });
       });
      
     }
    
     void _subscribeForObjectUpdate() {
       _testTableDataStore.rt().addUpdateListener(
         (response) => setState(() => _savedValue = response['foo']),
         whereClause: "objectId='${_savedTestObject["objectId"]}'");
     }
    
     void _updateValue() {
       _savedTestObject['foo'] = _controller.text;
       _testTableDataStore.save(_savedTestObject).then((response) {
         print("Saved $response");
         _controller.clear();
       });
     }
    
    
     @override
     Widget build(BuildContext context) {
       return Scaffold(
         appBar: AppBar(
           title: Text(widget.title),
         ),
         body: Padding(padding: EdgeInsets.all(10), child:
         Center(
           child: Column(
             mainAxisAlignment: MainAxisAlignment.center,
             children: [
               Text(
                 '$_status',
                 style: TextStyle(fontSize: 18),
               ),
               Text(
                 'Live update object property:',
                 style: TextStyle(fontSize: 18),
               ),
               Text(
                 '$_savedValue',
                 style: Theme.of(context).textTheme.display1,
               ),
               TextField(
                 decoration: InputDecoration(
                   hintText: 'Change property value'
                 ),
                 controller: _controller,
               ),
               RaisedButton(
                 child: const Text('Update'),
                 color: Colors.white54,
                
                 onPressed: _updateValue,
               ),
             ],
           ),
         ),
       ));
     }
    }


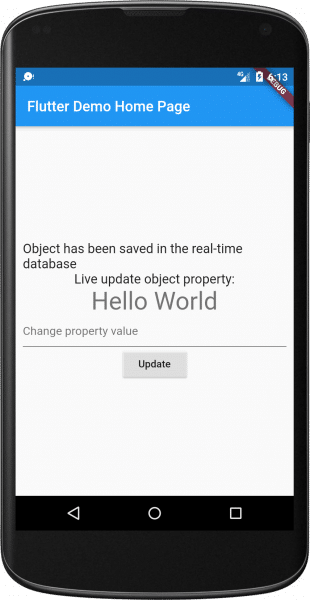
  7. The project is ready to run without any changes. Run the app in an emulator or on a device. When the application runs successfully, it displays a message on the screen informing that an object has been saved in Backendless:
  8. To verify that the object is saved in the Backendless database, return to Backendless Console, and click the Data icon. The TestTable table shows the persisted object:
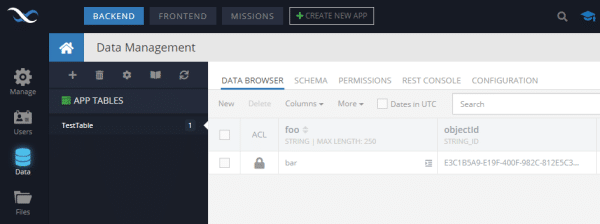
    Test Data In Flutter Project