This guide will help you get up and running with Backendless quickly so you can develop Angular applications on top of our services. At the end of the guide, you will have a configured working environment and a basic project with the code communicating with the Backendless services.
SETUP APP ENVIRONMENT
1. Setup your Angular app using this guide and run it. Your app will be served at http://localhost:4200/
2. Login to your Backendless account or register to create a new one.
3. Create a new Backendless App or use an existing one.
4. Install Backendless JS-SDK from npm with the following command:
npm i backendless -S5. Import and initialize Backendless JS-SDK in your app. To do that, go to the ../src/app/app.module.ts file and add the following code:
import Backendless from 'backendless';const APP_ID = 'YOUR-APP-ID';
const API_KEY = 'YOUR-JS-API-KEY';
Backendless.initApp(APP_ID, API_KEY);6. Use your own APP_ID and API_KEY. You can find them on your Dashboard page:
USER REGISTRATION
1. Add the following code to ../src/app/app.module.ts right after Backendless.initApp. The code registers a user with your app. Instead of michael@backendless.com as used in the code below, consider using an email address where you can check email – your Backendless backend will send out an email welcoming the user to your app.
class AppUser extends Backendless.User {
name: string;
}
const user: AppUser = new AppUser();
user.email = 'michael@backendless.com';
user.password = 'my_super_password';
user.name = 'Michael';
Backendless.UserService.register<AppUser>(user)
.then((result: AppUser) => console.log('Registered User:', result))
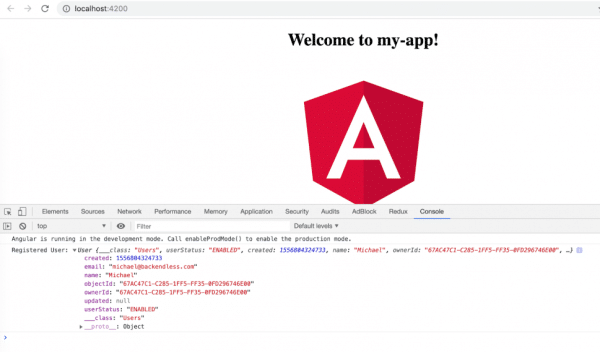
.catch(error => console.error('Can not Register User:', error.message));2. If your app is already running, you don’t need to restart the app or refresh your browser as Angular will do it for you. Otherwise, just start your app. Open your browser’s console to check the user registration result:
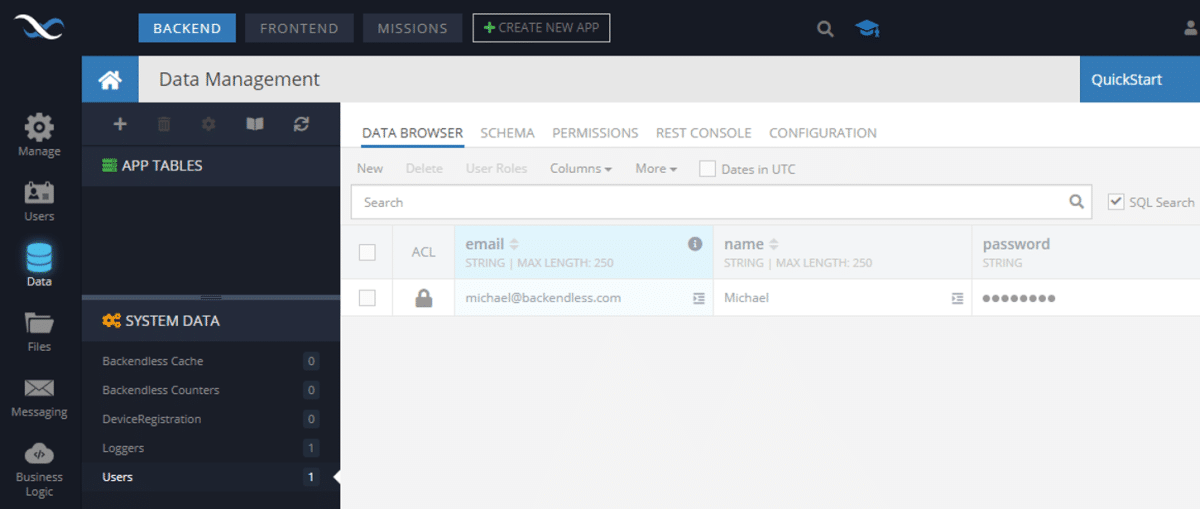
3. A new user is registered with Backendless. You can verify the registered user in the Data section of Backendless Console:
DATA PERSISTENCE
1. In order to utilize the Backendless Data Service API, declare a new class. Instances of the class can be saved using the Backendless API. The class is going to be called Person and will also correspond to a table with the same name. Add the following code right after Backendless.initApp:
class Person {
name: string;
age: number;
constructor(name: string, age: number) {
this.name = name;
this.age = age;
}
}
const bob = new Person('Bob', 25);
const jack = new Person('Jack', 42);
const personStore: Backendless.DataStore = Backendless.Data.of(Person);
personStore.save<Person>(bob)
.then((result: Person) => console.log('Saved Person:', result))
.catch(error => console.error('Can not Save Person:', error.message));
personStore.save<Person>(jack)
.then((result: Person) => console.log('Saved Person:', result))
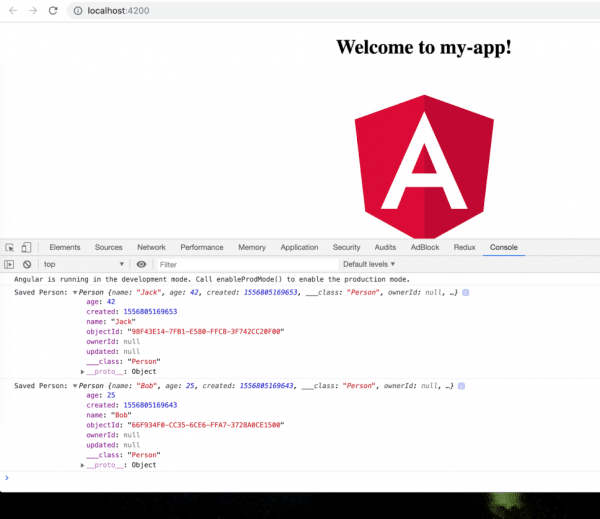
.catch(error => console.error('Can not Save Person:', error.message));2. After refreshing the app, take a look at your browser’s dev console. Those persons have been created:
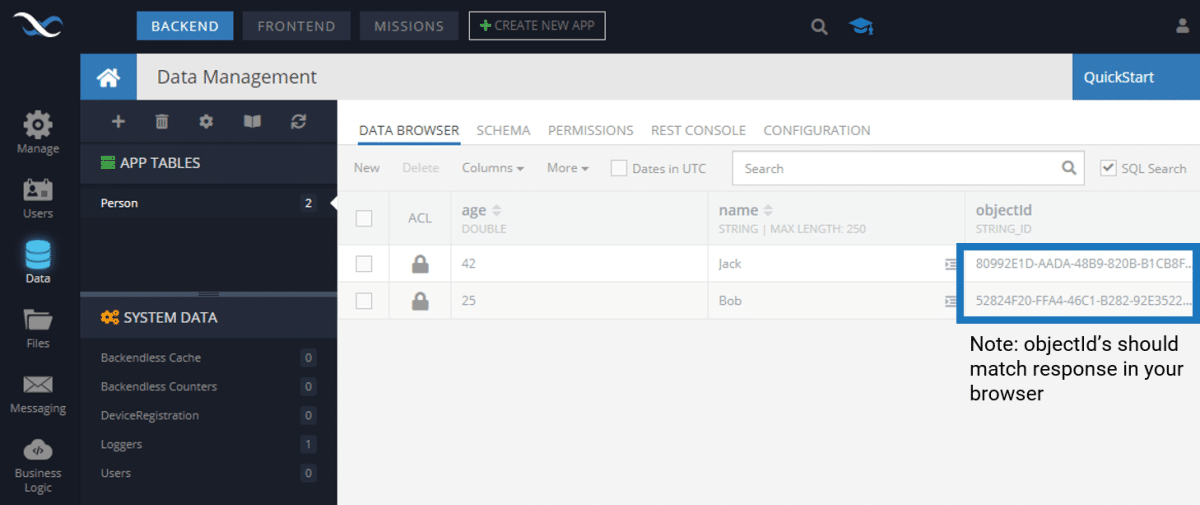
3. Check it on Backendless Console. Go to Data Service and select the Person table:
Finally, all your code in your ../src/app/app.module.ts file should look like this:
import {BrowserModule} from '@angular/platform-browser';
import {NgModule} from '@angular/core';
import Backendless from 'backendless';
import {AppComponent} from './app.component';
const APP_ID = 'YOUR-APP-ID';
const API_KEY = 'YOUR-JS-API-KEY';

Backendless.initApp(APP_ID, API_KEY);
class Person {
name: string;
age: number;
constructor(name: string, age: number) {
this.name = name;
this.age = age;
}
}
const bob = new Person('Bob', 25);
const jack = new Person('Jack', 42);
const personStore: Backendless.DataStore = Backendless.Data.of(Person);
personStore.save<Person>(bob)
.then((result: Person) => console.log('Saved Person:', result))
.catch(error => console.error('Can not Save Person:', error.message));
personStore.save<Person>(jack)
.then((result: Person) => console.log('Saved Person:', result))
.catch(error => console.error('Can not Save Person:', error.message));
class AppUser extends Backendless.User {
 name: string;
}

const user: AppUser = new AppUser();
user.email = 'michael@backendless.com';
user.password = 'my_super_password';
user.name = 'Michael';

Backendless.UserService.register<AppUser>(user)
 .then((result: AppUser) => console.log('Registered User:', result))
 .catch(error => console.error('Can not Register User:', error.message));
@NgModule({
declarations: [
AppComponent
],
imports: [
BrowserModule
],
providers: [],
bootstrap: [AppComponent]
})
export class AppModule {
}


