Modify the Backendless Chat App to Support Sending Images (Part 1)
Did you know you can use the Backendless Code Generator, which is a part of Backendless Console, to easily generate a simple real-time chat application for iOS, Android and JavaScript? You get full source code and can see how to use Backendless APIs for sending text-based chat messages in real time. In this article, we will describe how to modify the generated iOS application so you can send both pictures and text messages.
If you would like to jump to the completed app, we put the source code for the finished project into the author’s personal GitHub repository at https://github.com/olgadanylova/ChatWithImages.git.
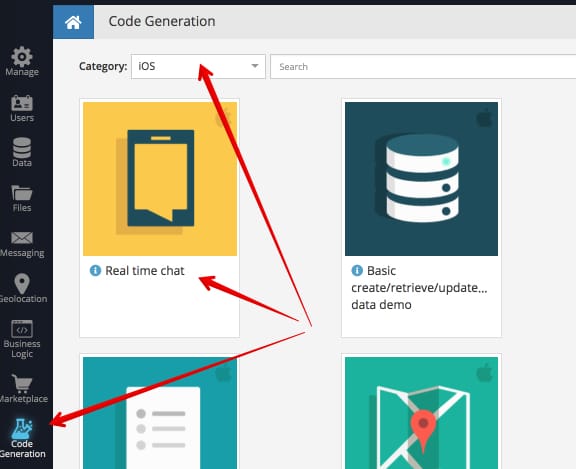
To get started, use the code generator to get the basic project. If you have not used the code generator, it is very easy to use:
- Login to your Backendless account and select/create your app.
- Click the Code Generator icon (it is in the lower-left corner of the user interface).
- Select iOS in the Category drop-down list.
- Locate and click the Real time chat code generator.
- Click the GENERATE button in the popup. Backendless generates a project for your backend and the browser will download a zip file with all the source code and the project files.
- To prepare the downloaded project, make sure to unzip the downloaded file, open a command prompt window, change the current directory to the project’s root folder and run the pod install command. The command will download the required dependencies (including Backendless SDK).
- Make sure to open the .xcworkspace file to open the project in Xcode.

Now that the project is set up, run it and make sure it works – you should be able to send text-based messages into the chat channel. To see the full effect, you would need to run the app in at least two emulators/devices.
Let’s move on to the fun part, adding support for sending images into the chat.
- Add the ChatMessage class to the project:
@objcMembers
class ChatMessage: NSObject {
    var userName: String?
    var messageText: String?
    var pictureUrl: String?
    var picture: UIImage?
}
Since messages now can contain both text and a picture, this class will be used to represent messages sent through Backendless.
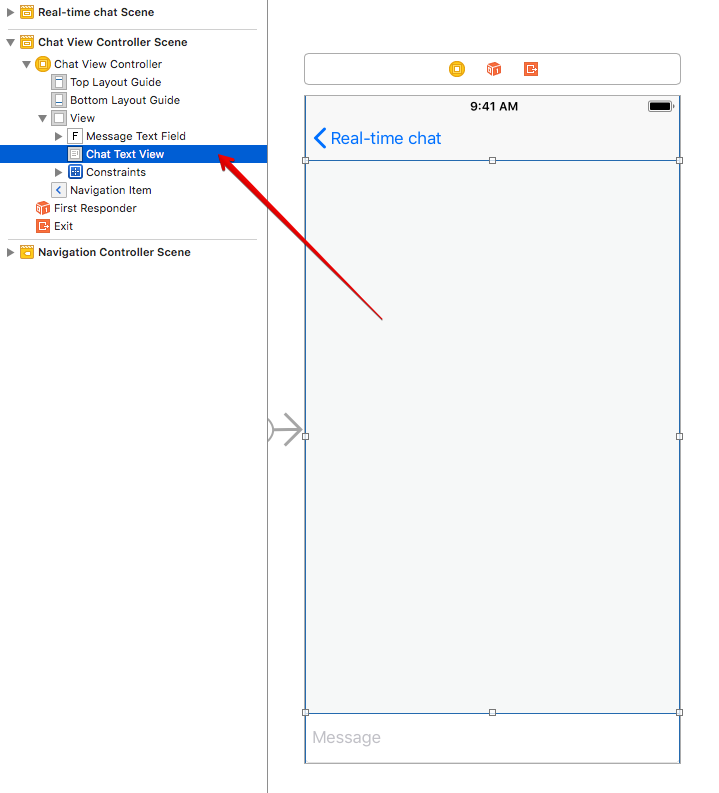
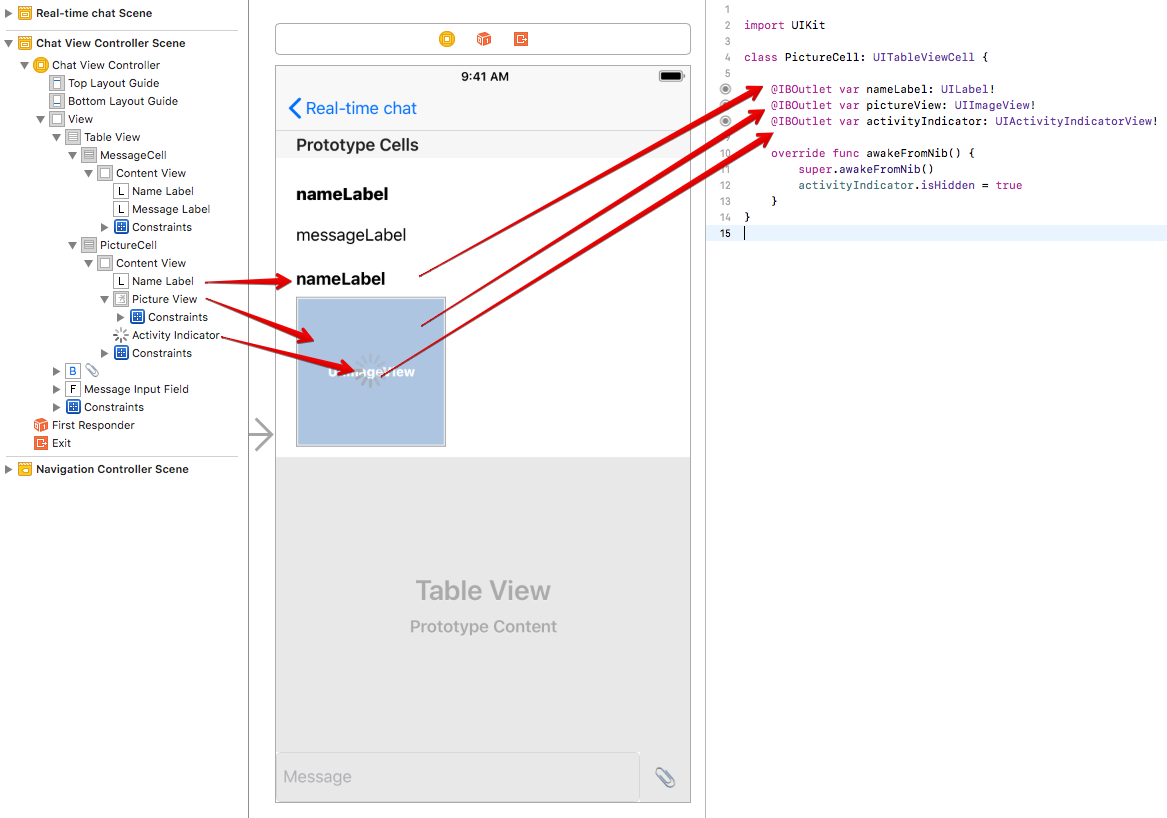
To send pictures, the Backendless File Service will be used – for each sent image a link is generated and is sent into the chat. That link will be set in the pictureUrl field in the ChatMessage objects. To send a text-based message, you need to create a ChatMessage object with the necessary text in the messageText field. - Open main.storyboard navigate to the Chat View Controller Scene as shown below:
- Delete Chat Text View:
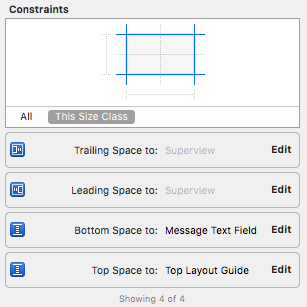
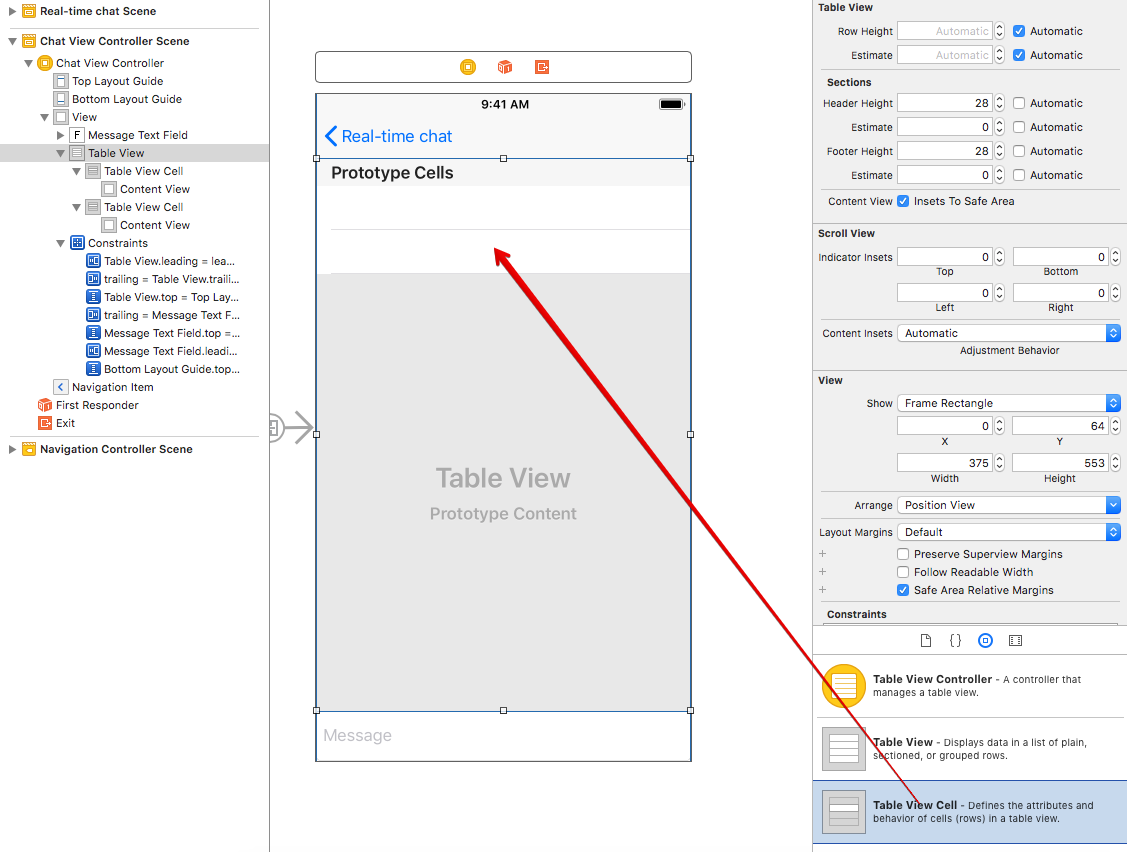
- In the Object Library, select Table View and drag it to the Chat View Controller Scene, then set the following constraints for this Table View:
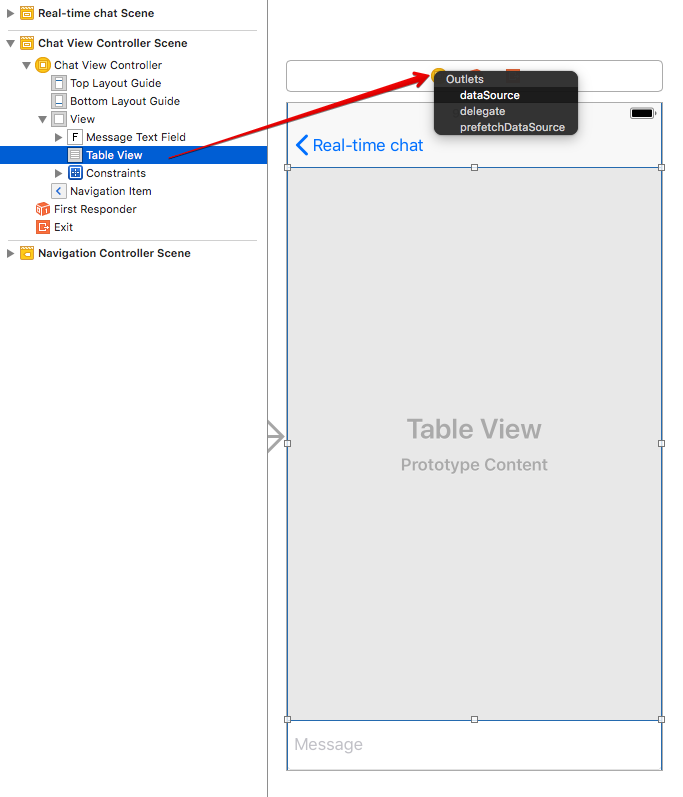
- Set ChatViewController as the delegate and the dataSource for Table View:
- Drag the two cells to into TableView :
- Delete Chat Text View:
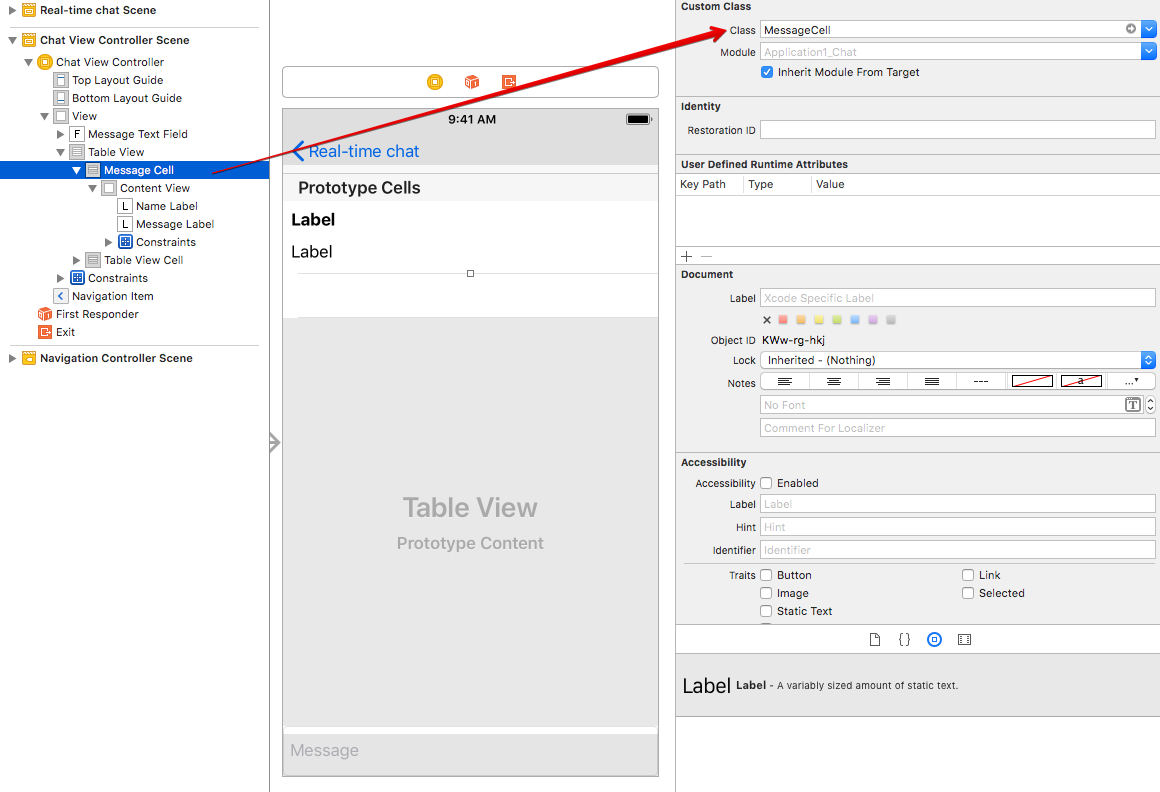
- Create the MessageCell and PictureCell classes:
Depending on the content of the received message, the data will be displayed in one of two types of cells – MessageCell for the text, PictureCell – for the picture. These classes will correspond to the two cells overlaid on the Table View in the previous step.class MessageCell: UITableViewCell { @IBOutlet var nameLabel: UILabel! @IBOutlet var messageLabel: UILabel! override func awakeFromNib() { super.awakeFromNib() } }class PictureCell: UITableViewCell { @IBOutlet var nameLabel: UILabel! @IBOutlet var pictureView: UIImageView! @IBOutlet var activityIndicator: UIActivityIndicatorView! override func awakeFromNib() { super.awakeFromNib() activityIndicator.isHidden = true } } - Now let’s return to the Chat View Controller Scene and to the created cells:
On one of the cells you need to add two labels – this will be a cell for text messages. This cell should be tied to the MessageCell class, and labels should be assigned to the nameLabel and messageLabel properties, respectively:
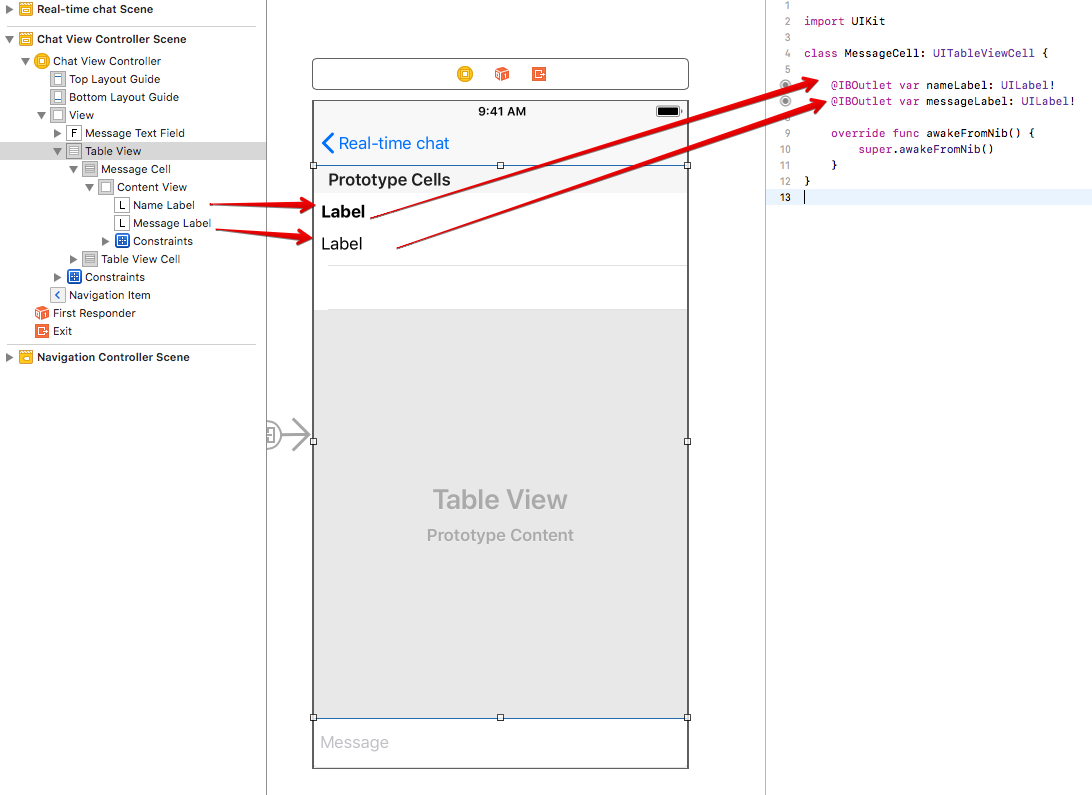
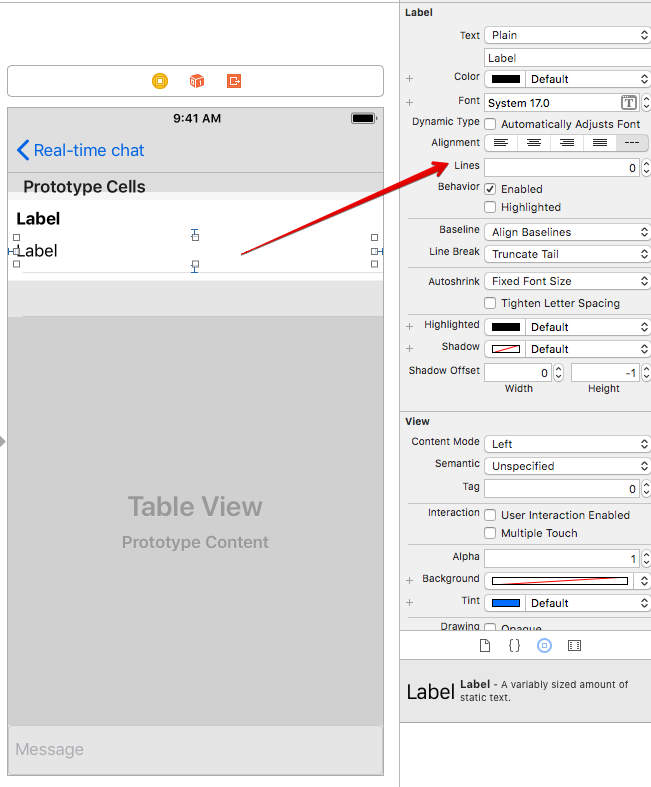
In order for the size of the cell to change in accordance with the length of the received message, you need to set the following constraints on messageLabel and specify the number of lines = 0.
The second created cell must be tied to the PictureCell class. Make sure to add a label, imageView and an activity indicator to it.
- Now that we have a Table View with two cells, we need to change the ChatViewController.swift class as follows:
- You must bind the created Table View in main.storyboard to the Table View property.
- Sending pictures will be possible by selecting already finished images from the photographs already on the device (using UIImagePickerControlelr ) or by creating a new image using the device camera (does not work in emulators).


Below is the source code of the class ChatViewController – it is slightly different from what was originally in the generated project – added code working with the table and the ability to select images.
class ChatViewController: UIViewController, UITableViewDelegate, UITableViewDataSource, UITextFieldDelegate, UINavigationControllerDelegate, UIImagePickerControllerDelegate {
    @IBOutlet var tableView: UITableView!
    @IBOutlet var messageInputField: UITextField!
    var channel: Channel?
    var userName: String?
    private var activeTextField: UITextField?
    private var messages: Array<ChatMessage>?
    override func viewDidLoad() {
        super.viewDidLoad()
        addMessageListeners()
        messages = Array<ChatMessage>()
        let message = ChatMessage()
        message.userName = userName
        message.messageText = "joined"
        Backendless.sharedInstance().messaging.publish(self.channel?.channelName, message: message, response: { messageStatus in
        }, error: { fault in
            self.showErrorAlert(fault!)
        })
    }
    override func viewWillAppear(_ animated: Bool) {
        super.viewWillAppear(animated)
        messageInputField.delegate = self
        navigationItem.title = userName
        navigationItem.hidesBackButton = true
        navigationItem.backBarButtonItem = nil
        NotificationCenter.default.addObserver(self, selector: #selector(keyboardDidShow(_:)), name: .UIKeyboardWillShow, object: nil)
        NotificationCenter.default.addObserver(self, selector: #selector(keyboardWillBeHidden(_:)), name: .UIKeyboardWillHide, object: nil)
    }
    override func viewWillDisappear(_ animated: Bool) {
        super.viewWillDisappear(animated)
        NotificationCenter.default.removeObserver(self, name: .UIKeyboardWillShow, object: nil)
        NotificationCenter.default.removeObserver(self, name: .UIKeyboardWillHide, object: nil)
    }
    override func viewDidLayoutSubviews() {
        super.viewDidLayoutSubviews()
    }
    @objc func keyboardDidShow(_ notification: NSNotification) {
        let infoValue = notification.userInfo![UIKeyboardFrameEndUserInfoKey] as! NSValue
        let keyboardSize = infoValue.cgRectValue.size
        UIView.animate(withDuration: 0.3, animations: {
            var viewFrame = self.view.frame
            viewFrame.size.height -= keyboardSize.height
            self.view.frame = viewFrame
        })
        DispatchQueue.main.async {
            if (self.tableView.numberOfRows(inSection: 0) > 0) {
                let indexPath = IndexPath(row: self.tableView.numberOfRows(inSection: 0) - 1, section: 0)
                self.tableView.scrollToRow(at: indexPath, at: .bottom, animated: true)
            }
        }
    }
    @objc func keyboardWillBeHidden(_ notification: NSNotification) {
        UIView.animate(withDuration: 0.3, animations: {
            let screenFrame = UIScreen.main.bounds
            var viewFrame = CGRect(x: 0, y: 0, width: screenFrame.size.width, height: screenFrame.size.height)
            viewFrame.origin.y = 0
            self.view.frame = viewFrame
        })
    }
    func textFieldDidBeginEditing(_ textField: UITextField) {
        activeTextField = textField
    }
    func textFieldDidEndEditing(_ textField: UITextField) {
        textField.resignFirstResponder()
        activeTextField = nil
    }
    func textFieldShouldReturn(_ textField: UITextField) -> Bool {
        if (!(messageInputField.text?.isEmpty)!) {
            let message = ChatMessage()
            message.userName = userName
            message.messageText = messageInputField.text
            publishMessage(message)
            messageInputField.text = ""
        }
        textField.resignFirstResponder()
        return true
    }
    func numberOfSections(in tableView: UITableView) -> Int {
        return 1
    }
    func tableView(_ tableView: UITableView, numberOfRowsInSection section: Int) -> Int {
        return (messages?.count)!
    }
    func tableView(_ tableView: UITableView, cellForRowAt indexPath: IndexPath) -> UITableViewCell {
        let message = self.messages![indexPath.row]
        if (message.messageText != nil) {
            let cell = tableView.dequeueReusableCell(withIdentifier: "MessageCell", for: indexPath) as! MessageCell
            cell.nameLabel.text = String(format: "[%@]:", message.userName!)
            cell.messageLabel.text = message.messageText
            return cell
        }
        else if (message.pictureUrl != nil) {
            let cell = tableView.dequeueReusableCell(withIdentifier: "PictureCell", for: indexPath) as! PictureCell
            cell.nameLabel.text = String(format: "[%@]:", message.userName!)
            if (message.picture != nil) {
                cell.pictureView.image = message.picture
            }
            else {
                cell.pictureView.image = nil
                cell.activityIndicator.isHidden = false
                cell.activityIndicator.startAnimating()
                let url = URL(string: message.pictureUrl!)!
                let session = URLSession(configuration: .default)
                let downloadPictureTask = session.dataTask(with: url) { (data, response, error) in
                    if let imageData = data {
                        let image = UIImage(data: imageData)
                        message.picture = image
                        DispatchQueue.main.async {
                            cell.pictureView.image = image
                            cell.activityIndicator.isHidden = true
                            cell.activityIndicator.stopAnimating()
                        }
                    }
                }
                downloadPictureTask.resume()
            }
            return cell
        }
        return UITableViewCell()
    }
    func addMessageListeners() {
        channel?.addMessageListenerCustomObject({ receivedMessage in
            if let message = receivedMessage as? ChatMessage {
                self.messages?.append(message)
                self.tableView.reloadData()
            }
        }, error: { fault in
            self.showErrorAlert(fault!)
        }, class: ChatMessage.ofClass())
    }
    func publishMessage(_ message: ChatMessage) {
        Backendless.sharedInstance().messaging.publish(channel?.channelName, message: message, response: { messageStatus in
        }, error: { fault in
            self.showErrorAlert(fault!)
        })
    }
    func showErrorAlert(_ fault: Fault) {
        let alert = UIAlertController(title: "Error", message: fault.message, preferredStyle: .alert)
        let dismissButton = UIAlertAction(title: "Dismiss", style: .cancel, handler: nil)
        alert.addAction(dismissButton)
        present(alert, animated: true, completion: nil)
    }
    func showImagePicker() {
        let alert = UIAlertController(title: "Select image", message: nil, preferredStyle: .alert)
        alert.addAction(UIAlertAction(title: "Use camera", style: .default, handler: { alertAction in
            if (!UIImagePickerController.isSourceTypeAvailable(.camera)) {
                let fault = Fault(message: "No device found. Camera is not available")
                self.showErrorAlert(fault!)
            }
            else {
                let cameraPicker = UIImagePickerController()
                cameraPicker.sourceType = .camera
                cameraPicker.delegate = self
                self.present(cameraPicker, animated: true, completion: nil)
            }
        }))
        alert.addAction(UIAlertAction(title: "Select from gallery", style: .default, handler: { alertAction in
            if UIImagePickerController.isSourceTypeAvailable(.photoLibrary) {
                let imagePicker = UIImagePickerController()
                imagePicker.sourceType = .photoLibrary
                imagePicker.delegate = self
                imagePicker.allowsEditing = false
                self.present(imagePicker, animated: true, completion: nil)
            }
        }))
        alert.addAction(UIAlertAction(title: "Cancel", style: .cancel, handler: nil))
        self.present(alert, animated: true)
    }
    func imagePickerControllerDidCancel(_ picker: UIImagePickerController) {
        dismiss(animated: true, completion: nil)
    }
    func imagePickerController(_ picker: UIImagePickerController, didFinishPickingMediaWithInfo info: [String : Any]) {
        let image = info[UIImagePickerControllerOriginalImage] as? UIImage
        let img = UIImage(cgImage: (image?.cgImage)!, scale: CGFloat(1.0), orientation: .right)
        let imagePath = String(format: "tmpChatFiles/%@.png", UUID().uuidString)
        Backendless.sharedInstance().file.uploadFile(imagePath, content: UIImagePNGRepresentation(img), response: { uploadedPicture in
            let message = ChatMessage()
            message.userName = self.userName
            message.pictureUrl = uploadedPicture?.fileURL
            self.publishMessage(message)
        }, error: { fault in
            self.showErrorAlert(fault!)
        })
        dismiss(animated: true, completion: nil)
    }
    @IBAction func attachFile(_ sender: Any) {
        view.endEditing(true)
        showImagePicker()
    }
}
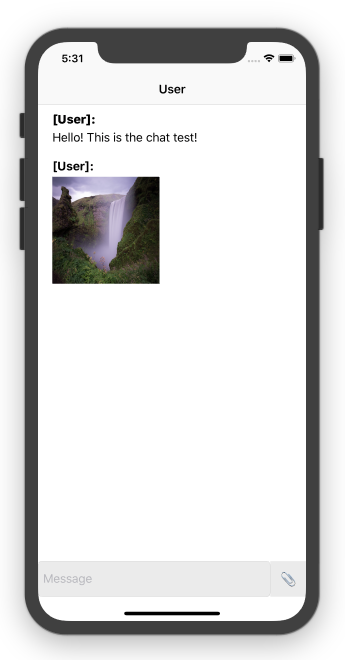
Instructions to use the enhanced chat app:
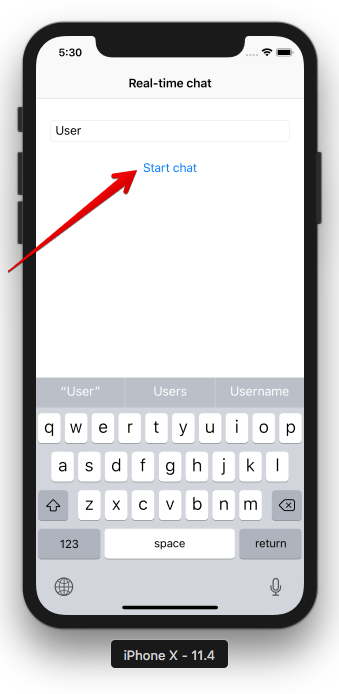
- The sender enters their username to start the chat.
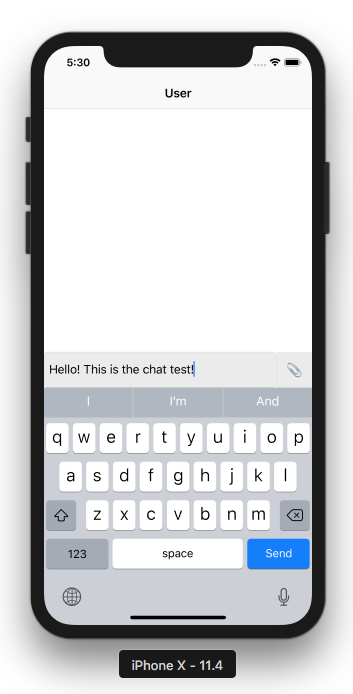
- To send a text message, you must enter a text message in the input field and click the Send button.
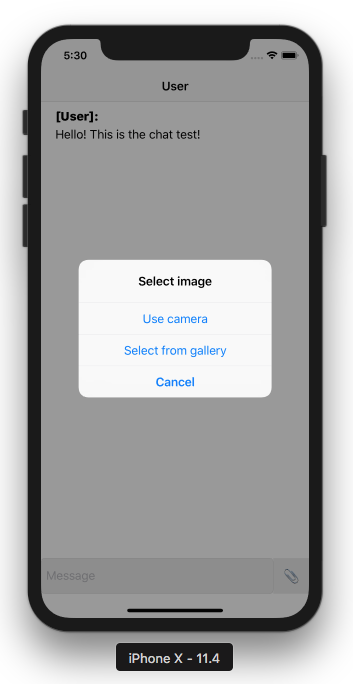
- In order to send an image, you must click the “attach” button represented by the clip icon, and select an image from the gallery or take a new picture on your own. Once an image is selected, it will be uploaded to the Backendless Files section of your app and sent to all chat users who listen to the “realtime-example” channel.


Now the RT Chat application can send and receive picture images. In the next article in this series, we will show how to save pictures from the chat to the device and how to delete already sent messages.
Happy Coding!
If you have any questions about this procedure, please post your questions in our support forum (https://support.backendless.com) or on Slack (http://slack.backendless.com).