How to Implement Mobile-to-Web Cross Login Using a QR Code
What does “mobile-to-web cross login with a QR code” mean? It is one of the approaches for two-factor authentication. Suppose that a user is already authenticated in your application (in our example, it would be an android app) and the user wants to use their actual session to perform an automatic authentication in another application (in my case it’s a web app).
There are several examples of popular apps which use this approach. For example, to login into a web session with WhatsАpp, you must log in on your phone and then scan a QR code in the web interface.
The content of this article assumes:
- you already have a Backendless account (if not, sign up free here),
- you are already familiar with the How to generate a QR code with Backendless API Service article,
- you know how to work with the Backendless CodeRunner utility and Backendless SDK for Java,
- and you have basic programming experience with Android.
The cross-login process
The overall process consists of the following steps:
- The initial page of your web application makes a request to the server to generate a QR code.
- A custom API service generates a QR code with an encoded unique value. In this case, that value is the name of a Backendless messaging channel. The service returns the QR code and the name of the channel channelName to the web app.
- The web app downloads the generated QR code and displays it on the web page. Then the web app connects to the messaging channel and waits for a message. The message will be sent by the Android app later (step 5).
- On the Android app, a user logs in to Backendless with their user name and password. As a result of the login, the Android app receives userToken, which uniquely identifies the user and his/her session.
- The user using the same Android app scans the QR code from the web page screen, receives the messaging channel and sends the userToken into the channel.
- The web application receives the message which contains the userToken. The token can be used for the API calls made in the web app as it now will carry the user’s identity.
The final project, which demonstrates this approach (both the Android and web apps), can be downloaded from here: LoginWithQR.zip. The archive includes a ready-to-use Android project and a simple web project (as a single html file). To get the demo running, you should do the following:
- Deploy the API service shown below into your Backendless app. The service is responsible for generating QR codes.
- Modify the Android app (from the zip archive) to add your APP ID and ANDROID API KEY, which can be obtained from Backendless Console.
- Install the Barcode Scanner app on your phone. The app will be used by the Android project for scanning the QR code.
- Build the Android application with Android Studio and run it on your phone.
- Modify the HTML file (also from the zip archive) for the web app qr-code-login.html to add your APP ID and JS API KEY.
- Copy the HTML file into the /web directory of your Backendless app.
Let’s get down to the most interesting things.
Step 1
We’ve based the implementation of this example on the code that was demonstrated in the How to generate a QR code with Backendless API Service article. We have changed the method generateQRCodePicture and created generateQRCodeForLogin. These methods will help us with creating QR codes. The method getUserId will be used to exchange userToken for the user’s objectId. You can see the changes below.
Do not forget to change the package name (first line of the code). Then use CodeRunner to deploy the code to Backendless.
package <<YOUR-PACKAGE-NAME>>;
import com.backendless.Backendless;
import com.backendless.servercode.BackendlessService;
import com.google.zxing.BarcodeFormat;
import com.google.zxing.WriterException;
import com.google.zxing.client.j2se.MatrixToImageWriter;
import com.google.zxing.common.BitMatrix;
import com.google.zxing.qrcode.QRCodeWriter;
import java.io.ByteArrayOutputStream;
import java.io.IOException;
import java.util.HashMap;
import java.util.UUID;
@BackendlessService
public class QRCodeGenerator
{
 // in this method the work mainly is with the 'ZXing' library
 public byte[] generateQRCode( String data, int width, int height ) throws IOException, WriterException
 {
   QRCodeWriter qrCodeWriter = new QRCodeWriter();
   BitMatrix bitMatrix = qrCodeWriter.encode( data, BarcodeFormat.QR_CODE, width, height );
   byte[] png;
   try (ByteArrayOutputStream baos = new ByteArrayOutputStream())
   {
     MatrixToImageWriter.writeToStream( bitMatrix, "PNG", baos );
     png = baos.toByteArray();
   }
   return png;
 }
 public HashMap<String, String> generateQRCodePicture( String data, int width, int height ) throws WriterException, IOException
 {
  // generate qr code with our method
  byte[] png = this.generateQRCode( data, width, height );
  // generate random uuid as file name and save it using Backendless File service
  String uuid = UUID.randomUUID().toString();
  String path = Backendless.Files.saveFile( "qr_codes", uuid + ".png", png );
  // return response with the raw data (that was encoded) and file path (to qr code)
  HashMap<String, String> record = new HashMap<>();
  record.put( "data", data );
  record.put( "file", path );
  return record;
 }
 public HashMap<String, String> generateQRCodeForLogin() throws IOException, WriterException
 {
   return generateQRCodePicture( UUID.randomUUID().toString(), 250, 250 );
 }
 public String getUserId()
 {
  return Backendless.UserService.loggedInUser();
 }
}
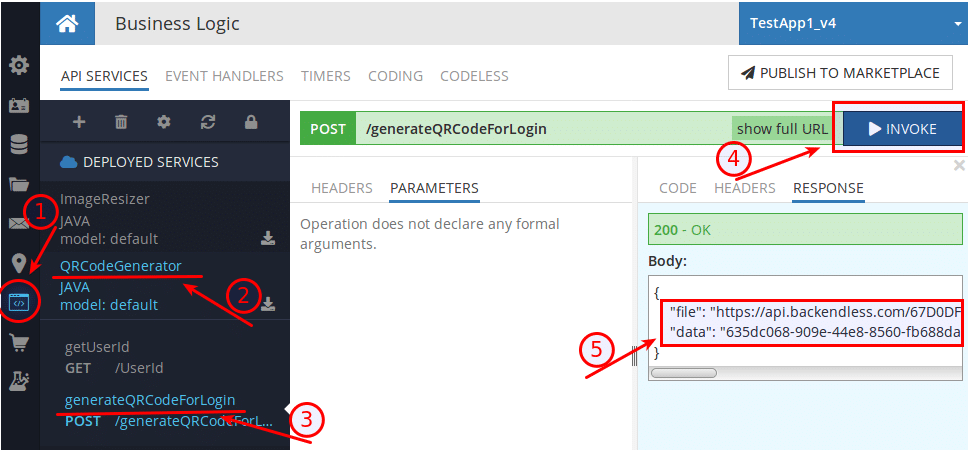
Once the code is deployed to Backendless, make sure it works as expected:
Step 2
Install the application for QR code scanning. We used the Barcode Scanner application. Here is the API for it.
Step 3
If you are not using the complete project code we shared at the beginning of this article, you would need to setup an Android project using Android Studio. Alternatively, you could use the project archive mentioned above.
The project must reference two additional libraries. The first one is ‘backendless’ and the second one is ‘socket.io-client’, which is required to enable the real-time capability available in Backendless version 5.0. Add the following dependencies to the build.gradle file:
// https://mvnrepository.com/artifact/com.backendless/backendless
implementation group: 'com.backendless', name: 'backendless', version: '5.0.+'
// https://mvnrepository.com/artifact/io.socket/socket.io-client
implementation group: 'io.socket', name: 'socket.io-client', version: '1.0.0'
Do not forget to add the INTERNET permission in the Android manifest file.
<uses-permission android:name="android.permission.INTERNET" />
Step 4
This is the listing of the MainActivity class in the Android app. Pay attention to the highlighted code:
package com.examples.backendless;
import android.content.Intent;
import android.content.SharedPreferences;
import android.content.pm.PackageManager;
import android.net.Uri;
import android.os.Bundle;
import android.os.Handler;
import android.support.design.widget.Snackbar;
import android.support.v7.app.AppCompatActivity;
import android.util.Log;
import android.view.View;
import android.view.inputmethod.InputMethodManager;
import android.widget.Button;
import android.widget.EditText;
import android.widget.TextView;
import com.backendless.Backendless;
import com.backendless.BackendlessUser;
import com.backendless.HeadersManager;
import com.backendless.async.callback.AsyncCallback;
import com.backendless.exceptions.BackendlessFault;
import com.backendless.messaging.MessageStatus;
import java.util.Map;
public class MainActivity extends AppCompatActivity {
    private static final String TAG = MainActivity.class.getSimpleName();
    private static final String PROPERTY_STORAGE = MainActivity.class.getName();
    private static final String USER_NAME_KEY = "userName";
    private static final String USER_PASSWORD_KEY = "userPassword";
    private static final String USER_TOKEN_KEY = "userToken";
    private static final int rc_ScanQR = 1;
    public static final Uri zxingUri = Uri.parse("https://play.google.com/store/apps/details?id=com.google.zxing.client.android");
    private static final String ZXING_PACKAGE = "com.google.zxing.client.android";
    private static final String appId = YOUR-APP-ID;
    private static final String apiKey = YOUR-ANDROID-API-KEY;
    private EditText editText_name;
    private EditText editText_password;
    private EditText editText_userInfo;
    private Button button_login_logout;
    private Button button_loginWithQR;
    private String channelName = null;
    private String userName = null;
    private String userPassword = null;
    private String userToken = null;
    @Override
    protected void onCreate(Bundle savedInstanceState) {
        super.onCreate(savedInstanceState);
        setContentView(R.layout.activity_main);
        initUI();
        Backendless.initApp(this.getApplicationContext(), appId, apiKey);
        if (!isPackageInstalled(ZXING_PACKAGE))
        {
            editText_name.setEnabled(false);
            editText_password.setEnabled(false);
            editText_userInfo.setEnabled(false);
            button_login_logout.setEnabled(false);
            button_loginWithQR.setEnabled(false);
            Handler handler = new Handler();
            handler.postDelayed(() ->
            {
                MainActivity.this.runOnUiThread(() ->
                {
                    if (getCurrentFocus() != null) {
                        InputMethodManager inputMethodManager = (InputMethodManager) getSystemService(INPUT_METHOD_SERVICE);
                        inputMethodManager.hideSoftInputFromWindow(getCurrentFocus().getWindowToken(), 0);
                    }
                    View view = findViewById(R.id.main_activity);
                    Snackbar snackbar = Snackbar.make(view, "Unable to find QR scanner app. Please make sure to install the 'Barcode Scanner' app by ZXing Team", Snackbar.LENGTH_INDEFINITE);
                    View snackbarView = snackbar.getView();
                    TextView textView = (TextView) snackbarView.findViewById(android.support.design.R.id.snackbar_text);
                    textView.setMaxLines(5);
                    snackbar.setAction("Install", this::installZXing);
                    snackbar.show();
                });
            }, 1500);
        }
    }
    private void initUI() {
        editText_name = findViewById(R.id.editText_name);
        editText_password = findViewById(R.id.editText_password);
        editText_userInfo = findViewById(R.id.editText_userInfo);
        button_login_logout = findViewById(R.id.button_login);
        button_loginWithQR = findViewById(R.id.button_loginWithQR);
        button_loginWithQR.setOnClickListener(this::scanDataFromQRCode);
    }
    @Override
    protected void onPause() {
        super.onPause();
        SharedPreferences sharedPreferences = getSharedPreferences(PROPERTY_STORAGE, MODE_PRIVATE);
        SharedPreferences.Editor editor = sharedPreferences.edit();
        editor.putString(USER_NAME_KEY, this.userName);
        editor.putString(USER_PASSWORD_KEY, this.userPassword);
        editor.putString(USER_TOKEN_KEY, this.userToken);
        editor.apply();
        Log.i(MainActivity.class.getSimpleName(), "onPause: saved data successfully [userName=" + this.userName + ", userPassword=" + this.userPassword + ", userToken=" + this.userToken + "]");
    }
    @Override
    protected void onPostResume() {
        super.onPostResume();
        SharedPreferences sharedPreferences = getSharedPreferences(PROPERTY_STORAGE, MODE_PRIVATE);
        this.userName = sharedPreferences.getString(USER_NAME_KEY, null);
        this.editText_name.setText(this.userName);
        this.userPassword = sharedPreferences.getString(USER_PASSWORD_KEY, null);
        this.editText_password.setText(this.userPassword);
        this.userToken = sharedPreferences.getString(USER_TOKEN_KEY, null);
        Log.i(MainActivity.class.getSimpleName(), "onPostResume: restore data successfully [userName=" + this.userName + ", userPassword=" + this.userPassword + ", userToken=" + this.userToken + "]");
        if (userToken != null) {
            button_loginWithQR.setVisibility(View.VISIBLE);
            button_login_logout.setText("Logout");
            button_login_logout.setOnClickListener(this::backendlessLogout);
        } else {
            button_login_logout.setOnClickListener(this::backendlessLogin);
        }
        if (channelName != null)
            loginWithQRCode(this.channelName);
    }
    @Override
    protected void onStart() {
        super.onStart();
        Log.i(MainActivity.class.getSimpleName(), "onStart: ");
    }
    @Override
    protected void onRestoreInstanceState(Bundle savedInstanceState) {
        super.onRestoreInstanceState(savedInstanceState);
        Log.i(MainActivity.class.getSimpleName(), "onRestoreInstanceState: ");
    }
    private void backendlessLogin(View view) {
        this.userName = editText_name.getText().toString();
        this.userPassword = editText_password.getText().toString();
        Backendless.UserService.login(MainActivity.this.userName, MainActivity.this.userPassword, new AsyncCallback<BackendlessUser>() {
            @Override
            public void handleResponse(BackendlessUser response) {
                button_loginWithQR.setVisibility(View.VISIBLE);
                button_login_logout.setText("Logout");
                button_login_logout.setOnClickListener(MainActivity.this::backendlessLogout);
                StringBuilder sb = new StringBuilder();
                for (Map.Entry<String, Object> property : response.getProperties().entrySet())
                    sb.append(property.getKey()).append(" : ").append(property.getValue()).append('\n');
                editText_userInfo.setText(sb.toString());
                userToken = HeadersManager.getInstance().getHeader(HeadersManager.HeadersEnum.USER_TOKEN_KEY);
                Log.i(MainActivity.class.getSimpleName(), "backendlessLogin [userToken=" + MainActivity.this.userToken + "]");
            }
            @Override
            public void handleFault(BackendlessFault fault) {
                userToken = null;
                editText_userInfo.setText(fault.getCode() + '\n' + fault.getMessage() + '\n' + fault.getDetail());
            }
        });
    }
    private void backendlessLogout(View view) {
        Backendless.UserService.logout(new AsyncCallback<Void>() {
            @Override
            public void handleResponse(Void response) {
                userToken = null;
                button_loginWithQR.setVisibility(View.INVISIBLE);
                button_login_logout.setText("Login to Backendless");
                button_login_logout.setOnClickListener(MainActivity.this::backendlessLogin);
                editText_userInfo.setText("");
            }
            @Override
            public void handleFault(BackendlessFault fault) {
                editText_userInfo.setText(fault.toString());
            }
        });
    }
    private void scanDataFromQRCode(View view) {
        Intent intent = new Intent(ZXING_PACKAGE + ".SCAN");
        intent.setPackage(ZXING_PACKAGE);
        intent.putExtra("SCAN_MODE", "QR_CODE_MODE");
        startActivityForResult(intent, rc_ScanQR);
    }
    private void loginWithQRCode(String channelName) {
        Log.i(MainActivity.class.getSimpleName(), "loginWithQRCode: start remote login process");
        if (userToken == null) {
            Log.i(TAG, "loginWithQRCode: userToken is null.");
            return;
        }
        Log.i(MainActivity.class.getSimpleName(), "loginWithQRCode [channelName=" + channelName + ", userToken=" + this.userToken + "]");
        Backendless.Messaging.publish(channelName, this.userToken, new AsyncCallback<MessageStatus>() {
            @Override
            public void handleResponse(MessageStatus response) {
                Log.i(MainActivity.class.getSimpleName(), "loginWithQRCode: sent token successfully");
            }
            @Override
            public void handleFault(BackendlessFault fault) {
            }
        });
        this.channelName = null;
    }
    @Override
    protected void onActivityResult(int requestCode, int resultCode, Intent intent) {
        if (resultCode == RESULT_OK) {
            String contents = intent.getStringExtra("SCAN_RESULT");
            String format = intent.getStringExtra("SCAN_RESULT_FORMAT");
            switch (requestCode) {
                case rc_ScanQR:
                    this.channelName = contents;
                    break;
            }
        } else if (resultCode == RESULT_CANCELED) {
            // Handle cancel
        }
    }
    private boolean isPackageInstalled(String packageName) {
        PackageManager pm = this.getApplicationContext().getPackageManager();
        try {
            pm.getPackageInfo(packageName, 0);
            return true;
        } catch (PackageManager.NameNotFoundException e) {
            return false;
        }
    }
    private void installZXing(View view) {
        Intent googlePlayIntent = new Intent(Intent.ACTION_VIEW, zxingUri);
        googlePlayIntent.addFlags(Intent.FLAG_ACTIVITY_NEW_DOCUMENT | Intent.FLAG_ACTIVITY_NO_HISTORY);
        startActivity(googlePlayIntent);
    }
}
Step 5
Create a web application. In this case, it is a simple html file with some JavaScript code in it (you can find the complete file in the archive we shared with you). Again, please pay attention to the code highlighted in bold:
<!doctype html>
<html lang="en">
<head>
    <title>Backendless QR Login Demo</title>
    <script type="text/javascript" src="//api.backendless.com/sdk/js/latest/backendless.js"></script>
    <style>
        .qr {
            width: 300px;
            height: 300px;
            text-align: center;
            vertical-align: middle;
        }
        #user_info {
            width: 600px;
            height: 100px;
            margin-top: 25px;
            margin-bottom: 25px;
        }
    </style>
</head>
<body>
<h2>Backendless QR Login Demo</h2>
<div id="user_info">
</div>
<div id="qr_image" class="qr">
    <img src="path" align="middle" alt="QR code."/>
</div>
<script>
    var APP_ID = YOUR-APP-ID;
    var API_KEY = YOUR-JS-API-KEY;
    Backendless.initApp( APP_ID, API_KEY );
    var channel = null;
    var channelName = null;
    var filePath = null;
    function clear()
    {
        channel.leave();
        channel = null;
        channelName = null;
        filePath = null;
    }
    function initializeQRLoginSession() {
        Backendless.LocalCache.set("user-token", null);
        if (channel != null)
            clear();
        Backendless.CustomServices.invoke( "QRCodeGenerator", "generateQRCodeForLogin" ).then( function ( qrData ) {
            channelName = qrData.data;
            filePath = qrData.file;
            console.log( "channelName: ", channelName );
            console.log( "filePath: ", filePath );
            img = `<img src="${filePath}" alt="QR code" align="middle"/>`;
            qr_image.innerHTML = img;
            channel = Backendless.Messaging.subscribe( channelName );
            channel.addMessageListener( onMessage )
        } );
    }
    function onMessage( data ) {
        console.log( 'got a message: ', data );
        // channel.removeMessageListener( onMessage );
        clear();
        login(data.message);
    }
    async function login(token)
    {
        console.log("user-token: " + token);
        Backendless.LocalCache.set("user-token", token);
        const userObjectId = await Backendless.CustomServices.invoke( "QRCodeGenerator", "getUserId" );
        console.log("current-user-id: " + userObjectId);
        Backendless.LocalCache.set("current-user-id", userObjectId);
        const userObject = await Backendless.Data.of(Backendless.User).findById( userObjectId );
        user_info.innerHTML = JSON.stringify(userObject);
        qr_image.innerHTML = ''
    }
    initializeQRLoginSession();
</script>
</body>
</html>
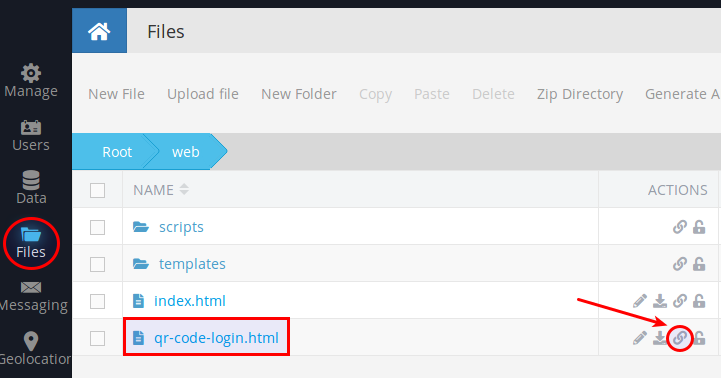
The file must be uploaded to the Files section of your Backendless application:

Step 6
Copy the link for the web application:
Open/paste the link in a web browser and press the “Login with a QR code” button. The web app fetches a QR code from the server and displays it.

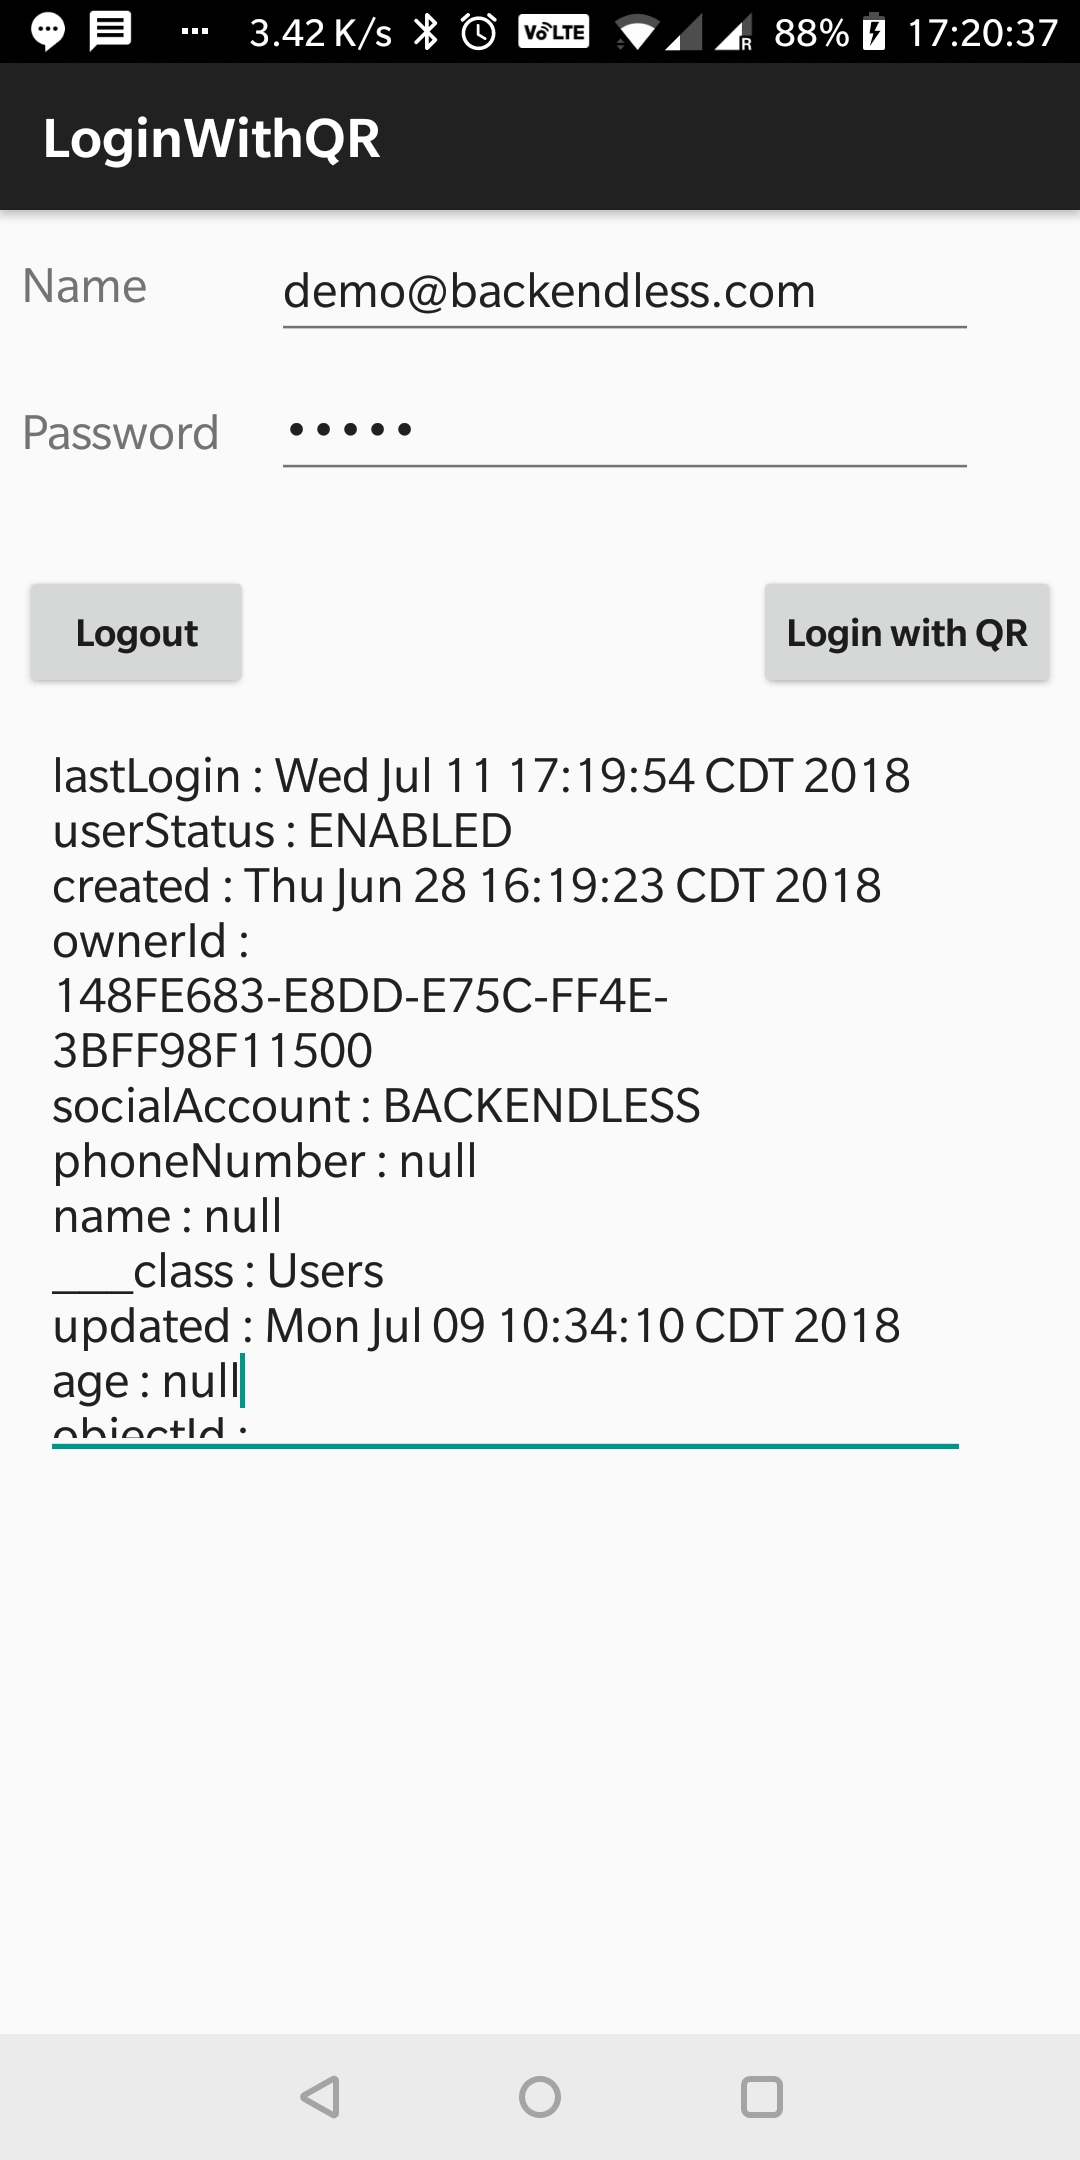
Step 7
Use the Android application to log in with your userid and password (make sure to create a user in your Backendless application). Once you log in, you will see the “Login with QR” button. Click the button to scan the QR code in the web app.
Step 8
Your web application should log in automatically as soon as you scan the QR code in the Android app.
Hope you enjoyed this article. Happy coding!
Mobile-to-Web Cross Login Using a QR Code is difficult to explain. Backendless has done a tremendous job in providing a step by step approach towards solving the issue.