How to Build a Dialogue Custom Alexa Skill Using JavaScript (Without Lambda)
Backendless offers support for the development of custom Amazon Alexa Skills. In this post, we are going to demonstrate how easy it is to create a custom skill using JavaScript. You will learn how to control the dialogue flow between the user and Alexa using Backendless and custom Cloud Code.
As an example, we will build a trip planner skill, albeit a trivialized version of it, which will gather from the user the departure date, the departure city, and the arrival city. The collected information can be used to search available fares, hotels and make any other necessary arrangements.
What You Will Need
- An Amazon Developer Account
- A Backendless Developer Account and App
- Install SDK for Amazon Alexa from Backendless Marketplace
Creating and Configuring a Skill in Amazon Developer Console
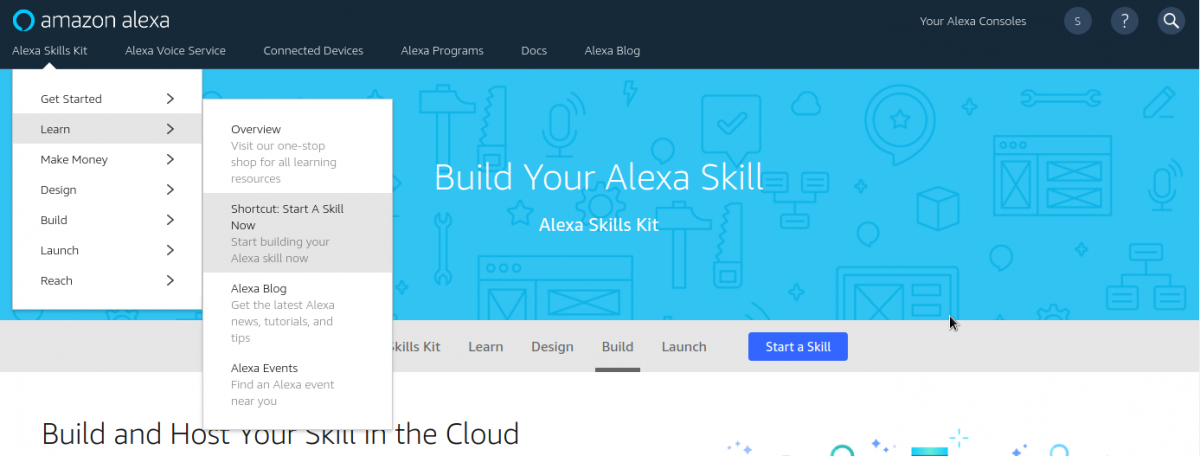
The very first step is creating a skill. To do that, you need to register for an Amazon Developer Account. Select Learn -> Shortcut: Start A Skill Now from the Alexa Skills Kit menu:
The Alexa Skills console will open.
- Click Create Skill and assign a name, for example: “Plan My Trip”. Click Next.
- Click Select for the Custom model.
- Click Create Skill.
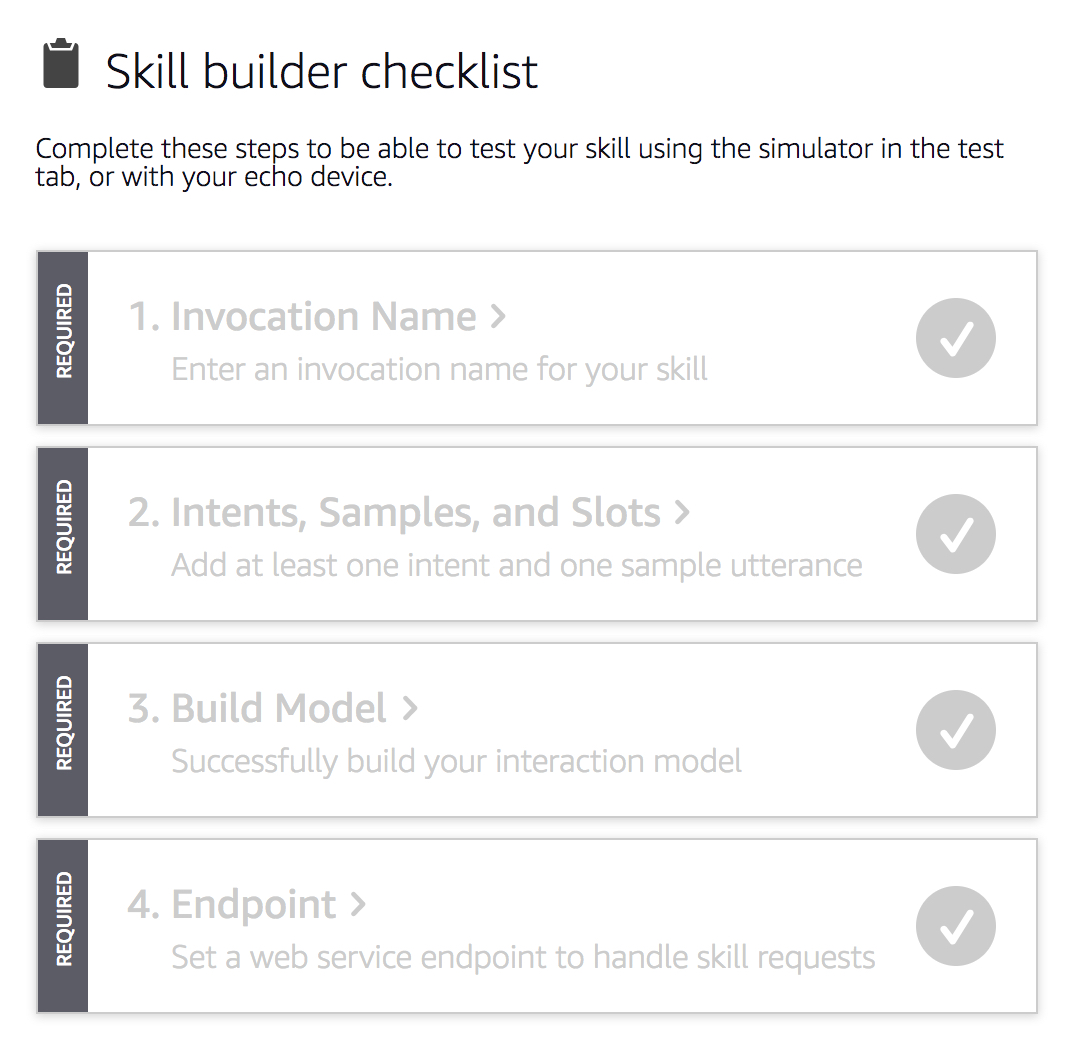
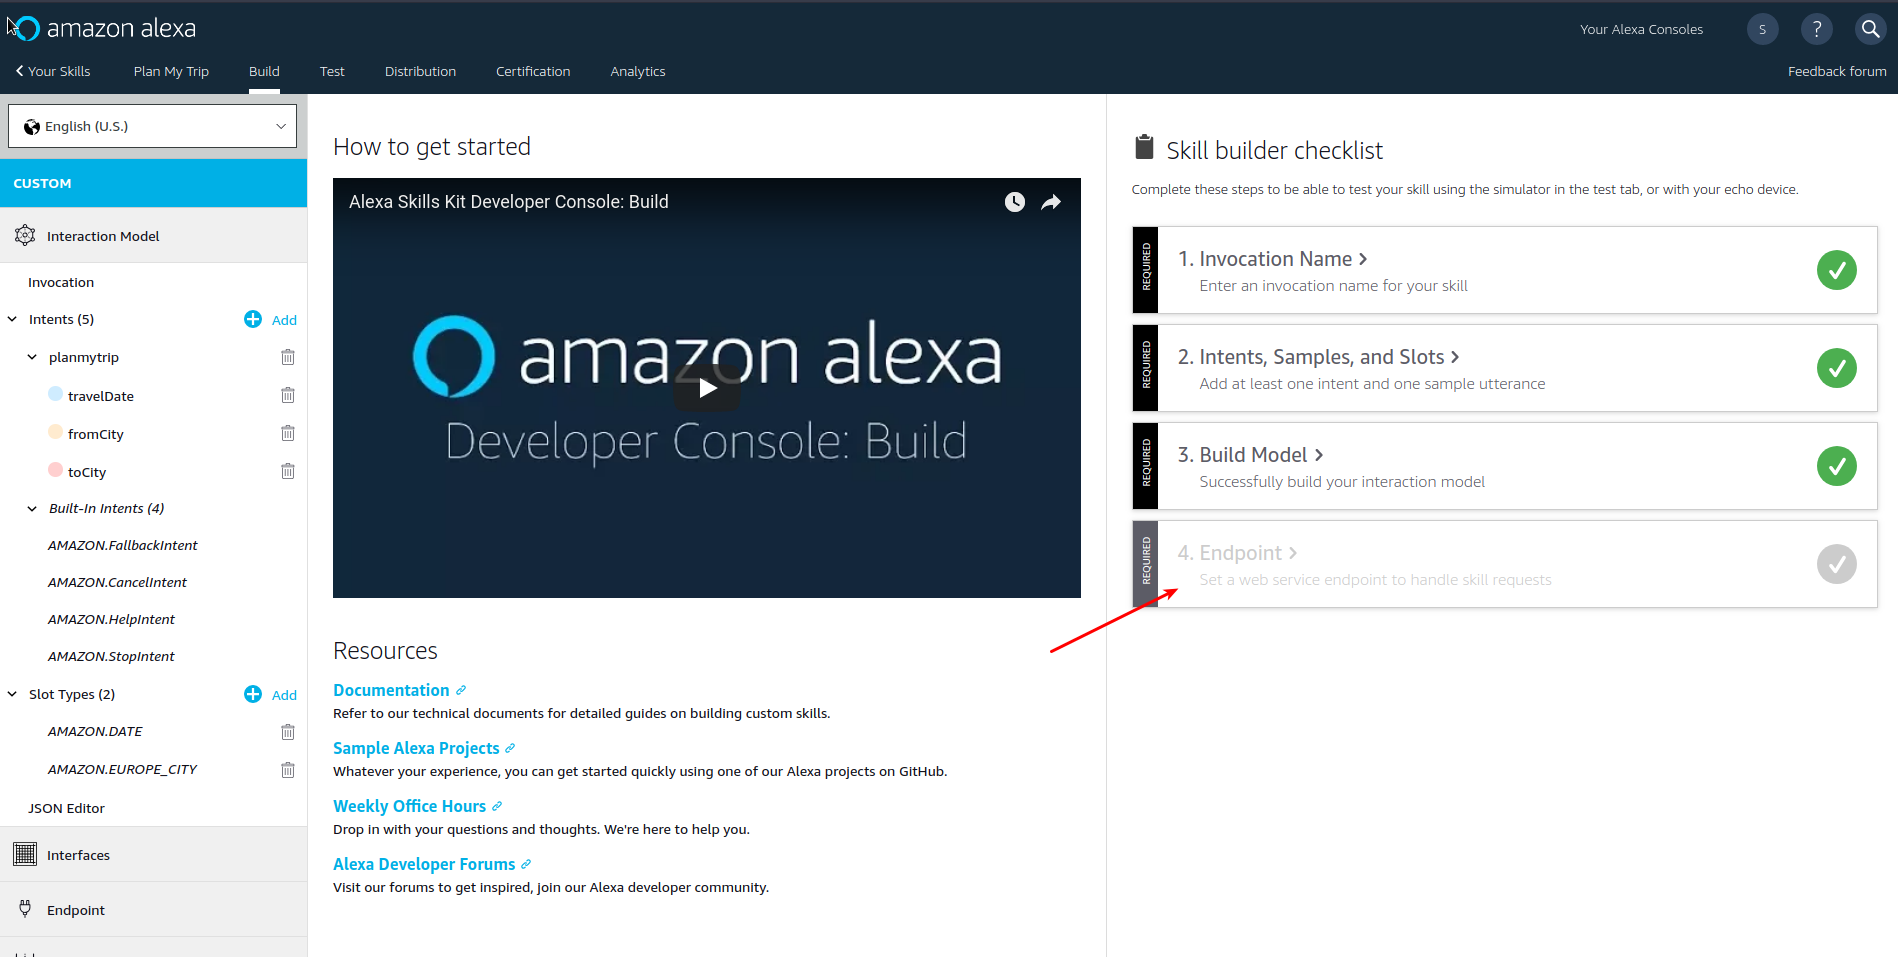
- You will see the Skill Builder Checklist on the right side of the interface. It is necessary to go through all four items on the list.

Invocation Name
Click the 1. Invocation Name step to get started. Enter a name into the Skill Invocation Name field. For example, the name could be “trip planner”. The invocation name is important, as users will say the skill’s invocation name to begin an interaction with your skill. Click the Save Model button and move on to the second step, Intents, Samples and Slots (to navigate to the second step, click the CUSTOM section in the menu on the left, then select the second step in the Skill Builder Checklist).
Intents, Samples, and Slots
An intent represents an action that fulfills a user’s spoken request. Intents can optionally have arguments called slots. The sample utterances are set of likely spoken phrases mapped to the intents. Let’s call our intent “planmytrip”. Enter the name and click the Create custom intent button.
After that, you will need to enter some sample utterances for what the user may say to Alexa. Please note, the greater the variety of the utterances, the more convenient and natural the conversation may go for the user. Additionally, we need to declare a few slots, which are the “arguments” of an intent. There are three slots in this sample: travelDate, fromCity, and toCity. Think of the slots as variables that will eventually contain the data gathered from the user. Make sure to select the slot types for each slot. The travelDate slot type must be AMAZON.DATE, as for fromCity and toCity, it can be any of the Amazon’s “CITY ‘ types.

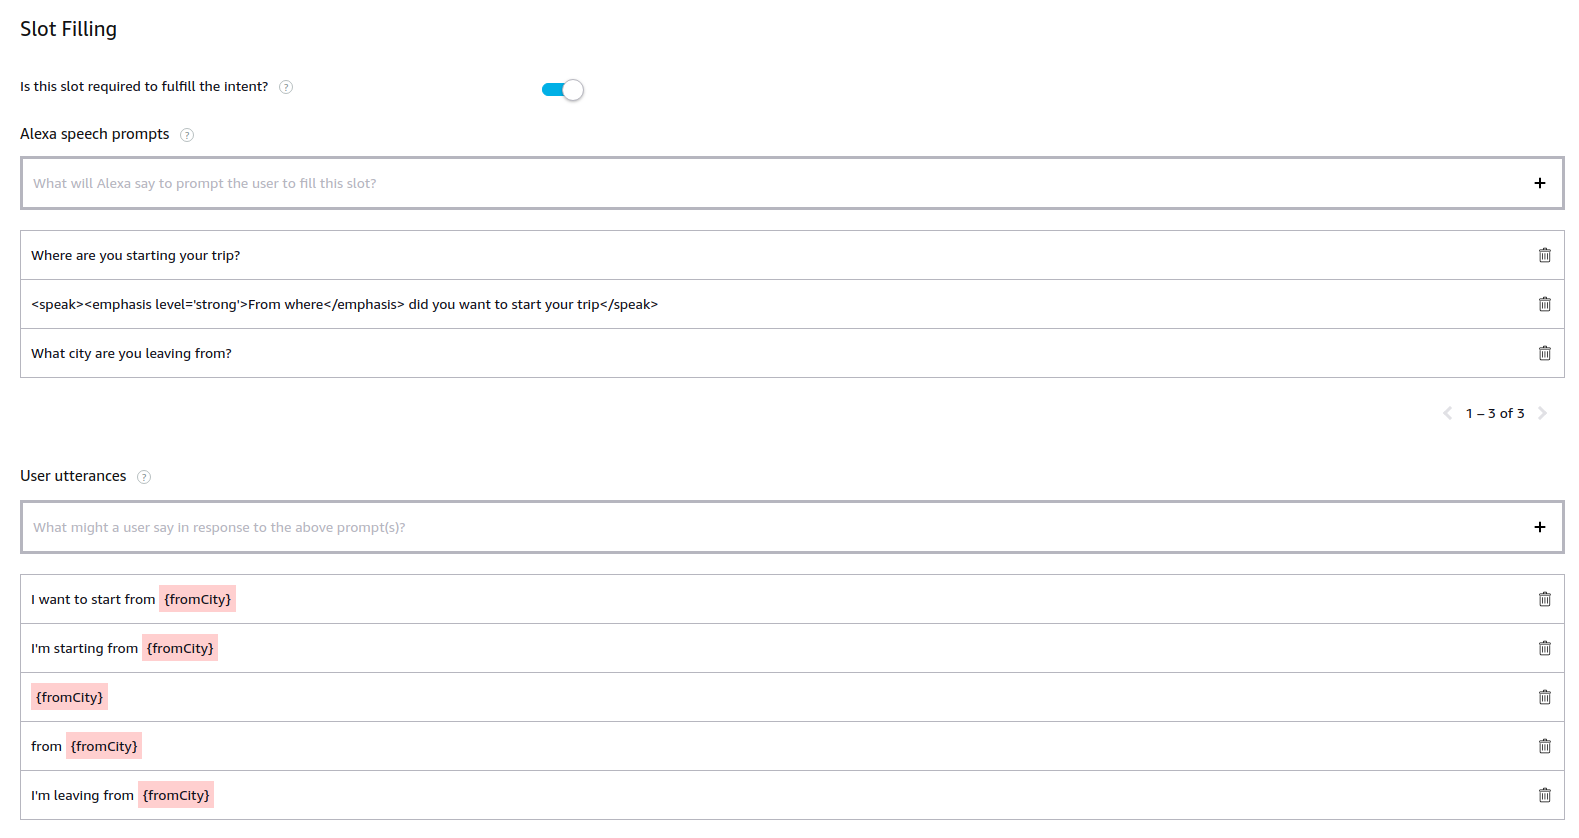
You will see the Edit Dialog link next to each slot. Make sure to click it for each slot and fill out the form. You will need to specify what Alexa will say to prompt the user to fill the spot. Also, make sure to enter what the user may say in response to the above prompts.
travelDate Slot:

fromCity Slot:
toCity Slot:

Once you enter all the data, you need to build the interaction model. Click the Build Model button located at the top of the screen. After the model is built, the last remaining step is to specify the endpoint of the custom Skill service. The endpoint will be created in Backendless in the next step of this guide. We will return to the Amazon Alexa Console a bit later.
Developing and Configuring Skill Service in Backendless
- Login to Backendless Console and select your app.
- Click the Marketplace icon in the vertical toolbar on the left.
- Click the All Services section and install SDK for Amazon Alexa. This will install all the APIs necessary to work with requests from Alexa.
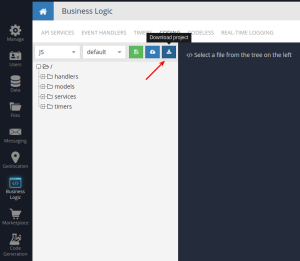
- Switch to the Business Logic section of Backendless Console and click the CODING tab.
- Select JS from the from the language dropdown list and click the Download project icon:
- Extract the files from the downloaded ZIP file and open any IDE you prefer to work with.
- Run the following command from the root directory of the project:
npm i - Create two files named alexa.js and alexa-base.js in the /services directory.
- Open alexa-base.js for editing and put the following code in it:
// alexa-base.js
'use strict'
const SERVICE_NAME = 'AlexaUtils'
class AlexaBase {
invoke(method, body) {
return Backendless.CustomServices.invoke(SERVICE_NAME, method, body)
}
/**
* @param {Object} req
*/
verifyRequest(req) {
const { headers } = this.request
const { Signature: signature, SignatureCertChainUrl: signatureCertChainUrl } = headers
return this.invoke('verify-request', { signatureCertChainUrl, signature, req })
}
/**
* @param {Object} request
* @param {String} intentName
* @param {String} slotName
*/
getSlotValue(request, intentName, slotName) {
return this.invoke('get-slot-value', { request, intentName, slotName })
}
/**
* @param {Object} request
*/
getIntentName(request) {
return this.invoke('get-intent-name', request)
}
/**
* @param {String} [whatToSay]
* @param {Boolean} [waitForResponse]
*/
sendAlexaResponse(whatToSay, waitForResponse) {
return this.invoke('send-alexa-response', { whatToSay, waitForResponse })
}
/**
* @param {Object} request
*/
isStarted(request) {
return this.invoke('is-started', request)
}
/**
* @param {Object} request
*/
isInProgress(request) {
return this.invoke('is-in-progress', request)
}
/**
* @param {Object} request
*/
isCompleted(request) {
return this.invoke('is-completed', request)
}
delegate() {
return this.sendAlexaResponse(null, true)
}
}
module.exports = AlexaBase
The methods in the class above use the APIs from the SDK for Amazon Alexa. The class wraps the APIs to make them more convenient to use in the JS code which will make up the implementation of the custom Alexa skill.
- Now is the time to implement the actual skill service. Open alexa.js for editing and paste the following code into it:
// alexa.js
'use strict'
const AlexaBase = require('./alexa-base')
class Alexa extends AlexaBase {
}
Backendless.ServerCode.addService(Alexa)
This code imports AlexaBase and declares a Backendless API service.
- Add the following method which will be responsible for processing requests sent by Alexa. Let’s call the method planMyTrip:
// alexa.js
'use strict'
const AlexaBase = require('./alexa-base')
class Alexa extends AlexaBase {
 /**
  * @route POST /plan-my-trip
  * @param {Object} req
  * @returns {Object}
  */
 async planMyTrip(req) {
   await this.verifyRequest(req)
 }
}
Backendless.ServerCode.addService(Alexa)
The method accepts only one argument – req, which is Alexa’s request. As you can see, the implementation of the method calls the verifyRequest API. This is important as it validates that the request was indeed sent by Alexa. You can learn more about validation here. As you can see from the requirements page, the validation process is quite involved; however, with the SDK for Alexa, it is reduced to a single API call.
- The next step in the implementation is to obtain the intent name. It can be done using the following line of code:
const intentName = await this.getIntentName(req)
- Now that we have the name of the intent, we need to make sure that it is indeed the intent we are prepared to handle, that is, the planmytrip intent. Additionally, we should check the state of the dialogue with the user. There may be three different states:
- STARTED – this is the state in the very first request sent by the Alexa service. It indicates that the dialogue has started, but none of the slots have been filled.
- IN_PROGRESS – this is the state for all requests sent by the Alexa service while the user is communicating with the device to fill all the slots.
- COMPLETED – this is the final state when all the slots have been filled.
Determining the state of the dialogue is easy when you use the Backendless SDK for Alexa – it provides the API (used in the base class you created): isStarted( req ), isInProgress( req ) and isComplete( req ). The final goal is to get all the slots filled in. As a result, until the dialogue has reached the COMPLETED state, we will return control back to Alexa so it can choose a response to gather all necessary data from the user. It is important to note that it is possible to program the skill in a way where it dictates what any “intermediary” response should be.
In order to pass the control to Alexa, it is sufficient to call the delegate() method defined in the base class. Alexa “knows” what slots have been filled and will continue prompting the user to provide information so any remaining slots would be filled. Once all the slots are filled, the dialogue state will change to COMPLETED and then we can move on to executing the core of the skill’s logic. - Now, the final version of the skill class looks like this:
// alexa.js
'use strict'
const AlexaBase = require('./alexa-base')
const PLAN_MY_TRIP_INTENT = 'planmytrip'
class Alexa extends AlexaBase {
/**
 * @route POST /plan-my-trip
 * @param {Object} req
 * @returns {Object}
 */
async planMyTrip(req) {
  await this.verifyRequest(req) // check that the request was sent by Alexa
  try {
    const intentName = await this.getIntentName(req)
    if (intentName === PLAN_MY_TRIP_INTENT) {
      const isCompleted = await this.isCompleted(req)
      if (!isCompleted) { // if not completed, delegate process back to Alexa
        return this.delegate()
      }
      // here we already have all required slot values, so we can easily get it all
      const fromCity = await this.getSlotValue(req, PLAN_MY_TRIP_INTENT, 'fromCity')
      const toCity = await this.getSlotValue(req, PLAN_MY_TRIP_INTENT, 'toCity')
      const travelDate = await this.getSlotValue(req, PLAN_MY_TRIP_INTENT, 'travelDate')
      // basic answer just for example.
      // You can do anything you want having this data and then answer to Alexa
      const message = `You will travel from ${fromCity} to ${toCity} at ${travelDate}. Have a nice trip!`
return this.sendAlexaResponse(message)
    }
  } catch (error) {
    // in case some error occurs, send message to Alexa so user could understand what happened
    return this.sendAlexaResponse(error.message, false)
  }
}
}
Backendless.ServerCode.addService(Alexa)
Notice that the body of the method is wrapped into a try/catch block in case if there is an error, the user would be notified about it.
- Finally, the code should be deployed to Backendless. To do this run the following command:
npm run deploy
- Once the code is deployed, return back to Backendless Console and open the Business Logic screen. You will see the Alexa API service which contains the planMyTrip operation. Click the operation name to see its details. The green bar contains the endpoint URL, which by default is shortened. Click the show full URL button to see the complete URL. Copy the URL – you will need to use in the Amazon Developer Console.

- Return to Amazon Developer Console, open your skill and click the 4th step: Endpoint:
- Select HTTPS and paste the endpoint URL into the Default Region field. In the SSL certificate type select “My development endpoint is a sub-domain of a domain that has a wildcard certificate from a certificate authority”. Your screen should look like the one below in the screenshot:

- Click the Save Endpoints button. Now the skill is ready for testing!


Testing Your Skill
Make sure to enable Test for your skill. Once enabled, you can interact with it using the simulator interface:
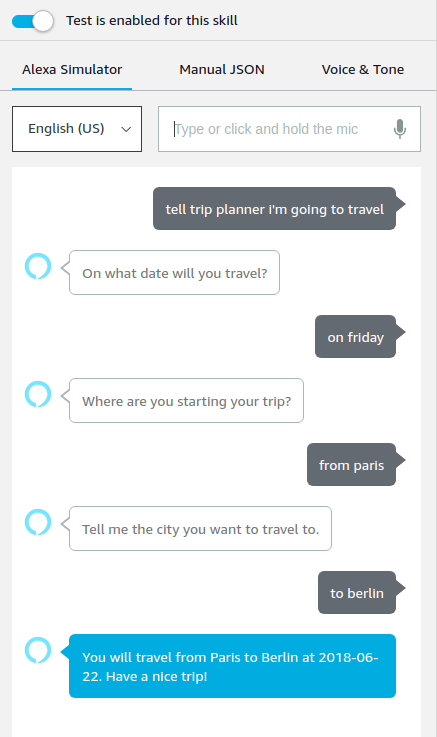
This is it! You have a skill that can gather multiple points of data from the user and then you have an excellent place in the code to start doing something useful with it. Can’t wait to see what powerful features and skills you will build using Alexa with Backendless! Next time we will show you a little more complex example of dialogues between Alexa and the user.
Happy coding!