Client-side Setup
Setting up your development environment consists of two steps: (1) Xcode project setup and (2) application setup.
Step 1. Xcode Project Setup
Backendless SDK for iOS/macOS includes a library which implements the Backendless APIs. It is recommended to use Cocoapods to configure an Xcode project to use Backendless:
Important
The simplest way to create an Xcode project is by using a Backendless Project Template. See the Quick Start section of this guide for instructions.
CocoaPods manages library dependencies for your Xcode projects. The dependencies for the projects are specified in a plain text file called a Podfile. CocoaPods will resolve dependencies between libraries, fetch the resulting source code, then link it together in an Xcode workspace to build your project. Make sure you have the Cocoapods installed your system as described in the CocoaPods documentation.
To create a new project with Backendless Pod, follow the steps below:
- Create a new project in Xcode as you normally would, then close the project.
- Open a Terminal window, and change the current directory to be the project's directory.
-
Run the following command in the Terminal window, which will create a file with the name
Podfile.pod init -
Open the created Podfile using a text editor and add the following text inside of the
targetblock:pod 'BackendlessSwift' -
Save Podfile, return to the Terminal window and run the following command:
pod install -
Once the pod is downloaded, Xcode project workspace file will be created. This should be the file you use to open the project in Xcode.
- Open
.xcworkspacefile to launch your project.
Important
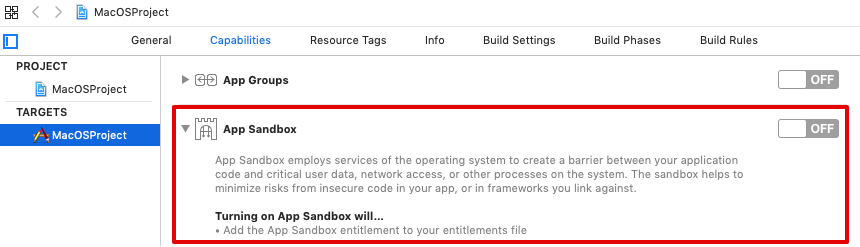
If your project is written for macOS you should disable sandboxing in capabilities:
Important
Step 2. Application Setup
Once your project is configured, the client application must initialize the SDK with one of the approaches shown below.
1. Using your Backendless subdomain name: Every Backendless application receives a subdomain under the backendless.app domain. The subdomain is in the format of xxxx.backendless.app. The subdomain is used to identify your backend when the client app uses Backendless APIs and also to run client-side applications created with UI Builder. To see the subdomain name assigned to your application navigate to the main dashboard of your application, you will see the Backendless subdomain field. Use the copy icon on the right side of the field to copy the value: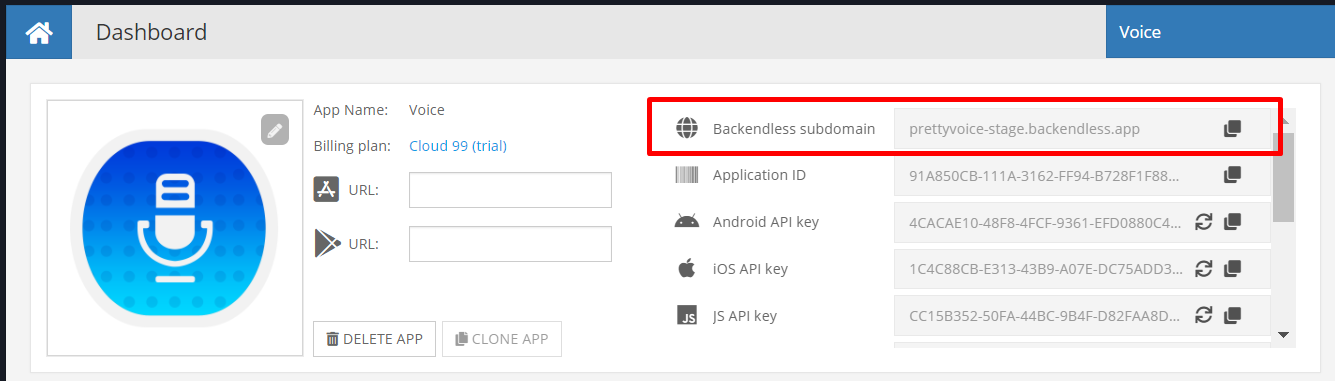
The code to initialize your iOS application with your subdomain name is:
[Backendless.shared initAppWithCustomDomain:@"YOUR-SUBDOMAIN.backendless.app"];
Backendless.shared.initApp(customDomain: "YOUR-SUBDOMAIN.backendless.app")
2. Your own domain name. You can assign a custom domain to your application using the Manage > App Settings > Custom Domain section of Backendless Console. When a custom domain is assigned, your iOS application should be initialized with the following code:
[Backendless.shared initAppWithCustomDomain:@"YOUR-CUSTOM-DOMAIN"];
Backendless.shared.initApp(customDomain: "YOUR-CUSTOM-DOMAIN")
To enable SSL for your custom domain, make sure your application is on the Scale plan. Configure a custom domain in Backendless Console, we will gladly generate an SSL certificate for your domain.
3. Backendless native endpoint. Every Backendless cluster (hosting zone) has a native endpoint. Your application's backend is running in one of the clusters below. It is important to make sure to use the endpoint that correspond to the cluster. The North American endpoint is automatically embedded in the SDK, it is not necessary to set it in the code, however, the EU endpoint must be explicitly specified. Use the code, based on the cluster your app is running in:
North American cluster:
- (BOOL)application:(UIApplication *)application didFinishLaunchingWithOptions:(NSDictionary *)launchOptions {
    [Backendless.shared initAppWithApplicationId:@"YOUR-APPLICATION-ID" apiKey:@"YOUR-APPLICATION-IOS-API-KEY"];
    return YES;
- (BOOL)application:(UIApplication *)application didFinishLaunchingWithOptions:(NSDictionary *)launchOptions {
    [Backendless.shared initAppWithApplicationId:@"YOUR-APPLICATION-ID" apiKey:@"YOUR-APPLICATION-IOS-API-KEY"];
    return YES;
}
South American cluster:
- (BOOL)application:(UIApplication *)application didFinishLaunchingWithOptions:(NSDictionary *)launchOptions {
     Backendless.shared.hostUrl = @"https://api.sa.backendless.com";
    [Backendless.shared initAppWithApplicationId:@"YOUR-APPLICATION-ID" apiKey:@"YOUR-APPLICATION-IOS-API-KEY"];
    return YES;
}
func application(_ application: UIApplication, didFinishLaunchingWithOptions launchOptions: [UIApplication.LaunchOptionsKey: Any]?) -> Bool {
    Backendless.shared.hostUrl = "https://api.sa.backendless.com"
    Backendless.shared.initApp(applicationId: "YOUR-APPLICATION-ID", apiKey: "YOUR-APPLICATION-IOS-API-KEY")
    return true
}
European Union cluster:
- (BOOL)application:(UIApplication *)application didFinishLaunchingWithOptions:(NSDictionary *)launchOptions {
     Backendless.shared.hostUrl = @"https://eu-api.backendless.com";
    [Backendless.shared initAppWithApplicationId:@"YOUR-APPLICATION-ID" apiKey:@"YOUR-APPLICATION-IOS-API-KEY"];
    return YES;
}
func application(_ application: UIApplication, didFinishLaunchingWithOptions launchOptions: [UIApplication.LaunchOptionsKey: Any]?) -> Bool {
    Backendless.shared.hostUrl = "https://eu-api.backendless.com"
    Backendless.shared.initApp(applicationId: "YOUR-APPLICATION-ID", apiKey: "YOUR-APPLICATION-IOS-API-KEY")
    return true
}
The values for "application-Id" and "API-key" must be obtained from Backendless Console. They are available on the main dashboard as well as the Manage > App Settings screen.