Stripe Integration plugin enables secure processing of credit card transactions using Stripe. Additionally, the plugin can update the app about the status of the transaction, which is handled through an asynchronous callback.
Feature
Stripe Integration Plugin
Marketplace Product

The product integrates the Stripe service with Backendless to enable secure credit card processing and transaction status notification. Using Stripe Integration plugin developers can enjoy the simplicity of transaction processing by Stripe with the security and reliability of the Backendless servers. With the power of real-time messaging and real-time database, Backendless apps instantly get a notification when Stripe finishes transaction processing so the end user can be notified without waiting.
The Stripe integration plugin enables server-side validation and callback handling for payments processed by Stripe. The overall flow of the Backendless/Stripe integration can be seen in the diagram below:
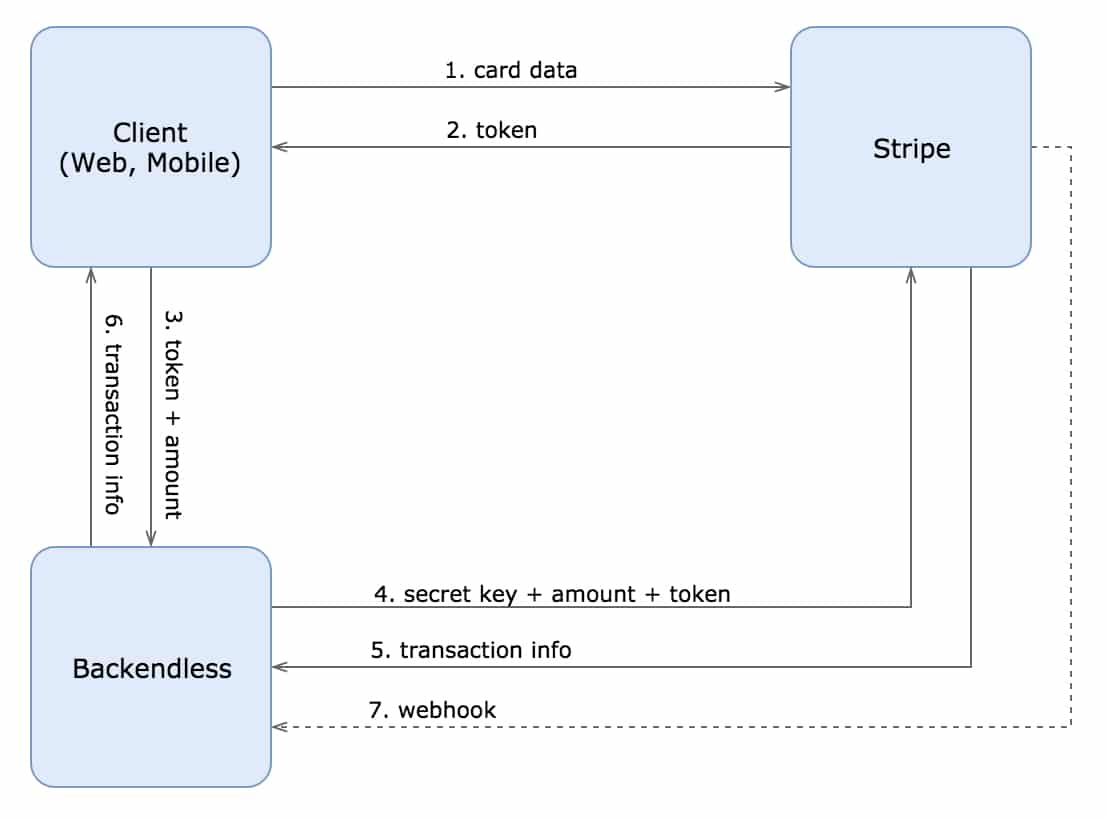
- Client app sends credit card data to the Stripe servers using the Stripe SDK.
- If the data is valid, the app gets a response with a one-time token, otherwise it will get an error.
- The client app sends the token and the amount to charge to the Backendless servers using the
POST /Stripe/chargeroute. - Backendless sends a request containing transaction data (the amount) and the client’s token to Stripe along with a secret key which exists only on the Backendless servers.
- If the secret key, transaction data (the amount) and token are valid, Stripe begins transaction processing and returns the info about current transaction back to Backendless:
- Backendless sends the transaction info to the client app.
- Once Stripe finishes the processing of the transaction, it executes a callback (a webhook) to Backendless. The callback contains the information about the transaction status. The information is stored in the Backendless Database (the
StripeEventstable). Additionally, Backendless publishes the information into a messaging channel. The client app can subscribe to an event using Backendless Real-Time Messaging (channel:stripe/<transaction-id>). When it receives a message with the transaction status, the app can inform the user that the transaction has been completed.

There are a few things to note:
- Steps 1 and 2 are request/response operations for a request from web/mobile client to the Stripe servers.
- Steps 3, 4, 5 and 6 are executed as a part of the same workflow where Backendless acts as a proxy between the web/mobile client and Stripe. The importance of Backendless here is it adds a secret key to the request sent to Stripe.
Installation Instructions
- Login to Backendless Console and select your app. Open the Marketplace screen and install the “Stripe Integration plugin” from the Backendless marketplace. The plugin product is available under the All services menu. The product itself is available at no cost (free), however, keep in mind that your app must be on a paid plan in order to install a product from the Marketplace.
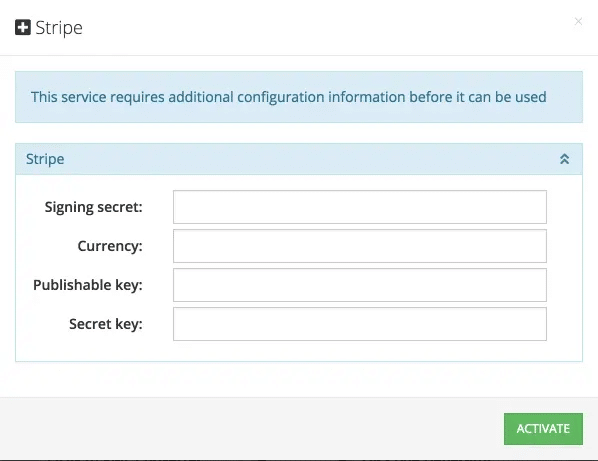
- The Stripe Integration plugin product has required configuration parameters. When installing the product, you will be presented with a configuration popup window shown below. Keep the browser window open as you will return to it with the required information.
- Open a new browser window and navigate to Stripe’s website. Register/login to your account.
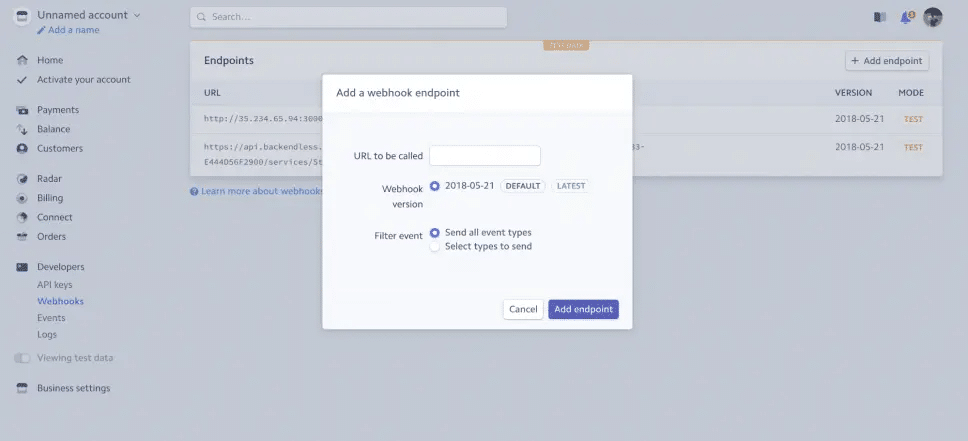
- Open the Stripe developer console and navigate to Developers > Webhooks. Click the + Add endpoint button in the “Endpoints receiving events from your account” section. Add the URL in the following format:
https://<APP-CUSTOM-DOMAIN>/api/services/Stripe/webhooks/handler
where:
<APP-CUSTOM-DOMAIN>is one of your Backendless application custom domains.
This value can be obtained from the main dashboard of Backendless console. Since the other browser window is left open where you were installing the product from the marketplace, you can open an additional browser window/tab to obtain the value for the URL.
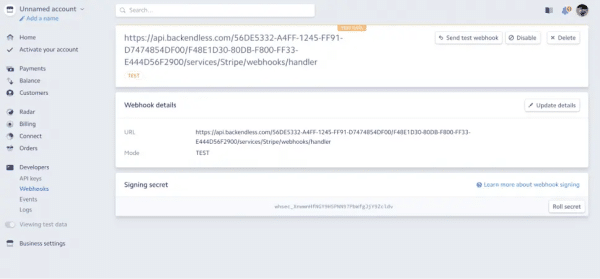
Enter the URL into the field shown in the screenshot below:

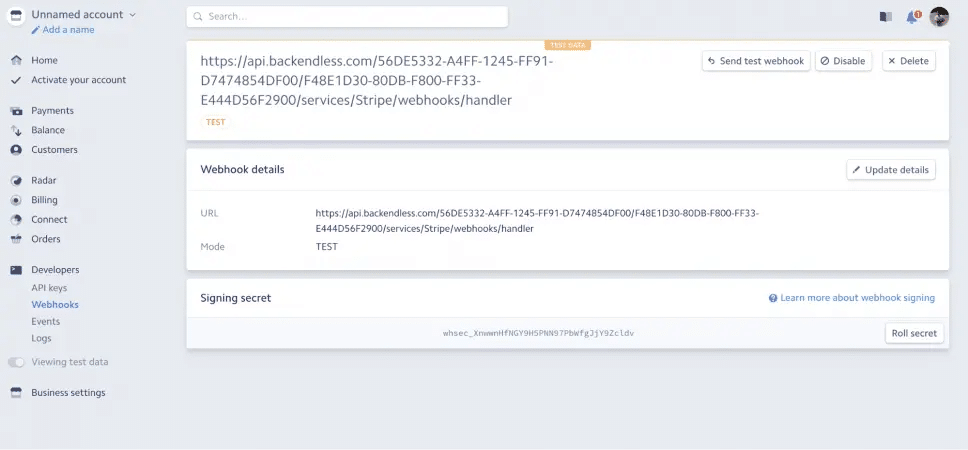
- Select the created webhook endpoint, click the Click to reveal button and copy the Signing secret:
- Return to Backendless console where the Stripe Integration product is being installed and paste Signing secret from the previous step into the Signing secret field.
- Make sure to enter a value for the Currency field.
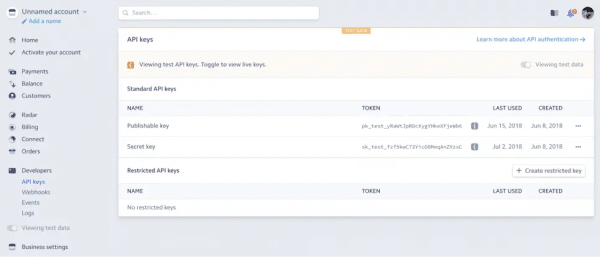
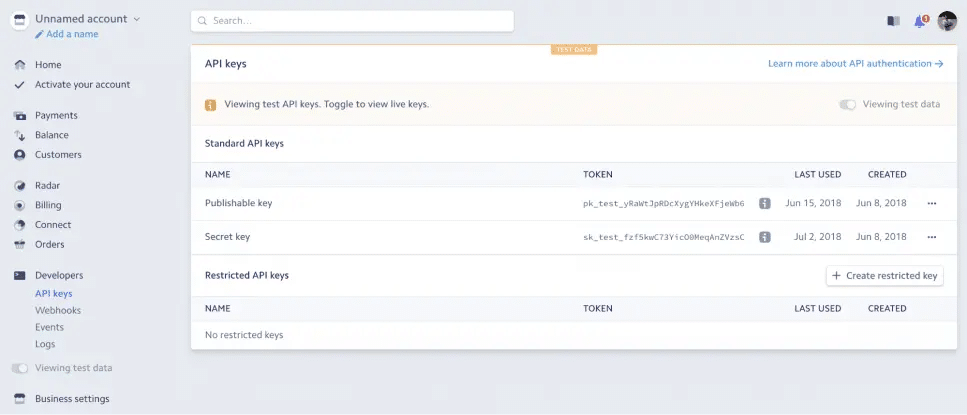
- The values for the Secret key and the Publishable key fields should also be obtained from Stripe console as shown below (see the Developers > API keys section):
- Click the ACTIVATE button to finalize the installation of the product from the Marketplace. The service is now ready to process your transactions.
Webhooks and Stripe Events
When a webhook is registered with Stripe, the Stripe Integration plugin processes Stripe events and performs the following actions:
- Saves event data in the Backendless Database
- Publishes a pub/sub message (via real-time messaging) with event information.
Events in the database are stored in the StripeEvents table. The table has the following schema (you do not need to create it manually unless the Dynamic Schema Definition option is disabled):
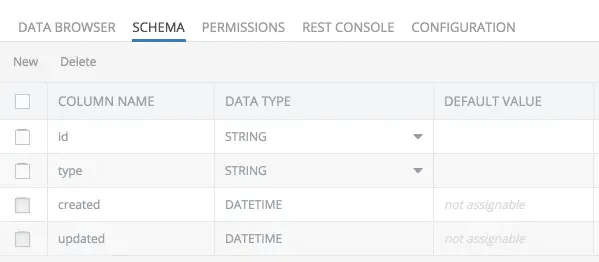
where:
- The
idcolumn contains the id of the transaction. - The
typecolumn contains the event type.
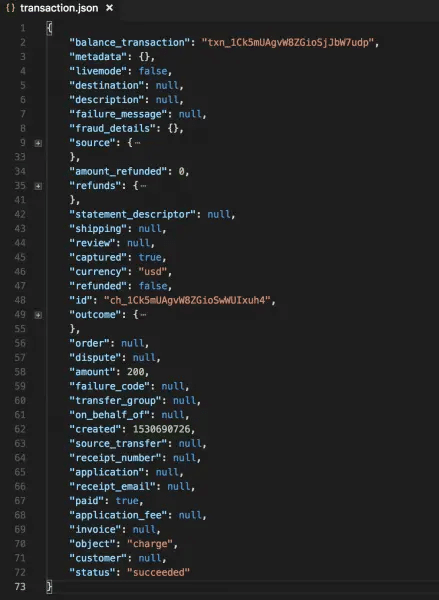
The screenshot below shows sample contents of the data table:
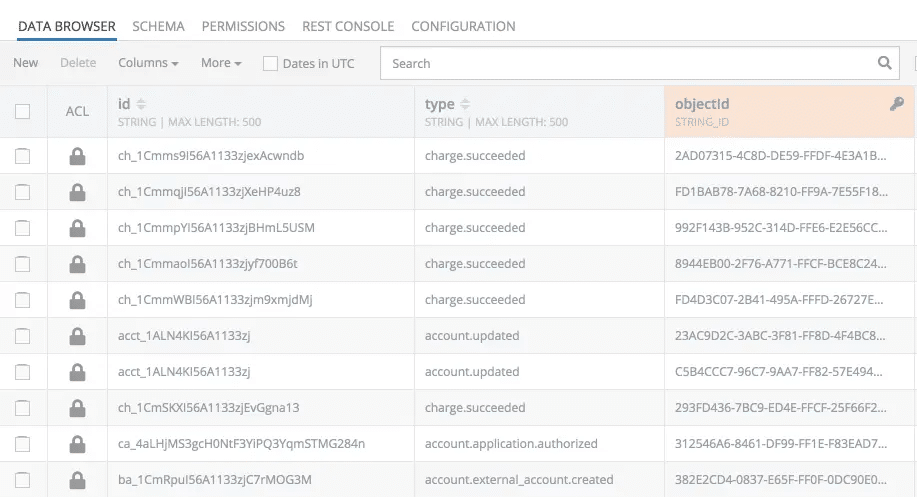
Additionally, the plugin implementation sends out the payload of the event through Backendless Real-Time Messaging. To receive the messages, the client application must subscribe to the stripe messaging channel. To receive a message for a specific transaction, the following selector must be used:
id = 'transaction id'
For example,
id = 'ch_1Cmms9I56A1133zjexAcwndb'
The transaction id can be obtained from the response object received for the “Initiating a charge” API call documented below.
Supported API
The Stripe Integration plugin provides the following APIs:
Initiating a Charge
This is the API which is used in step 3 in the diagram above:
Backendless.initApp( "YOUR-APP-ID", "ANDROID-API-KEY" );

float amount = AMOUNT-TO-CHARGE;
HashMap<String, Object> params = new HashMap<String,Object>();
params.put( "token", TOKEN-VALUE-FROM-STRIPE );
params.put( "amount", amount );
Object[] args = new Object[]{ params };
Backendless.CustomService.invoke( "Stripe", "charge", args, Object.class,
  new AsyncCallback<Object>()
  {
    @java.lang.Override
    public void handleResponse( Object response )
    {
      Log.info( "MYAPP", "Charge has been submitted" );

      // to get a real-time message:
      HashMap responseHash = (HashMap) response;
      String txId = (String) responseHash.get("id");
      Channel channel = Backendless.Messaging.subscribe("stripe");
      channel.addMessageListener("id = '" + txId + "'", new AsyncCallback<HashMap>() {
        @Override
        public void handleResponse(HashMap response) {
            Log.i( "MYAPP", "got webhook callback " + response );
        }

        @Override
        public void handleFault(BackendlessFault fault) {
            Log.e( "MYAPP", "got error " + fault.toString() );

        }
    }, HashMap.class );}

    @java.lang.Override
    public void handleFault( BackendlessFault fault )
    {
      Log.error( "MYAPP", "Server returned an error " + fault );
    }
  });
Backendless.initApp( YOUR-APP-ID, YOUR-JS-API-KEY );
var chargeData = {
token: TOKEN-VALUE-FROM-STRIPE,
amount: AMOUNT-TO-CHARGE
}
Backendless.CustomServices.invokeSync( "Stripe", "charge", [ chargeData ] )
.then( function( result ) {
// result.id provides transaction id
})
.catch( function( error ) {
});curl -X "POST" "https://api.backendless.com/<API-ID>/<API-KEY>/services/Stripe/charge" \
-H 'Content-Type: application/json' \
-H 'Accept: application/json' \
-d $'{
"amount" : <amount>,
"token" : <token>
}'