How to Create a Web App Using Angular and Backendless
Today we are going to talk about the integration of Backendless into your AngularJS/TypeScript app. We will create a simple Address Book application where all the application data will be stored in the Backendless mobile backend. The main goal of this article is to provide step-by-step instructions and to show how to create an Angular application with Backendless mBaaS.
Setup Environment
In order to start developing our application, we will need to setup the environment first:
- NodeJS should be installed on your machine.
- Also, you would need to install the Angular CLI package globally; if you already have it, just skip this step. Otherwise, execute the following line in the Terminal:
npm install -g @angular/cli
Alright, we have set everything up, and now let’s generate our app and run it:
ng new backendless-angular
cd backendless-angular
npm start
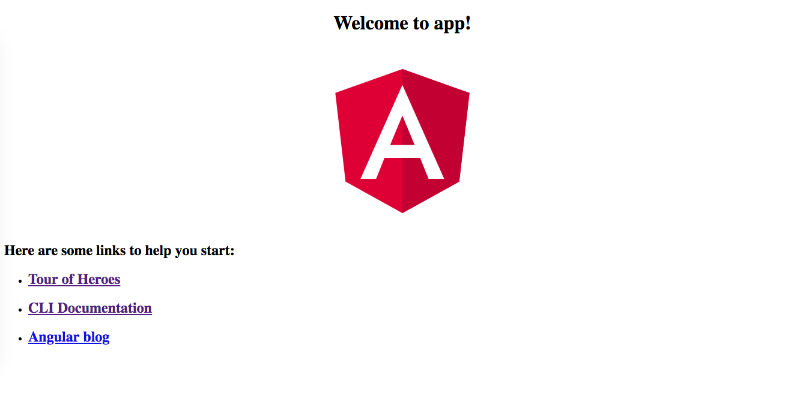
Once that is done, the application will be running at “http://localhost:4200”. You can check it in your browser.
Assuming everything is properly set up, you should see this web page:
Add Styles
In order to style the app, we will use the Bootstrap framework. This will add a high-quality and modern “look and feel” to the app.
Just add a few lines into index.html as described here:
<link rel="stylesheet" href="https://stackpath.bootstrapcdn.com/bootstrap/4.1.0/css/bootstrap.min.css" integrity="sha384-9gVQ4dYFwwWSjIDZnLEWnxCjeSWFphJiwGPXr1jddIhOegiu1FwO5qRGvFXOdJZ4" crossorigin="anonymous">
<script src="https://code.jquery.com/jquery-3.3.1.slim.min.js" integrity="sha384-q8i/X+965DzO0rT7abK41JStQIAqVgRVzpbzo5smXKp4YfRvH+8abtTE1Pi6jizo" crossorigin="anonymous"></script>
<script src="https://cdnjs.cloudflare.com/ajax/libs/popper.js/1.14.0/umd/popper.min.js" integrity="sha384-cs/chFZiN24E4KMATLdqdvsezGxaGsi4hLGOzlXwp5UZB1LY//20VyM2taTB4QvJ" crossorigin="anonymous"></script>
<script src="https://stackpath.bootstrapcdn.com/bootstrap/4.1.0/js/bootstrap.min.js" integrity="sha384-uefMccjFJAIv6A+rW+L4AHf99KvxDjWSu1z9VI8SKNVmz4sk7buKt/6v9KI65qnm" crossorigin="anonymous"></script>
Now, change the app.component.html file by replacing the file’s content using the following code:
<div class="container">
  <div class="header">
   <h3>Backendless Angular Addresses Book</h3>
  </div>
</div>
Setup Backendless
Login to your Backendless developer account. If you do not have one, you can register for free here.

Also, you will need to have a Backendless App created. In my case, it is called backendless_angular_article.
To enable client-server communication between the app and Backendless, we will use the Backendess SDK for JS. It is completely compatible with TypeScript, therefore you don’t need to worry about any other dependencies for using Backendless API inside of your TypeScript applications. Let’s install the Backendless SDK for JS from NPM:
npm i backendless -S
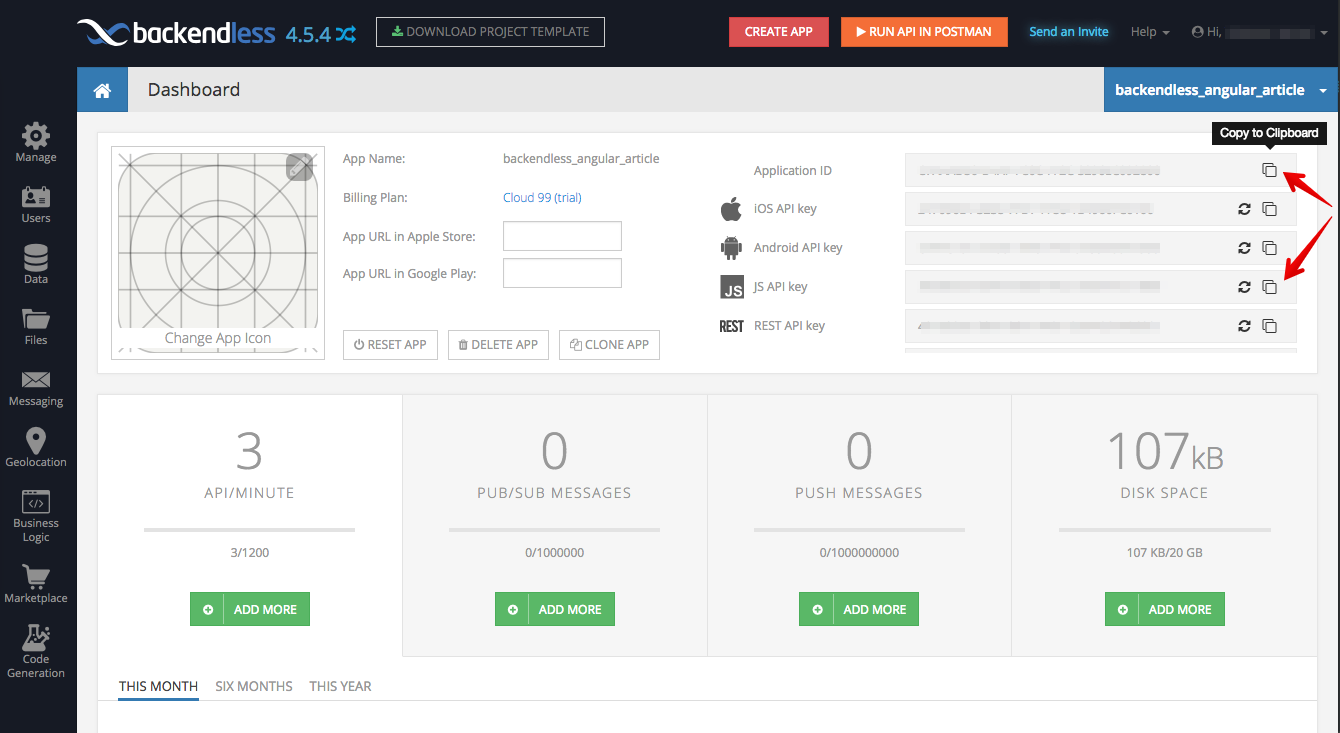
Now we are going to add Backendless API keys into our app. To do that, open your Backendless App Dashboard and you will see the panel with the API keys. For our application, you need both the APP_ID and the JS_API_KEY.
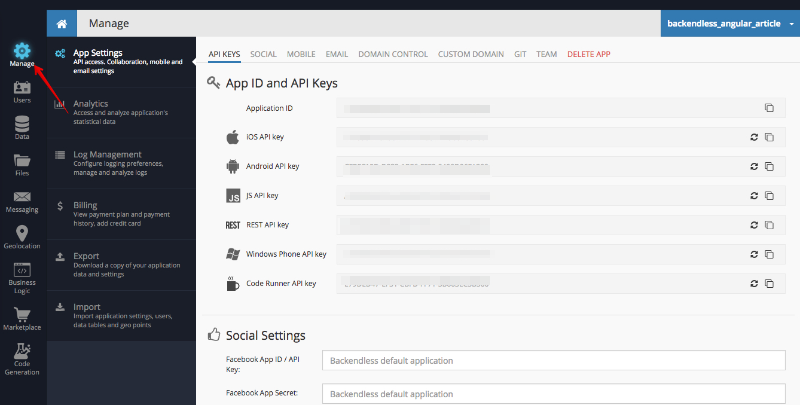
You can find these keys on the Manage > App Settings screen as well.
Let’s get back to Angular CLI, where we will create a file called environments/environment.ts and add the API keys there:
//environments/environment.ts
export const environment = {
production: false,
backendless: {
  APP_ID: 'C7AAAD50-D4AF-FC0C-FF2C-3296EC092800',
  API_KEY: 'AE50EECB-67A4-435D-FFCC-C93A14C11800'
}
}
Let’s include and initialize the Backendless JS-SDK in our project. To do that, just add a few lines of code to app.module.ts as shown below:
//app.module.ts
import { BrowserModule } from '@angular/platform-browser';
import { NgModule } from '@angular/core';
import Backendless from 'backendless';
import { environment } from '../environments/environment';
import { AppComponent } from './app.component';
Backendless.initApp(environment.backendless.APP_ID, environment.backendless.API_KEY);
@NgModule({
declarations: [
  AppComponent
],
imports: [
  BrowserModule
],
providers: [],
bootstrap: [AppComponent]
})
export class AppModule {
}
Create the Persons List Component
Angular CLI has a command for component creation, so let’s use it:
ng g component persons-list
It will generate a persons-list directory with the TS/HTML/CSS files. Once it is created, modify the HTML and TS files as shown below:
//persons-list/persons-list.component.html
<ul class="list-group">
<ul class="list-group">
  <li *ngFor="let person of persons" class="list-group-item">
    <div>{{person.name}}</div>
    <div class="text-muted small">{{person.address}}</div>
  </li>
</ul>
</ul>
//persons-list/persons-list.component.ts
import { Component, OnInit } from '@angular/core';
const DUMMY_PERSONS = [
{ name: 'Tony Stark', address: '10880 Malibu Point' },
{ name: 'Bruce Banner', address: '2766 Taylor Street' },
{ name: 'Steve Rogers', address: 'New York City, Brooklyn' },
{ name: 'Thor Odinson', address: 'Palace in Asgard' }
];
@Component({
selector: 'app-persons-list',
templateUrl: './persons-list.component.html',
styleUrls: ['./persons-list.component.css']
})
export class PersonsListComponent implements OnInit {
public persons;
ngOnInit() {
  this.getPersons().then(persons => {
    this.persons = persons;
  });
}
getPersons() {
  return Promise.resolve(DUMMY_PERSONS);
}
}
Now we can include the component in our app.component HTML file:
// app.component.html
<div class="container">
<div class="header">
  <h3>
    Backendless Angular Addresses Book
  </h3>
</div>
<app-persons-list></app-persons-list>
</div>
The list is rendered, so just check it in your web browser:

Create Persons Service
As you may have noticed, we render a dummy list of persons, so let’s just create a simple service for Persons data. Angular CLI also has a command for services generation:
ng g service persons
Let’s move our dummy persons list into PersonsService and inject the service into PersonsListComponent. To do that, modify both thepersons.service.ts and persons-list/persons-list.component.ts files.
// persons.service.ts
import { Injectable } from '@angular/core';
const DUMMY_PERSONS = [
{ name: 'Tony Stark', address: '10880 Malibu Point' },
{ name: 'Bruce Banner', address: '2766 Taylor Street' },
{ name: 'Steve Rogers', address: 'New York City, Brooklyn' },
{ name: 'Thor Odinson', address: 'Palace in Asgard' }
];
@Injectable({
providedIn: 'root'
})
export class PersonsService {
public persons: Object[] = [];
loadAll() {
  Promise.resolve(DUMMY_PERSONS).then((persons: Object[]) => {
    this.persons = persons;
  });
}
}
// persons-list/persons-list.component.ts
import { Component, OnInit } from '@angular/core';
import { PersonsService } from '../persons.service';
@Component({
selector: 'app-persons-list',
templateUrl: './persons-list.component.html',
styleUrls: ['./persons-list.component.css']
})
export class PersonsListComponent implements OnInit {
constructor(private personsService: PersonsService) {
}
ngOnInit() {
  this.personsService.loadAll();
}
get persons(): Object[] {
  return this.personsService.persons;
}
}
Integrate Backendless Data
It’s time to use some real data from the Backendless backend. Let’s put our dummy persons list into Backendless. First, we need to create a new table on the Data screen in Backendless Console:

Then, we are going to import all the dummy persons into the table. REST Console in Backendless will help us with that:
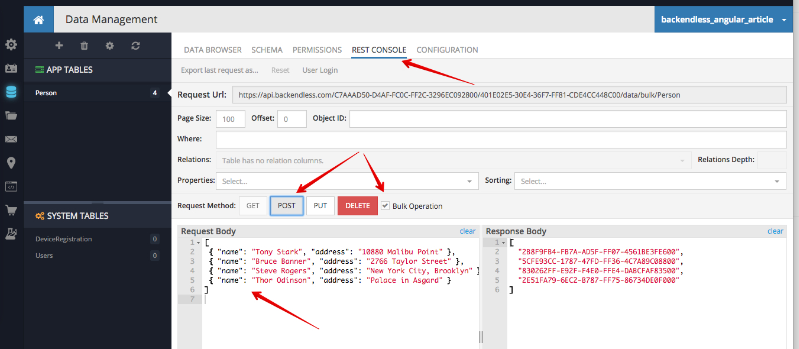
// Request body
[
 { "name": "Tony Stark", "address": "10880 Malibu Point" },
 { "name": "Bruce Banner", "address": "2766 Taylor Street" },
 { "name": "Steve Rogers", "address": "New York City, Brooklyn" },
 { "name": "Thor Odinson", "address": "Palace in Asgard" }
]
Check this out in the Data Browser: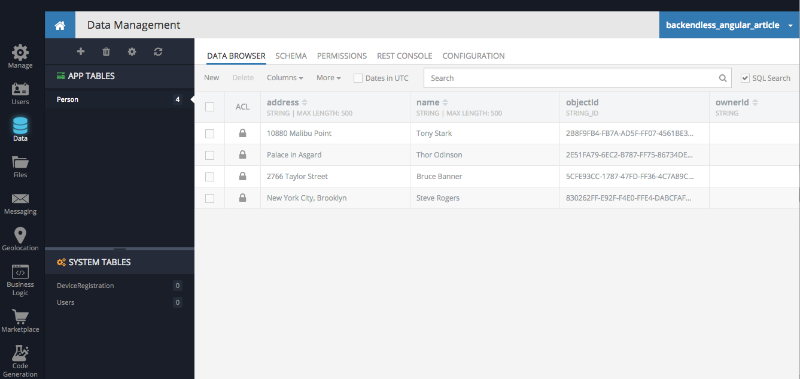
As you can see, we don’t do any additional steps to set up the SCHEMA for the Person table, but there are two columns, name and address, created already. These columns were created because the dynamic schema definition is turned on by default, and once we’ve saved our dummy person objects in REST Console, the server automatically created these two columns for us. It’s a great feature for development, but for production, we recommend turning it off.

Let’s add some logic for retrieving the persons’ objects in our app. To achieve that, we need to change the persons.service.ts file:
// persons.service.ts
import { Injectable } from '@angular/core';
import Backendless from 'backendless';
const PersonsStore = Backendless.Data.of('Person');
@Injectable({
providedIn: 'root'
})
export class PersonsService {
public persons: Object[] = [];
loadAll() {
  PersonsStore.find().then((persons: Object[]) => {
    this.persons = persons;
  });
}
}
Here is how we can add the Person type to our application. Just create a Person class and fix all the declarations:
// persons.service.ts
import { Injectable } from '@angular/core';
import Backendless from 'backendless';
export class Person {
public name: string;
public address: string;
}
const PersonsStore = Backendless.Data.of(Person);
@Injectable({
providedIn: 'root'
})
export class PersonsService {
public persons: Person[] = [];
loadAll() {
  PersonsStore.find<Person>().then((persons: Person[]) => {
    this.persons = persons;
  });
}
}
// persons-list/persons-list.component.ts
import { Component, OnInit } from '@angular/core';
import { Person, PersonsService } from '../persons.service';
@Component({
selector: 'app-persons-list',
templateUrl: './persons-list.component.html',
styleUrls: ['./persons-list.component.css']
})
export class PersonsListComponent implements OnInit {
constructor(private personsService: PersonsService) {
}
ngOnInit() {
  this.personsService.loadAll();
}
get persons(): Person[] {
  return this.personsService.persons;
}
}
As you can see, using types with Backendless SDK for JS is not complicated, you just need to define the expected result type:
//code
PersonsStore.find<Person>().then((persons: Person[]) => ...);
Adding New Persons
Time to implement the ‘adding a new item’ option into our Address Book. Generate a new component with Angular CLI as we did before:
ng g component add-new-person
And just replace contents for some files (the file names are in the comments in the first line of each block below):
// app/add-new-person/add-new-person.component.html
<p>
 <button type="button" data-toggle="modal" data-target="#exampleModal" class="btn btn-primary">Add New Person</button>
</p>
<div class="modal fade" id="exampleModal" tabindex="-1" role="dialog" aria-labelledby="exampleModalLabel"
    aria-hidden="true">
 <div class="modal-dialog" role="document">
   <div class="modal-content">
     <div class="modal-header">
       <h5 class="modal-title" id="exampleModalLabel">Add new person</h5>
       <button type="button" class="close" data-dismiss="modal" aria-label="Close">
         <span aria-hidden="true">×</span>
       </button>
     </div>
     <div class="modal-body">
       <form>
         <div class="form-group">
           <label>Person Name</label>
           <input name="name" [(ngModel)]="newPerson.name" class="form-control" placeholder="enter name">
         </div>
         <div class="form-group">
           <label>Person Address</label>
           <input name="address" [(ngModel)]="newPerson.address" class="form-control" placeholder="enter address">
         </div>
       </form>
     </div>
     <div class="modal-footer">
       <button #closeBtn type="button" class="btn btn-secondary" data-dismiss="modal">Close</button>
       <button type="button" (click)="onSubmit()" class="btn btn-primary">Save</button>
     </div>
   </div>
 </div>
</div>
// add-new-person/add-new-person.component.ts
import { Component, OnInit, ViewChild, ElementRef } from '@angular/core';
import { Person, PersonsService } from '../persons.service';
@Component({
selector: 'app-add-new-person',
templateUrl: './add-new-person.component.html',
styleUrls: ['./add-new-person.component.css']
})
export class AddNewPersonComponent implements OnInit {
@ViewChild('closeBtn') closeBtn: ElementRef;
public newPerson: Person;
constructor(private personsService: PersonsService) {
}
ngOnInit() {
  this.newPerson = new Person();
}
onSubmit() {
  if (this.newPerson.name && this.newPerson.address) {
    this.personsService.add(this.newPerson)
      .then(() => {
        this.newPerson = new Person();
      });
    this.closeBtn.nativeElement.click();
  } else {
    alert('need to fill all the fields');
  }
}
}
Include the component into our app-component:
// app.component.html
<div class="container">
<div class="header">
  <h3>
    Backendless Angular Addresses Book
  </h3>
</div>
<app-add-new-person></app-add-new-person>
<app-persons-list></app-persons-list>
</div>
Add a new method to the PersonsService class for saving new persons in Backendless:
// persons.service.ts
export class PersonsService {
...
add(newPerson: Person) {
return PersonsStore.save<Person>(newPerson).then((savedPerson: Person) => {
  this.persons.push(savedPerson);
});
…
}
Also, we need to import FormsModule into app.module.ts file, the following code should be added to the end of this file:
// app.module.ts
import { BrowserModule } from '@angular/platform-browser';
import { NgModule } from '@angular/core';
import { FormsModule } from '@angular/forms';
import Backendless from 'backendless';
import { environment } from '../environments/environment';
import { AppComponent } from './app.component';
import { PersonsListComponent } from './persons-list/persons-list.component';
import { AddNewPersonComponent } from './add-new-person/add-new-person.component';
Backendless.initApp(environment.backendless.APP_ID, environment.backendless.API_KEY);
@NgModule({
declarations: [
  AppComponent,
  PersonsListComponent,
  AddNewPersonComponent
],
imports: [
  BrowserModule,
  FormsModule
],
providers: [],
bootstrap: [AppComponent]
})
export class AppModule {
}
Build And Deploy It To Backendless
Now we want to show you another Backendless feature. Let’s build our application:
npm run build
Once it’s done, you need to zip the generated files (zip the backendless-angular directory):
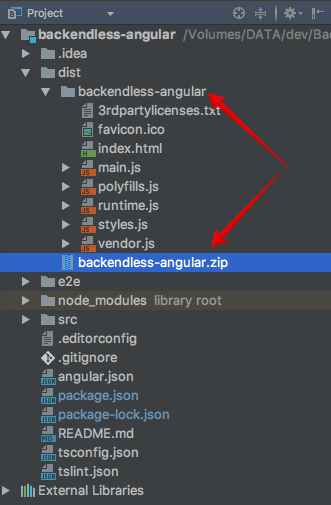
Open Backendless Console and switch to the Files section of your app. Upload the zip by either using the Upload file menu or simply dragging the file from your computer into the Console. Once uploaded, use the Unzip file icon as shown below.
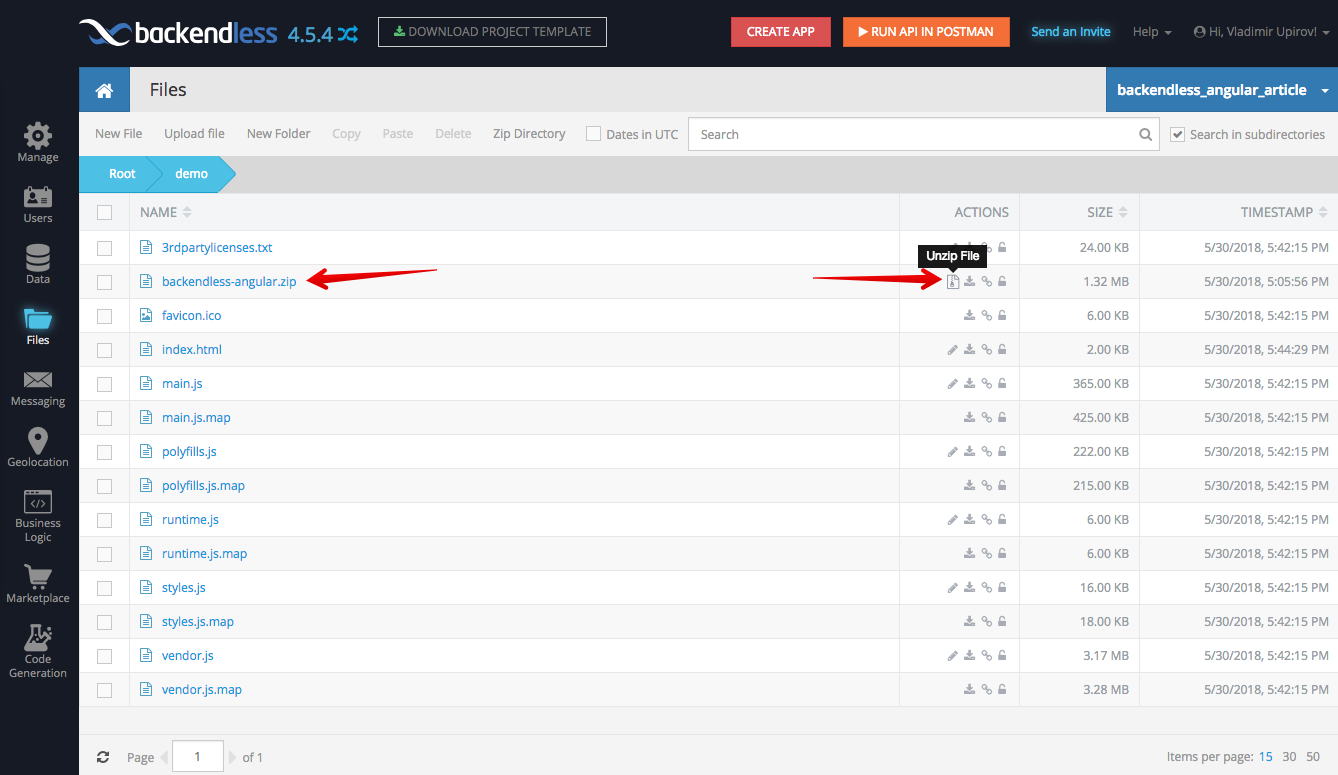
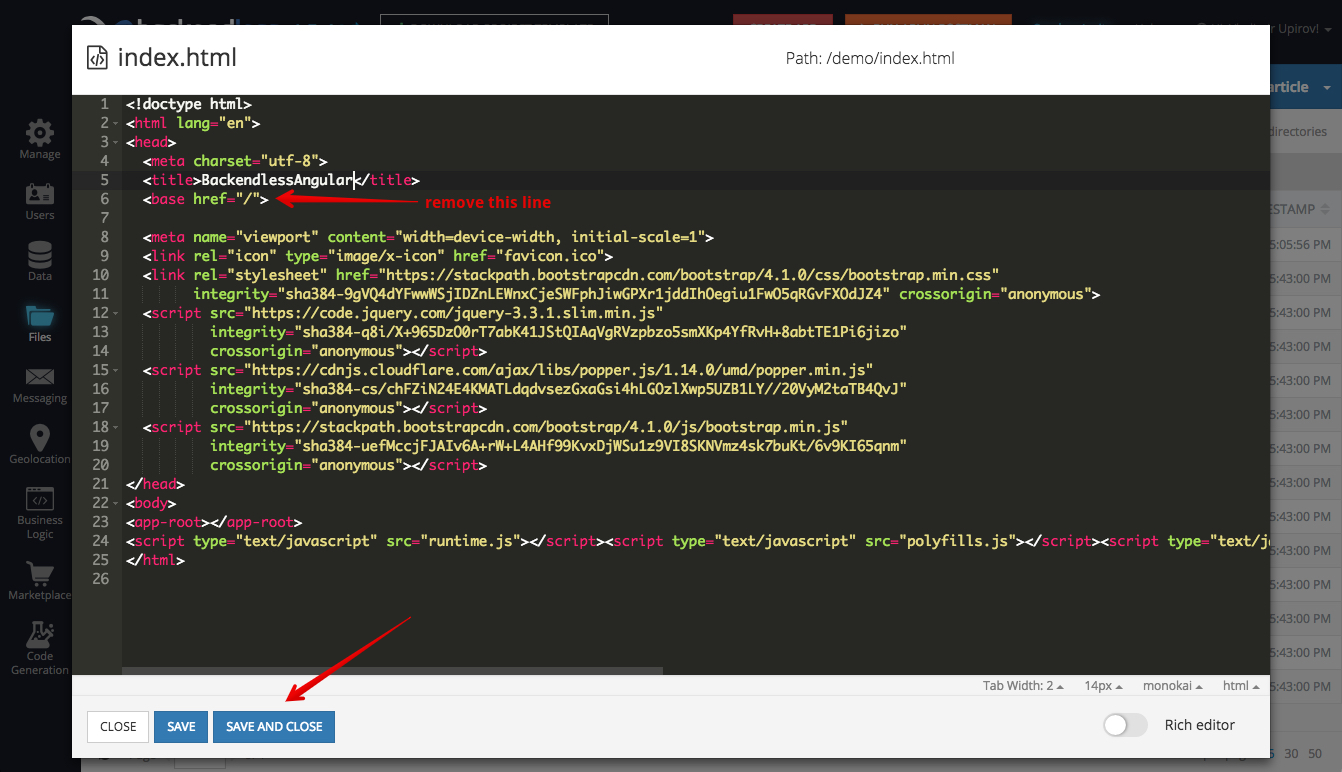
When the zip is expanded, Backendless will create a directory which includes all the contents of the zip file. Click the directory to navigate to it. Now, we need to add some fixes to our index.html file. Just open index.html for editing and remove <base href=”/”> line. Once done, just save and close the popup:
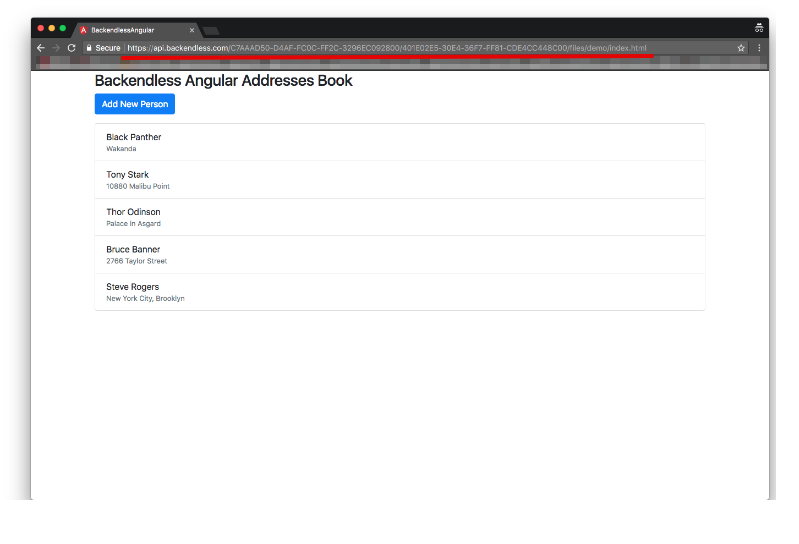
Finally, let’s open our deployed application by copying the index.html URL as shown below. The copied URL can be pasted in a new browser window to launch the app.

Here we go, the application is hosted in Backendless where it also loads/saves all the data from/to:
Summary
We created a simple application with some real data stored on the server in a few minutes. Also, we learned how to publish an Angular application to Backendless where it can be launched from. You can take a look at the demo app here. Also, check the project source code on github.com. If you would like to see the changelog of the features added to Backendless considering Angular CLI, go the following link backendless-angular/commit.
In a future article, we’ll show you how to integrate RealTime services into our application.
Thank you for reading this post, hope you enjoyed it!